Home> Fix Maytag Microwave
Fix Maytag Microwave: Ultimate Guide to DIY Repairs & Fixes
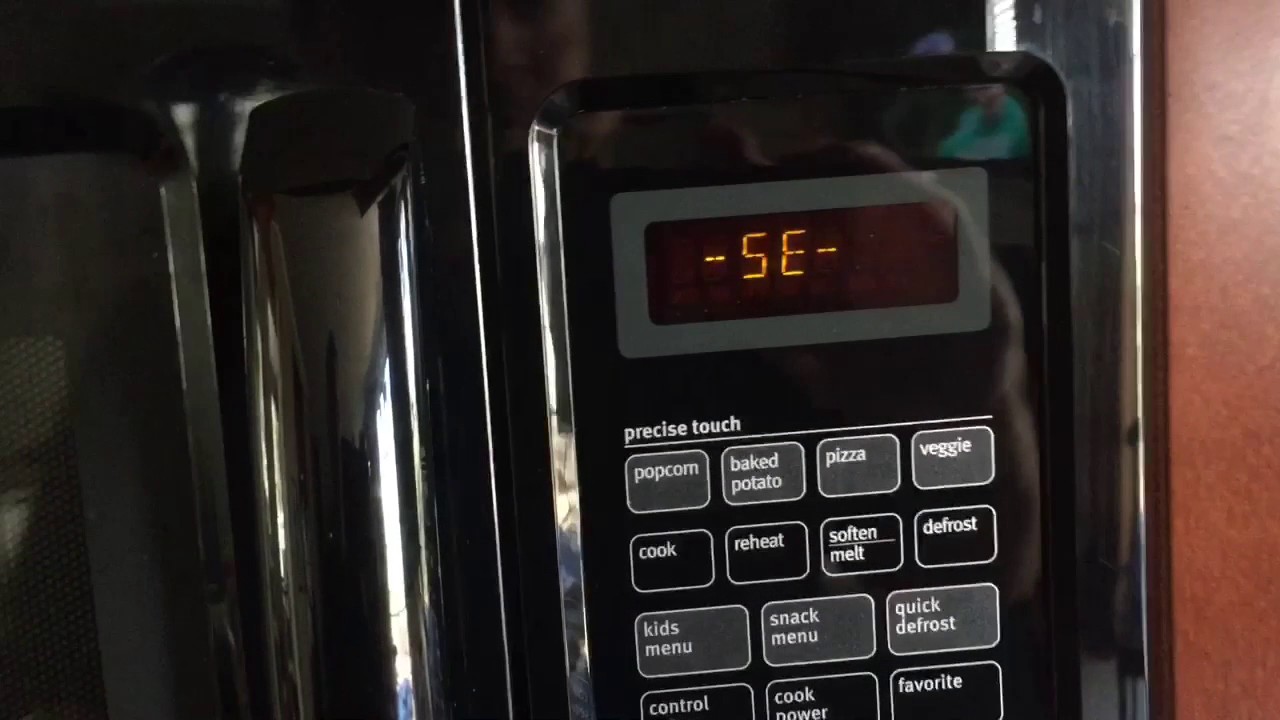
Discover how to fix your Maytag Microwave yourself. Step by step guide, pro tips, and quick hacks for common problems. Start saving today!
Introduction
Maytag Microwaves have been a staple appliance in many households for decades, known for their durability and efficiency. As tough as these machines are, you may occasionally run into either mechanical or electrical issues that could impact performance. In such cases, having a fundamental understanding of how to perform a DIY repair can be incredibly beneficial. It not only helps save money but also introduces a sense of self-reliance, eliminating dependency on a professional service.
However, before attempting any repair, it is crucial to understand the risks involved and the safety precautions needed. Microwaves are complex electrical appliances, and carelessness can lead to electrical shocks or further damage to the appliance. Therefore, it’s vital to work in a safe environment, be equipped with the right tools, and follow recommended guidance when repairing.
Key Takeaways:
- The SE or 5E error code on your Maytag microwave indicates a stuck or malfunctioning key on the touchpad. Simple troubleshooting steps like cleaning and inspecting the touchpad can often resolve this issue.
- If the SE or 5E error persists, contacting Maytag customer support is recommended. While some fixes can be done independently, professional assistance may be necessary for more complex issues or part replacement.
Brief History of Maytag Microwaves
Maytag Corporation started as a farm implement manufacturer in 1893 before shifting focus onto home appliances. These included washing machines, dryers, refrigerators, and eventually microwaves. With its excellent craftsmanship and the pledge for dependability, Maytag became a trusted household name. Their microwaves, with their superior features and robust design, quickly earned a place in many kitchens across the globe.
Despite their renowned efficiency and reliability, even Maytag microwaves aren’t immune to issues. While many problems that arise can be fixed by a professional, others can be effectively resolved with a basic understanding of the machine’s mechanisms, saving homeowners time and money.
Common Issues With Maytag Microwaves
Although Maytag microwaves are designed to last, users can sometimes encounter common problems impacting the appliance’s functionality. Such issues may be mechanical, such as the microwave not starting or heating, door problems, control panel issues, or problems with timers and clocks. Electrical problems could range from unusual noises, light bulb problems, exhaust fan issues, or dealing with various error codes.
Understanding these common problems can help in diagnosing issues quickly, ensuring immediate action can be taken. However, it’s necessary to know that while some problems can be handled via DIY tactics, others might require the expertise of a professional for safe resolution.
For instance, error codes are often more complex and require detailed understanding for resolution. For a guide on how to handle specific error codes, sites like storables.com provide comprehensive articles on everything from how to fix the SE or 5E error to how to fix F6 error.
Understanding Safety Precautions
Microwaves, like any electrical appliances, require safety measures while repairing. One of the primary precautions is ensuring the microwave is unplugged before you start any diagnostics or repairs. This ensures electrical safety and prevents any accidental shocks.
While handling components, be careful not to cause any physical damage. Sharp edges, broken glass, and other such hazards should be approached cautiously. Always wear the proper safety equipment like gloves and safety glasses during the process.
Lastly, limit your DIY repairs to basic tasks. If the issue seems complex, do not hesitate to call in a professional. Your safety should always be a priority.
Understanding the Importance of Electrical Safety
Electrical safety is vital when dealing with appliances like microwaves. Always ensure the device is unplugged before starting any repairs because even the smallest electrical shock can have serious implications. For routine maintenance that doesn’t involve opening up the appliance, such as cleaning or replacing bulbs, turn off and unplug the appliance before beginning.
Tools needed for Fixing Microwaves
Having the right set of tools is essential for successful DIY repairs. Typically, you’ll need screwdrivers (both flat and Phillips head), needle-nose pliers, a voltage tester and a digital multi-meter.
The screwdrivers and pliers are important for disassembling and reassembling the appliance during repairs. The voltage tester and digital multi-meter are particularly useful for diagnosing electrical issues and ensuring the devices work as expected once repaired.
Importance of Proper Tool Handling
Proper tool handling is a necessity in all repair projects. Using the wrong tool can lead to further damage or unsafe situations. Ensure you’re comfortable with using all tools and that they are in good working order before beginning any repair tasks. Constantly using damaged or unsuitable tools can lead to inefficient repairs and potential hazards.
Fixing Not Starting or Not Heating Issues
When a microwave does not start or heat, it is often due to a faulty door switch. It can also be because of a blown fuse or problematic internal diode. You can check these components using a multi-meter or voltage tester.
Replacing a door switch or internal fuse is a common DIY fix. Look at the specific might require professional help. issues guide for your microwave for step-by-step guidance. However, if the internal diode or any other complex component is causing the problem, it may require professional help.
Common Mistakes to Avoid
When dealing with issues like the microwave not starting or not heating, refrain from making the common mistake of not adequately checking the door seal or power cord. Often, these two areas can cause the issue and are quickly overlooked in the diagnosis process.
Additionally, it’s important to remember that the microwave uses high-voltage electricity. Handle the capacitor with care, even if the microwave is unplugged. Improper handling of the capacitor can lead to dangerous shocks as they tend to hold charge even when the power supply is disconnected.
Fixing Door Issues
Issues with the microwave door can lead to the microwave not working correctly as safety switches are connected to the door. If the door doesn’t close properly or latches are faulty, this could mean your microwave doesn’t turn on.
Diagnose this issue by visually inspecting the door latch and seals. Check for any mechanical blockage or deformity. If there’s an obstruction in the latch mechanism, you may remove it carefully. If the seals or latches are worn out or cracked, you’ll need to replace these parts. Always ensure that the replacement parts are of the correct model for your microwave.
Avoiding door-related problems
You can avoid door related problems by handling the microwave door gently. Forceful closing or opening could cause unnecessary damage to the seals or latches. Regularly clean the door seals and hooks to prevent any obstruction or dirt build up that can interrupt the latch mechanism.
Solving Control Panel Issues
The control panel is an essential component of the microwave. If the buttons are unresponsive or the display is unreadable, it can be hard to control the microwave’s operation. These issues can arise due to a faulty touchpad or display unit.
Try to troubleshoot this by unplugging the microwave and then plugging it back in. If that doesn’t help, check for any visible damage. If you’re comfortable with disassembly, you can remove the control panel and inspect the touchpad and display unit. If any parts are damaged, you’ll need to replace them.
Preventive Measures for Control Panel Issues
Prevent control panel issues by cleaning the panel regularly. Food residue and liquid spillage can affect the functionality of the panel over time. Also, remember to press buttons gently. Forceful use can damage both the external and internal components of the panel.
Repairing Timer and Clock Problems
The timer and clock are essential features in a microwave. If they’re not working correctly, it can disrupt your cooking. Often, such problems are due to a faulty control board or issues with the power supply to these components.
If resetting the microwave doesn’t work, you might need to replace the control board. This is relatively easy to do with the right tools – often, just a screwdriver is needed. However, if you’re uncomfortable with removing and replacing electronic parts, it’s better to call for professional help.
Avoiding Recurrence of Timer and Clock Issues
Avoid timer and clock issues by keeping the microwave clean and free from residue. Unclean environments can harbor dirt and affect the electronic components. Regularly inspecting the components can help catch any problems early and prevent them from becoming larger issues. Also, ensure the microwave is protected against power surges with a surge protector. Electrical surges can damage the control board and other electronic components.
Addressing Unusual Noise Problems
The presence of unusual noise while the microwave operates can be an alarming issue. Such noises can be due to a variety of reasons – a turntable misalignment, a faulty motor, or any loose components inside.
Firstly, check if the turntable is correctly placed and there’s no food debris causing the noise. If that doesn’t solve the problem, you might need to inspect the internal components. Open the casing carefully and check for any loose parts. In case of a faulty motor, replacement would be necessary.
Fixing Methods for Unusual Noise
The necessary fixing methods depend largely on the exact cause of the issue. For a faulty motor or other internal components, you might need a bit more technical knowledge to fix them. If you are not comfortable handling electronics, it’s probably best to seek professional help.
Resolving Light Bulb Problems
Over time, the light bulb inside your microwave may stop functioning. Lack of internal light might make it difficult for you to observe the food while being cooked. The light bulb can fail due to its own lifespan reaching the end or else due to electrical problems.
First, you will need to identify the bulb type required for your specific model. Then, secure the microwave’s main power source by unplugging the unit. Carefully remove the bulb and replace it with a new one. Make sure not to touch the new bulb with bare hands as the oil can shorten its lifespan.
Safety Tips for Bulb Replacement
When handling the bulb replacement, make sure the microwave is unplugged from the power source. Handle the bulb gently to avoid any potential breakage that can lead to injuries. Remember not to touch the new bulb with your hands – use a piece of cloth or gloves for the process.
Fixing Exhaust Fan Not Working
The exhaust fan in your microwave helps to keep the unit cool during operation. If the fan stops working, it could cause the microwave to overheat, which is a safety concern.
The problem often lies in the motor of the exhaust fan. Unplug the microwave, open it up and inspect the fan motor. If you notice any burning smell or signs of damage on the motor, it might need to be replaced. Make sure to order the exact make and model of the motor for a replacement.
Ensuring Continuous Functionality of Exhaust Fan
As a preventive measure, keep your microwave clean both inside and out. Dust and grease build-up can block the exhaust fan and damage the motor. Regularly check the fan to ensure it’s functioning properly. If you notice any early signs of the motor slowing down, address it immediately.
Dealing with Error Codes
Surprisingly, the error codes that seem disturbing at first glance are a helpful way your Maytag microwave communicates the problem with you. While each model might have its own specific codes, common codes like F7, SE, F10, F5, F1, F6, F2, F9 and F8 indicate problems ranging from a shorted touch pad to issues with the lower oven sensor or humidity sensor.
For example, the F7 error code implies a function key is stuck, while SE error code denotes a shorted keypad. Both require that you check the connection of the control panel and replace it if necessary. For a comprehensive list of error code interpretations, refer to your microwave’s manual or the manufacturer’s website.
Resolving Common Error Codes
Often, unplugging the microwave and plugging it back after a few minutes resolves some error codes. If the error code still persists, you might have to replace some parts. For instance, if you encounter a F5 error code, you’d need to replace the sensor of the lower oven as suggested here.
While some repairs might be possible at home, others might be a bit complex and require a professional’s help. For example, resolving a F1 error code can be quite challenging as it involves checking the oven control.
When to Seek Professional Assistance
While DIY repairs do save a considerable amount of money, there could be situations where seeking professional assistance is necessary. Complex issues like a malfunctioning magnetron or tackling painfully specific error codes (F2, F6) often require technical expertise that goes beyond what an average homeowner possesses.
Moreover, safety is a significant factor. Microwaves can store lethal amounts of electricity in their capacitors, even when unplugged. Reaching blindly into an open microwave can be extremely dangerous. In such cases, it’s sensible to leave the job in the hands of experienced professionals.
Finding a Reputable Repair Service
Once you decide to reach out to professionals, choose a reputable repair service. Check their reviews, rates, and warranty on repairs. Ask for recommendations or do an internet search to find services with good reputation. Always go with someone certified or with adequate experience in the field.
Maintenance Tips for Longer Usage
Maintaining your Maytag microwave not only increases its lifespan but also helps avoid many common issues prevalent in poorly maintained appliances. Regular cleaning of the interior to avoid food splatters and debris build-up, and dusting the exhaust fan are few easy steps that go a long way in keeping your microwave in peak condition.
Exterior cleaning is equally important. Wiping the control panel clean can protect the touchpad from getting damaged. Be vigilant about any minor issues and address them immediately to avoid major repairs.
Regular Check-ups and Minor Component Replacements
Regular check-ups ensure you maintain a working knowledge of your microwave condition and can foresee any looming issues. It’s always beneficial to replace faulty components as soon as they’re detected.
For instance, keeping the door latch or the light bulb updated can seem insignificant but contributes significantly to the overall functioning of your Maytag microwave. Remember, preventative maintenance is key to keeping your microwave running efficiently for a long time.
Warranty and Service Options from Maytag
Every Maytag product, including microwaves, comes with a warranty that includes parts and labor. Warranty durations can vary, but most Maytag microwaves have a limited one-year warranty. This warranty assures the user that in the event of a malfunction or breakdown, Maytag will assist in mitigating the issue, either through replacement of parts or general repair procedures. Understanding the terms and conditions of your warrantee is essential, as it could save you significant cost on repairs and replacement parts during the warranty period.
Maytag also offers service options in the event of a malfunction. Should your appliance require more significant repairs, Maytag’s service department stands at the ready. Services range from expert diagnosis and handling of error codes to major part replacements. It is recommended for users to first contact Maytag’s service department in the event of a malfunction, especially when dealing with complex issues.
To fix the SE or 5E error code on a Maytag microwave, unplug the appliance for a few minutes and then plug it back in. If the error persists, it may indicate a faulty control panel or sensor, and professional repair may be necessary.
Pros and Cons of DIY Microwave Repairs
A DIY repair approach can be rewarding as it offers financial savings, valuable learning experiences and the satisfaction of fixing something with your own two hands. Getting familiar with your appliance, learning about its working mechanisms and how to troubleshoot can be empowering and financially beneficial. This can save you from repair service costs for issues that are easy to manage on your own.
However, DIY repairs do come with drawbacks. When repairing appliances, there’s the potential for accidents or incorrect fixes that could damage the microwave or even invalidate your warranty. Furthermore, some errors require specific tools for diagnosing problems and testing parts, which may not be readily available for the average user. It could also be time-consuming depending upon the complexity of the problem.
Recap of DIY Methods for Repair
Fixing a Maytag microwave on your own is feasible, especially if you have some knowledge on household appliance repair and are dealing with common issues. For example, handling a stuck function key, replacing a faulty light bulb, or resetting the control panel are issues typically manageable at home.
Nonetheless, always prioritize safety by unplugging the microwave first before starting with any troubleshooting. Getting to know your microwave and understanding common error codes can often simplify the diagnosis and repair process.
While DIY repair methods are a financially reasonable option, it’s always important to know when to call for professional help. Complex repairs that involve handling of high voltage components, such as the magnetron, or dealing with specific error codes like F6 and F2 are better left to professionals to prevent further damage and ensure safety.
Reader Interactive Content
We understand that our readers may have their own unique experiences, tips, and solutions regarding Maytag microwave repair. We invite you to share these experiences in our comment section or forum to provide added value to our community of Maytag users. Your practical insights could help other readers effectively resolve their microwave issues and extend the lifespan of their appliance.
Besides sharing your experiences, we also encourage you to participate in our polls or surveys. These activities are designed to further gauge common microwave issues experienced by our readers, analyze the effectiveness of certain DIY solutions, and continuously improve our content to cater to your needs. Furthermore, subscribing to our newsletter will ensure you receive updates on newer repair guides, emerging issues, and their solutions pertaining to Maytag microwaves.
Conclusion
Understanding your Maytag microwave, its functions, and typical issues can significantly aid in effective problem resolution, extending the lifespan of your appliance and saving you potential repair costs. DIY solutions, as discussed, are applicable to various common issues, provided that safety precautions are strictly adhered to.
Yet, it’s also crucial to recognize when to seek professional assistance to ensure the safe and effective repair of the appliance. Balancing DIY approaches with professional services can ensure that your Maytag microwave serves you optimally for a long time.
To this end, consistent routine maintenance should be encouraged. Simple practices such as regular cleaning and timely minor component replacement can prevent many issues from arising, further ensuring the longevity of your microwave.
Maytag continues to deliver reliable and durable appliances, and understanding your microwave goes a long way in tapping into this reliability. Equipped with the knowledge from this guide, you are better prepared to address and resolve common microwave issues.