Articles
How To Store Lemons To Last Longer
Modified: December 7, 2023
Discover the best methods for storing lemons to keep them fresh and flavorful for longer. Learn how to maximize the shelf life of your lemons with these helpful articles.
(Many of the links in this article redirect to a specific reviewed product. Your purchase of these products through affiliate links helps to generate commission for Storables.com, at no extra cost. Learn more)
Introduction
Welcome to the world of lemons! These small yellow fruits are not only tangy and refreshing but also packed with essential vitamins and minerals. Whether you’re using them in cooking, making lemonade, or adding a splash of acidity to your dishes, lemons are a versatile ingredient that can elevate any recipe. However, despite their many benefits, lemons have a relatively short shelf life and can quickly go bad if not stored properly.
In this article, we will explore the factors that cause lemons to spoil, the best practices for storing them, and some tips and tricks to extend their lifespan. By following these guidelines, you’ll be able to keep your lemons fresh and delicious for longer periods, ensuring that you always have a citrusy zing at your fingertips.
Key Takeaways:
- Extend the life of your lemons by storing them in a cool, dry place, avoiding excessive moisture and direct sunlight. Keep them whole and separate to prevent spoilage and maximize their freshness.
- Embrace the versatility of lemons by freezing their zest and juice for future use, reviving old lemons with creative tips, and making the most out of their tangy flavor in cooking, baking, and household tasks.
Read more: How To Store Peaches To Last Longer
Why Lemons Go Bad
Before we delve into the best storage practices, let’s understand why lemons tend to spoil relatively quickly. Like any other fresh produce, lemons are vulnerable to various factors that contribute to their deterioration. The primary culprits behind the spoilage of lemons are:
- Moisture: Lemons have a high water content, which makes them prone to mold and bacterial growth when exposed to excessive moisture.
- Air Exposure: Oxygen plays a role in the breakdown of the fruit’s enzymes, causing changes in color, flavor, and texture.
- Temperature: Lemons are sensitive to extreme temperatures. Storing them in excessively hot or cold environments can accelerate the decaying process.
- Physical Damage: Bruises, cuts, or punctures on the skin of lemons can lead to faster spoilage as they provide entry points for bacteria and mold.
Furthermore, lemons contain natural oils and ethylene gas, the latter of which is a ripening hormone. Ethylene gas can speed up the ripening process, resulting in overripe lemons if not stored properly.
Now that we understand the factors contributing to the spoilage of lemons, let’s explore the best practices for storing them to extend their shelf life and maintain their quality.
Factors Affecting Lemon Shelf Life
Several factors can influence the shelf life of lemons. By understanding these factors, you can take the necessary precautions to ensure your lemons last as long as possible. Here are the key factors affecting the shelf life of lemons:
- Ripeness: The level of ripeness when you purchase lemons can impact their shelf life. Overripe lemons will have a shorter lifespan compared to slightly underripe ones.
- Temperature: Lemons prefer cooler temperatures. Exposure to high temperatures can cause lemons to spoil more quickly, while storing them at very low temperatures can affect their quality and flavor.
- Humidity: Lemons are susceptible to moisture, but excessive humidity can lead to mold and decay. Find a balance by avoiding overly damp storage environments.
- Airflow: Proper airflow is essential for maintaining the freshness of lemons. Storing lemons in a well-ventilated area can help prevent mold and prolong their shelf life.
- Handling: Rough handling can cause physical damage to lemons, increasing the chances of bruising and spoilage. Treat lemons gently to maintain their integrity for longer.
- Protection from Light: Exposure to direct sunlight can accelerate the deterioration of lemons. Store them in a dark or opaque container to shield them from light.
By considering these factors when storing your lemons, you can maximize their longevity and keep them fresh for an extended period.
Best Practices for Storing Lemons
To ensure your lemons stay fresh and flavorful for as long as possible, it’s important to follow some best practices for storage. Here are the top tips to keep in mind:
- Choose the Right Lemons: Select lemons that are firm, with smooth and vibrant yellow skin. Avoid fruits with bruises, soft spots, or signs of mold.
- Avoid Washing Before Storage: It’s best to avoid washing lemons before storing them. Moisture can lead to accelerated spoilage. Instead, give them a quick rinse just before using.
- Store Whole Lemons: Keep lemons intact until you’re ready to use them. Cutting or juicing lemons in advance can accelerate the deterioration process.
- Separate and Wrap: If storing multiple lemons, wrap each fruit individually in paper towels or place them in separate compartments to prevent them from touching. This helps reduce the spread of mold if one lemon starts to spoil.
- Choose the Right Storage Location: Store lemons in a cool, dry, and well-ventilated place. Avoid storing them near heat sources like stoves or appliances that emit warmth.
- Avoid Direct Sunlight: Protect lemons from direct exposure to light, as it can deteriorate their quality. Store them in a dark or opaque container, such as a paper bag or airtight container.
- Regularly Check for Spoilage: Keep an eye on your stored lemons and inspect them regularly for any signs of mold, soft spots, or discoloration. Remove any spoiled lemons promptly to prevent the spread of decay.
By following these best practices, you can extend the shelf life of your lemons and enjoy their juicy goodness in your culinary creations for a longer duration.
Keeping Lemons at Room Temperature
While refrigeration is often the go-to method for storing fruits, lemons can also be stored at room temperature, especially if you plan to use them within a week or so. Here are some guidelines to effectively store lemons at room temperature:
- Choose a Cool Spot: Find a cool area in your kitchen away from direct sunlight and heat sources. A countertop or pantry shelf away from the stove or oven is ideal.
- Use a Fruit Bowl: Place the lemons in a bowl or fruit basket, allowing for airflow around each fruit. Avoid overcrowding, as this can lead to bruising and moisture buildup.
- Inspect Regularly: Check the lemons regularly for any signs of spoilage. Remove any damaged or moldy fruits to prevent contamination.
- Rotate the Lemons: Rotate the lemons occasionally to ensure even air circulation and prevent any potential bruising or soft spots from forming.
Storing lemons at room temperature can help maintain their juiciness and flavor. However, keep in mind that room temperature storage may cause the lemons to dry out and lose freshness more quickly compared to refrigeration. If you live in a particularly hot and humid climate, it’s advisable to store lemons in the refrigerator to extend their lifespan.
Now that you know how to store lemons at room temperature, let’s explore the option of refrigeration, which is a popular choice for long-term storage and preservation.
Store lemons at room temperature for up to a week, or in the refrigerator in a plastic bag for up to a month. To extend their shelf life, you can also freeze lemon juice in ice cube trays for later use.
Read more: How To Store Bananas To Last Longer
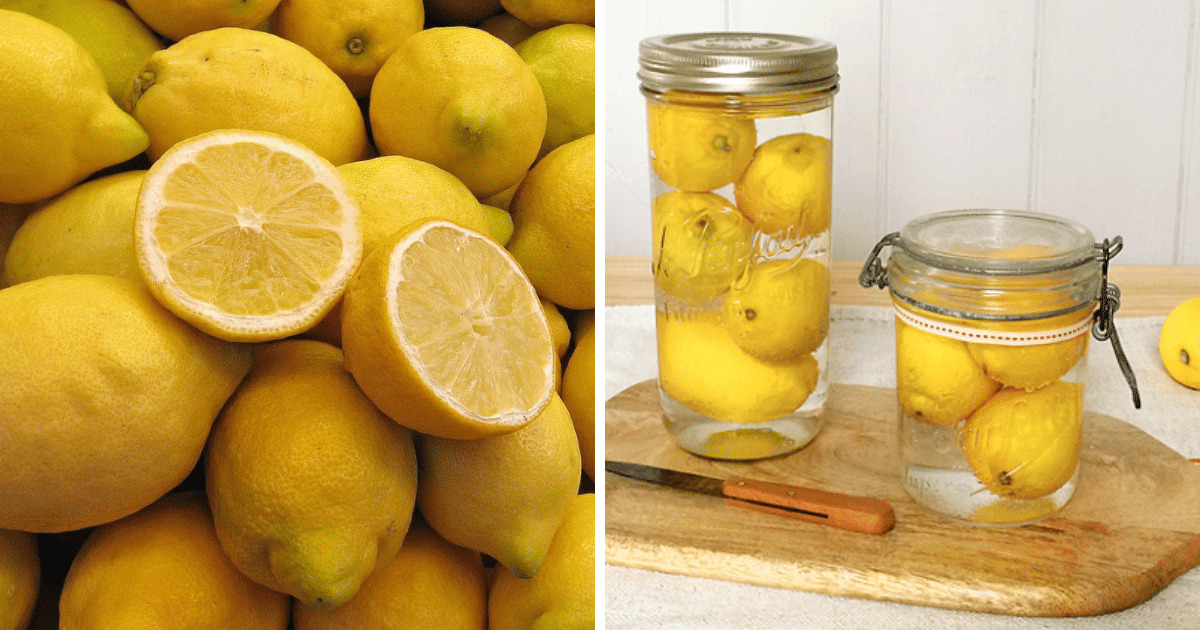
Storing Lemons in the Refrigerator
Refrigeration is a widely preferred method for storing lemons, especially if you don’t plan on using them within a week. The cool temperature of the refrigerator helps slow down the ripening process and extends the shelf life of lemons. Here’s how to store lemons in the refrigerator:
- Keep Them Whole: Keep the lemons in their original state without cutting them or juicing them in advance. This helps preserve their freshness for a longer period.
- Wrap in a Plastic Bag or Wrapping: Place the lemons in a plastic bag or wrap them tightly in plastic wrap. This helps maintain moisture levels and prevents them from drying out.
- Store in the Produce Drawer: Place the wrapped lemons in the refrigeration produce drawer, where the temperature and humidity levels are usually optimal for preserving fruits and vegetables.
- Avoid Storing Next to Strong-Smelling Foods: Lemons have a porous skin and can absorb odors from strong-smelling foods nearby. Keep them separate from items like onions or garlic to maintain their natural aroma.
- Check Regularly: Check the lemons periodically for any signs of spoilage. Remove any damaged or moldy fruits to prevent contamination.
By following these steps, you can maximize the lifespan of your lemons and ensure they stay fresh and juicy when you’re ready to use them. Just remember that refrigerated lemons may lose some of their flavor compared to storing them at room temperature, so it’s important to use them within a few weeks for the best taste.
If you have an abundance of lemons or want to store them for an even longer period, freezing can be an excellent preservation method.
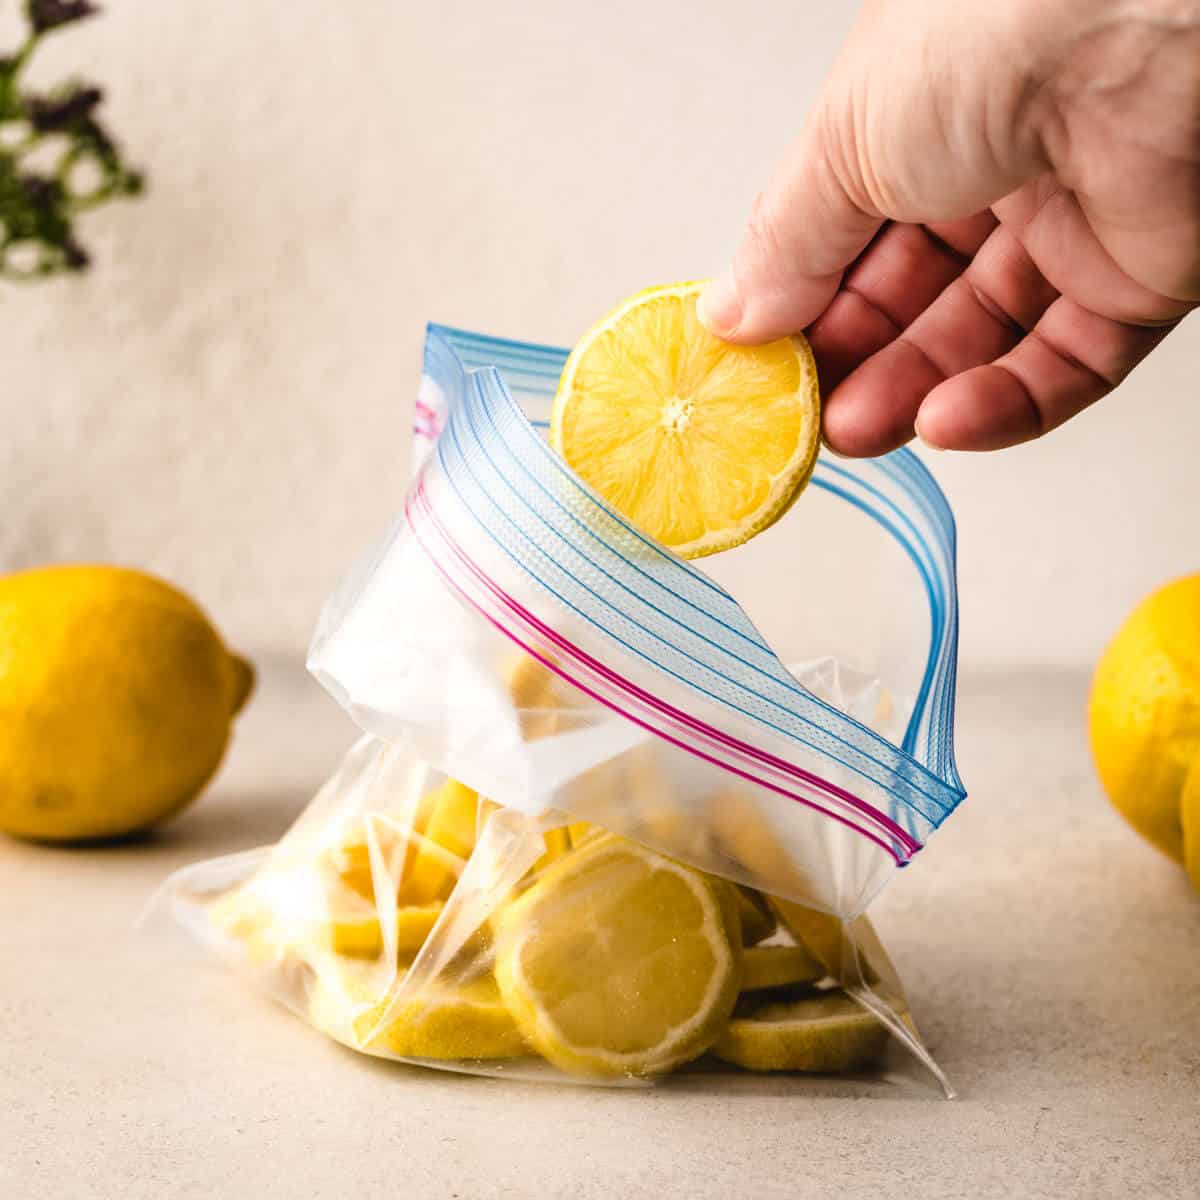
Freezing Lemons for Extended Storage
If you have an excess of lemons or want to store them for an extended period, freezing is an excellent option. Freezing lemons not only allows you to preserve their fresh flavor but also provides you with readily available lemon zest and juice whenever you need it. Here’s how to freeze lemons:
- Wash and Dry: Start by washing the lemons thoroughly under cool running water. Pat them dry with a towel to remove any excess moisture.
- Zest the Lemons: Use a microplane or grater to zest the lemons before freezing. This will allow you to have easy access to lemon zest for various recipes.
- Juice the Lemons: Squeeze the lemons to extract their juice. You can either freeze the juice in ice cube trays for convenient portioning or pour it into freezer-safe containers or bags.
- Freeze the Zest and Juice: Place the lemon zest and juice into separate airtight containers or freezer bags. Make sure to squeeze out any excess air to prevent freezer burn.
- Freeze Until Solid: Place the containers or bags in the freezer and allow them to freeze until solid. This usually takes around 2-4 hours for lemon juice and zest.
- Label and Date: Once frozen, label the containers or bags with the content (lemon zest or juice) and the date of freezing. This will help you keep track of their freshness.
- Store for up to 3 Months: Frozen lemons can be stored for up to 3 months. Beyond that, they may start to lose their quality and flavor.
When you’re ready to use the frozen lemons, simply take out the desired amount of zest or juice from the freezer and thaw it in the refrigerator or at room temperature. Frozen lemon zest can be used directly in recipes, while frozen lemon juice can be thawed and used for cooking, baking, or making refreshing beverages.
Freezing lemons is an excellent way to extend their shelf life and have a convenient supply of lemon zest and juice on hand. Just remember to label and date your frozen lemons to ensure you use them within their recommended storage period.
Now that you know how to freeze lemons, let’s explore some tips for using frozen lemons and reviving old lemons.
Using Lemon Zest and Juice for Future Use
When you freeze lemons, you not only preserve their freshness but also have a ready supply of lemon zest and juice for future use. Here are some creative and practical ways to utilize frozen lemon zest and juice:
- Lemon Zest:
- Sprinkle lemon zest on top of salads, soups, or roasted vegetables to add a burst of citrus flavor.
- Add lemon zest to baked goods such as cookies, cakes, and muffins for a tangy and aromatic twist.
- Stir lemon zest into marinades, dressings, or sauces to enhance the overall flavor profile.
- Infuse lemon zest in oils, vinegars, or syrups for homemade flavored ingredients.
- Lemon Juice:
- Thawed lemon juice can be used in place of fresh lemon juice in a wide array of recipes.
- Mix lemon juice with water or sparkling water to make a refreshing lemonade or spritzer.
- Add lemon juice to marinades, sauces, or dressings for a tangy and bright flavor.
- Use lemon juice when making homemade sorbets, frozen yogurt, or popsicles for a citrusy kick.
Both lemon zest and juice can bring a vibrant and refreshing taste to your culinary creations. By keeping a stash of frozen lemon zest and juice, you’ll always have the essence of lemons on hand, even if fresh lemons are not readily available.
Now that you’re equipped with the knowledge of using frozen lemon zest and juice, let’s explore some tips for reviving and using old lemons that may have seen better days.
Tips for Reviving and Using Old Lemons
It happens to the best of us – we discover a forgotten stash of lemons at the back of the fridge or notice that our lemons have started to lose their freshness. But fear not! Here are some helpful tips for reviving and making the most of old lemons:
- Soak in Water: Placing old lemons in a bowl of room temperature water for a few hours can help rehydrate them and revive their juiciness.
- Roll and Soften: Before squeezing the juice out of an old lemon, roll it firmly against the countertop under the palm of your hand to help break down the cells and make it easier to extract the juice.
- Use Scant Amounts: If an old lemon’s flavor has dulled, it can still be used in small quantities in recipes that require a subtle hint of citrus.
- Make Lemon Infused Water: Squeeze the juice of old lemons into a pitcher of water to create a refreshing and detoxifying beverage.
- Zest and Preserve: Even if the flesh of the lemon is past its prime, the zest can still be used to add flavor to dishes. Grate the zest and freeze it for future use.
- Clean with Lemon: Use the juice of old lemons as a natural cleaning agent. It works wonders for removing stains, cleaning cutting boards, and freshening up kitchen utensils.
- Make Citrus Vinegar Cleaner: Place old lemon peels in a jar filled with white vinegar and let it sit for a few weeks. Strain the vinegar and use it as an all-purpose cleaner.
- Create Lemon Sugar Scrub: Mix the zest of old lemons with sugar and a carrier oil like coconut oil to create a refreshing homemade body scrub.
Don’t let old lemons go to waste! With a little creativity and these tips, you can still find ways to enjoy the flavor and benefits of lemons, even when they are past their prime.
By following the best practices for storing lemons, utilizing frozen lemon zest and juice, and making the most out of old lemons, you can ensure that you always have a citrusy touch in your cooking, baking, and everyday life.
Now, go forth and embrace the wonderful world of lemons!
Read more: How To Store Blueberries To Last Longer
Conclusion
Lemons, with their tangy flavor and refreshing zest, are an essential ingredient in many recipes and a staple in kitchens around the world. However, their relatively short shelf life can be a challenge when it comes to storage. By understanding the factors that cause lemons to spoil and implementing the best practices for storing them, you can extend their longevity and ensure they remain fresh and flavorful for longer periods.
Whether you choose to store lemons at room temperature, in the refrigerator, or freeze them for extended storage, each method offers its own benefits and considerations. Room temperature storage is suitable for short-term preservation, while refrigeration helps maintain the fruit’s freshness for a longer duration. Freezing lemons provides the convenience of having readily available lemon zest and juice whenever you need it, even months later.
Furthermore, with a little creativity, you can make the most out of old lemons. Reviving and utilizing them in various ways allows you to minimize waste and enjoy the citrusy goodness they offer. From rehydrating them in water to using the zest for flavoring or making natural cleaners, old lemons can still find purpose in your kitchen and household.
By implementing these tips and tricks in storing, using, and reviving lemons, you can fully embrace their versatility and maximize their potential in your culinary endeavors. So whether you’re baking, cooking, making beverages, or cleaning, lemons will always be there to lend their vibrant touch.
From their tangy flavor to their health benefits and versatile applications, lemons truly deserve a special place in the kitchen. So go ahead, stock up on lemons, store them with care, and never be without that delightful burst of citrus again!
Frequently Asked Questions about How To Store Lemons To Last Longer
Was this page helpful?
At Storables.com, we guarantee accurate and reliable information. Our content, validated by Expert Board Contributors, is crafted following stringent Editorial Policies. We're committed to providing you with well-researched, expert-backed insights for all your informational needs.


0 thoughts on “How To Store Lemons To Last Longer”