
Articles
How To Store Kale To Last Longer
Modified: January 18, 2024
Learn how to store kale properly to ensure it stays fresh for longer. Our articles provide helpful tips and techniques for extending the shelf life of this nutritious green vegetable.
(Many of the links in this article redirect to a specific reviewed product. Your purchase of these products through affiliate links helps to generate commission for Storables.com, at no extra cost. Learn more)
Introduction
Welcome to the world of kale storage! Kale is a popular leafy green vegetable known for its nutrient-rich profile and versatility in various culinary dishes. Whether you grow your own kale or buy it from the local market, knowing how to properly store it is essential for extending its shelf life and maintaining its freshness.
When it comes to storing kale, there are a few key factors to consider. Temperature, moisture, and air exposure all play a role in determining how long your kale will last. In this article, we will explore different methods and techniques for storing kale to maximize its lifespan and keep it in the best condition for consumption.
By understanding the lifespan of kale and implementing proper storage methods, you can make sure your kale stays fresh and vibrant for longer periods of time. So, let’s dive in and learn how to store kale to last longer!
Key Takeaways:
- Extend the lifespan of kale by understanding its natural shelf life, preparing it for storage, and utilizing various methods such as air-tight container storage, refrigeration, blanching and freezing, and vacuum sealing. Enjoy fresh and nutritious kale for longer periods with proper storage techniques.
- Revive wilted kale by soaking it in cold water to restore its crispness, and use it in cooked dishes. Implement proper storage methods to reduce wastage and ensure a constant supply of fresh and nutritious kale for your meals.
Read more: How To Store Peaches To Last Longer
Understanding the Lifespan of Kale
Before delving into the various storage methods, it is important to have a basic understanding of the natural lifespan of kale. Kale is a hearty vegetable that can generally last for a few days to a couple of weeks, depending on how it is stored.
Freshly harvested kale can retain its crispness and nutrients for up to a week when stored properly. However, as time goes by, kale begins to wilt, lose its vibrant color, and its nutrient content gradually deteriorates. Therefore, it is crucial to consume or store kale as soon as possible after purchasing or harvesting.
Keep in mind that the age of kale at the time of purchase or harvest will also affect its lifespan. The fresher the kale, the longer it is likely to stay fresh. When buying kale from the market, choose bunches with crisp leaves and firm stems. If you’re growing kale in your garden, pick the leaves when they are at their peak freshness.
With a basic understanding of the lifespan of kale, let’s move on to the next step: preparing kale for storage.
Preparing Kale for Storage
Before storing kale, it is important to properly prepare it to ensure its longevity. Here are some steps to follow when preparing kale for storage:
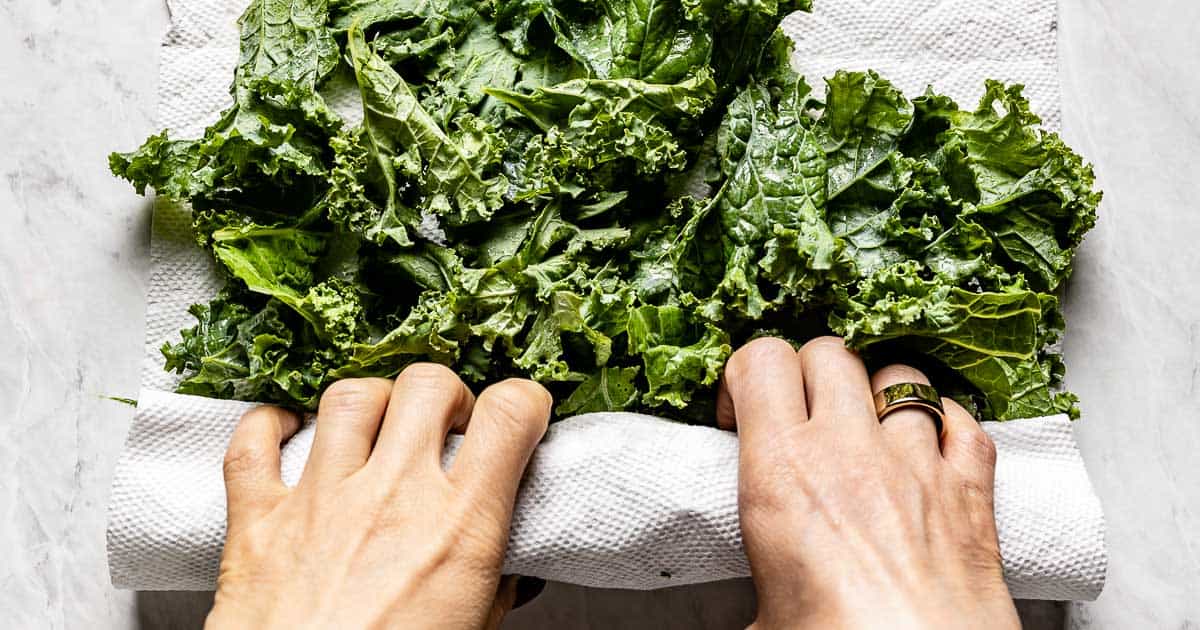
- Clean the kale: Start by rinsing the kale leaves under cool water to remove any dirt or debris. Gently pat them dry using a clean kitchen towel or paper towels.
- Remove tough stems: While the stems of kale are edible, they can be tough and fibrous. To improve the texture and flavor, it is best to remove the stems. Simply hold the kale leaf by the stem and run your fingers along the sides to strip the leaf from the stem. Alternatively, you can use a knife to carefully cut away the stem.
- Chop or tear the leaves: Once the stems are removed, you can choose to chop or tear the kale leaves into bite-sized pieces. This will not only make it easier to store but also make it convenient for future use in dishes.
- Inspect for any damaged or wilted leaves: It is important to remove any leaves that are damaged, wilted, or discolored. These leaves can accelerate the spoilage process and decrease the overall freshness of the kale.
- Ensure the kale is dry: Moisture is one of the main factors that can hasten the deterioration of kale. Make sure the kale leaves are completely dry before storing them to prevent mold or rot. You can use a salad spinner or gently pat the leaves dry with a kitchen towel.
By following these preparation steps, you can ensure that your kale is in optimal condition for storage. Now that the kale is ready, let’s explore the various methods of kale storage to prolong its shelf life.
Air-Tight Container Storage
One of the simplest and most effective ways to store kale is by using air-tight containers. Air-tight containers create a sealed environment that helps to keep moisture out and maintain the freshness of the kale. Here’s how to store kale using air-tight containers:
- Place the prepared kale leaves into a clean, dry, and air-tight container. You can use glass containers with tight-fitting lids or plastic containers specifically designed for food storage.
- Fill the container so that it is not overcrowded. Leave some space at the top to allow for air circulation.
- If necessary, you can layer a piece of paper towel or a dry cloth between the kale leaves to absorb any excess moisture.
- Seal the container tightly to prevent any air from entering.
- Label the container with the date of storage to keep track of its freshness.
- Store the container in the refrigerator in the crisper drawer or a cool, dark place away from direct sunlight.
When stored in air-tight containers, kale can last up to a week in the refrigerator. Be sure to check the kale periodically for any signs of spoilage and discard any leaves that have begun to wilt or develop an off smell.
Air-tight container storage is a convenient option that allows for easy access to your kale whenever you need it. Next, let’s explore another method of kale storage: refrigeration.
Storing Kale in the Refrigerator
Refrigeration is a common and effective method for storing kale, as it helps to slow down the natural deterioration process. Here’s how to store kale in the refrigerator:
- Place the prepared kale leaves in a clean, dry, and breathable bag. You can use a plastic produce bag or a perforated bag specifically designed for storing vegetables.
- Before sealing the bag, gently press out any excess air to minimize moisture accumulation.
- Label the bag with the date of storage.
- Store the bag of kale in the crisper drawer of the refrigerator. The temperature in the crisper drawer is slightly higher and more humid, which helps to maintain the crispness of the kale. If you don’t have a crisper drawer, place the bag in the main compartment of the refrigerator.
- Avoid storing kale near ethylene-producing fruits such as apples, bananas, or tomatoes. Ethylene can speed up the decay process of kale.
When stored properly, kale can last up to two weeks in the refrigerator. However, it is best to consume it within the first week to enjoy the freshest flavor and maximum nutrient content. Remember to periodically check the kale and discard any leaves that have started to wilt or show signs of spoilage.
Refrigerating kale is a convenient option that allows for longer storage, giving you more flexibility in meal planning. Next, let’s explore another method of preserving kale: blanching and freezing.
Store kale in a plastic bag with a paper towel to absorb excess moisture, then place it in the crisper drawer of the refrigerator. This will help keep it fresh for up to a week.
Read more: How To Store Celery To Last Longer
Blanching and Freezing Kale
If you have an abundant supply of kale and want to extend its shelf life even further, blanching and freezing is an excellent option. Blanching involves briefly immersing the kale leaves in boiling water, followed by rapid cooling, before freezing. Here’s how to blanch and freeze kale:
- Start by bringing a large pot of water to a rolling boil.
- While the water is heating, prepare an ice bath by filling a large bowl with cold water and ice cubes.
- Carefully add the clean and prepared kale leaves to the boiling water. Blanch them for 2-3 minutes to partially cook and deactivate enzymes that contribute to wilting and degradation.
- After blanching, use a slotted spoon or tongs to transfer the kale leaves to the ice bath. This will stop the cooking process and cool down the kale quickly.
- Allow the kale leaves to sit in the ice bath for about 2-3 minutes, until they are completely cooled. This helps to preserve their vibrant color and texture.
- Once cooled, remove the kale leaves from the ice bath and drain them well.
- Pat the kale leaves dry using paper towels or a clean kitchen towel.
- Divide the kale into portion sizes that you will likely use in recipes. You can choose to chop or leave the leaves whole.
- Place the portions of kale into airtight freezer bags or freezer-safe containers. Make sure to remove any excess air before sealing.
- Label the bags or containers with the date and contents.
- Store the kale in the freezer, where it should remain fresh for up to 12 months.
Blanching and freezing kale allows you to have a supply of kale on hand for future use. Frozen kale is great for adding to smoothies, soups, stews, and other cooked dishes. However, note that the texture will change upon thawing, and it may no longer be suitable for raw salads or dishes that require crispness.
Now that you know how to freeze kale, let’s explore another method that is particularly useful for long-term storage: vacuum sealing.
Using Vacuum Sealing for Kale Storage
Vacuum sealing is a method that creates an air-tight environment around the kale, preventing the entry of oxygen and reducing the risk of spoilage. This technique is ideal for long-term storage as it helps to preserve the freshness of kale for an extended period. Here’s how to use vacuum sealing for kale storage:
- Start by cleaning and preparing the kale, removing the stems and cutting or tearing the leaves into the desired size.
- Ensure that the kale is completely dry before vacuum sealing. Excess moisture can create a breeding ground for bacteria and lead to accelerated decay.
- Using a vacuum sealer machine, place the prepared kale in a vacuum sealing bag or roll.
- Ensure that the kale is evenly spread out and not overcrowded in the bag to ensure proper sealing.
- Seal the bag according to the instructions provided by your vacuum sealing machine. This typically involves placing the open end of the bag into the sealing chamber and activating the vacuum and sealing functions.
- Once the bag is sealed, label it with the date and contents.
- Store the vacuum-sealed bag of kale in a cool, dark place, such as a pantry or cellar, away from sunlight and excessive heat.
- When stored in a vacuum-sealed bag, kale can retain its freshness and nutrient content for several months.
Using a vacuum sealer is a great option if you have a large quantity of kale that you want to preserve for an extended period. The airtight seal helps to prevent freezer burn and maintain the quality of the kale over time. When you’re ready to use the vacuum-sealed kale, simply thaw it in the refrigerator or incorporate it directly into your cooking.
Now that we’ve covered various methods of kale storage, let’s explore how to revive wilted kale and make it fresh again.
Rejuvenating Wilted Kale
Despite our best efforts in storing kale properly, there may be times when it becomes slightly wilted. The good news is that wilted kale can still be salvaged and made fresh again with a simple technique. Here’s how to rejuvenate wilted kale:
- Start by filling a large bowl or sink with cold water.
- Place the wilted kale leaves in the bowl of water, ensuring they are completely submerged.
- Allow the kale to soak in the water for about 10-15 minutes. During this time, the leaves will rehydrate and regain their crispness.
- After the specified soaking time, remove the kale from the water and give it a gentle shake to remove excess moisture.
- Pat the kale leaves dry using a kitchen towel or paper towels. Make sure they are not dripping wet.
- Inspect the kale for any remaining wilted or damaged leaves and remove them.
- Once the kale is dried and cleaned, it is ready to be used in your desired recipes or stored again using the appropriate storage method.
By following these steps, you can breathe new life into wilted kale and restore its texture and freshness. However, it is important to note that the flavor and texture may not be exactly the same as freshly harvested kale. Therefore, it is best to use the revived kale in cooked dishes rather than raw preparations.
Now that you know how to rejuvenate wilted kale, you can confidently tackle any limp leaves that come your way. Let’s wrap up with a quick summary of what we’ve learned about kale storage.
Conclusion
Properly storing kale is crucial for extending its lifespan and maintaining its freshness. Whether you have a small supply from your garden or a bulk purchase from the market, implementing the right storage techniques can make a significant difference in preserving the quality of kale. Here are the key points to remember:
Understanding the lifespan of kale is essential. Freshly harvested kale can last up to a week, but its freshness and nutrient content gradually decline over time.
Preparing kale for storage involves cleaning, removing tough stems, inspecting for damaged leaves, and ensuring it is dry.
Air-tight container storage provides an easy and convenient way to store kale, keeping it fresh for up to a week in the refrigerator.
Refrigeration is another effective method, allowing kale to last up to two weeks when stored properly in the crisper drawer.
Blanching and freezing kale is a great option for long-term storage, allowing you to enjoy kale for up to 12 months. However, note that the texture will change upon thawing.
Vacuum sealing is ideal for long-term storage, maintaining the freshness and quality of kale for several months.
In case your kale becomes wilted, you can rejuvenate it by soaking it in cold water for a few minutes, restoring its crispness and freshness.
By implementing these storage techniques, you can significantly prolong the shelf life of kale, reducing wastage and ensuring that you always have fresh and nutritious kale at your disposal.
So, the next time you have an abundance of kale, don’t let it go to waste! Store it properly using the methods outlined in this article, and enjoy the benefits of fresh kale in your meals for a longer period of time.
Remember, proper storage is key to enjoying the full flavor, texture, and nutritional value of kale. Happy storing!
Frequently Asked Questions about How To Store Kale To Last Longer
Was this page helpful?
At Storables.com, we guarantee accurate and reliable information. Our content, validated by Expert Board Contributors, is crafted following stringent Editorial Policies. We're committed to providing you with well-researched, expert-backed insights for all your informational needs.


0 thoughts on “How To Store Kale To Last Longer”