Articles
How To Store Nachos
Modified: March 23, 2024
Learn how to store nachos properly with these helpful articles. Keep your nachos fresh and crispy for your next snack time!
(Many of the links in this article redirect to a specific reviewed product. Your purchase of these products through affiliate links helps to generate commission for Storables.com, at no extra cost. Learn more)
Introduction
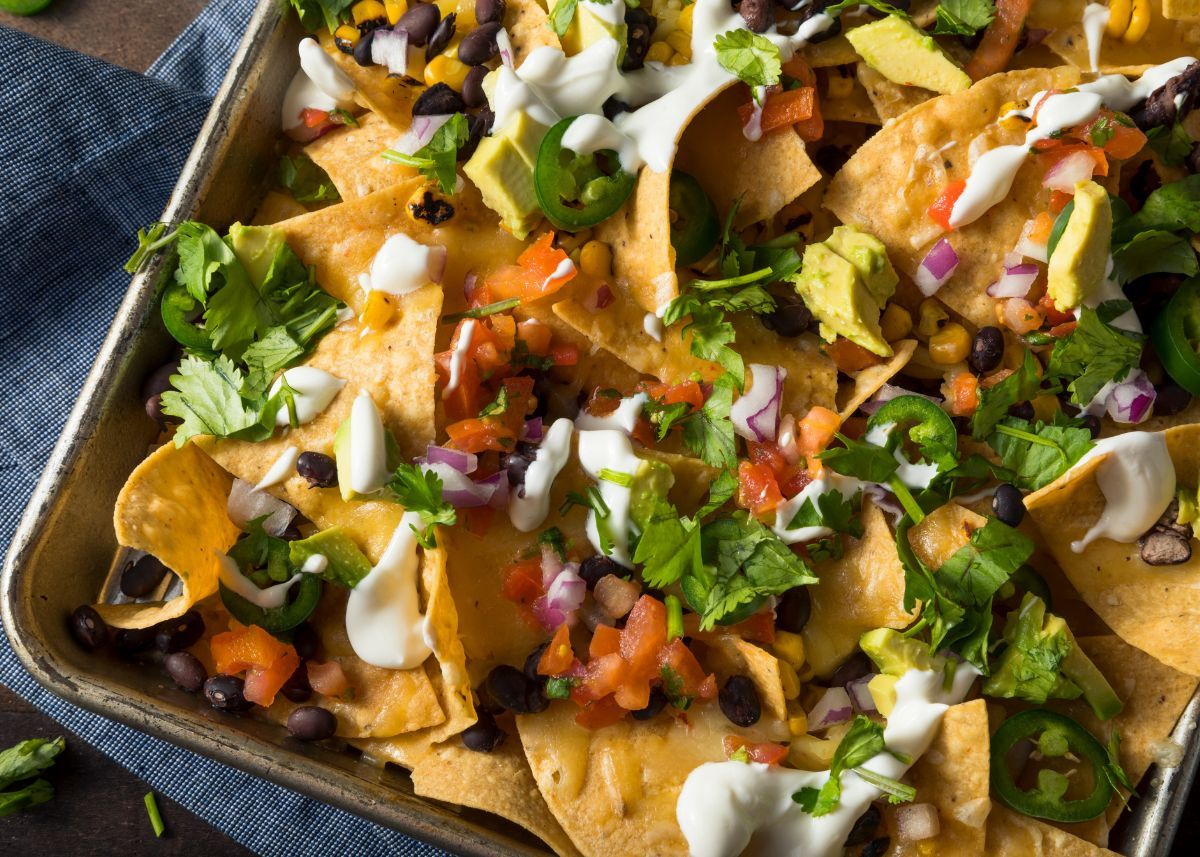
Who doesn’t love a plate of delicious, crispy nachos loaded with all the tasty toppings? Whether you’re hosting a game night or simply craving a savory snack, nachos are always a crowd-pleaser. But what do you do when you have leftover nachos? Can they be store for later enjoyment? The answer is yes! In this article, we will guide you on how to store nachos properly to ensure they stay fresh and maintain their deliciousness.
When it comes to storing nachos, it’s important to remember that maintaining their crispiness is key. Soggy nachos can be a huge disappointment, so taking the right steps to store them correctly will ensure you still get to enjoy their satisfying crunch later on. It’s all about the right storage container and reheating techniques.
But before we dive into the storing process, let’s go over the basic ingredients you’ll need to make a delicious batch of nachos, so you’re fully prepared to create a mouth-watering snack.
Key Takeaways:
- Properly layering and storing nachos in an airtight container with parchment paper or aluminum foil helps maintain their crispy texture and deliciousness, ensuring a satisfying crunch when reheated.
- Reheat nachos in the oven or microwave, and consider toasting tortilla chips beforehand for extra crispiness. Avoid overly wet toppings and use an air fryer for smaller portions to maintain their crunch.
Read more: How To Store Leftover Nachos
Ingredients
To make a mouth-watering batch of nachos, you’ll need the following ingredients:
- Tortilla chips: Choose high-quality tortilla chips that are sturdy and thick to hold up against the toppings.
- Shredded cheese: Opt for a meltable cheese like cheddar, Monterey Jack, or a blend of cheeses.
- Protein: Add your choice of protein such as cooked ground beef, shredded chicken, or seasoned black beans for a vegetarian option.
- Vegetables: Slice up fresh tomatoes, onions, jalapenos, and bell peppers to add some crunch and freshness to your nachos.
- Guacamole: Whip up a delicious batch of creamy guacamole or use store-bought for added flavor.
- Sour cream: Dollop some cool and tangy sour cream on top of your nachos.
- Salsa: Choose your favorite salsa or make your own for a burst of flavor.
- Cilantro: Finely chop some fresh cilantro leaves for a vibrant and herbaceous kick.
Of course, feel free to customize your nachos by adding extra toppings like olives, corn, or even pickled jalapenos for an extra spicy kick. Now that you have all the necessary ingredients, let’s move on to the equipment needed to store your nachos properly.
Equipment Needed
To store your nachos properly, you’ll need the following equipment:
- Airtight container: Invest in a good quality airtight container that can seal in the freshness and prevent moisture from getting in.
- Parchment paper or aluminum foil: These will help create a barrier between the nachos and the container to prevent them from sticking together and becoming soggy.
- Microwave or oven-safe dish: If you plan on reheating your nachos, having a microwave or oven-safe dish will come in handy.
- Cooking spray (optional): You may want to use a cooking spray to lightly grease the container or dish to prevent any sticking.
Now that you have all the necessary ingredients and equipment, let’s move on to the steps involved in properly storing your nachos to maintain their deliciousness.
Step 1: Preparing the Nachos
Before you can store your nachos, you’ll need to prepare them. Follow these steps to ensure your nachos are delicious and ready to be stored:
- Preheat your oven to 375°F (190°C) or preheat your broiler.
- On a large baking sheet, spread out a single layer of tortilla chips. Make sure they are evenly distributed and not overlapping.
- Sprinkle shredded cheese evenly over the tortilla chips. Be generous with the cheese to ensure every chip is covered.
- Add your protein of choice, such as cooked ground beef or shredded chicken, evenly over the cheese.
- Next, add sliced vegetables like tomatoes, onions, jalapenos, and bell peppers. Spread them out evenly over the nachos.
- Place the baking sheet in the preheated oven or under the broiler until the cheese is melted and bubbly. This usually takes about 5-7 minutes, but keep an eye on them to avoid burning.
- Remove the nachos from the oven and let them cool for a few minutes before moving on to the storing process.
Once your nachos are prepared and have cooled slightly, it’s time to move on to the next step: choosing the right storage container.
Step 2: Choosing the Right Storage Container
When it comes to storing your nachos, choosing the right container is crucial to keeping them fresh and maintaining their crispiness. Follow these guidelines to select the perfect storage container:
- Opt for an airtight container: Look for a container that has a tight-fitting lid to create a seal and prevent air and moisture from getting in. This will help preserve the crispiness of the nachos.
- Choose a container with enough space: Make sure the container is large enough to hold all the nachos without crushing or overcrowding them. It’s better to have a slightly larger container than to squish the nachos together.
- Consider using a shallow container: Nachos are best stored in a shallow container rather than a deep one. This allows for better air circulation and helps prevent condensation from making the nachos soggy.
- Use a microwave and oven-safe container: If you plan on reheating your nachos, make sure the storage container is microwave and oven-safe. This will allow you to easily heat them up without transferring them to another dish.
Once you have chosen the right storage container, you’re ready to move on to the next step: layering the nachos.
Read more: How To Store Canned Nacho Cheese
Step 3: Layering the Nachos
Properly layering your nachos is essential to ensure that each chip is coated with cheese and toppings, and to prevent them from becoming soggy. Follow these steps to achieve the perfect nacho layering:
- Prepare your selected storage container by lightly greasing it with cooking spray, if desired. This will prevent the nachos from sticking to the container.
- Line the bottom of the container with a layer of parchment paper or aluminum foil. This will create a barrier between the nachos and the container, helping to maintain their crispiness.
- Transfer a portion of the prepared nachos onto the lined container, ensuring an even distribution.
- Add a layer of shredded cheese on top of the nachos, followed by the protein of your choice and any additional toppings like vegetables or beans.
- Repeat the layering process until all the nachos are used, making sure to evenly distribute the cheese and toppings with each layer.
- End with a final layer of cheese on top to ensure a cheesy delight.
Remember, the key to maintaining the crispiness of the nachos is to avoid overcrowding and ensure even distribution of the toppings. Once the nachos are layered, it’s time to move on to the next step: adding toppings.
To store nachos, place them in an airtight container or resealable bag to keep them fresh. Store at room temperature for up to 2 days, or in the refrigerator for up to 5 days. Avoid storing in a humid environment to prevent sogginess.
Step 4: Adding Toppings
Adding toppings to your nachos not only enhances their flavor but also adds a delightful visual appeal. Here’s how you can add toppings to your prepared nachos:
- Sprinkle additional shredded cheese on top of the layered nachos. This will create a delicious cheesy crust when heated.
- Add any remaining vegetables, like diced tomatoes, onions, jalapenos, and bell peppers, for a burst of freshness and texture.
- Don’t forget to include other favorite toppings like guacamole, sour cream, salsa, and chopped cilantro. These toppings add richness, creaminess, and tang to your nachos.
- Be creative and feel free to experiment with additional toppings that suit your taste buds. Olives, corn, and even pickled jalapenos are excellent choices to give your nachos a unique twist.
Ensure that the toppings are evenly spread out over the nachos, covering as much surface area as possible. The combination of flavors and textures will make each bite a true delight. Now that your nachos are loaded with toppings, it’s time to move on to the crucial step of storing them in the fridge.
Step 5: Storing in the Fridge
Now that your nachos are prepared and topped with all the deliciousness, it’s time to store them in the fridge to keep them fresh until you’re ready to enjoy them. Follow these steps to properly store your nachos:
- Ensure that the container with the layered nachos is tightly sealed with its lid.
- Place the container in the refrigerator on a flat surface to avoid any shifting or mixing of the toppings.
- Keep the nachos refrigerated for up to 24 hours. Beyond that, the freshness and crispiness may start to deteriorate.
It’s important to note that storing your nachos for too long may cause them to become slightly soft. However, with proper reheating techniques, you can restore some of their crispiness. Speaking of reheating, let’s move on to the next step: reheating the nachos.
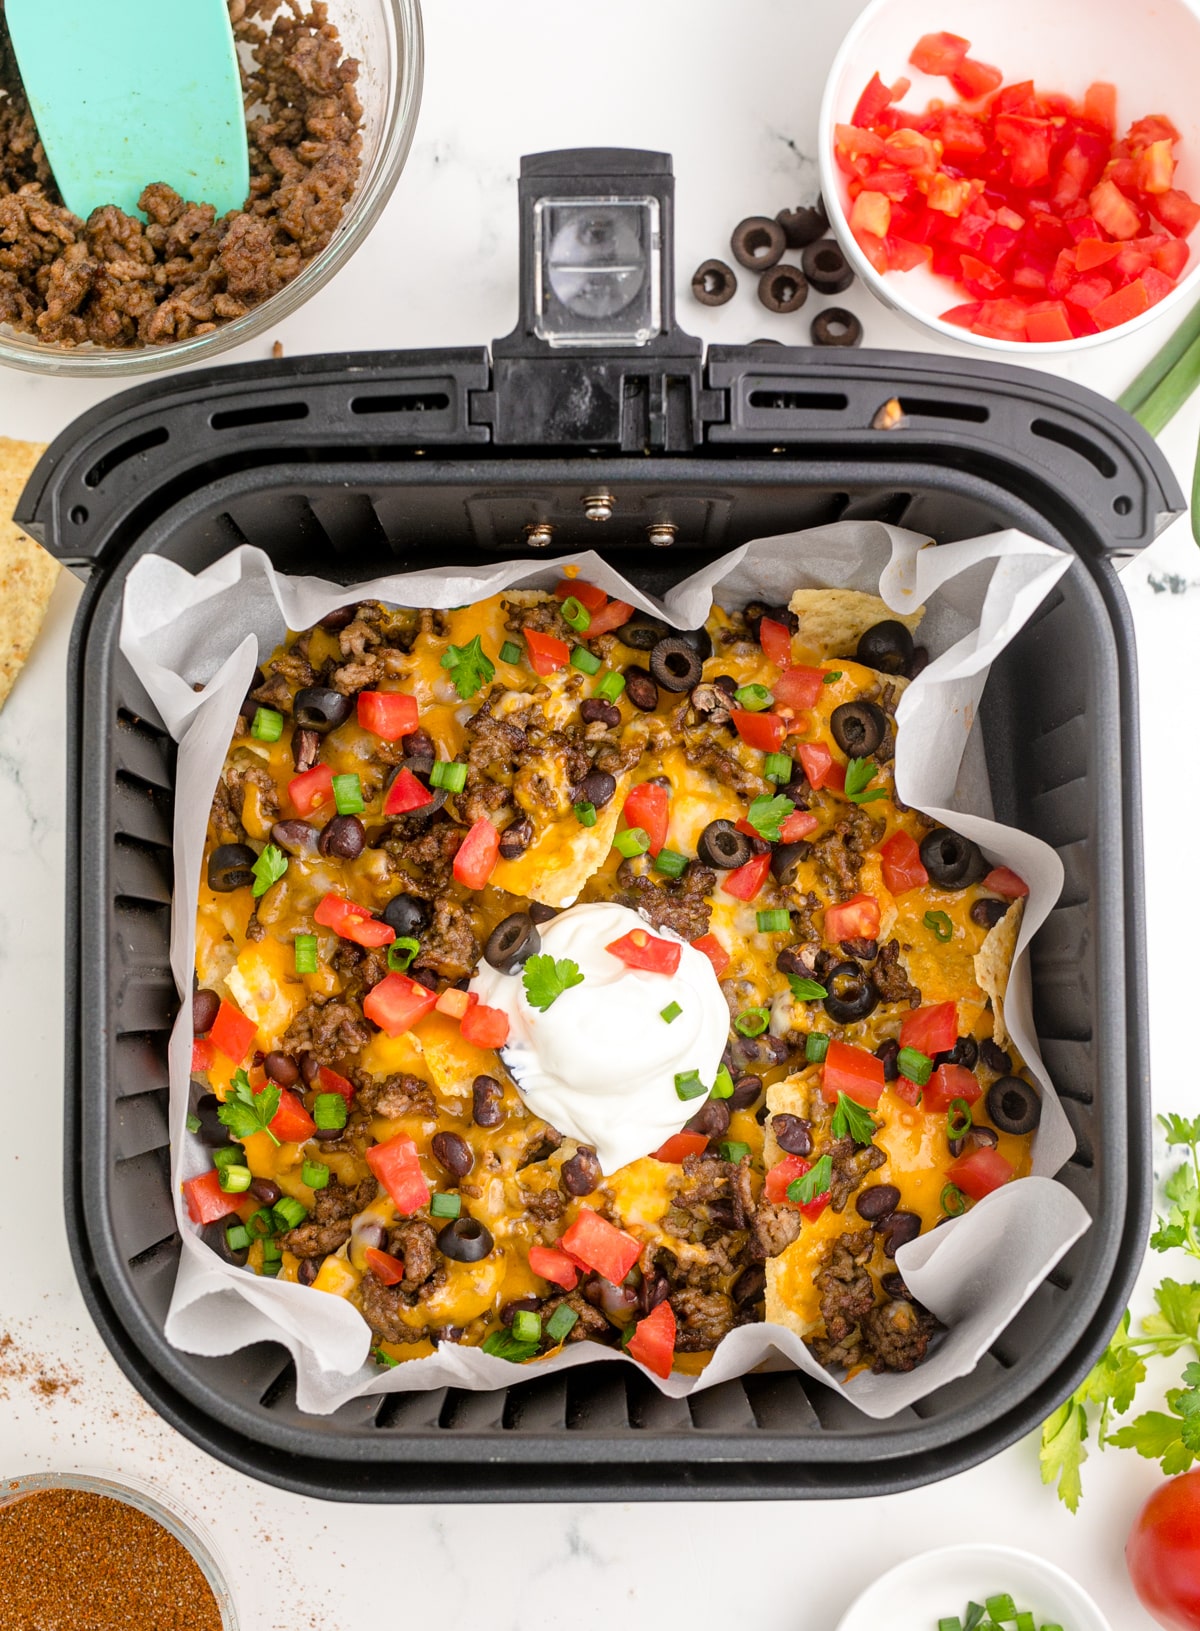
Step 6: Reheating Nachos
When it’s time to enjoy your stored nachos, you’ll want to reheat them properly to bring back their delicious crunch. Follow these steps to reheat your nachos:
- Preheat your oven to 350°F (175°C) or use the microwave if you prefer a quicker option.
- If using the oven, transfer the nachos from the storage container onto an oven-safe dish. Spread them out evenly to ensure they heat evenly.
- If using the microwave, you can reheat the nachos directly in the container. Be sure to remove the lid to prevent steam from building up.
- In the oven: Place the dish of nachos in the preheated oven and heat for about 10 minutes or until the cheese is melted and bubbly.
- In the microwave: Microwave the nachos on high in 30-second intervals, stirring in between, until the cheese is melted and the nachos are heated through.
- Once reheated, remove them from the oven or microwave and let them cool slightly before serving. This will help to avoid any potential burns.
Reheating time may vary depending on the quantity of nachos and the power of your oven or microwave. It’s important to keep an eye on them to prevent overcooking.
Remember, reheating might not restore the exact same level of crispiness as freshly made nachos, but it will still bring back some of their satisfying crunch. Now that your nachos are reheated, it’s time to enjoy your delicious creation!
Read more: How To Store Nacho Cheese Sauce
Tips for Maintaining Crispy Nachos
To ensure that your nachos stay crispy and delicious after storage and reheating, consider these helpful tips:
- Avoid adding wet or juicy toppings when preparing your nachos. Excess moisture can make the chips soggy, so opt for ingredients like diced tomatoes or salsa that are not too watery.
- If you prefer a crunchy texture, store and reheat your nachos without any toppings that can introduce moisture. Instead, serve the toppings separately.
- For extra crispness, you can briefly toast the tortilla chips in the oven or under the broiler before layering the toppings. This will help them stay crunchier for longer.
- When reheating your nachos, use the oven or toaster oven for optimum crispiness. The microwave can soften the chips and make them less crispy.
- To add an extra layer of crispiness, you can sprinkle a small amount of additional cheese on top of the reheated nachos and broil them for a few minutes until golden and bubbly.
- If you want to reheat smaller portions of nachos, consider using an air fryer. The hot air circulation will help maintain their crunch.
- Eat the reheated nachos as soon as possible to enjoy their maximum crispiness. Nachos tend to lose their crunch over time due to exposure to air.
By following these tips, you can enjoy your stored and reheated nachos with a satisfying crunch just like they were freshly made. Now, it’s time to savor your delicious snack!
Conclusion
Nachos are a beloved and versatile snack, and with the right storage and reheating techniques, you can enjoy their deliciousness even after they are made. By following the steps outlined in this article, you can ensure that your nachos stay fresh and maintain their crispy texture.
From properly layering the toppings to selecting the right storage container, each step plays a crucial role in preserving the taste and texture of your nachos. By choosing an airtight container, layering the nachos evenly, and adding toppings strategically, you can help maintain their crunchiness even after being stored in the fridge.
When it’s time to enjoy your stored nachos, reheating them in the oven or microwave will bring back their delightful flavors. While they may not be as crispy as when they were freshly made, following the reheating instructions will ensure that they still have that satisfying crunch.
Remember to consider additional tips such as avoiding overly wet toppings, toasting the tortilla chips beforehand, and using an air fryer for smaller portions to enhance the crispiness of your nachos.
Now that you’re equipped with the knowledge and techniques to properly store and reheat nachos, you can confidently make a larger batch and enjoy them at your convenience. So grab your favorite toppings, prepare a delicious batch of nachos, and when you have leftovers, store them properly to savor their incredible flavors later.
Enjoy your crispy and delicious nachos!
Frequently Asked Questions about How To Store Nachos
Was this page helpful?
At Storables.com, we guarantee accurate and reliable information. Our content, validated by Expert Board Contributors, is crafted following stringent Editorial Policies. We're committed to providing you with well-researched, expert-backed insights for all your informational needs.


0 thoughts on “How To Store Nachos”