Articles
How To Store Pump Parts In Fridge
Modified: February 23, 2024
Learn the best techniques for storing pump parts in your fridge and keep them clean and hygienic. Read our informative articles now!
(Many of the links in this article redirect to a specific reviewed product. Your purchase of these products through affiliate links helps to generate commission for Storables.com, at no extra cost. Learn more)
Introduction
Storing pump parts in the fridge is an important aspect of ensuring the cleanliness and safety of your breast milk. When using a breast pump, it is crucial to properly clean and store the pump parts to prevent the growth of bacteria and maintain the integrity of the milk. By following a few simple steps, you can confidently store your pump parts in the fridge and provide your baby with safe and healthy breast milk.
In this article, we will guide you through the process of storing pump parts in the fridge. We will discuss the reasons why it is important to store pump parts in the fridge, the necessary preparations, and the steps to ensure proper storage and organization. Additionally, we will provide tips on maintaining hygiene in the fridge and thawing the stored pump parts when needed.
By implementing these guidelines, you can effectively store pump parts in the fridge and establish a safe and convenient routine for expressing and storing breast milk. Let’s dive in and explore the detailed steps for storing pump parts in the fridge.
Key Takeaways:
- Properly storing pump parts in the fridge helps prevent bacterial growth, prolongs freshness, and preserves the essential nutrients in breast milk, ensuring safe and healthy nourishment for your baby.
- Thorough cleaning, drying, and organizing of pump parts, along with maintaining fridge hygiene and proper thawing methods, are essential steps for successful and safe storage of breast milk.
Read more: How To Store Butter In Fridge
Why Store Pump Parts in the Fridge
Storing pump parts in the fridge offers several benefits to ensure the safety and freshness of your breast milk. Let’s take a closer look at why it is essential to store pump parts in the fridge:
- Prevents bacterial growth: Breast milk is a nutrient-rich substance that provides essential antibodies and nutrients to your baby. However, it is also a perfect breeding ground for bacteria if not handled properly. Storing your pump parts in the fridge helps to inhibit the growth of bacteria and maintain the integrity of the breast milk.
- Prolongs freshness: When you refrigerate your pump parts along with the expressed breast milk, it helps to extend the freshness of the milk. This is especially important if you plan to use the milk within a few days or if you need to transport the milk to another location.
- Convenience and efficiency: Storing pump parts in the fridge allows you to prepare for expressing milk in advance, making it easier and more efficient. By having clean and ready-to-use pump parts on hand, you can save time and energy, especially during those late-night pumping sessions.
- Preserves nutrients: Breast milk contains a wide range of beneficial nutrients that can start to break down when exposed to light, heat, and air. Storing the pump parts in the fridge helps to preserve the nutritional quality of the breast milk, ensuring that your baby receives all the essential vitamins, minerals, and antibodies.
Storing pump parts in the fridge not only helps to maintain the quality of your breast milk but also ensures that the milk remains safe for your baby to consume. It is essential to follow the proper steps to prepare and store the pump parts to minimize the risk of contamination and ensure optimal freshness.
Now that we understand the importance of storing pump parts in the fridge, let’s move on to the necessary preparations to ensure successful storage and efficient organization.
Preparation for Storing Pump Parts
Before you start storing your pump parts in the fridge, it is crucial to make the necessary preparations to ensure clean and safe storage. Here are the key steps to follow in preparation for storing pump parts:
- Cleaning pump parts: Thoroughly clean your pump parts after each use. Disassemble all the removable parts and wash them with warm water and mild soap. Use a bottle brush to clean hard-to-reach areas. Rinse the parts thoroughly to remove any soap residue. Avoid using harsh cleaners or abrasive materials that may damage the pump parts. Proper cleaning is essential to remove any leftover milk residue or bacteria that may be present.
- Drying pump parts: After cleaning, allow the pump parts to air dry on a clean and dry surface. Avoid using towels or cloths to dry the parts, as they may introduce bacteria or fibers. Ensure that the pump parts are completely dry before storing them in the fridge. Moisture can promote bacterial growth, so it is important to allow the parts to air dry thoroughly.
- Choosing a sealable container: Select a clean and airtight container to store your pump parts in the fridge. Ideally, choose a container that is specifically designed for storing breast milk or food. Ensure that the container is made of safe and BPA-free materials to maintain the purity of the breast milk. It is recommended to use a container with separate compartments or dividers to keep the pump parts organized.
- Gather necessary supplies: Prepare any additional supplies you may need, such as breast milk storage bags or labels. These will be helpful when you need to separate and label pumped milk from different sessions or different pump parts.
By following these preparation steps, you can ensure that your pump parts are clean, dry, and ready for safe storage in the fridge. Now that you are ready, let’s move on to the step-by-step process of storing pump parts in the fridge.
Step 1: Cleaning Pump Parts
Properly cleaning your pump parts is the first and most crucial step in preparing them for storage in the fridge. Here’s a step-by-step guide on how to clean your pump parts:
- Disassemble the pump: Start by disassembling all the removable parts of your breast pump, including the breast shields, valves, membranes, and any other accessories. Refer to the manufacturer’s instructions if you are unsure how to disassemble the specific model of your breast pump.
- Rinse with warm water: Rinse all the pump parts with warm water immediately after each use. This will help remove any leftover milk residue and prevent it from drying and sticking to the parts.
- Wash with soap: Use a mild dish soap or a specially formulated cleaning solution designed for breast pump parts. Apply a small amount of soap to each part and gently scrub them with your hands or a bottle brush. Pay attention to all the crevices and hard-to-reach areas to ensure thorough cleaning.
- Rinse thoroughly: After washing, rinse each pump part thoroughly with warm water to remove any soap residue. Ensure that there is no soapy scent or residue left on the parts.
- Air dry: Place the pump parts on a clean drying rack or a clean paper towel to air dry. Avoid using cloth towels or tissues, as they may leave lint or fibers on the parts.
- Consider sterilizing: Depending on your preference and your baby’s needs, you may choose to sterilize your pump parts after cleaning. You can use a sterilizing solution, sterilizing bags, or a steam sterilizer. However, keep in mind that most manufacturers do not require daily sterilization and that proper cleaning and air drying are usually sufficient.
Properly cleaning your pump parts helps to remove any milk residue, oils, and bacteria that may be present. This step is crucial in preventing contamination and maintaining the hygiene and safety of the stored breast milk. By following these cleaning guidelines, you can ensure that your pump parts are clean and ready for the next step: drying.
Step 2: Drying Pump Parts
After cleaning your pump parts, it is important to ensure that they are thoroughly dried before storing them in the fridge. Here’s a step-by-step guide on how to properly dry your pump parts:
- Shake off excess water: After rinsing the pump parts, gently shake off any excess water. This will help remove most of the water droplets, making the drying process more efficient.
- Air dry: Place the pump parts on a clean drying rack or a clean paper towel. Ensure that each part is spread out to allow proper air circulation. Avoid stacking or overlapping the parts, as this can prolong the drying time and create moisture pockets that may promote bacterial growth.
- Separate small parts: If your pump has small parts like valves or membranes, be sure to separate them to ensure thorough drying. These parts tend to retain moisture, so giving them extra attention will help prevent any potential bacterial growth.
- Avoid using towels: It is best to avoid using cloth towels or tissues to dry the pump parts, as they may leave lint or fibers behind. These can contaminate the parts or the breast milk. Opt for air drying, as it is the most effective and hygienic method.
- Ensure complete dryness: Allow the pump parts to air dry completely before proceeding to the next step. Depending on the climate and humidity level, it may take around 30 minutes to a few hours for the parts to dry completely.
Properly drying your pump parts is crucial to avoid introducing moisture into the storage container and to prevent the growth of bacteria. Make sure all parts are completely dry before moving on to the next step of choosing a sealable container for storage.
Read more: How To Store Basil In Fridge
Step 3: Choosing a Sealable Container
Choosing the right sealable container is essential for storing your pump parts in the fridge. A proper container helps to maintain the cleanliness and organization of your pump parts and ensures that the stored breast milk remains fresh. Here are some important factors to consider when choosing a sealable container:
- Material: Look for a container made of food-grade and BPA-free materials to ensure the safety and purity of the breast milk. Avoid containers made of plastic with recycling codes 3, 6, or 7, as they may contain harmful chemicals that can leach into the milk.
- Size and compartments: Consider the size and compartments of the container based on the number of pump parts you need to store. Look for a container that has enough space to comfortably fit all the parts without overcrowding or squishing them together. Additionally, compartments or dividers can help keep the parts organized and prevent them from shifting or touching each other.
- Airtight seal: Ensure that the container has a sturdy and tight-fitting lid to create an airtight seal. This will help prevent any air or moisture from entering the container, which can compromise the quality and safety of the stored pump parts.
- Transparency: Opt for a container that is transparent or semi-transparent so that you can easily see the contents without having to open it. This will help you quickly locate the specific pump parts you need, reducing the risk of contamination.
- Ease of cleaning: Choose a container that is easy to clean and can withstand frequent washing. Look for containers that are dishwasher-safe or easy to hand wash with mild soap and water.
Remember to clean and sanitize the chosen container before using it for storing your pump parts. This will help ensure that the container is free from any contaminants or residues that could potentially affect the quality of the breast milk.
Selecting the right sealable container is a crucial step in storing your pump parts in the fridge. Now that you have chosen a suitable container, you are ready to move on to the next step: properly storing the pump parts in the fridge.
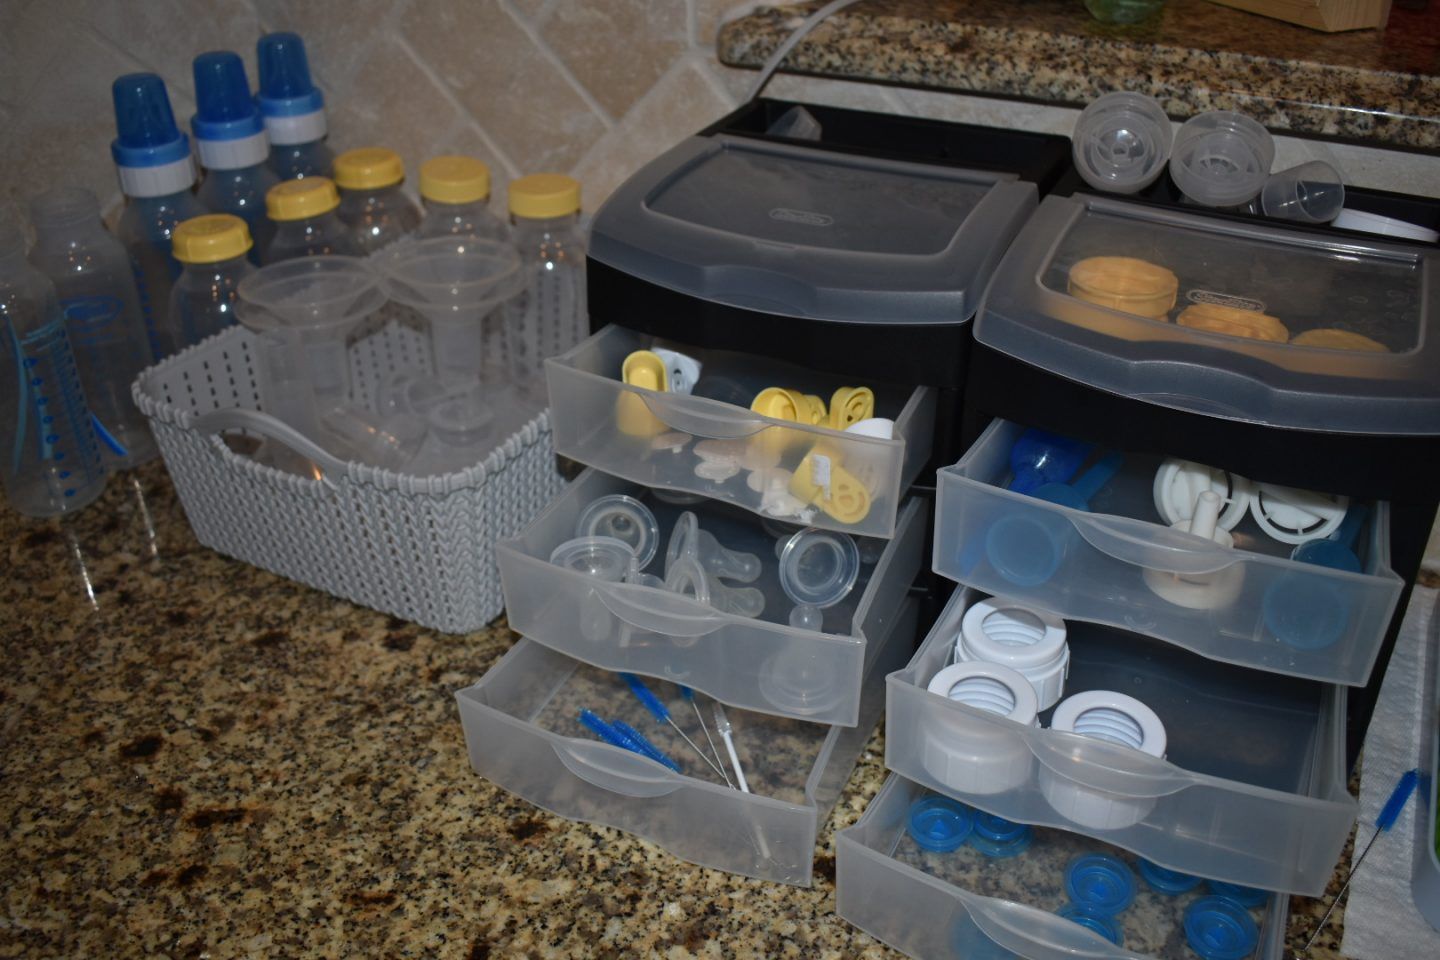
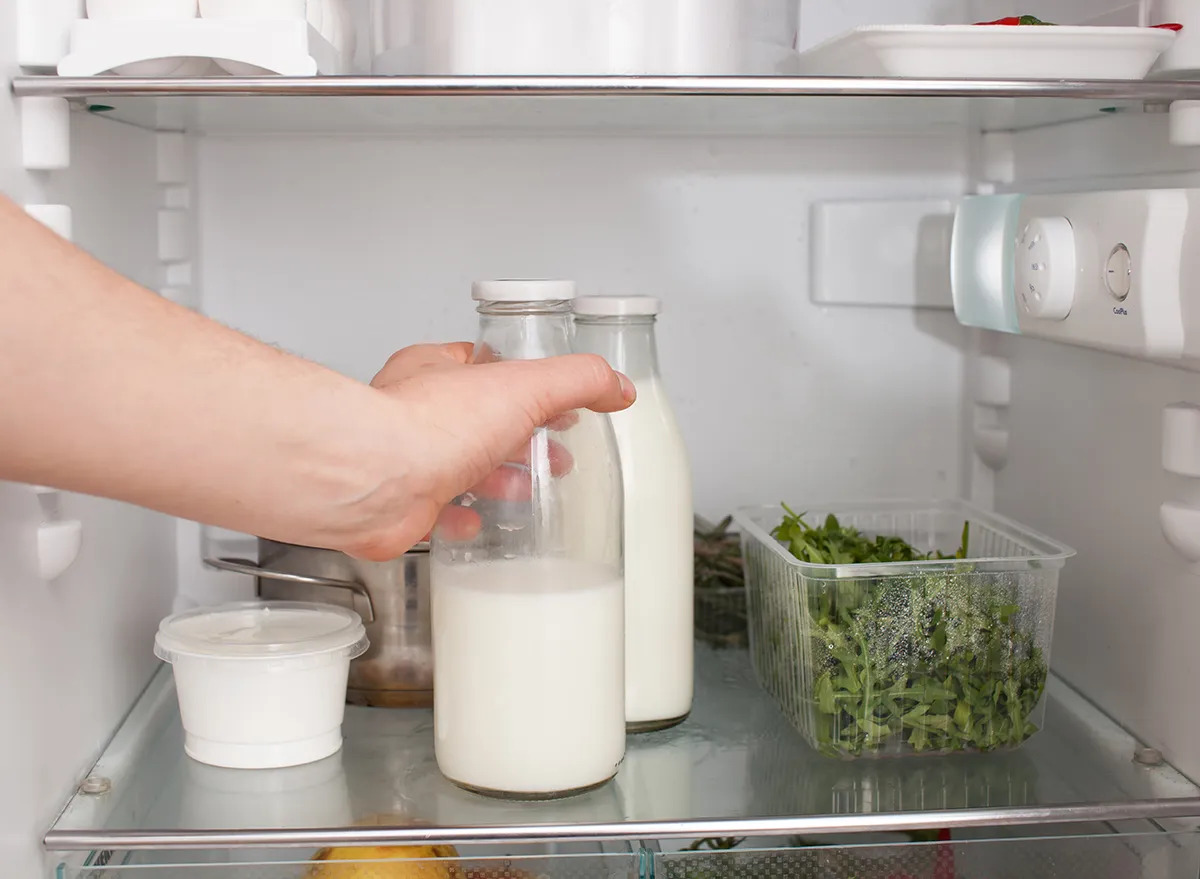
After cleaning pump parts, store them in a clean, sealed container in the fridge to keep them fresh and ready for use. Make sure to label the container with the date to track freshness.
Step 4: Properly Storing Pump Parts in the Fridge
Once you have cleaned and dried your pump parts and chosen a suitable sealable container, it’s time to properly store the pump parts in the fridge. Follow these steps to ensure safe and organized storage:
- Arrange the parts: Place the clean and dried pump parts in the chosen container. Make sure they are arranged in a way that maximizes space but without overcrowding or squishing them together. Allow sufficient room for air circulation to prevent bacteria growth.
- Seal the container: Once all the pump parts are inside the container, securely seal the lid to create an airtight seal. This will help maintain the freshness and hygiene of the pump parts. Make sure the lid is properly closed and locked to prevent any accidental leaks.
- Select a spot in the fridge: Choose a designated spot in your fridge to store the container of pump parts. Ideally, this spot should be away from raw meats or other potential sources of contamination. Consider placing the container on a clean shelf or in a designated storage bin to keep it separate from other food items.
- Temperature control: Ensure that your fridge is set at the appropriate temperature to keep the pump parts and breast milk fresh. The optimal temperature for storing breast milk is between 32°F and 39°F (0°C and 4°C). Avoid placing the container near the door or any areas where temperature fluctuations may occur.
- Keep track of storage time: It is important to keep track of the storage time of the pump parts. Breast milk can be safely stored in the fridge for up to 4 days. Label the container with the date and time of storage to help you monitor the freshness and expiration of the stored breast milk.
By following these steps, you can ensure that your pump parts are properly stored in the fridge, maintaining their cleanliness and freshness. Proper organization and temperature control will help you efficiently manage your breast milk supply and ensure that it is safe for your baby to consume.
Next, let’s discuss how to label and organize the pump parts to further simplify the storage and retrieval process.
Step 5: Labeling and Organizing Pump Parts
Labeling and organizing your pump parts in the fridge is an important step to ensure easy identification and prevent any confusion. Here are some tips to help you label and organize your pump parts effectively:
- Label with date and time: Use waterproof labels or a permanent marker to clearly label the container with the date and time of storage. This will help you keep track of the freshness and expiration of the stored pump parts.
- Separate parts from different sessions: If you pump multiple times a day or over a few days, consider using separate compartments or containers for each pumping session. This will help you keep track of the order in which the pump parts were used and ensure proper rotation of the stored breast milk.
- Arrange by size or type: Consider arranging the pump parts in the container based on their size or type. For example, you can group all the valves together, all the membranes together, and so on. This will make it easier to locate specific parts when assembling the pump for your next session.
- Use color-coded labels or storage bags: To further enhance organization, consider using color-coded labels or storage bags for different pump parts. This can help you quickly identify and retrieve the specific parts you need without any confusion.
- Rotate the storage: Practice the first-in, first-out (FIFO) method to ensure that the oldest expressed milk and pump parts are used first. When adding new pump parts to the container, place them behind the older ones to maintain a consistent rotation.
By labeling and organizing your pump parts in the fridge, you can maintain a clear inventory and ensure that the oldest breast milk and pump parts are used first. This will help you effectively manage your breast milk supply and maximize its freshness and nutritional value.
Now that you have labeled and organized your pump parts, it’s important to maintain hygiene and cleanliness in the fridge. Let’s move on to the next step: maintaining hygiene in the fridge.
Step 6: Maintaining Hygiene in the Fridge
To ensure the safety and cleanliness of your stored pump parts and breast milk, it is essential to maintain proper hygiene in the fridge. Follow these steps to keep your fridge clean and minimize the risk of contamination:
- Regularly clean your fridge: Clean your fridge regularly to remove any spills or residue that may contaminate your pump parts or breast milk. Empty and wipe down the shelves, drawers, and surfaces with a mild detergent solution. Rinse with water and dry thoroughly before placing the pump parts back in.
- Use refrigerator liners or mats: Consider using refrigerator liners or mats on the shelves and in the drawers. These liners can be easily cleaned or replaced, helping to prevent cross-contamination and making it easier to clean any spills or leaks that may occur.
- Keep raw meats separate: Store raw meats, poultry, and seafood in sealed containers or bags to prevent any potential leakage or drips that may contaminate other items in the fridge, including the pump parts and breast milk.
- Avoid overcrowding: Avoid overcrowding the fridge, as it can restrict air circulation and lead to temperature fluctuations. Ensure there is enough space around the pump parts container for proper air circulation and to maintain the desired temperature.
- Regularly check the temperature: Monitor the temperature of your fridge to ensure it remains within the recommended range of 32°F to 39°F (0°C to 4°C). Use a refrigerator thermometer to accurately measure the temperature and make any necessary adjustments to maintain the optimal storage conditions.
- Practice good food handling: Follow proper food handling practices to prevent cross-contamination. Wash your hands before handling the pump parts or breast milk, and use separate cutting boards and utensils for raw meats and other foods.
By maintaining proper hygiene in the fridge, you can minimize the risk of contamination and ensure the safety and freshness of your stored pump parts and breast milk. Regular cleaning, separation of raw meats, and monitoring the temperature will help create a clean and safe environment for your stored items.
Now that you have learned how to maintain hygiene in the fridge, let’s move on to the final step: thawing the pump parts before use.
Read more: How To Store Meats In Fridge
Step 7: Thawing Pump Parts Before Use
When you’re ready to use the stored pump parts, it’s important to thaw them properly to maintain their quality and safety. Here’s a step-by-step guide on how to thaw your pump parts before use:
- Remove the container from the fridge: Take the container with the pump parts out of the fridge and place it on a clean surface. Ensure that you handle the container and its contents with clean hands to minimize the risk of contamination.
- Thaw in the refrigerator: The safest method to thaw your pump parts is to do so in the refrigerator. Place the sealed container in the refrigerator and allow the pump parts to thaw slowly and gradually. This method helps to maintain the integrity of the breast milk and avoids any potential bacterial growth.
- Plan ahead: Thawing in the refrigerator takes time, so plan ahead and allow several hours or overnight for the pump parts to thaw completely. This will ensure that they are ready for use when you need them.
- Avoid using hot water or microwave: It is not recommended to thaw your pump parts using hot water or the microwave. These methods can lead to uneven heating and may compromise the quality and safety of the breast milk. Microwaving can also create hot spots that can scorch or overheat the milk.
- Check the temperature: After thawing, check the temperature of the pump parts using a thermometer or by touching them against the inside of your wrist. The temperature should feel lukewarm or slightly warm, but not hot. Discard any pump parts that feel excessively hot or have an unusual odor.
- Inspect for quality: Before using the thawed pump parts, inspect them for any signs of spoilage, such as off colors, strange odors, or curdled milk. If you notice any abnormalities, discard the parts and do not use them.
Properly thawing your pump parts ensures that they are ready for use without compromising the quality and safety of the breast milk. By following these steps, you can confidently thaw your pump parts and proceed with expressing milk for your baby.
Now that you have completed all the steps, you are well-equipped with the knowledge and guidance to effectively store, thaw, and use your pump parts. By following these guidelines, you can ensure the cleanliness, freshness, and safety of your breast milk for your little one.
Congratulations on taking the necessary steps to properly store your pump parts in the fridge. With this newfound knowledge, you can confidently maintain a safe and convenient routine for pumping and providing nourishing breast milk for your baby.
Remember, the information provided in this article is for general guidance. If you have any specific concerns or questions, consult with a healthcare professional or lactation consultant for personalized advice.
Happy pumping and storing!
Conclusion
Storing pump parts in the fridge is a crucial aspect of ensuring the cleanliness, freshness, and safety of your breast milk. By following the steps outlined in this guide, you can confidently store your pump parts and provide your baby with safe and healthy breast milk.
We discussed the importance of storing pump parts in the fridge to prevent bacterial growth, prolong freshness, and preserve the nutrients in breast milk. Proper preparations, including cleaning and drying the pump parts, choosing a sealable container, and gathering necessary supplies, are essential for successful storage.
We also covered the step-by-step process of cleaning pump parts, drying them thoroughly, choosing an appropriate sealable container, and properly storing the pump parts in the fridge. Additionally, we emphasized the importance of labeling and organizing the pump parts as well as maintaining hygiene in the fridge to ensure optimal safety and cleanliness.
Lastly, we provided guidance on thawing the pump parts before use, highlighting the importance of proper thawing methods to maintain quality and safety. Avoid using hot water or the microwave, and plan ahead for gradual thawing in the refrigerator.
By following these guidelines and putting the knowledge into practice, you can establish a safe, convenient, and organized routine for storing and using your pump parts. Enjoy the benefits of having readily available breast milk for your baby while ensuring their health and well-being.
Remember, the information provided in this article serves as a general guide. If you have specific concerns or questions, always consult with a healthcare professional or lactation consultant for personalized advice and recommendations.
Happy pumping and storing, and may your breastfeeding journey be filled with joy and success!
Frequently Asked Questions about How To Store Pump Parts In Fridge
Was this page helpful?
At Storables.com, we guarantee accurate and reliable information. Our content, validated by Expert Board Contributors, is crafted following stringent Editorial Policies. We're committed to providing you with well-researched, expert-backed insights for all your informational needs.


0 thoughts on “How To Store Pump Parts In Fridge”