Home>Furniture & Design>Interior Design Trends>How To Use Folk Art Home Decor Wax
Interior Design Trends
How To Use Folk Art Home Decor Wax
Modified: January 9, 2024
Learn how to enhance your interior design with Folk Art Home Decor Wax. Discover the latest interior design trends and elevate your space effortlessly.
(Many of the links in this article redirect to a specific reviewed product. Your purchase of these products through affiliate links helps to generate commission for Storables.com, at no extra cost. Learn more)
Introduction
When it comes to adding character and charm to your home decor, folk art techniques are a timeless choice. One of the most versatile tools in the folk art enthusiast’s arsenal is home decor wax. This simple yet powerful product can transform ordinary surfaces into rustic, vintage, or shabby chic masterpieces.
Whether you’re a seasoned crafter or just beginning to explore the world of folk art, understanding how to use home decor wax effectively is essential. In this guide, we’ll delve into the intricacies of folk art home decor wax, exploring its uses, application techniques, and the transformative impact it can have on your DIY projects.
Key Takeaways:
- Folk art home decor wax is a versatile and user-friendly product that can transform ordinary surfaces into rustic, vintage, or shabby chic masterpieces, making it a must-have for DIY enthusiasts and seasoned artisans alike.
- By understanding the nuances of selecting, preparing, applying, and finishing with home decor wax, individuals can embark on a journey of creative exploration, reimagining furniture, decor accents, and craft projects with a distinctive, time-worn allure.
What Is Folk Art Home Decor Wax?
Folk Art Home Decor Wax is a specialized product designed to enhance and protect various surfaces, including wood, metal, and painted furniture. This type of wax is formulated to provide a durable, matte finish that can impart an aged or distressed look to your projects. It is commonly used in folk art, shabby chic, and vintage-inspired decor styles to achieve an authentic, time-worn appearance.
Available in a range of colors, including clear, white, and dark, folk art home decor wax offers versatility for different aesthetic preferences. The clear wax is perfect for preserving the natural beauty of wood or painted surfaces, while tinted waxes can add depth and dimension to your projects. Whether you’re aiming for a subtle antiquing effect or a more dramatic transformation, there’s a home decor wax to suit your needs.
One of the defining features of folk art home decor wax is its ease of use. Unlike traditional furniture finishes, such as varnish or polyurethane, wax can be applied with minimal equipment and expertise. This makes it an accessible option for both experienced artisans and DIY enthusiasts looking to elevate their home decor with a touch of rustic elegance.
Furthermore, folk art home decor wax is renowned for its ability to highlight intricate details and textures. When applied to carved wood, metal accents, or decorative moldings, the wax can settle into recessed areas, creating an antiqued patina that accentuates the piece’s craftsmanship. This makes it an invaluable tool for bringing out the character of vintage or upcycled furniture, as well as adding depth to newly crafted items.
Overall, folk art home decor wax is a transformative medium that empowers creators to achieve an array of aesthetic effects, from subtle age-wear to bold, weathered finishes. Its user-friendly nature and artistic versatility make it a must-have for anyone seeking to infuse their living spaces with the warmth and charm of folk art.
Choosing the Right Wax for Your Project
When selecting a folk art home decor wax for your project, several factors come into play, including the desired finish, the base color of the surface, and the level of distressing or aging you wish to achieve. Understanding these considerations will guide you toward choosing the most suitable wax for your specific application.
Finish: The first step in choosing the right wax is to determine the finish you want to achieve. If you’re aiming for a natural, unaltered look, clear wax is the ideal choice. It provides a protective layer without altering the color of the underlying surface. For a brighter, more vintage appearance, white wax can be used to impart a light, sun-bleached effect. Conversely, dark wax is perfect for creating an aged, antique look, adding depth and richness to the finish.
Base Color: The color of the surface you’re working with will also influence your wax selection. Light-colored surfaces, such as white or pastel-painted furniture, pair well with clear or white wax to maintain a bright, airy aesthetic. In contrast, dark or heavily stained surfaces benefit from the depth and contrast provided by dark wax, enhancing their richness and character.
Level of Distressing: Consider the level of distressing or aging you want to achieve. If you’re looking to subtly age a piece, clear or white wax can provide a delicate, nuanced finish. For more pronounced distressing, dark wax can be strategically applied to create the appearance of wear and patina, particularly in recessed areas and along edges.
It’s important to note that experimenting with wax on a small, inconspicuous area of your project can help you gauge the impact of different wax colors and application techniques before committing to the entire piece. This allows you to fine-tune your approach and ensure that the chosen wax complements the overall aesthetic you’re aiming for.
Ultimately, the right wax for your project will harmonize with the existing colors and textures while enhancing the desired style and ambiance. By carefully considering the finish, base color, and distressing level, you can confidently select a wax that will bring your creative vision to life.
Preparing Your Surface
Before applying folk art home decor wax, proper surface preparation is essential to ensure optimal adhesion and a flawless finish. Whether you’re working with raw wood, painted furniture, or metal accents, the following steps will help you create a suitable foundation for the wax application:
- Clean the Surface: Begin by thoroughly cleaning the surface to remove any dust, dirt, or residue. A mild detergent and water solution can effectively eliminate grime and grease, while a gentle degreaser is ideal for removing oily buildup. Once cleaned, allow the surface to dry completely before proceeding.
- Sand and Smooth: If the surface has imperfections, rough patches, or an existing finish, consider sanding it lightly to create a smooth, uniform base for the wax. This step is particularly important when working with painted or varnished surfaces, as it promotes better wax adhesion and prevents uneven absorption.
- Remove Excess Dust: After sanding, use a tack cloth or a damp microfiber cloth to remove any sanding dust or debris. This step is crucial for achieving a clean, blemish-free surface, as residual dust can interfere with the wax application and result in an uneven finish.
- Optional Distressing: If you desire a distressed or antiqued look, this is the stage at which you can create intentional wear and character on your surface. Techniques such as sanding edges, creating small dents, or using a wire brush to simulate natural wear can add authenticity to the final appearance once the wax is applied.
By diligently preparing your surface, you set the stage for a successful wax application and ensure that the transformative effects of the wax are showcased to their fullest potential. This meticulous approach not only enhances the visual appeal of your project but also contributes to the longevity and durability of the wax finish.
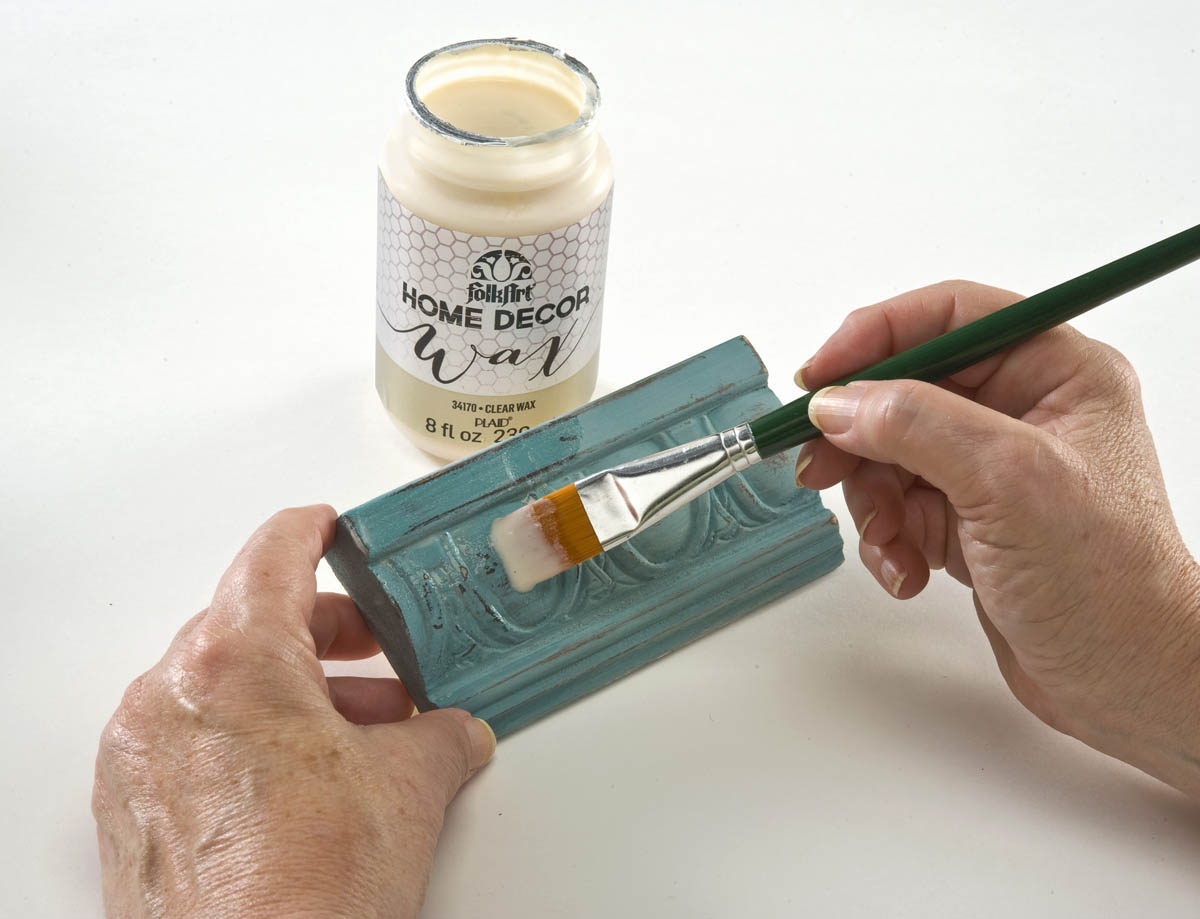
Apply Folk Art Home Decor Wax with a soft cloth in a thin, even layer. Let it dry for 24 hours, then buff with a clean cloth for a smooth, protective finish on your project.
Applying the Wax
Once your surface is meticulously prepared, the application of folk art home decor wax can begin. This stage is where the magic happens, as the wax imparts depth, character, and a tactile allure to your project. Follow these steps to achieve a professional and polished wax finish:
- Use a Quality Wax Brush: Select a high-quality wax brush with natural bristles, as these are ideal for applying wax evenly and reaching intricate details. The bristles should be soft and pliable, allowing for smooth and controlled application.
- Apply in Sections: Work in manageable sections to ensure thorough coverage and prevent the wax from drying before it can be buffed. A small, consistent amount of wax applied in one area at a time will yield the best results.
- Apply the Wax: Dip the wax brush into the jar of wax, ensuring that only a small amount of wax is loaded onto the bristles. Using light pressure, apply the wax in a circular motion, working it into the surface and any decorative details. The goal is to achieve an even, thin layer of wax across the entire section.
- Blend and Feather: As you apply the wax, blend and feather the edges to create a seamless transition. This technique prevents visible lines or buildup of wax at the section borders, ensuring a uniform finish.
- Remove Excess Wax: After applying wax to a section, use a lint-free cloth to gently remove any excess wax, buffing the surface lightly. This step helps to eliminate streaks and uneven buildup, leaving behind a smooth, consistent layer of wax.
It’s important to approach the wax application with patience and attention to detail, as the manner in which the wax is applied directly influences the final appearance of your project. By following these steps methodically, you can achieve a professional-quality wax finish that enhances the character and beauty of your creation.
Buffing and Finishing
Once the wax has been applied to your satisfaction, the next crucial step is buffing and finishing the surface. This process not only enhances the visual appeal of the waxed area but also ensures that the protective qualities of the wax are fully realized. Follow these steps to achieve a lustrous and durable wax finish:
- Allow the Wax to Cure: After applying the wax, allow it to cure for the specified duration recommended by the manufacturer. This curing time allows the wax to bond with the surface and achieve its full protective and aesthetic potential.
- Buff the Surface: Using a clean, lint-free cloth or a wax buffing brush, gently buff the waxed surface in a circular motion. The friction generated by buffing helps to distribute the wax evenly, remove any residual haze, and create a subtle sheen on the surface.
- Adjust the Sheen: Depending on the level of sheen you desire, you can adjust the buffing intensity. For a soft, matte finish, a gentle buffing motion is sufficient. If you prefer a slightly higher sheen, increase the pressure and speed of your buffing strokes.
- Inspect for Uniformity: As you buff the surface, inspect it under different lighting conditions to ensure that the wax is distributed uniformly and that the desired finish has been achieved. Address any areas that appear uneven or lackluster by applying additional wax and buffing as needed.
By meticulously buffing the waxed surface, you not only enhance its visual allure but also fortify its protective properties. The buffing process ensures that the wax forms a cohesive, resilient layer that safeguards the underlying surface while showcasing its inherent beauty.
Tips and Tricks for Using Folk Art Home Decor Wax
Mastering the art of applying folk art home decor wax involves understanding a few tips and tricks that can elevate your projects and streamline the waxing process. These insights can help you achieve professional-looking results while maximizing the transformative potential of the wax. Consider the following tips and tricks as you embark on your waxing endeavors:
- Layering for Depth: Experiment with layering different wax colors to create depth and dimension. For example, applying a base coat of clear wax followed by strategic accents of dark wax can produce a nuanced, aged effect with rich undertones.
- Focus on Details: When waxing intricate or carved surfaces, use a smaller, pointed brush to ensure that the wax reaches recessed areas and decorative details. This meticulous approach highlights the craftsmanship of the piece and adds visual interest.
- Custom Tinting: Customize the color of your wax by mixing clear wax with a small amount of acrylic or chalk paint. This technique allows you to tailor the wax color to complement your project’s palette, achieving a cohesive and harmonious finish.
- Wax Resist Technique: Explore the wax resist technique by applying wax to specific areas before painting or staining. When the surface is treated with wax, subsequent layers of paint or stain can be selectively removed, revealing the underlying finish for a distressed or weathered effect.
- Protective Topcoat: For high-traffic or frequently handled surfaces, consider applying a clear polyurethane topcoat over the wax to provide additional protection and durability. This extra layer safeguards the waxed finish from abrasion and moisture, prolonging its beauty.
- Practice on Sample Boards: Before embarking on a large project, practice different waxing techniques and color combinations on sample boards or small items. This allows you to refine your approach and visualize the impact of various wax applications before committing to your main project.
By incorporating these tips and tricks into your waxing process, you can expand your creative possibilities and achieve nuanced, professional-quality results. Embracing experimentation and innovation with folk art home decor wax opens the door to a myriad of artistic expressions and decorative transformations.
Conclusion
Embracing the art of using folk art home decor wax empowers DIY enthusiasts and artisans to breathe new life into their projects, infusing them with character, charm, and a touch of nostalgia. The versatility of this transformative medium extends beyond its aesthetic impact, as it also provides a protective layer that enhances the durability and longevity of surfaces.
By understanding the nuances of selecting, preparing, applying, and finishing with home decor wax, individuals can embark on a journey of creative exploration, reimagining furniture, decor accents, and craft projects with a distinctive, time-worn allure. The ability to customize wax colors, experiment with layering techniques, and employ innovative applications such as the wax resist method expands the creative horizons, allowing for unique and personalized expressions of style.
Furthermore, the accessibility and user-friendly nature of folk art home decor wax make it an ideal medium for both seasoned artisans and beginners seeking to elevate their DIY endeavors. Its forgiving nature and the forgiving nature of wax enable individuals to experiment, refine their techniques, and achieve professional-quality results with relative ease.
As you embark on your waxing adventures, remember that patience, attention to detail, and a spirit of experimentation are your allies. Whether you’re aiming to create a subtly aged patina or a bold, weathered finish, the art of using folk art home decor wax invites you to infuse your projects with a timeless, rustic elegance that transcends trends and captivates the imagination.
Ultimately, the journey of using folk art home decor wax is a celebration of creativity, craftsmanship, and the enduring allure of vintage and rustic aesthetics. It invites individuals to embrace the beauty of imperfection, honor the passage of time, and imbue their creations with a sense of history and character.
So, as you embark on your next DIY endeavor, consider the transformative potential of folk art home decor wax, and let its enchanting effects transport you to a world of timeless elegance and artistic expression.
Frequently Asked Questions about How To Use Folk Art Home Decor Wax
Was this page helpful?
At Storables.com, we guarantee accurate and reliable information. Our content, validated by Expert Board Contributors, is crafted following stringent Editorial Policies. We're committed to providing you with well-researched, expert-backed insights for all your informational needs.


0 thoughts on “How To Use Folk Art Home Decor Wax”