Home>Garden Essentials>How To Plant Ivy For Ground Cover
Garden Essentials
How To Plant Ivy For Ground Cover
Modified: May 6, 2024
Learn how to plant ivy for ground cover in your garden and create a lush and beautiful landscape. Discover the best techniques and tips for successful ivy planting.
(Many of the links in this article redirect to a specific reviewed product. Your purchase of these products through affiliate links helps to generate commission for Storables.com, at no extra cost. Learn more)
Introduction
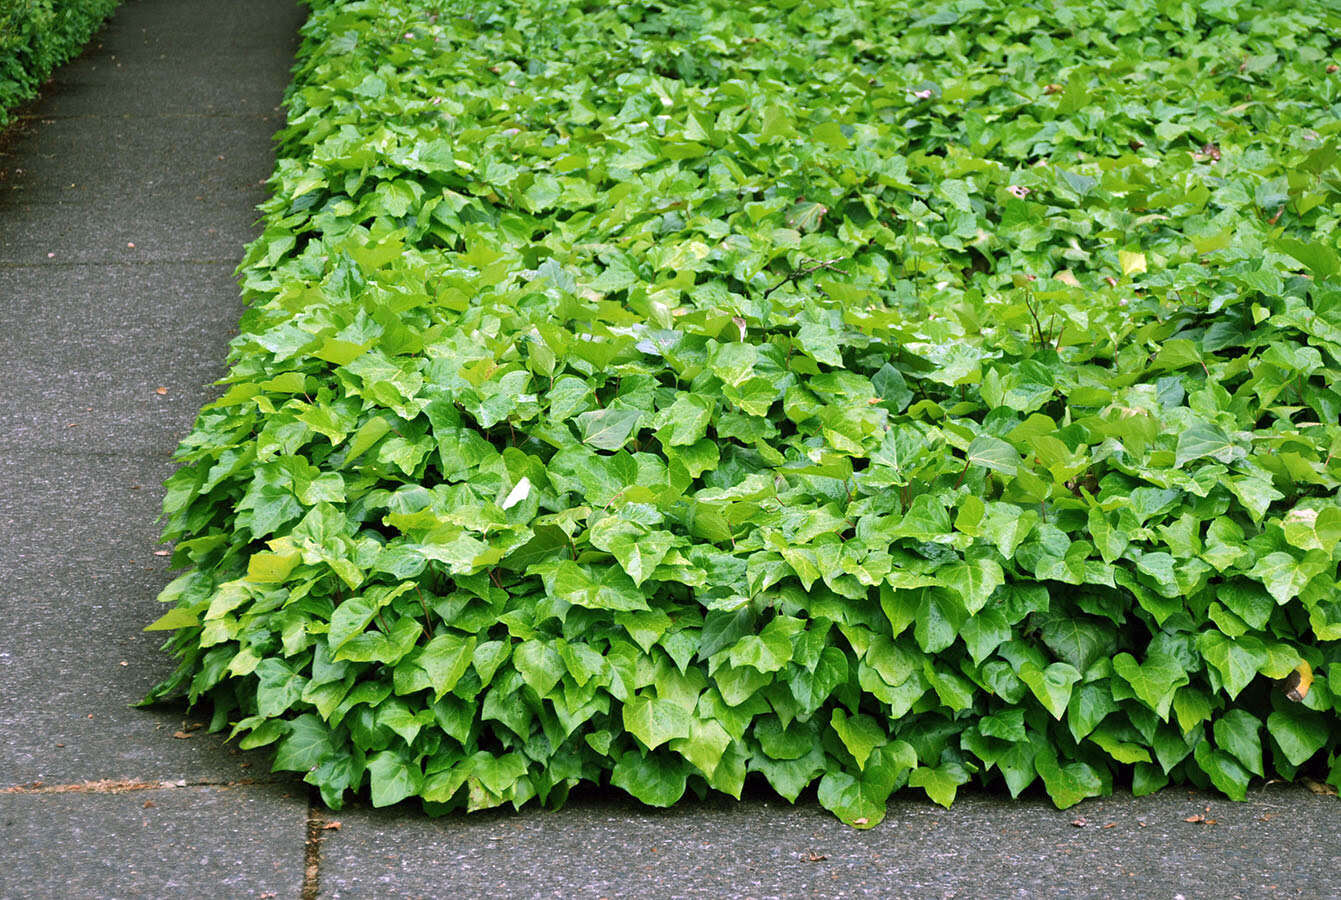
Welcome to the world of gardening, where the beauty and tranquility of nature can be nurtured right in your own backyard. Whether you have a sprawling garden or a cozy balcony, adding greenery can transform any space into a soothing oasis. One plant that is particularly versatile and popular for its rich foliage is ivy.
In this article, we will guide you through the process of planting ivy as a ground cover. This type of ivy is perfect for filling in gaps between larger plants, creating a lush carpet effect, and adding a touch of elegance to your garden. We will cover everything from choosing the right ivy species to caring for and propagating your ivy plants.
Before we dive into the details, it’s worth mentioning that ivy is known for its fast growth and ability to climb walls and structures. While this can be a desirable feature, it’s important to plan its location and growth carefully to ensure it doesn’t become too invasive and overshadow other plants in your garden.
Now, let’s get started on our journey to discover how to plant ivy for ground cover!
Key Takeaways:
- Choose the right ivy species for your garden based on its unique characteristics and your local climate to ensure successful ground cover and long-lasting beauty.
- Provide proper care for your ivy plants by watering, mulching, and pruning regularly to maintain their health and vibrant appearance, creating a lush and picturesque garden.
Read more: How To Trim Ivy Ground Cover
Choosing the Right Ivy Species
When it comes to ivy, there are numerous species to choose from, each with its own unique characteristics and growth habits. Selecting the right ivy species is crucial to ensure successful ground cover and a harmonious garden environment.
One popular choice for ground cover is English ivy (Hedera helix), known for its vigorous growth and ability to quickly fill in spaces. Its glossy, dark green leaves provide a lush and attractive backdrop. However, it’s important to note that English ivy can be invasive in some regions, so be sure to check with your local gardening authority before planting.
If you prefer a more low-maintenance option, Algerian ivy (Hedera canariensis) is a great alternative. It has larger, leathery leaves and grows at a slower pace compared to English ivy. Algerian ivy is also more tolerant of heat and drought, making it a suitable choice for warmer climates.
For a unique touch, consider variegated ivy varieties such as ‘Goldchild’ or ‘Gloire de Marengo’. These ivies have leaves with beautiful splashes of cream, yellow, or white, adding visual interest to your ground cover.
Another option worth exploring is Boston ivy (Parthenocissus tricuspidata). While technically not an ivy, it offers stunning fall foliage colors, with leaves transitioning from deep green to vibrant shades of red and orange. Boston ivy is an excellent choice if you want to incorporate autumnal tones into your garden design.
Remember to consider the climate and specific growing conditions of your area when selecting an ivy species. Some varieties may thrive in shade, while others prefer more sunlight. By choosing the right ivy species, you can ensure long-lasting beauty and successful ground cover.
Selecting the Ideal Location
Now that you have chosen the perfect ivy species, it’s time to find the ideal location in your garden for planting. Consider the following factors to ensure that your ivy thrives and provides the desired ground cover:
- Sunlight: Most ivy species prefer partial shade to full shade, although some varieties can tolerate more sun. Observe the sunlight patterns in your garden throughout the day and select a location that matches your ivy’s light requirements.
- Soil Type: Ivy thrives in well-drained soil that is rich in organic matter. Conduct a soil test to determine the pH level and nutrient content. Ideally, the soil should be slightly acidic to neutral (pH 6-7).
- Moisture: While ivy prefers moist soil, it’s important to strike a balance and avoid waterlogged areas. Ensure that the location you choose has adequate drainage to prevent root rot.
- Support: Consider whether your ivy will have a structure to climb, such as a wall or fence, or if it will solely serve as ground cover. If you plan to provide support, select a location near the structure.
- Competition: Take note of existing plants and their root systems in the area. Avoid planting ivy too close to other plants, as they may compete for water and nutrients.
Additionally, it’s important to be mindful of ivy’s invasive potential. If you live in an area where ivy is considered invasive, select a location that does not have direct contact with native vegetation, as ivy can spread rapidly and smother other plants in its path.
By carefully considering these factors, you can choose an ideal location for your ivy ground cover, ensuring optimal growth and a visually appealing garden.
Preparing the Soil
Before planting your ivy, it’s important to prepare the soil to create the best possible conditions for its growth. Here are the steps to follow when preparing the soil:
- Clear the area: Begin by removing any existing vegetation, debris, or weeds from the planting area. This will help prevent competition for nutrients and ensure that the ivy has ample space to spread.
- Loosen the soil: Use a garden fork or tiller to loosen the soil to a depth of about 6-8 inches. This will improve drainage and allow the roots to establish more easily.
- Amend the soil: If the soil is poor in quality, consider adding organic matter to improve its fertility and structure. This can include compost, well-rotted manure, or peat moss. Mix the organic matter into the soil thoroughly.
- Test the soil pH: Use a soil testing kit to determine the pH level of the soil. Ivy prefers slightly acidic to neutral soil with a pH range of 6-7. If the pH is too acidic or alkaline, you may need to adjust it by adding lime to raise the pH or sulfur to lower it.
- Smooth the soil surface: Once the amendments are mixed in, use a rake to level and smooth the soil surface. This will provide a more even base for planting your ivy.
By taking the time to properly prepare the soil, you are setting the stage for your ivy plants to flourish and establish a healthy root system.
Planting Ivy
Now that your soil is prepared, it’s time to proceed with planting your ivy for ground cover. Follow these steps to ensure successful establishment:
- Dig planting holes: Dig holes that are slightly larger and deeper than the root ball of the ivy plant. Space the holes according to the recommended spacing for the specific ivy species you are planting, usually around 12-18 inches apart.
- Place the ivy plants: Gently remove the ivy plants from their containers and place them in the prepared holes. Ensure that the top of the root ball is level with or slightly above the soil surface.
- Backfill the holes: Fill the holes with the soil you removed while digging, gently firming it around the roots. Avoid compacting the soil too tightly, as this can hinder root growth.
- Water thoroughly: After planting, give your ivy plants a deep watering to settle the soil and encourage root establishment. Provide enough water to ensure that the soil is evenly moist but not soaked.
- Apply mulch: Spread a layer of organic mulch, such as shredded bark or compost, around the base of the ivy plants. This will help conserve moisture, suppress weed growth, and regulate soil temperature.
It’s important to note that if you’re using ivy as ground cover between existing plants, create a small planting hole around the stem of each existing plant and follow the same process of planting the ivy. Take care not to damage the roots or stems of the established plants.
By properly planting your ivy and providing adequate water and mulch, you are giving it the best start for vigorous growth and attractive ground cover in your garden.
Read more: How To Kill Ivy Ground Cover
Watering and Mulching
Watering and mulching are key aspects of maintaining healthy and thriving ivy ground cover. Here are some guidelines to follow:
Watering:
- Establishment phase: After planting, water your ivy plants deeply and consistently to help them establish a strong root system. Aim to keep the soil evenly moist, but not waterlogged. This is especially important during the first few months.
- Mature plants: Once your ivy has established itself, it is relatively drought-tolerant. However, it’s still essential to monitor soil moisture levels during dry periods and provide supplemental watering when necessary.
- Timing: Water in the early morning or late afternoon to minimize evaporation and allow the foliage to dry before evening, which can help prevent disease.
Mulching:
- Apply mulch: Spread a layer of organic mulch, such as shredded bark or compost, around the base of the ivy plants. This helps to retain soil moisture, suppress weed growth, and regulate soil temperature.
- Mulch depth: Apply a layer of mulch that is approximately 2-3 inches deep, taking care to keep it a few inches away from the stems of the ivy plants to prevent excess moisture and potential rotting.
- Mulch renewal: Every year or as needed, check the mulch layer and replenish if necessary. Over time, mulch may break down and thin out, so adding a fresh layer will ensure its effectiveness.
By providing adequate watering and mulching, you can maintain optimal soil moisture levels and enhance the overall health and appearance of your ivy ground cover.
When planting ivy for ground cover, make sure to choose a well-drained location with partial to full shade. Water the ivy regularly, especially during dry periods, and avoid over-fertilizing to prevent excessive growth.
Caring for Ivy Plants
Proper care is essential for keeping your ivy ground cover healthy and vibrant. Here are some important care tips to follow:
Fertilization:
- Timing: Fertilize your ivy plants in the spring, before the growing season begins. Avoid fertilizing in the fall, as this can stimulate new growth that may be vulnerable to winter cold.
- Fertilizer type: Use a balanced, slow-release fertilizer specifically formulated for foliage plants. Follow the package instructions for application rates and methods.
- Application: Apply the fertilizer evenly around the base of the plants, taking care not to allow it to come into direct contact with the leaves or stems.
Weed control:
- Regular maintenance: Keep an eye out for weeds and remove them promptly. Weeds can compete with ivy for water, nutrients, and space, so it’s important to stay vigilant.
- Hand pulling: For small weeds, gently hand pull them, taking care to remove the entire root system. This helps prevent regrowth.
- Mulching: Applying a layer of organic mulch around the base of the ivy plants helps suppress weed growth and reduces the need for frequent weeding.
Monitoring pests and diseases:
- Pest control: Watch for common pests such as aphids, spider mites, and scale insects. If detected, treat the infestations promptly with organic insecticidal soap or horticultural oil.
- Disease management: Ivy is generally resistant to most diseases. However, keep an eye out for any signs of leaf spots or fungal infections. If necessary, prune affected areas and provide proper air circulation to minimize disease spread.
Regular pruning:
- Maintenance pruning: Trim back any overgrown or straggly branches to encourage bushier growth and maintain a neat appearance. Regular pruning also helps control the spread of ivy in areas where you don’t want it to grow.
- Timing: Prune ivy during the spring or early summer, when new growth is just beginning. Avoid pruning in late fall or winter, as this can leave the plants vulnerable to cold damage.
- Tool sterilization: Clean and sterilize pruning tools before and after use to prevent the spread of disease.
By following these care guidelines, you can ensure that your ivy ground cover remains healthy, attractive, and free from common issues.
Dealing with Common Problems
While ivy is a resilient and adaptable plant, it may occasionally encounter some common problems. Here’s how to address them:
Overwatering:
- Symptoms: Yellowing or wilting foliage, root rot, and a damp, foul-smelling soil.
- Solution: Adjust your watering practices to ensure that the soil is consistently moist but not waterlogged. Improve drainage if necessary by amending the soil or reevaluating the planting location.
Underwatering:
- Symptoms: Dried-out or yellowing leaves, wilting foliage, and stunted growth.
- Solution: Increase the frequency and duration of your watering, especially during hot or dry periods. Ensure that the soil is evenly moist and provide supplemental irrigation as needed.
Invasive growth:
- Symptoms: Ivy spreading rapidly and overtaking other plants or structures.
- Solution: Regularly monitor your ivy for any signs of invasive growth and take immediate action. Prune back aggressively, pulling up any stray runners or stems that are growing out of control. Consider installing physical barriers, such as root barriers or underground edging, to contain the growth.
Pest infestations:
- Symptoms: Discolored or distorted leaves, visible pests on the foliage, and damage to the plant.
- Solution: Identify the specific pest causing the issue and treat it accordingly. Use organic insecticidal soaps or horticultural oils to control common pests like aphids, spider mites, or scale insects. Follow the product instructions carefully to ensure safe and effective use.
Disease outbreaks:
- Symptoms: Spots on the leaves, discoloration, wilting, or fungal growth.
- Solution: Prune infected leaves or stems promptly to prevent the spread of the disease. Improve air circulation around the plants by spacing them adequately and avoiding overcrowding. If necessary, apply fungicides labeled for use on ivy plants, following the instructions provided.
By promptly addressing these common problems, you can help ensure the health and vitality of your ivy ground cover, maintaining its beauty and functionality in your garden.
Pruning Ivy
Pruning ivy is an important part of maintaining its health, appearance, and preventing it from becoming too invasive. Here are some guidelines for pruning your ivy:
- Maintenance pruning: Regularly trim back overgrown or straggly branches to encourage bushier growth and maintain a neat appearance. This helps control the spread of ivy in areas where you don’t want it to grow.
- Timing: It’s best to prune ivy during the spring or early summer when new growth is just beginning. Avoid pruning in late fall or winter, as this can leave the plants vulnerable to cold damage.
- Tools: Use sharp pruning shears or handheld pruners for small to medium-sized branches. For larger branches or dense growth, you may need loppers or a pruning saw. Ensure that your tools are clean and sterilized to prevent the spread of disease.
- Pruning techniques: When pruning, make clean cuts just above a leaf node or leaf set to encourage new growth. Remove any dead, diseased, or damaged branches. Additionally, trim back any stems that are growing too far away from the intended area or interfering with other plants or structures.
- Training and shaping: If you want your ivy to climb a specific structure, such as a trellis or wall, guide the growth by gently tying the branches to the support or using plant ties. Gradually redirect any errant growth towards the desired direction.
- Disposing of pruned material: Properly dispose of the pruned ivy branches, as they can still root if left on the ground. Either collect and dispose of the trimmings in yard waste bags or place them in a compost bin if you’re confident in your composting practices.
By incorporating regular pruning into your ivy care routine, you can keep the plants in check, maintain their desired appearance, and prevent them from overpowering your garden.
Read more: How To Plant Sedum Ground Cover
Propagating Ivy
If you want to expand your ivy ground cover or share it with others, propagating your ivy plants is a great option. Here are some methods for propagating ivy:
Propagation by stem cuttings:
- Select healthy stems: Choose mature, healthy stems from your existing ivy plant. Look for stems with several sets of leaves and no signs of damage or disease.
- Prepare the cuttings: Take 4-6 inch cuttings from the selected stems, making the cut just below a leaf node. Remove the lower sets of leaves, leaving only a few leaves near the top of the cutting.
- Rooting hormone (optional): If desired, you can dip the cut end of the stem in a powdered rooting hormone to promote root growth. This step is optional but can improve the chances of successful rooting.
- Plant the cuttings: Insert the prepared cuttings into a well-draining potting mix or a mixture of perlite and vermiculite. Ensure that at least one leaf node is buried in the soil and the remaining leaves are above the soil line.
- Maintain humidity: Keep the cuttings in a warm, humid environment with indirect sunlight. You can cover them with a plastic bag or use a propagation dome to create a mini-greenhouse effect.
- Water regularly: Keep the potting mix consistently moist but not waterlogged. Mist the cuttings daily to maintain humidity levels and prevent them from drying out.
- Root development: Over the course of several weeks, the cuttings should develop roots. You can gently tug on the base of the cutting to check for resistance, indicating root growth.
- Transplanting: Once the cuttings have established a healthy root system, typically after 6-8 weeks, they can be transplanted into individual pots or directly into the garden soil.
Propagation by division:
- Select a mature ivy plant: Choose a mature ivy plant with multiple clumps or dense growth.
- Dig up the plant: Carefully dig up the entire plant, taking care to minimize damage to the roots.
- Divide the plant: Gently separate the clumps or sections of the plant, ensuring that each division has a healthy portion of roots and foliage.
- Replant: Transplant the divided sections into individual pots or directly into prepared garden soil. Water thoroughly to settle the soil and encourage root establishment.
By utilizing these propagation methods, you can multiply your ivy plants and expand your ground cover, creating a lush and picturesque garden.
Conclusion
Planting ivy for ground cover is a wonderful way to add beauty, versatility, and texture to your garden. With its lush foliage and ability to quickly fill in empty spaces, ivy can transform your garden into a tranquil oasis. By following the steps outlined in this guide, you can successfully plant, care for, and propagate ivy, creating a stunning and thriving ground cover.
From selecting the right ivy species and choosing an ideal location to preparing the soil and planting the ivy, each step is essential for the success of your ground cover. Regular watering, proper mulching, and timely pruning will help keep your ivy plants healthy and attractive. Additionally, being vigilant about common problems such as overwatering, invasive growth, pests, and diseases will ensure that your ivy remains robust.
If you wish to expand your ivy ground cover or share its beauty with others, propagating ivy through stem cuttings or division is a rewarding and straightforward process. It allows you to multiply your ivy plants and extend their reach in your garden or share them with friends and family.
Remember to consider the specific needs of your chosen ivy species and your local climate when implementing the care and maintenance guidelines. Different ivy species may have varying light and water requirements, so it’s important to tailor your care practices accordingly.
By following these guidelines and infusing your gardening expertise, you can create a thriving and visually captivating ivy ground cover. So, get your hands dirty, embrace the joy of gardening, and enjoy the beauty that ivy brings to your outdoor space.
Happy gardening!
Now that you've mastered planting ivy for ground coverage, why stop there? Expand your gardening skills with our guide on choosing other vibrant and hardy ground cover plants. These selections not only complement ivy but also bring variety and color to your outdoor spaces. Ready to turn your garden into a verdant paradise? Dive into our detailed article next, and keep your green thumb thriving!
Frequently Asked Questions about How To Plant Ivy For Ground Cover
Was this page helpful?
At Storables.com, we guarantee accurate and reliable information. Our content, validated by Expert Board Contributors, is crafted following stringent Editorial Policies. We're committed to providing you with well-researched, expert-backed insights for all your informational needs.

0 thoughts on “How To Plant Ivy For Ground Cover”