Home>Ideas and Tips>Backyard Chicken Coop Construction for Urban Farming Solutions
Ideas and Tips
Backyard Chicken Coop Construction for Urban Farming Solutions
Published: September 2, 2024
Learn how to build a backyard chicken coop with our step-by-step guide. Enhance your urban farming with fresh eggs and a self-sufficient lifestyle.
(Many of the links in this article redirect to a specific reviewed product. Your purchase of these products through affiliate links helps to generate commission for Storables.com, at no extra cost. Learn more)
Introduction
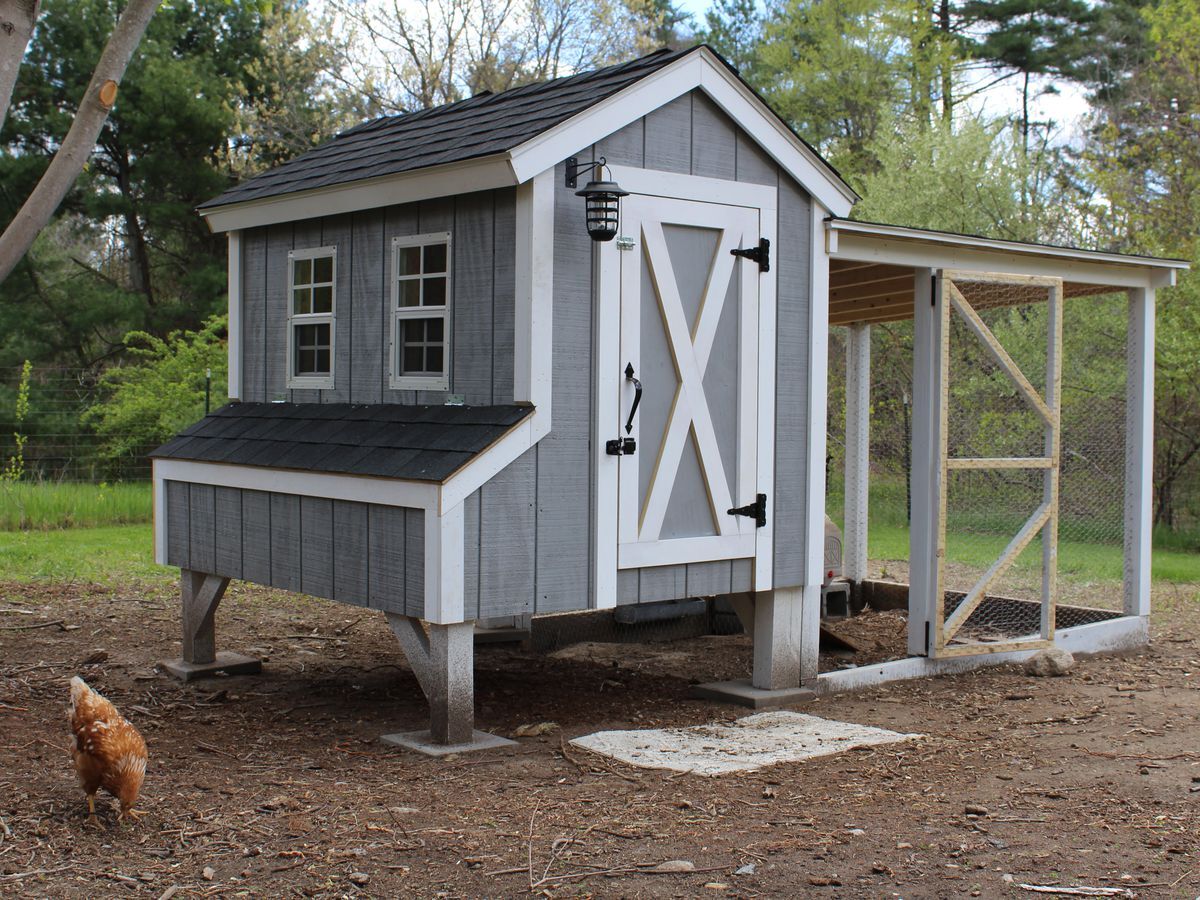
Raising backyard chickens has become an increasingly popular hobby and sustainable living practice in urban areas. Not only do chickens provide fresh eggs and companionship, but they also contribute to a more self-sufficient lifestyle. However, building a safe and functional chicken coop is crucial for the health and well-being of your birds. In this article, we will guide you through the process of constructing a backyard chicken coop, addressing various aspects from planning to completion.
Why Build Your Own Chicken Coop?
Building your own chicken coop offers several advantages. Firstly, it allows you to tailor the design to your specific needs and the needs of your chickens. This includes considerations such as space, ventilation, insulation, and predator protection. Secondly, constructing a coop yourself can be cost-effective compared to purchasing a pre-made one. Lastly, the process of building a coop can be a rewarding DIY project that enhances your connection with nature and your urban environment.
Step 1: Planning Your Chicken Coop
Before you start building, it's essential to plan your chicken coop meticulously. Here are some key considerations:
Space Requirements
The size of your coop will depend on the number of chickens you plan to keep. Generally, each chicken needs about 4 square feet of coop space, but this can vary depending on the breed and your specific needs. Larger coops provide more room for your chickens to move around comfortably and can also accommodate additional features like nesting boxes and roosts.
Climate Considerations
The climate where you live will significantly influence the design of your coop. For example, in colder climates, you'll need to ensure that the coop is well-insulated to keep your chickens warm. In warmer climates, adequate ventilation is crucial to prevent overheating.
Read more: What To Put On Floor Of Chicken Coop
Materials
The materials you choose for your coop will depend on your budget, availability, and personal preference. Wood is a popular choice due to its affordability and availability. However, other materials like metal or plastic can also be used. Consider using durable materials that can withstand weather conditions and potential predator attacks.
Location
The location of your coop is also important. Ideally, it should be about 30 feet away from your house to prevent noise and odors from disturbing you. Additionally, ensure that the area is clear of any vegetation and levelled to prevent water accumulation.
Step 2: Preparing the Ground and Foundation
Once you have decided on the location and size of your coop, it's time to prepare the ground and lay the foundation.
Clearing the Area
Clear any vegetation from the area where you plan to build your coop. This will help prevent any potential issues with pests or diseases.
Read more: Starting A Backyard Orchard With Fruit Trees
Marking Out the Ground
Measure out the area where you want to build your coop. Use stakes and twine to mark out the dimensions of your coop.
Digging Trenches
Dig trenches at least 8 inches deep around the perimeter of your marked area. These trenches will help create a solid foundation for your coop.
Filling Trenches with Concrete
Fill the trenches with concrete and let it cure. This will provide a stable base for your coop.
Laying Bricks
Lay bricks around the perimeter of the cured concrete to create a solid foundation for your coop.
Step 3: Building Your Coop Frame
With the foundation in place, it's time to start building the frame of your coop.
Cutting Lumber
Cut the lumber according to your plan, ensuring that you account for the thickness of the boards when cutting.
Assembling the Base
Assemble the base of your coop using 2×4 boards. Screw the pieces together to form a sturdy base.
Attaching Vertical Posts
Attach vertical posts to the base to provide support for the horizontal beams.
Installing Horizontal Beams
Install horizontal beams to create the structure of your coop. Ensure that these beams are securely attached to the vertical posts.
Framing for Door and Windows
Frame for the door and windows, making sure they are securely attached to the main structure.
Building Roof Support
Build roof support by attaching horizontal beams across the top of your coop. This will provide additional strength and stability.
Step 4: Outer Sheathing of Walls and Roof
After constructing the frame, it's time to add sheathing to protect your coop from weather conditions.
Cutting Plywood
Cut plywood sheets according to your plan, ensuring they fit snugly over the frame.
Installing Sheathing
Install plywood sheets over the walls and roof of your coop. Cut openings in the sheathing for doors and windows.
Step 5: Insulation and Internal Cladding
Insulation is crucial for maintaining a comfortable temperature inside your coop.
Cutting Insulating Material
Cut insulating material (such as foam board or straw) according to your plan.
Installing Insulation
Install insulation using appropriate adhesive or staples. Ensure that all gaps are sealed to prevent heat loss.
Installing Cladding
Install cladding material (such as plywood or oriented strand board) over the insulation. Trim the cladding material for a smooth finish.
Step 6: Nesting Boxes
Nesting boxes are essential for laying hens to lay their eggs safely and comfortably.
Building Nesting Box Frame
Build a frame for nesting boxes using 2×4 boards. Ensure that these frames are securely attached to the main structure of your coop.
Installing Sheathing on Nesting Boxes
Install plywood sheets over the nesting box frames, ensuring they are well-insulated and dry.
Adding Nesting Material
Line nesting boxes with soft material like hay or straw to make them comfortable for your chickens.
Step 7: Installing a Window and Litter Tray
A window provides natural light and ventilation, while a litter tray helps keep your coop clean.
Constructing Window Elements
Construct window elements using materials like plywood or plastic. Install them in spaces where they will provide maximum natural light.
Installing Litter Tray
Install a litter tray under roosts or nesting areas to collect droppings easily. This helps maintain hygiene within your coop.
Step 8: Predator Protection
Predators like raccoons, foxes, and hawks can threaten your chickens. Here are some steps you can take to protect them:
Locking the Door
Use a secure latch or lock on the door to prevent predators from entering. A spring-lock latch is recommended as it provides extra security against dexterous animals like raccoons.
Checking for Chinks and Crannies
Inspect your coop regularly for any chinks or crannies where predators might squeeze through. Seal these gaps with metal mesh or hardware cloth to prevent entry.
Using Hardware Cloth
Cover any openings with hardware cloth to prevent predators from reaching inside. This includes vents under roof awnings and any gaps around windows or doors.
Step 9: Final Touches
Once you've completed all steps, add some final touches to ensure your coop is safe and functional:
Adding Ventilation
Ensure adequate ventilation by installing vents under roof awnings or adding windows that open wide enough for airflow.
Providing Roosts
Install roosts made from dowels, branches, or other sturdy materials at least 10 inches off the ground where chickens can roost safely at night.
Adding Dropping Board
Consider adding a dropping board under roosts to keep chicken poop off the floor, making cleaning easier.
Conclusion
Building a backyard chicken coop is a rewarding DIY project that requires careful planning but offers numerous benefits for urban farmers. By following these steps—from preparing the ground to adding final touches—you can create a safe and functional home for your chickens where they can thrive while providing you with fresh eggs and companionship. Whether you're an experienced farmer or just starting out, this guide will help you navigate through each stage of constructing an ideal urban farming solution tailored specifically for raising backyard chickens.
Additional Tips
- Regular Maintenance: Regularly inspect your coop for any damage or wear and tear. Make necessary repairs promptly to ensure your chickens remain safe and healthy.
- Cleaning: Clean out droppings regularly from nesting boxes and litter trays to maintain hygiene within your coop.
- Feeding: Provide adequate food and water for your chickens. Ensure they have access to fresh water at all times.
- Health Checks: Regularly check your chickens' health by monitoring their behavior, appetite, and egg production.
By following these guidelines and tips, you'll be well on your way to creating a thriving urban farm right in your backyard
Was this page helpful?
At Storables.com, we guarantee accurate and reliable information. Our content, validated by Expert Board Contributors, is crafted following stringent Editorial Policies. We're committed to providing you with well-researched, expert-backed insights for all your informational needs.


0 thoughts on “Backyard Chicken Coop Construction for Urban Farming Solutions”