Home>Ideas and Tips>DIY Guide to Installing a Bathroom Shower with a Pebble Tile Floor

Ideas and Tips
DIY Guide to Installing a Bathroom Shower with a Pebble Tile Floor
Published: August 29, 2024
Learn how to install a stunning pebble tile floor in your bathroom shower with our step-by-step DIY guide. Perfect for both beginners and seasoned DIYers.
(Many of the links in this article redirect to a specific reviewed product. Your purchase of these products through affiliate links helps to generate commission for Storables.com, at no extra cost. Learn more)
Installing a pebble tile floor in your bathroom shower can be a rewarding DIY project, adding a unique and visually captivating element to your bathroom. However, it requires careful planning, the right tools, and some patience. In this guide, we will walk you through the steps to install a pebble tile floor in your bathroom shower, ensuring that you achieve a professional-looking result.
Materials Needed
Before you begin, it's essential to gather all the necessary materials. Here’s a comprehensive list of what you’ll need:
- Pebble floor tiles: These come in various shapes, colors, and textures. Choose the type that best suits your design preferences.
- Thinset mortar: This is the adhesive that binds the pebbles to the floor. Make sure to choose a waterproof thinset.
- Notched trowel: Used to spread the thinset mortar evenly.
- Grout: You’ll need sanded grout for wider gaps and unsanded grout for narrower gaps.
- Grout float: A tool used to spread and smooth out the grout.
- Sponge: For cleaning excess grout from the surface.
- Rubber mallet: For setting the pebbles firmly into place.
- Tile spacers (if necessary): These ensure even spacing between tiles.
- Tile saw (if necessary): For cutting tiles at the edges and corners.
- Waterproofing membrane: Essential for preventing water from seeping under the tiles.
- Grout sealer: To protect the grout from moisture and stains.
- Safety gear: Gloves, goggles, and a dust mask to protect yourself from the materials.
Read more: DIY Guide To Installing A Pebble Tile Floor
Preparation
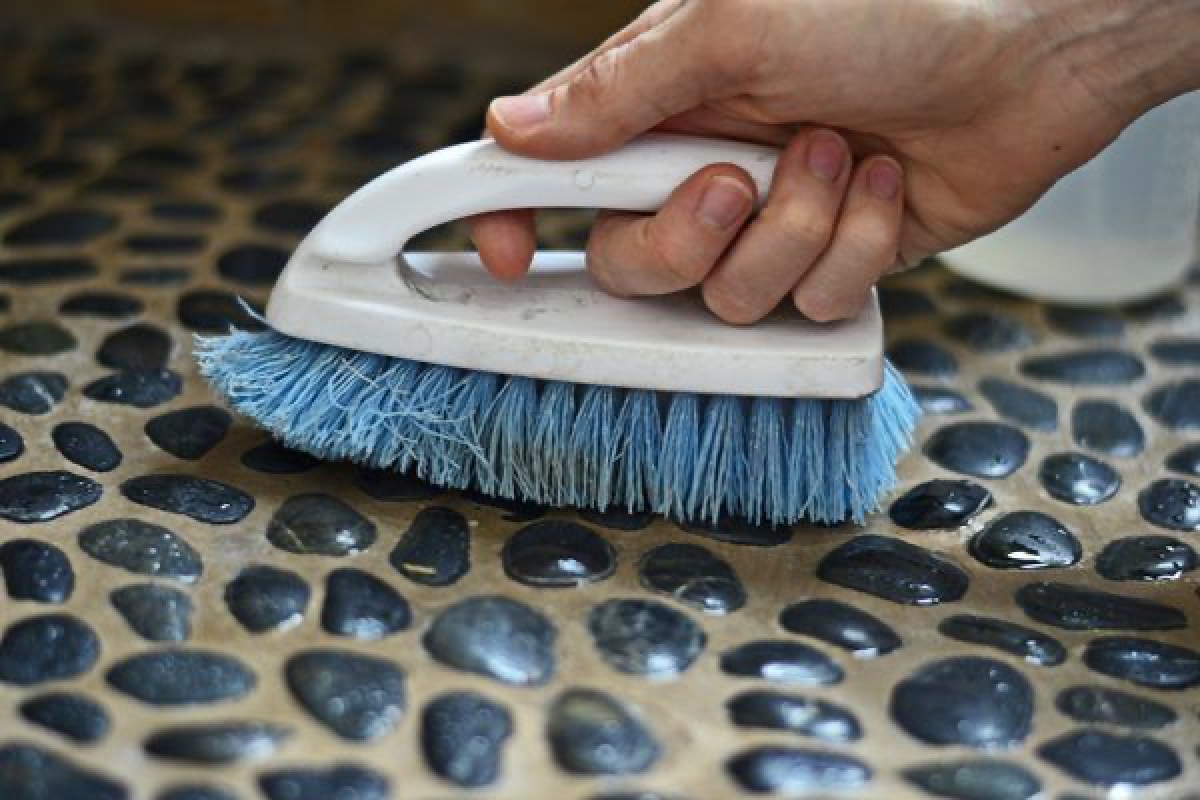
Step 1: Clean and Prepare the Shower Floor
The first step in any tiling project is to ensure that the surface is clean and free from any debris, dirt, or old adhesive. This might require some elbow grease, but it’s crucial for a smooth installation process. Use a scrub brush and a mixture of water and bleach to clean the floor thoroughly. Once clean, check the floor’s level. For tiles to lay flat and drain water properly, your shower floor needs to be as level as possible. If there are noticeable dips or rises, you might need to apply a self-leveling compound or sand down high spots.
Step 2: Apply Waterproofing Membrane
A waterproofing membrane is essential for preventing water from seeping under the tiles. Lay the membrane down according to the manufacturer’s instructions, ensuring it covers the entire floor and reaches a few inches up the walls of the shower. Ensure all seams and edges are sealed tight. This is your shower’s shield against moisture, so take your time and ensure it’s done right.
Planning Your Layout
Read more: DIY Guide To Installing A Tile Shower
Step 3: Mark Your Layout
Getting your layout right is half the battle in tiling. Imagine putting together a puzzle; you’d want to know where each piece goes before you start. To mark your layout, find the center of your shower floor by measuring the length and width of the shower and then marking the halfway points of each. Where these two lines intersect is your central point. Some people like to snap chalk lines to create visible guides, which helps keep the tile placement straight and uniform.
Starting from the center, lay out your tiles dry (without any adhesive). This is your chance to play around with the layout, see how tiles fit, and make any necessary adjustments. If you find that you’ll have very narrow tiles on one side, you may want to shift your starting point a bit to ensure you don’t have small tile slivers which can be tricky to cut and may not look as appealing. Remember to leave space for grout; tile spacers can be a huge help here, ensuring even gaps between each tile.
Mixing Thinset Mortar
Step 4: Mix Thinset Mortar
Follow the manufacturer’s instructions to mix the thinset mortar to the right consistency. It’s crucial to mix it correctly as it dries quickly and can be difficult to work with if it becomes too thick or too thin. Use a notched trowel to spread a layer of thinset onto the prepared surface. Work in small sections as thinset dries quickly.
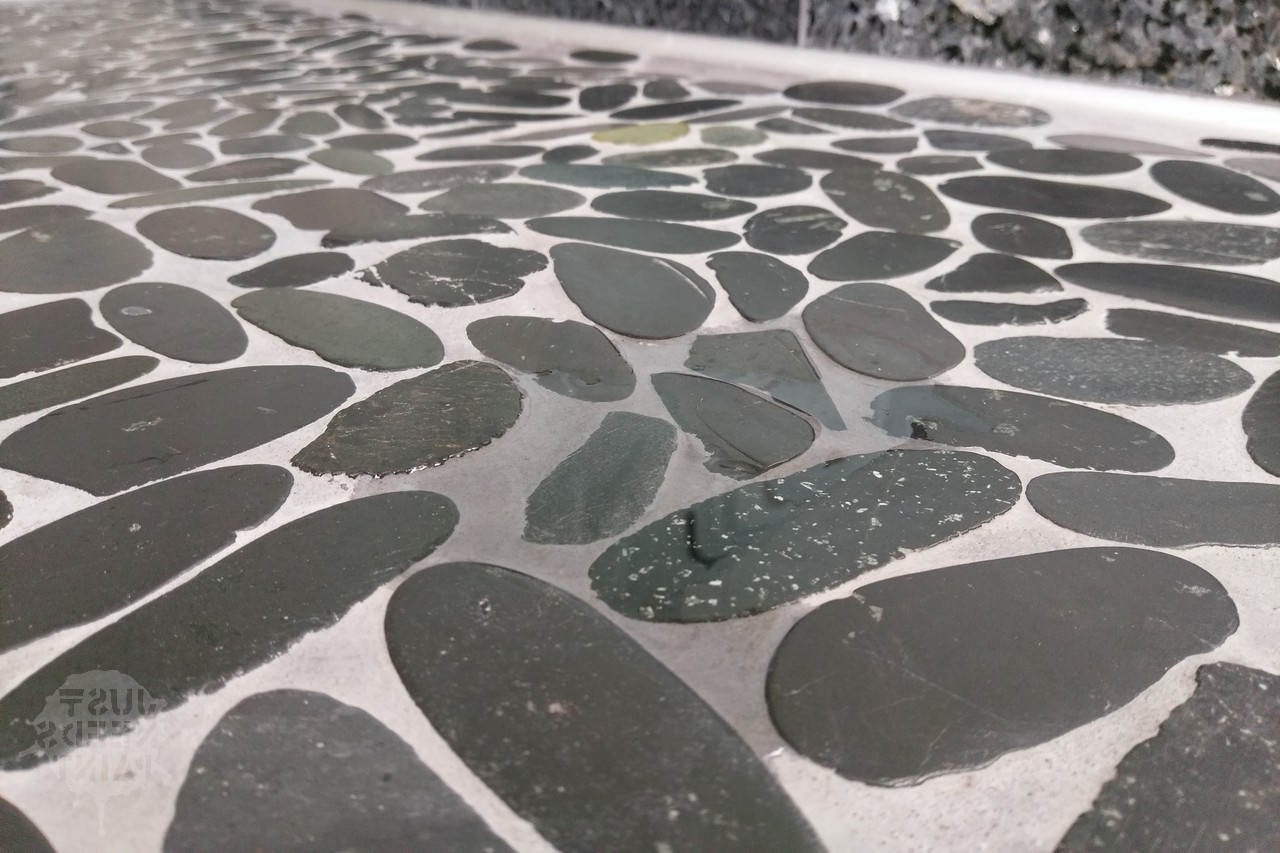
Laying Pebble Tiles
Read more: DIY Guide To Installing A Tile Floor
Step 5: Lay Pebble Tiles
Press the pebble tiles firmly into the thinset, starting from one corner and working your way out. If necessary, use tile spacers to maintain even spacing between tiles. The interlocking sheets of pebbles make it easier to create a random pattern that looks visually appealing. However, if you prefer a more uniform pattern, you can arrange the pebbles manually.
Cutting Tiles
Step 6: Cut Tiles (If Necessary)
Use a tile saw or tile cutter to cut tiles at the edges and corners to fit the desired shape. For rounded pebbles, cutting can be more challenging but is essential for achieving a seamless look. A diamond wet saw is the modern way to cut pebbles; it’s more efficient than using nippers which take lots of time.
Grouting
Read more: DIY Guide To Installing A Subway Tile Shower
Step 7: Grout the Tiles
After the thinset has dried (typically 24 hours), apply grout between the pebble tiles using a grout float. Ensure all gaps are filled and wipe away excess grout with a damp sponge. For wider gaps (1/8 inch or more), use sanded grout; for narrower gaps (less than 1/8 inch), use unsanded grout. The choice between sanded and unsanded grout depends on the width of the grout lines.
Sealing
Step 8: Seal the Surface
Once the grout has dried (usually after 48 hours), apply a sealer to protect the pebbles and grout from moisture and stains. Reapply a sealer every 6-12 months or as recommended by the manufacturer to maintain its integrity.
Final Touches
Step 9: Final Touches
After sealing, inspect your work for any imperfections. If necessary, touch up any areas where the grout may have come loose or where there are gaps between tiles. Use a grout sponge to clean any excess grout from the surface of the tiles.
Tips and Considerations
Drainage Considerations
When installing pebble tiles in a shower floor, drainage is crucial. Ensure that there is a gentle slope toward the shower floor drain so all water runs into the drain and doesn’t puddle. This can be achieved by applying a cement mud base under the pebbles, which helps create a solid surface that prevents cracking of the tile and grout.
Cutting Pebbles
Cutting pebbles can be time-consuming but essential for achieving a seamless look. Use nippers for precise cuts if you have the time; otherwise, rent a diamond wet saw from a tool rental business near you.
Safety Precautions
Always wear safety gear when working with tile and adhesive. Gloves protect your hands from cuts and abrasions, goggles protect your eyes from debris, and a dust mask protects you from inhaling dust particles.
Conclusion
Installing a pebble tile floor in your bathroom shower is a rewarding DIY project that adds a unique and visually captivating element to your bathroom. With careful planning, the right tools, and some patience, you can achieve a professional-looking result. Remember to clean and prepare the surface thoroughly, apply a waterproofing membrane, plan your layout meticulously, mix thinset mortar correctly, lay pebbles firmly into place, cut tiles as needed, grout carefully between tiles, seal the surface to protect it from moisture and stains, and finally inspect your work for any imperfections.
By following these steps and tips, you can transform your bathroom into a relaxing oasis with the soothing aesthetic of pebble tiles. Whether you’re a seasoned DIY enthusiast or just starting out, this guide provides a comprehensive walkthrough to help you succeed in your pebble tile installation project.
Additional Resources
For more detailed instructions or specific tips on installing pebble tiles, consider checking out the following resources:
- YouTube Video: "Installing Pebble Tiles on a Shower Floor" by DIY Doris (2020)
- Blog Post: "The Complete Guide to Pebble Tile" by Free Range Cottage
- Article: "Pebble Shower Floor: Doable DIY Project" by Chicago Tribune
- Blog Post: "How to Tile a Shower Floor Without a Pan in 6 Steps" by Rubi Blog USA (2023)
- Blog Post: "Adding a Luxury Touch to Your Bathroom with Pebble Tile" by Buy Tiles and More (2023)
These resources offer additional insights and practical advice that can help you navigate the process more effectively.
By following this guide and utilizing the resources provided, you’ll be well on your way to creating a stunning pebble tile floor in your bathroom shower that not only enhances the aesthetic appeal but also provides a comfortable and relaxing space for years to come.
Was this page helpful?
At Storables.com, we guarantee accurate and reliable information. Our content, validated by Expert Board Contributors, is crafted following stringent Editorial Policies. We're committed to providing you with well-researched, expert-backed insights for all your informational needs.


0 thoughts on “DIY Guide to Installing a Bathroom Shower with a Pebble Tile Floor”