
Articles
How Big Should A Woodworking Shop Be
Modified: January 8, 2024
Discover the ideal size for your woodworking shop with our informative articles. Find out how much space you need for efficient and enjoyable woodworking projects.
(Many of the links in this article redirect to a specific reviewed product. Your purchase of these products through affiliate links helps to generate commission for Storables.com, at no extra cost. Learn more)
Introduction
If you’re passionate about woodworking, you understand the importance of having a dedicated space to pursue your craft. A woodworking shop is not just a place to work; it’s a sanctuary where creativity comes to life, and skills are honed to perfection. But how big should your woodworking shop be? This question is crucial as it determines the functionality, efficiency, and overall enjoyment of your woodworking experience.
When determining the size of your woodworking shop, several factors need to be considered. These include the tools and equipment you plan to use, the types of projects you intend to undertake, and your available space. By carefully evaluating these factors, you can create a woodworking shop that is not only a joy to work in but also maximizes your potential as a woodworker.
In this article, we will delve into the factors to consider when determining the size of a woodworking shop, explore the space requirements for essential woodworking tools, provide layout and organization tips, discuss the importance of ergonomics and safety, and even explore additional amenities and features that can enhance the woodworking experience. Plus, we will look at some real-life case studies of woodworking shop sizes and configurations to inspire you and help you visualize what might work best for your own space.
So, whether you’re just starting out in woodworking or looking to upgrade your existing space, this article will provide you with valuable insights and practical guidance to create a woodworking shop that suits your needs and brings your woodworking dreams to life.
Key Takeaways:
- When determining the size of your woodworking shop, consider available space, project types, tools, workflow, and storage needs. Optimize layout, prioritize safety, and create a space that inspires creativity and efficiency.
- Enhance your woodworking shop with amenities like air filtration, soundproofing, and comfortable seating. Customize the layout based on your needs and preferences, and continually evaluate and adjust as you gain experience and acquire new tools.
Read more: How Big Should Patio Be
Factors to consider when determining the size of a woodworking shop
When it comes to determining the size of your woodworking shop, there are several factors that need to be taken into consideration. These factors will ultimately help you optimize your space and create a functional and efficient working environment. Here are some key factors to keep in mind:
- Available space: The first and most obvious factor to consider is the available space you have. Take measurements of the area and determine how much of it can be dedicated to your woodworking activities. Consider not only the floor space but also the height of the ceiling, as this will affect the storage options for long or tall tools.
- Type of projects: Consider the types of projects you plan on undertaking in your woodworking shop. If you mostly work on small projects like boxes or cutting boards, you may not need a large shop. However, if you plan on taking on larger projects like furniture pieces or cabinetry, you will need more space to accommodate the materials and the finished product.
- Tools and equipment: Take an inventory of the tools and equipment you currently own or plan on acquiring. Consider the size and dimensions of each tool, and leave enough room for proper storage, workbenches, and maneuverability. It’s essential to have enough space around each tool to work comfortably and safely.
- Workflow and traffic: Think about the workflow and the traffic patterns in your woodworking shop. Consider how you move between different workstations and tools and ensure there is enough space to navigate without feeling cramped. Create designated areas for cutting, sanding, and assembly, and ensure they are easily accessible from one another.
- Storage needs: Woodworking often involves working with various materials, accessories, and supplies. Take into account your storage needs for lumber, hardware, finishes, and other items. Incorporating adequate storage solutions such as shelves, cabinets, and bins will help keep your shop organized and clutter-free.
By carefully considering these factors, you can determine the ideal size for your woodworking shop. Remember, it’s better to have a slightly larger space than to feel cramped and restricted. Give yourself room to grow and evolve as a woodworker, and create a space that inspires creativity and efficiency.
Space requirements for essential woodworking tools
Having the right tools is essential for any woodworker, and it’s important to allocate enough space in your woodworking shop to accommodate these tools properly. Here are some space requirements to consider for essential woodworking tools:
- Table saw: The table saw is often considered the heart of a woodworking shop. It requires a significant amount of space due to its large footprint and the need for infeed and outfeed space. Aim for at least 6 feet of space in front and behind the saw to allow for proper material handling and maneuverability.
- Miter saw: The miter saw, or chop saw, is another essential tool for making accurate crosscuts and angles. It is typically placed on a dedicated workbench or stand. Allow enough space on either side of the miter saw to accommodate long stock and ensure there is ample space in front for the saw’s sliding action.
- Jointer and planer: Jointers and planers are used to flatten and smooth boards. These tools require a longer work surface and adequate infeed and outfeed space. Aim for at least 4 feet of space in front and behind these tools to handle longer stock effectively. Consider placing them side by side to save on space.
- Router table: Router tables are versatile tools for creating decorative edges and joinery. They require a stable work surface and enough space to maneuver the stock. Allocating around 4 feet of space in front and to the sides of the router table will allow for comfortable operation.
- Band saw: Band saws are excellent for making curved cuts and intricate shapes. They require ample space in front and behind for proper material handling. Allow at least 3 feet of space on either side of the saw to accommodate wider stock and provide room for adjustments and feeding.
- Drill press: The drill press is used for precise drilling and is typically mounted on a stand or workbench. Allocate enough space on either side of the drill press for stock handling, and ensure there is sufficient vertical clearance for taller stock.
- Workbench: A sturdy workbench is an essential component of any woodworking shop. It provides a solid surface for assembling projects and performing various tasks. Ensure that your workbench is positioned in a way that allows for easy access to other tools and work areas.
These are just a few examples of essential woodworking tools and their space requirements. Remember to leave enough space in your woodworking shop for maneuverability, working comfortably, and storing accessories and supplies for each tool. It’s crucial to plan your shop layout carefully to optimize workflow and create a functional and efficient workspace.
Layout and organization tips for optimizing a woodworking shop
Creating an efficient and well-organized layout is key to optimizing your woodworking shop. A well-thought-out layout will not only improve your workflow but also ensure safety and accessibility to your tools and materials. Here are some tips to help you optimize the layout and organization of your woodworking shop:
- Zoning: Divide your woodworking shop into different functional zones. For example, have a cutting zone, sanding zone, assembly zone, and storage zone. This zoning approach helps keep similar tools and activities grouped together, reducing the need for unnecessary movement.
- Flow: Consider the flow of work in your woodworking shop. Arrange your tools and workstations in a logical order that follows your typical workflow. This will minimize the distance you need to travel between tasks and increase efficiency.
- Tool placement: Arrange your tools based on frequency of use. Keep the most frequently used tools easily accessible, while the less frequently used ones can be placed further away or in storage. This will save time and effort when grabbing the tools you need.
- Benchtop organization: Keep your workbench clutter-free by utilizing tool racks, drawers, and organizers. Have designated spaces for frequently used tools, ensuring they are within arm’s reach. This will save time searching for tools and keep your work area tidy.
- Vertical storage: Utilize vertical space by installing shelves or pegboards to hang tools and accessories. This allows you to maximize storage without taking up valuable floor space. Labeling and organizing items on the shelves will further improve efficiency.
- Workshop lighting: Ensure that your woodworking shop is well-lit. Proper lighting is essential for accuracy, safety, and overall productivity. Use a combination of overhead lighting and task lighting to illuminate specific work areas and reduce eye strain.
- Cord management: Keep cords and cables organized and out of the way to prevent tripping hazards and maintain a clean workspace. Use cable management solutions such as zip ties, cable clips, or cord reels to keep everything neatly arranged.
- Clear workspace: Regularly clean and declutter your workspace to maintain a clean and organized environment. Remove unnecessary tools, scraps, and debris to create a safer and more efficient working space.
Remember, the layout and organization of your woodworking shop should be customized to your specific needs and preferences. Constantly evaluate and adjust your layout as you gain more experience and acquire new tools. By implementing these tips and maintaining an organized shop, you will greatly enhance your woodworking experience.
Consider the types of projects you plan to work on and the tools and equipment you need. A good rule of thumb is to allow 50-100 square feet per major tool, plus space for material storage and workbenches.
Ergonomics and safety considerations in a woodworking shop
When setting up your woodworking shop, it’s essential to prioritize ergonomics and safety. Woodworking can be physically demanding, and spending long hours in the shop can take a toll on your body if proper ergonomic principles are not followed. Additionally, prioritizing safety is crucial to prevent accidents and injuries. Here are some key considerations for ergonomics and safety in a woodworking shop:
- Workbench height: Ensure that your workbench is at the correct height for comfortable and efficient work. Ideally, the height of your workbench should allow for a relaxed posture, with your elbows at a 90-degree angle when standing or sitting on a stool.
- Tool height and placement: Position your tools at a height that allows for comfortable use. Avoid placing heavy tools too high, as it can strain your shoulders and back. Keep frequently used tools within easy reach to minimize bending or stretching.
- Anti-fatigue flooring: Standing for extended periods can cause fatigue and discomfort. Invest in anti-fatigue mats or flooring to absorb shock and reduce strain on your feet, legs, and back. This will help increase your productivity and minimize the risk of injuries.
- Proper lighting: Good lighting is crucial for both accuracy and safety in a woodworking shop. Ensure that your workspace is well-lit, with no shadows or glare that can impede your ability to see clearly. Task lighting can be added to specific areas for detailed work.
- Fire safety: Woodworking involves working with flammable materials such as sawdust, wood shavings, and finishes. It’s important to have fire safety measures in place, such as fire extinguishers, a fire-resistant work surface, and proper ventilation to minimize the risk of fire.
- Dust collection: Wood dust can be a health hazard and a fire hazard. Implement a dust collection system to remove hazardous particles from the air. This helps maintain a clean and healthy working environment while reducing the risk of respiratory issues and potential fire hazards.
- Safety equipment: Always wear appropriate safety equipment, such as safety glasses, hearing protection, and a dust mask, when working in the woodworking shop. Invest in a good-quality respirator if you work with toxic fumes or chemicals. Additionally, keep a first aid kit readily available in case of any accidents or injuries.
- Machine guards and safety features: Ensure that all your power tools and machinery have proper guards and safety features in place. Familiarize yourself with their operation and read the manufacturer’s instructions to understand the proper usage and safety precautions.
By prioritizing ergonomics and safety in your woodworking shop, you can prevent strain and injuries while enjoying a productive and comfortable work environment. Take the time to evaluate your shop regularly and make necessary adjustments to promote a safe and ergonomic workspace.
Read more: Where Do Landscapers Shop For Hand Tools
Additional amenities and features to enhance a woodworking shop
In addition to the basic setup and organization of a woodworking shop, there are several additional amenities and features that can greatly enhance your woodworking experience. These amenities not only improve functionality but also add convenience and comfort to your workspace. Here are some ideas to consider:
- Air filtration system: Install an air filtration system to remove dust and particles from the air. This is particularly important if your woodworking projects generate a significant amount of dust. Clean air promotes a healthier working environment and reduces the risk of respiratory issues.
- Soundproofing: Woodworking can be a noisy endeavor, especially when using power tools. Consider soundproofing the walls or using sound-absorbing materials to minimize noise pollution. This not only creates a more pleasant working environment but also reduces disturbances to others in the vicinity.
- Climate control: Maintain a comfortable working temperature and humidity level in your woodworking shop. Extreme temperature fluctuations can affect the quality and stability of your materials. Install heating and cooling systems or use fans and dehumidifiers to regulate the climate as needed.
- Mirror or magnifying glass: Place a mirror or magnifying glass near your workbenches to help you inspect details and ensure your work is precise. This can be particularly useful when working on intricate joinery or carving.
- Sink or water source: Having access to water within your woodworking shop can be incredibly convenient. Install a sink or have a water source nearby for cleaning tools, washing hands, and addressing any spills or accidents in a timely manner.
- Storage and organization solutions: Consider investing in additional storage options if you have a large collection of tools, accessories, and supplies. This might include cabinets, drawers, racks, or wall-mounted storage systems. Having a dedicated place for each item will keep your shop tidy and make it easier to find what you need.
- Inspiration and reference materials: Surround yourself with inspiration and reference materials that ignite your creativity. Hang up posters of exceptional woodworking projects, create a library of woodworking books and magazines, or even have a corkboard for displaying sketches and ideas.
- Comfortable seating area: Create a cozy seating area in your woodworking shop where you can sit and brainstorm ideas, take breaks, or discuss projects with fellow woodworkers. This provides a space for relaxation and reflection amidst the bustling activity of the shop.
Remember, these additional amenities and features are not mandatory, but they can greatly enhance your woodworking experience and make your shop a more enjoyable place to be. Choose the ones that align with your specific needs and preferences, and gradually incorporate them into your woodworking shop over time.
Case studies: Examples of woodworking shop sizes and configurations
Woodworking shops can come in all shapes and sizes, customized to fit the available space and the unique needs of the woodworker. Let’s explore a few case studies of different woodworking shop sizes and configurations to provide you with some real-life examples:
Case Study 1: Small Home Workshop
In this case study, we have a woodworker who has limited space available in their home for a woodworking shop. They have converted a small corner of their garage or basement into a workshop. The shop consists of a compact workbench, a table saw, a miter saw, and some wall-mounted storage for tools. It is well-organized and optimized for efficient use of space. This small shop is perfect for hobbyists or those with limited projects but still allows for enjoyable woodworking endeavors.
Case Study 2: Medium-Sized Garage Workshop
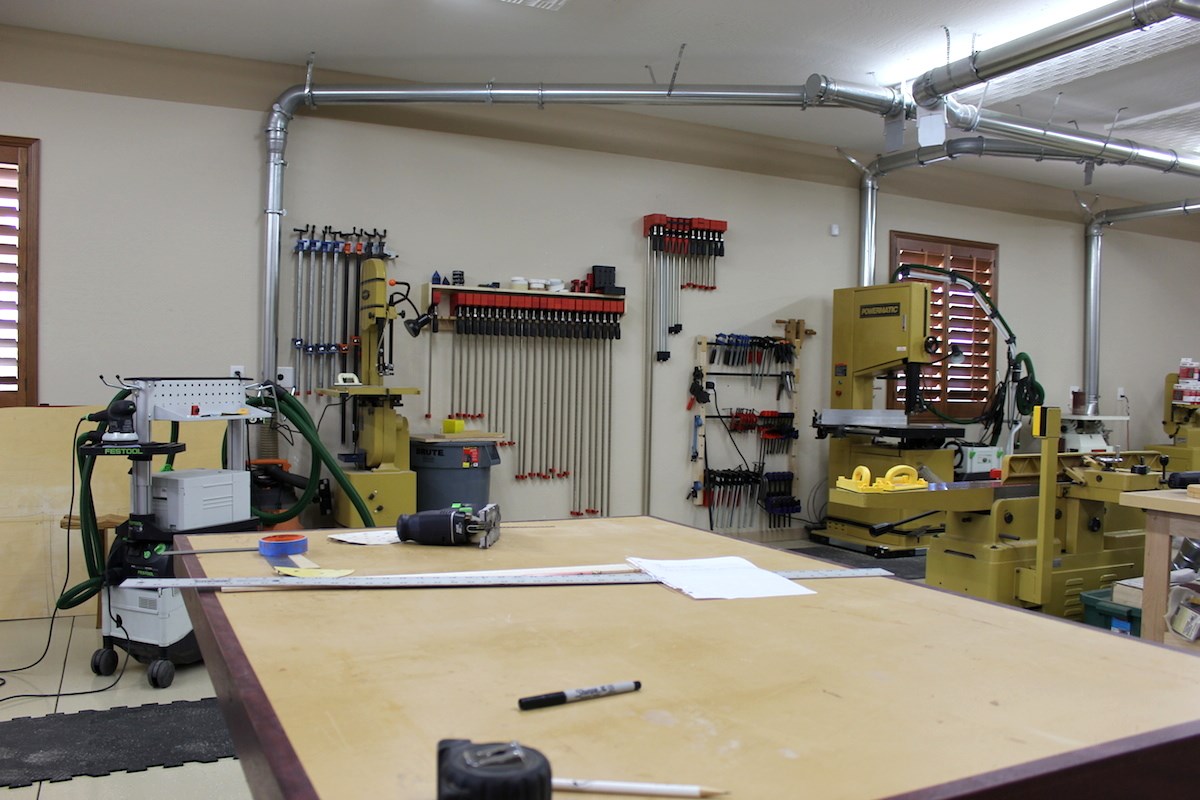
In this case study, we have a woodworker who has converted their two-car garage into a dedicated woodworking shop. The shop features a spacious workbench with ample storage for tools and supplies. It includes essential power tools like a table saw, band saw, jointer, and planer, along with a dust collection system. There is also a dedicated assembly area with a large work surface and clamps. This medium-sized garage shop allows for a wider range of projects and provides more room for maneuverability and storage.
Case Study 3: Large Professional Woodworking Studio
In this case study, we have a professional woodworker running a full-fledged woodworking business. They have a dedicated standalone building or an industrial warehouse as their woodworking studio. This large shop features multiple workstations, each equipped with specialized tools like CNC machines, large capacity table saws, drum sanders, and a wide range of hand tools. The studio is designed for efficient workflow, with designated areas for cutting, sanding, assembly, and finishing. It also includes a spray booth for applying paint and finishes. This spacious and well-equipped woodworking studio allows for large-scale projects and can accommodate multiple woodworkers working simultaneously.
These case studies are just a few examples of different woodworking shop sizes and configurations. The size of your woodworking shop will depend on factors such as available space, the scale of your projects, and your personal preferences. By optimizing the layout, organizing tools efficiently, and creating a comfortable working environment, you can create a woodworking shop that suits your needs and helps you pursue your woodworking passion.
Conclusion
Designing and setting up a woodworking shop requires careful thought and consideration. It’s important to strike a balance between space efficiency, functionality, and personal preference. By taking into account factors like available space, project types, tools, workflow, ergonomics, and safety, you can create a woodworking shop that enhances your craft and brings your woodworking dreams to life.
Remember that there is no one-size-fits-all approach to woodworking shop size and configuration. The size of your woodworking shop will depend on your specific needs, whether you are a hobbyist pursuing small projects or a professional woodworker working on large-scale ventures. The key is to optimize the space you have, organize your tools effectively, and create a safe and ergonomic working environment.
In addition, consider the amenities and features that will enhance your woodworking experience. Whether it’s air filtration systems, soundproofing, or comfortable seating areas, these additional elements can add convenience, comfort, and inspiration to your shop.
Furthermore, case studies of different woodworking shop sizes and configurations demonstrate the flexibility and customization available when designing a shop. From small home workshops to medium-sized garage setups to large professional studios, the possibilities are vast. Select the layout and organization that best suits your needs, and continually evaluate and adjust as you gain experience and acquire new tools.
Ultimately, a well-designed and well-equipped woodworking shop creates an environment where creativity can thrive, skills can be sharpened, and projects can be brought to fruition. It becomes a space that truly reflects your passion for woodworking and provides a sanctuary for craftsmanship and self-expression.
So, whether you’re just starting out or looking to upgrade your existing shop, take the time to plan, optimize, and create a woodworking shop that is a true reflection of your woodworking journey. With the right size, layout, organization, and amenities, you’ll find yourself working with greater efficiency, enjoyment, and satisfaction in your woodworking pursuits.
Frequently Asked Questions about How Big Should A Woodworking Shop Be
Was this page helpful?
At Storables.com, we guarantee accurate and reliable information. Our content, validated by Expert Board Contributors, is crafted following stringent Editorial Policies. We're committed to providing you with well-researched, expert-backed insights for all your informational needs.








0 thoughts on “How Big Should A Woodworking Shop Be”