Articles
How To Get Rid Of Brown Spots On Ceiling
Modified: October 19, 2024
Learn effective techniques and articles on how to easily remove and restore ceilings from the unsightly brown spots. Say goodbye to the blemishes today!
(Many of the links in this article redirect to a specific reviewed product. Your purchase of these products through affiliate links helps to generate commission for Storables.com, at no extra cost. Learn more)
Introduction
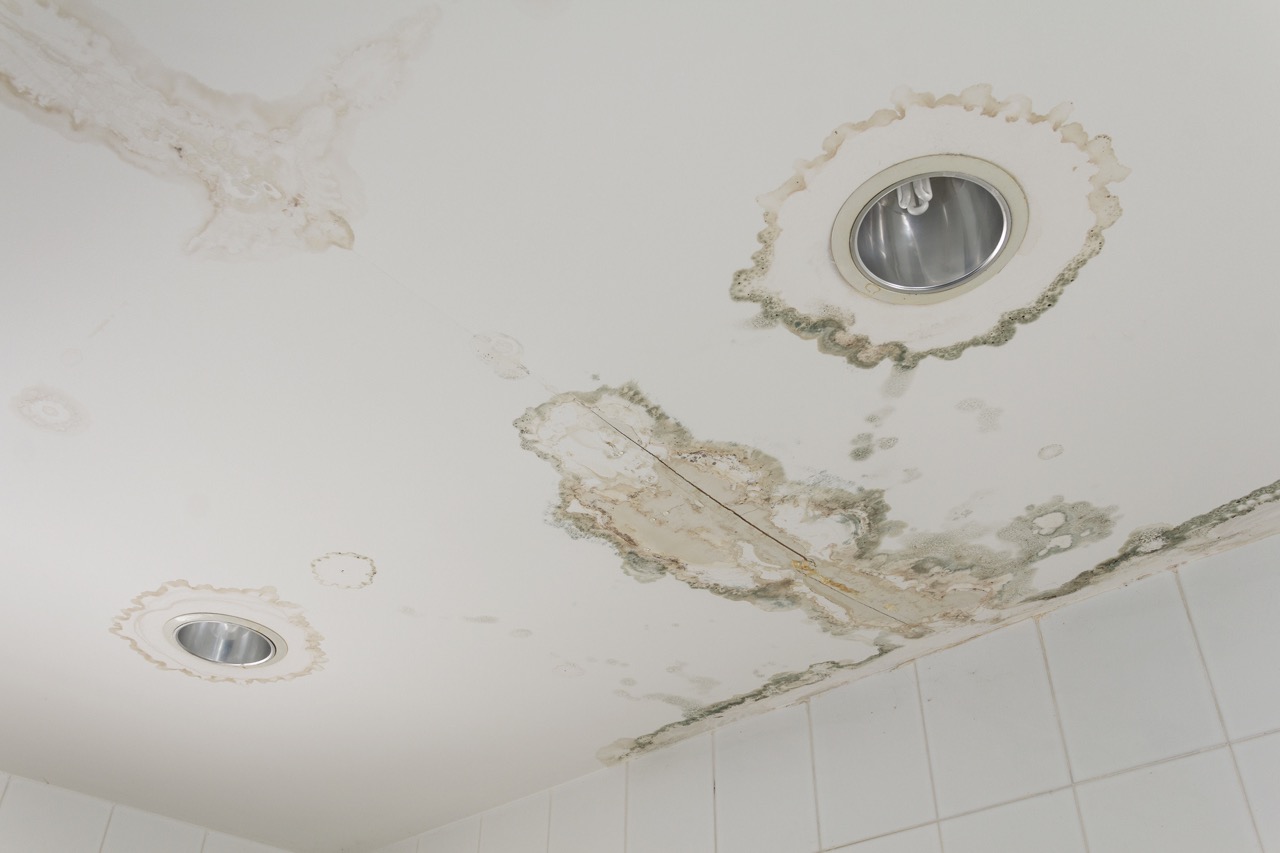
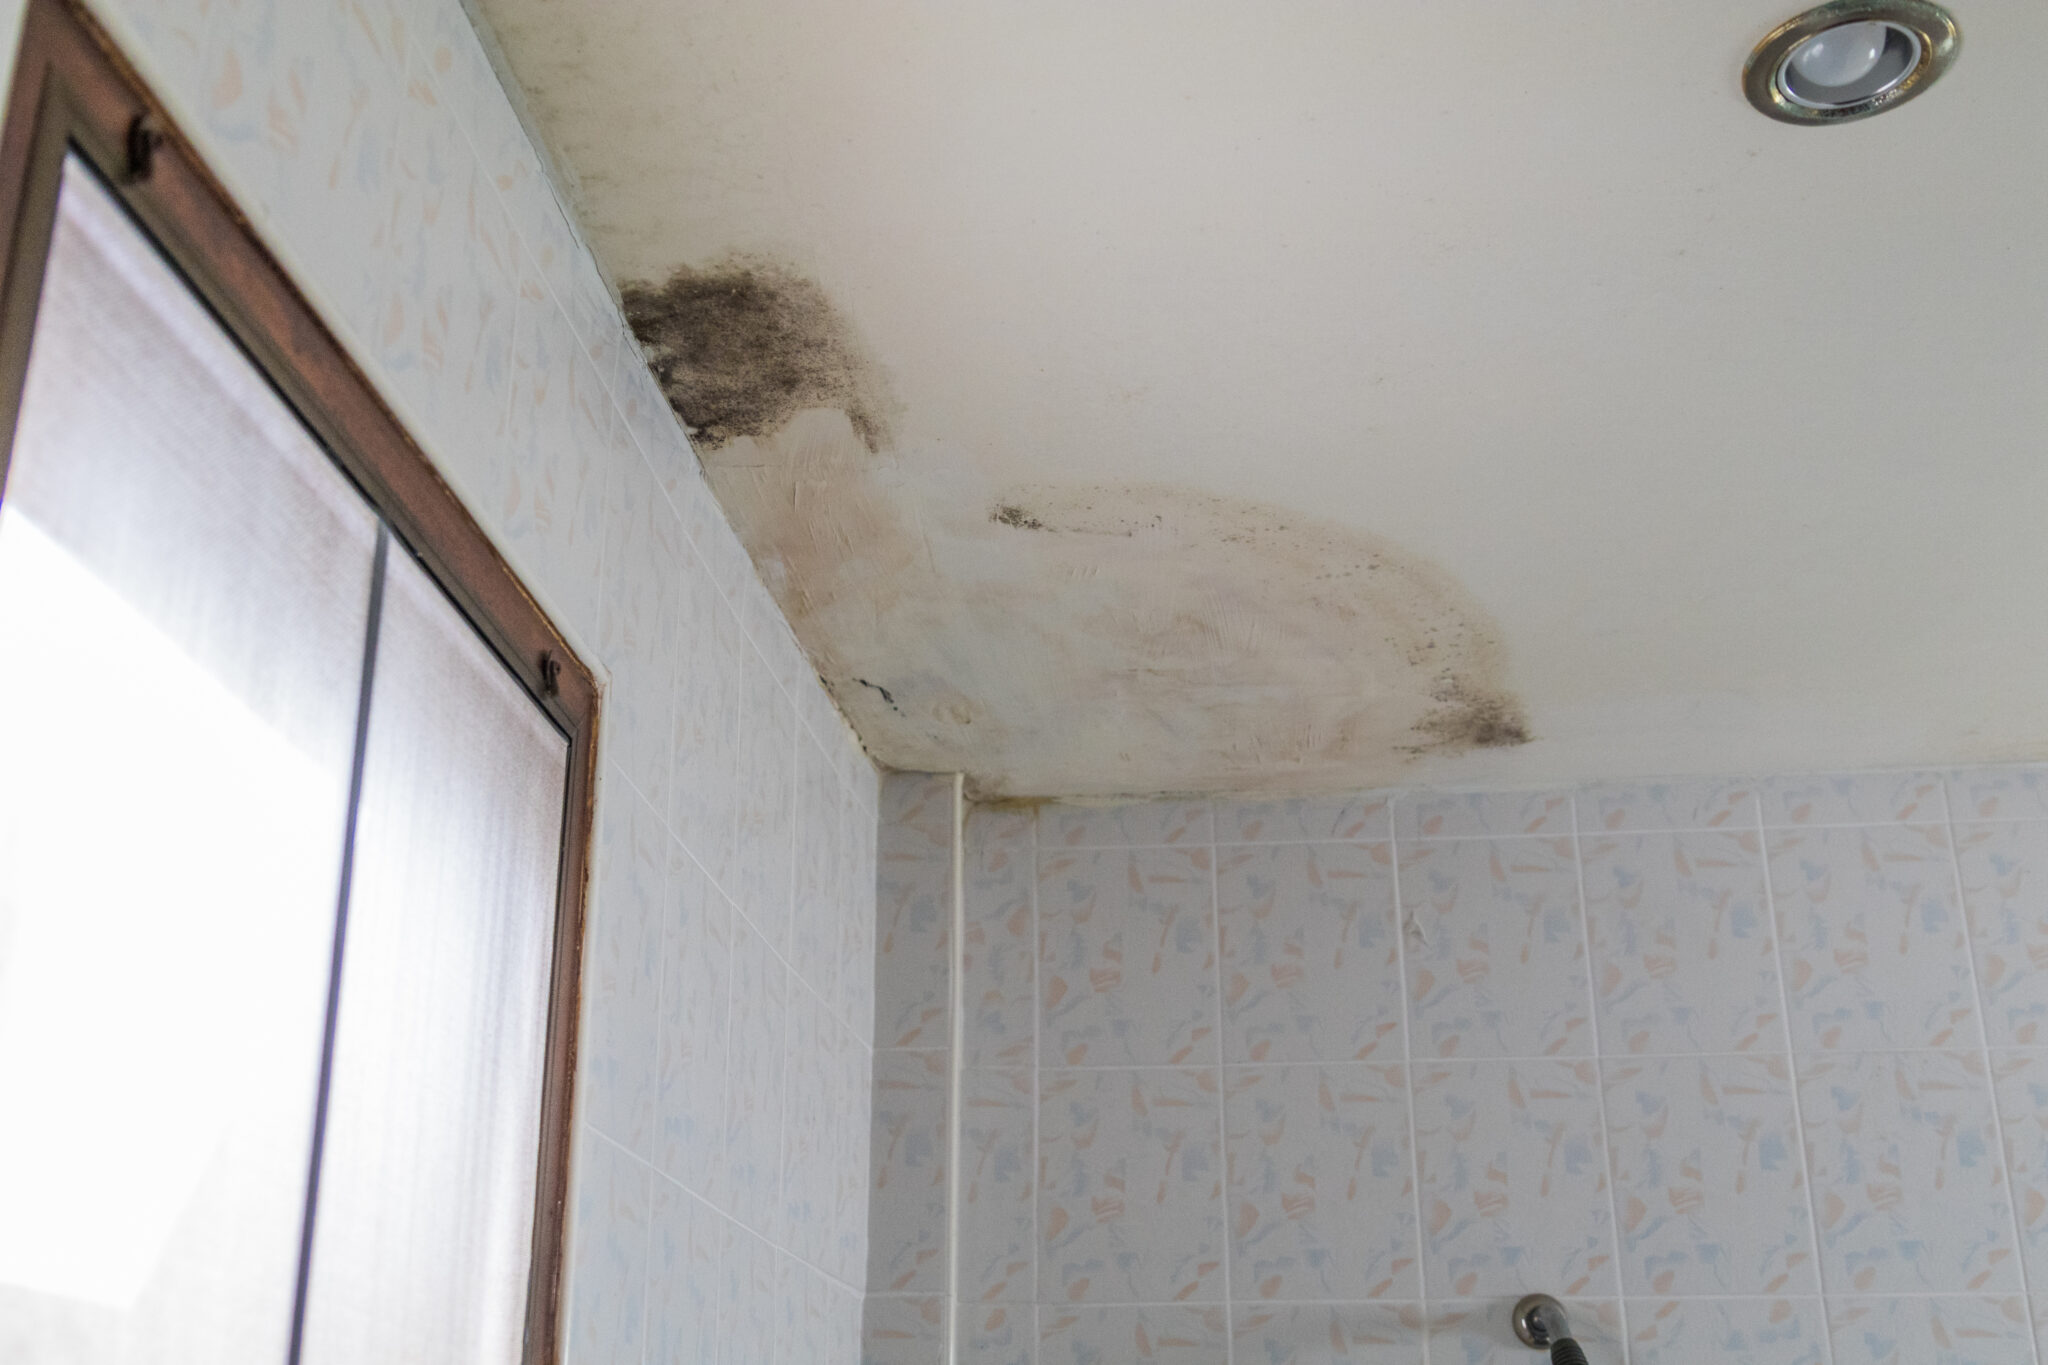
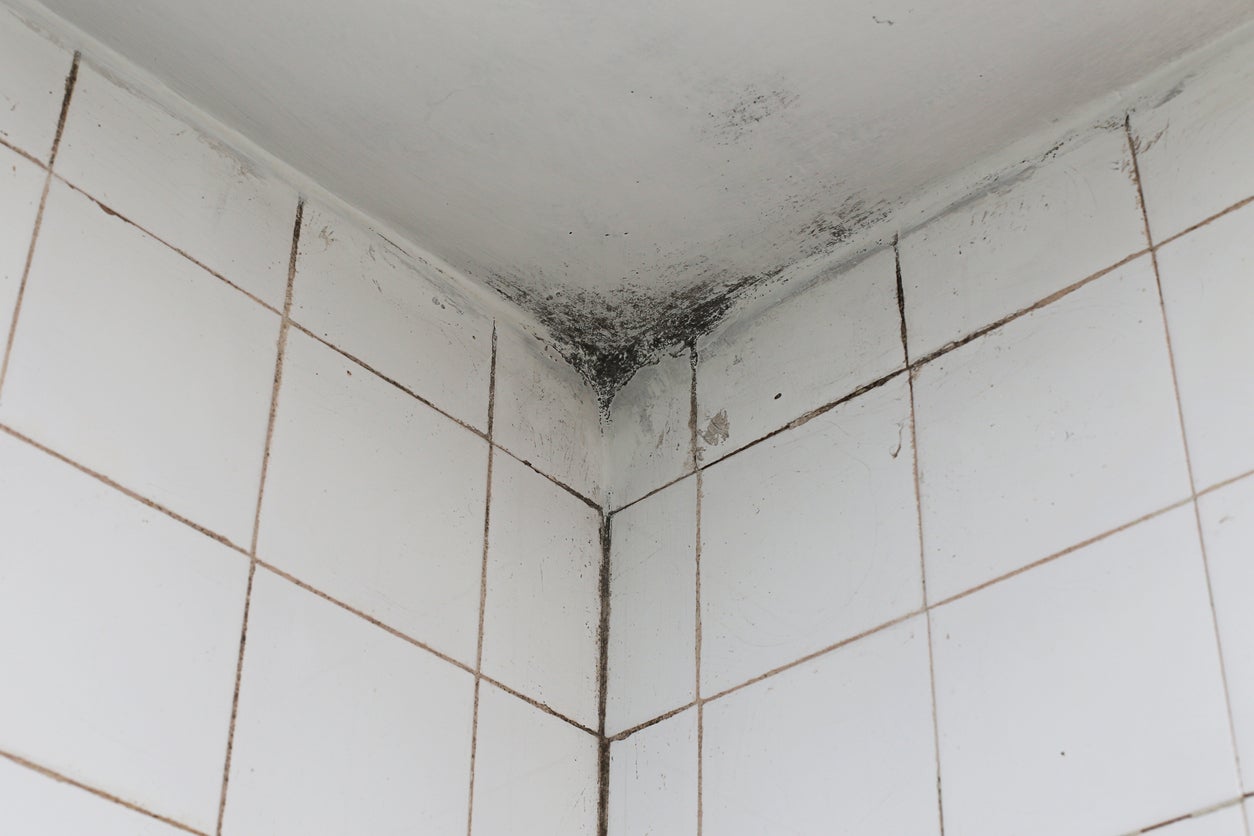
Brown spots on the ceiling can be unsightly and frustrating to deal with. Not only do they detract from the overall appearance of a room, but they can also indicate underlying issues that need to be addressed. Whether it’s a result of water damage, mold, or other factors, it’s important to take action and get rid of these brown spots.
In this article, we will explore the causes of brown spots on the ceiling, how to prepare for their removal, and various methods you can use to effectively eliminate them. We will also provide tips on preventing future brown spot formations, so you can keep your ceilings looking fresh and clean.
Before we delve into the solutions, it’s important to understand the root causes of brown spots on the ceiling. This knowledge will help us choose the most appropriate method for removal and make necessary repairs. Let’s explore some common causes next.
Key Takeaways:
- Understanding the root causes of brown spots on the ceiling, such as water leaks, mold, and smoke residue, is crucial for effective removal. Preparing adequately and choosing the right method can help restore your ceiling’s appearance.
- Implementing preventive measures, such as addressing water leaks promptly, maintaining proper ventilation, and monitoring humidity levels, can significantly reduce the chances of brown spots recurring on your ceiling. Regular maintenance is key to a spot-free living environment.
Read more: How To Get Rid Of Pee Spots On Grass
Causes of Brown Spots on Ceiling
There are several potential causes for the appearance of brown spots on the ceiling. Understanding these causes will not only help you treat the existing spots but also prevent their recurrence in the future.
- Water Leaks: One of the most common causes of brown spots on the ceiling is water leakage. This could be from a leaking roof, plumbing issues, or even a faulty appliance. When water seeps into the ceiling, it can lead to discoloration and the formation of brown spots.
- Mold and Mildew: Another common cause is the growth of mold and mildew. These fungi thrive in damp and poorly ventilated areas, and ceilings can be particularly susceptible to mold growth, especially in humid environments. The presence of mold can contribute to the formation of brown spots as well as pose potential health risks.
- Smoke Residue: If you have a fireplace or frequently burn candles or incense, the smoke residue can accumulate on the ceiling over time. This can create brown discoloration and stains, especially in rooms with inadequate ventilation.
- Condensation: Ceilings in bathrooms or kitchens are prone to condensation due to the high levels of moisture generated in these areas. The constant exposure to moisture can result in the development of brown spots on the ceiling.
- Roofing Issues: Damaged or poorly maintained roofs can lead to water infiltration during rainstorms. This can cause water to seep into the ceiling, resulting in brown spots. Other roofing issues such as missing shingles or damaged flashing can also contribute to water leakage.
Identifying the cause of the brown spots is essential as it will guide you in taking the appropriate steps to address the issue. It’s recommended to inspect your ceiling thoroughly to determine the root cause before proceeding with the removal methods.
Preparing for Removal
Before diving into the process of removing brown spots on your ceiling, it’s crucial to make the necessary preparations to ensure a smooth and successful removal process. Here are a few steps you should take to prepare:
- Ensure Safety: First and foremost, prioritize your safety. Wear protective gear such as gloves, goggles, and a dust mask to protect yourself from any potential harmful substances or debris that may be present during the removal process.
- Cover Nearby Furniture and Flooring: To prevent any accidental damage or staining, it’s advisable to cover or move furniture, carpets, or other items around the affected area. Use plastic sheets or drop cloths to create a protective barrier.
- Turn Off Electricity: If the brown spots are near light fixtures or electrical connections, switch off the electricity in that area to avoid any accidents or electrocution. Consult a professional electrician if you’re unsure about dealing with electricity.
- Clean the Ceiling: Before starting the removal process, clean the ceiling surface using a gentle cleaner or mild detergent. This will remove any dirt, dust, or grease that may interfere with the effectiveness of the removal methods.
- Examine and Repair the Source: If the brown spots are caused by a water leak or roofing issue, it’s important to address and fix the underlying problem. Check the roof, plumbing, or any other potential sources of moisture or damage, and make the necessary repairs before proceeding with the removal.
Preparing adequately for the removal process will not only ensure better results but also minimize the risk of accidents or further damage to your ceiling. With these preparations in place, you can now move on to the various methods available to remove those stubborn brown spots.
Methods to Remove Brown Spots on Ceiling
Now that you’re prepared to tackle the brown spots on your ceiling, let’s explore some effective methods to remove them. These methods vary depending on the cause and severity of the spots. Here are a few options to consider:
- Using Lemon Juice: Lemon juice is a natural acidic cleaner that can be effective in removing light stains and discoloration. Mix equal parts lemon juice and water in a spray bottle, then spray the solution onto the brown spots. Let it sit for a few minutes, then gently scrub the area with a soft cloth or sponge. Rinse with clean water and dry the ceiling thoroughly.
- Applying Vinegar: Vinegar is another natural cleaning agent that can effectively eliminate brown spots. Create a mixture of equal parts white vinegar and water, and apply it to the affected area using a sponge or cloth. Allow it to sit for a few minutes, then gently scrub the spots. Rinse with water and dry the ceiling completely.
- Utilizing Bleach: For more stubborn brown spots, bleach can be an effective option. Mix one part bleach with three parts water and apply the solution to the affected area using a sponge or brush. Allow it to sit for a few minutes, then scrub gently. Rinse the area thoroughly with water to remove any residue, and ensure proper ventilation during the process.
- Painting Over Brown Spots: In some cases, particularly if the brown spots are stubborn or have caused significant discoloration, painting over them may be necessary. Choose a stain-blocking primer designed specifically for ceilings, apply it to the affected area following the manufacturer’s instructions, and allow it to dry. Then, paint over the primed area with a matching ceiling paint.
- Consulting a Professional: If the brown spots persist even after trying these methods, or if you’re unsure about dealing with the issue yourself, it’s recommended to consult a professional. A skilled contractor or restoration specialist can assess the situation and provide targeted solutions based on the specific cause of the brown spots.
Remember to always follow safety precautions when using cleaning agents or working on your ceiling. Additionally, test any cleaning solutions on a small, inconspicuous area first to ensure they don’t cause any damage or discoloration.
By choosing the appropriate method and carefully following the instructions, you can effectively remove those pesky brown spots from your ceiling, restoring its appearance and freshness.
Using Lemon Juice
Lemon juice is not only a delicious addition to your favorite dishes and beverages, but it can also be a powerful natural cleaner for removing brown spots on your ceiling. The acidic properties of lemon juice make it effective in breaking down stains and discoloration. Here’s how you can use lemon juice to tackle those unsightly brown spots:
- Gather Your Materials: Before you begin, gather the necessary materials. You will need fresh lemons or bottled lemon juice, water, a spray bottle, a soft cloth or sponge, and a ladder or step stool to reach the ceiling.
- Create the Lemon Juice Solution: Squeeze the juice from a lemon or pour a sufficient amount of bottled lemon juice into a bowl. Dilute it with an equal amount of water to reduce the acidity and prevent any potential damage to the ceiling paint or surface.
- Prepare the Area: Cover nearby furniture and flooring with plastic sheets or drop cloths to protect them from any potential drips or splatters. Ensure proper ventilation in the room by opening windows or using fans to minimize the strong lemon scent.
- Spray the Lemon Juice Solution: Transfer the lemon juice solution into a spray bottle for easy application. Shake well to mix the ingredients. Stand on the ladder or step stool and spray the solution directly onto the brown spots on the ceiling. Ensure that the affected areas are thoroughly saturated.
- Allow Time for the Lemon Juice to Work: After spraying the lemon juice solution, allow it to sit on the brown spots for about 5-10 minutes. This will give the acidic properties enough time to break down the stains and discoloration.
- Gently Scrub the Area: After the lemon juice has had time to work, take a soft cloth or sponge and gently scrub the brown spots. Use circular motions and apply gentle pressure to avoid damaging the ceiling. Continue scrubbing until the stains start to fade.
- Rinse and Dry the Ceiling: Once you’re satisfied with the results, rinse the ceiling with clean water using a damp cloth or sponge. Make sure to remove any residue or leftover lemon juice. After rinsing, dry the ceiling thoroughly with a clean towel or allow it to air dry completely.
It’s important to note that lemon juice may not be effective for all types of brown spots, especially if they are caused by severe water damage or molds. In such cases, it’s advisable to consult a professional to determine the best course of action.
Using lemon juice is a cost-effective and natural solution for removing brown spots on your ceiling. It not only helps eliminate the discoloration but also leaves a fresh citrus scent behind. Give it a try, and enjoy the refreshed appearance of your ceiling.
Inspect and repair any leaks in the roof or plumbing to prevent further water damage. Use a bleach solution to clean the brown spots, then repaint the ceiling with a stain-blocking primer and paint.
Read more: How To Get Rid Of Mice In The Ceiling
Applying Vinegar
Vinegar is a versatile household cleaner that can be highly effective in removing brown spots from your ceiling. Its acidic nature makes it an excellent stain remover and disinfectant. When properly used, vinegar can help break down stains and restore the cleanliness of your ceiling. Here’s how you can use vinegar to tackle those stubborn brown spots:
- Gather Your Materials: Before you begin, gather the necessary materials. You will need white vinegar, water, a spray bottle, a soft cloth or sponge, and a ladder or step stool to reach the ceiling.
- Mix the Vinegar Solution: In a bowl or container, mix equal parts white vinegar and water. This dilution will prevent damage to the ceiling surface while still providing the cleaning power of the vinegar.
- Prepare the Area: Cover any furniture or flooring near the affected area with plastic sheets or drop cloths to protect them from drips or splatters. Ensure proper ventilation in the room by opening windows or using fans to minimize the strong vinegar odor.
- Transfer the Solution to a Spray Bottle: Pour the vinegar solution into a spray bottle for easy application. Shake well to ensure the vinegar and water are thoroughly mixed.
- Spray the Vinegar Solution: Stand on the ladder or step stool and spray the vinegar solution directly onto the brown spots on the ceiling. Make sure to fully saturate the affected areas, ensuring that the vinegar solution covers the stains.
- Allow Time for the Vinegar to Work: After spraying the vinegar solution, allow it to sit on the brown spots for approximately 10-15 minutes. During this time, the acidic properties of the vinegar will help break down the stains and discoloration.
- Gently Scrub the Area: Using a soft cloth or sponge, gently scrub the brown spots on the ceiling. Apply gentle pressure and use circular motions to avoid damaging the surface. Continue scrubbing until the stains start to fade and the area looks cleaner.
- Rinse and Dry the Ceiling: Once you’ve finished scrubbing, dampen a clean cloth or sponge with plain water and rinse the ceiling, removing any residual vinegar solution. Make sure to remove all traces of vinegar. After rinsing, dry the ceiling thoroughly with a clean towel or allow it to air dry.
It’s important to note that vinegar may not be suitable for all types of stains or ceiling surfaces. If you’re unsure, it’s always best to test a small, inconspicuous area first to ensure that it doesn’t cause any damage or discoloration.
Applying vinegar is a cost-effective and natural method for removing brown spots on your ceiling. Its acidic properties make it a powerful cleaning agent, capable of tackling various stains and discoloration. Give it a try, and enjoy the renewed cleanliness of your ceiling.
Utilizing Bleach
When it comes to stubborn brown spots on your ceiling, bleach can be a powerful tool to remove stains and discoloration. Bleach is highly effective in treating mold and mildew, as well as eliminating tough stains caused by water damage. Here’s how you can utilize bleach to tackle those persistent brown spots:
- Gather Your Materials: Before you begin, make sure you have the necessary materials. You will need bleach, water, a spray bottle, protective gloves, goggles, a sponge or soft cloth, and a ladder or step stool to reach the ceiling.
- Mix the Bleach Solution: In a well-ventilated area, mix one part bleach with three parts water in a bowl or container. This dilution will help prevent any potential damage to the ceiling paint or surface while still harnessing the cleansing power of bleach.
- Prepare the Area: Protect nearby furniture and flooring by covering them with plastic sheets or drop cloths. Ensure adequate ventilation in the room by opening windows or using fans to minimize exposure to bleach fumes.
- Put on Protective Gear: Before handling bleach, put on gloves to protect your hands and goggles to shield your eyes from any potential splashes.
- Transfer the Solution to a Spray Bottle: Transfer the bleach solution into a spray bottle for easy and controlled application. Shake the bottle well to ensure the bleach and water are thoroughly mixed.
- Spray the Bleach Solution: Stand on the ladder or step stool, and carefully spray the bleach solution directly onto the brown spots on the ceiling. Ensure that the affected areas are fully saturated with the solution.
- Allow Time for the Bleach to Work: After spraying the bleach solution, allow it to sit on the brown spots for approximately 15-20 minutes. This will give the bleach enough time to penetrate and break down the stains.
- Gently Scrub the Area: Using a sponge or soft cloth, gently scrub the brown spots on the ceiling. Apply light pressure and use circular motions to avoid damaging the surface. Continue scrubbing until the stains start to fade and the area looks cleaner.
- Rinse and Dry the Ceiling: Once you’ve finished scrubbing, dampen a clean cloth or sponge with plain water and thoroughly rinse the ceiling, removing any residual bleach solution. Make sure to remove all traces of bleach. After rinsing, dry the ceiling completely with a clean towel or allow it to air dry.
It’s vital to exercise caution when working with bleach due to its strong chemical properties. Always follow the manufacturer’s instructions and take appropriate safety measures such as proper ventilation and wearing protective gear.
Utilizing bleach can be an effective method for tackling stubborn brown spots on your ceiling caused by mold, mildew, or water damage. However, if you’re unsure or uncomfortable working with bleach, it’s advisable to consult a professional who can provide specialized guidance and assistance.
Painting Over Brown Spots
If you’ve tried various cleaning methods and the brown spots on your ceiling persist, painting over them may be a suitable solution. Painting provides a fresh and uniform surface, effectively covering up the unsightly stains. Here’s a step-by-step guide on how to paint over brown spots on your ceiling:
- Gather Your Materials: Before you begin, gather the necessary materials. You will need a stain-blocking primer specifically designed for ceilings, ceiling paint in your desired color, a paint roller or paintbrush, drop cloths or plastic sheets to protect the area, painter’s tape, and a ladder or step stool to reach the ceiling.
- Clean the Ceiling: Before painting, make sure the surface is clean and free of dirt, dust, and debris. Use a mild cleaner or detergent to wash the affected area, then rinse with clean water and allow it to dry completely.
- Protect Surrounding Areas: Cover nearby furniture, flooring, and walls with drop cloths or plastic sheets to protect them from accidental drips or splatters. Use painter’s tape to secure the coverings and create clean edges along the ceiling perimeter.
- Apply the Stain-Blocking Primer: Before painting, it’s crucial to apply a stain-blocking primer to prevent the brown spots from bleeding through the new paint. Follow the manufacturer’s instructions for the primer, and apply it evenly over the brown spots using a paint roller or brush. Allow the primer to dry completely before proceeding.
- Paint the Ceiling: Once the primer is dry, you can apply the ceiling paint. Choose a high-quality paint that is specifically formulated for ceilings. Stir the paint thoroughly to ensure an even consistency. Using a paint roller or brush, apply the paint in smooth and even strokes, working from one side of the brown spots to the other. Depending on the coverage, you may need to apply multiple coats, allowing each coat to dry completely before applying the next.
- Inspect the Results: After the final coat of paint has dried, inspect the area to ensure that the brown spots are completely covered. If any discoloration is still visible, you may need to repeat the process of priming and painting until the spots are no longer noticeable.
- Clean Up and Final Touches: After you’re satisfied with the results, carefully remove the drop cloths or plastic sheets and painter’s tape. Clean up your painting materials according to the manufacturer’s instructions. Give the paint ample time to cure fully before reintroducing furniture or applying any additional accents or touch-ups to the ceiling.
Painting over brown spots on the ceiling provides a comprehensive solution, not only covering up the stains but also rejuvenating the overall appearance of the room. If you’re unsure or inexperienced in painting, it’s worth seeking advice from a professional painter who can guide you through the process and ensure a smooth, professional finish.
Preventing Future Brown Spots
Preventing the formation of brown spots on your ceiling is essential to maintain its cleanliness and appearance. By taking proactive measures, you can minimize the risk of water damage, mold, and other factors that contribute to the development of brown spots. Here are some tips to help prevent future brown spots:
- Address Water Leaks Promptly: If you notice any signs of water leakage, such as stains, dampness, or a musty odor, address the issue immediately. Inspect the source of the leak and have it repaired by a professional plumber or contractor.
- Maintain Proper Ventilation: Ensure that your home has adequate ventilation, particularly in high-moisture areas such as bathrooms, kitchens, and laundry rooms. Use exhaust fans or open windows to reduce moisture buildup, which can lead to the formation of brown spots.
- Monitor Humidity Levels: Keep an eye on the humidity levels in your home. Excess humidity can contribute to the growth of mold and mildew. Use dehumidifiers or air conditioners to maintain optimal humidity levels, typically between 30% and 50%.
- Inspect and Maintain the Roof: Regularly inspect your roof for any signs of damage or deterioration. Address any issues promptly, such as missing shingles, damaged flashing, or clogged gutters, to prevent water infiltration into the ceiling.
- Ensure Proper Insulation: Adequate insulation can help prevent condensation on your ceiling, which can lead to the formation of brown spots. Insulate your attic and ceilings properly to regulate temperature and reduce moisture buildup.
- Monitor and Control Moisture Sources: Be mindful of activities that generate excess moisture, such as boiling water, taking hot showers, or drying clothes indoors. Use proper ventilation, exhaust fans, or dehumidifiers to manage and control moisture levels.
- Keep the Ceiling Clean: Regularly clean your ceiling to remove dust, dirt, and potential contaminants that can lead to discoloration. Use a soft cloth or duster to gently wipe the ceiling’s surface, avoiding excessive moisture that could potentially cause damage.
- Inspect and Maintain Plumbing: Periodically inspect your plumbing system for any leaks or drips. Repair or replace faulty pipes, faucets, or valves to prevent water damage and the formation of brown spots.
By implementing these preventive measures, you can significantly reduce the chances of brown spots appearing on your ceiling. Regular maintenance and vigilance are key to ensuring a clean and spot-free ceiling in the long run.
If you notice any recurring issues or are unsure about the cause of brown spots, it’s advisable to consult a professional contractor or restoration specialist. They can assess the situation, provide expert advice, and offer customized solutions to prevent further brown spot formations.
Read more: How To Get Rid Of Brown Water In Hot Tub
Conclusion
Dealing with brown spots on your ceiling can be a frustrating experience, but with the right knowledge and tools, you can successfully remove them and prevent their recurrence. Whether the spots are caused by water damage, mold, smoke residue, or other factors, understanding the underlying causes is crucial in choosing the most effective removal method.
In this article, we discussed several methods for removing brown spots on the ceiling, including using lemon juice, vinegar, bleach, and even painting over the spots. Each method has its own benefits and considerations, so it’s important to choose the one that suits your situation best.
Additionally, we provided tips on how to prepare for the removal process, such as ensuring safety, covering nearby furniture and flooring, and addressing the underlying cause of the spots. Taking these precautions will make the removal process smoother and help achieve better results.
Preventing future brown spots is equally important. By addressing water leaks promptly, maintaining proper ventilation, monitoring humidity levels, inspecting and maintaining the roof and plumbing systems, and keeping the ceiling clean, you can minimize the chances of brown spots recurring in the future.
Remember, safety should always be a priority when working on your ceiling. If you’re unsure or uncomfortable with the removal process, it’s always wise to consult a professional contractor or restoration specialist for guidance and assistance.
By following the methods and preventive measures outlined in this article, you can effectively remove brown spots from your ceiling and maintain a clean and spot-free living environment. Enjoy the fresh, renewed look of your ceiling and the peace of mind that comes with a healthy, well-maintained home.
Good luck with your brown spot removal journey!
Frequently Asked Questions about How To Get Rid Of Brown Spots On Ceiling
Was this page helpful?
At Storables.com, we guarantee accurate and reliable information. Our content, validated by Expert Board Contributors, is crafted following stringent Editorial Policies. We're committed to providing you with well-researched, expert-backed insights for all your informational needs.


0 thoughts on “How To Get Rid Of Brown Spots On Ceiling”