Articles
How To Store Bulk Grains
Modified: August 25, 2024
Learn the best methods for storing bulk grains with our informative collection of articles. Discover tips for maintaining freshness and prolonging shelf life.
(Many of the links in this article redirect to a specific reviewed product. Your purchase of these products through affiliate links helps to generate commission for Storables.com, at no extra cost. Learn more)
Introduction
Storing bulk grains is a practical and cost-effective way to ensure a steady supply of staple food items. Whether you’re a prepper, homesteader, or simply looking to save money on groceries, having a well-stocked pantry is essential. Bulk grains, such as rice, beans, oats, and wheat, are versatile, nutritious, and have a long shelf life when stored properly.
In this article, we will discuss the benefits of storing bulk grains and provide you with essential tips on how to store them effectively. So let’s dive in and discover the secrets to maintaining a well-stocked and sustainable pantry!
Key Takeaways:
- Storing bulk grains offers cost savings, dietary versatility, and food security. Proper preparation, storage containers, and rotation are essential for maintaining quality and longevity.
- Temperature, humidity control, and pest prevention are crucial for preserving bulk grains. Proper handling, inventory management, and regular monitoring ensure a sustainable pantry.
Read more: How To Store Coins In Bulk
Benefits of Storing Bulk Grains
There are numerous benefits to storing bulk grains, making it a wise investment for anyone looking to be self-sufficient or save money on groceries. Let’s explore some of the key advantages:
- Cost savings: Buying grains in bulk is significantly cheaper than purchasing packaged or pre-portioned items. By purchasing in larger quantities, you can take advantage of lower prices per pound, ultimately saving money in the long run.
- Long shelf life: Bulk grains have an impressive shelf life when stored properly. Items like rice, beans, and wheat can last for several years, ensuring you have a stable food supply even during emergencies or natural disasters.
- Dietary versatility: Grains are incredibly versatile and can be used in a myriad of dishes. From hearty soups and stews to delicious salads and baked goods, bulk grains provide endless possibilities for creating nutritious and satisfying meals.
- Food security: Storing bulk grains provides a sense of security knowing that you have a reliable food source readily available. This is especially important in times of crisis or when access to grocery stores may be limited.
- Health benefits: Many bulk grains, such as oats and whole grains, are packed with essential nutrients like fiber, vitamins, and minerals. Incorporating these grains into your diet can promote better digestive health, cardiovascular health, and weight management.
- Sustainability: By purchasing grains in bulk, you reduce packaging waste associated with individual portions. This environmentally-friendly approach contributes to a more sustainable lifestyle.
These benefits highlight the value of storing bulk grains. Now that we understand the advantages, let’s explore the different types of bulk grains commonly available for storage.
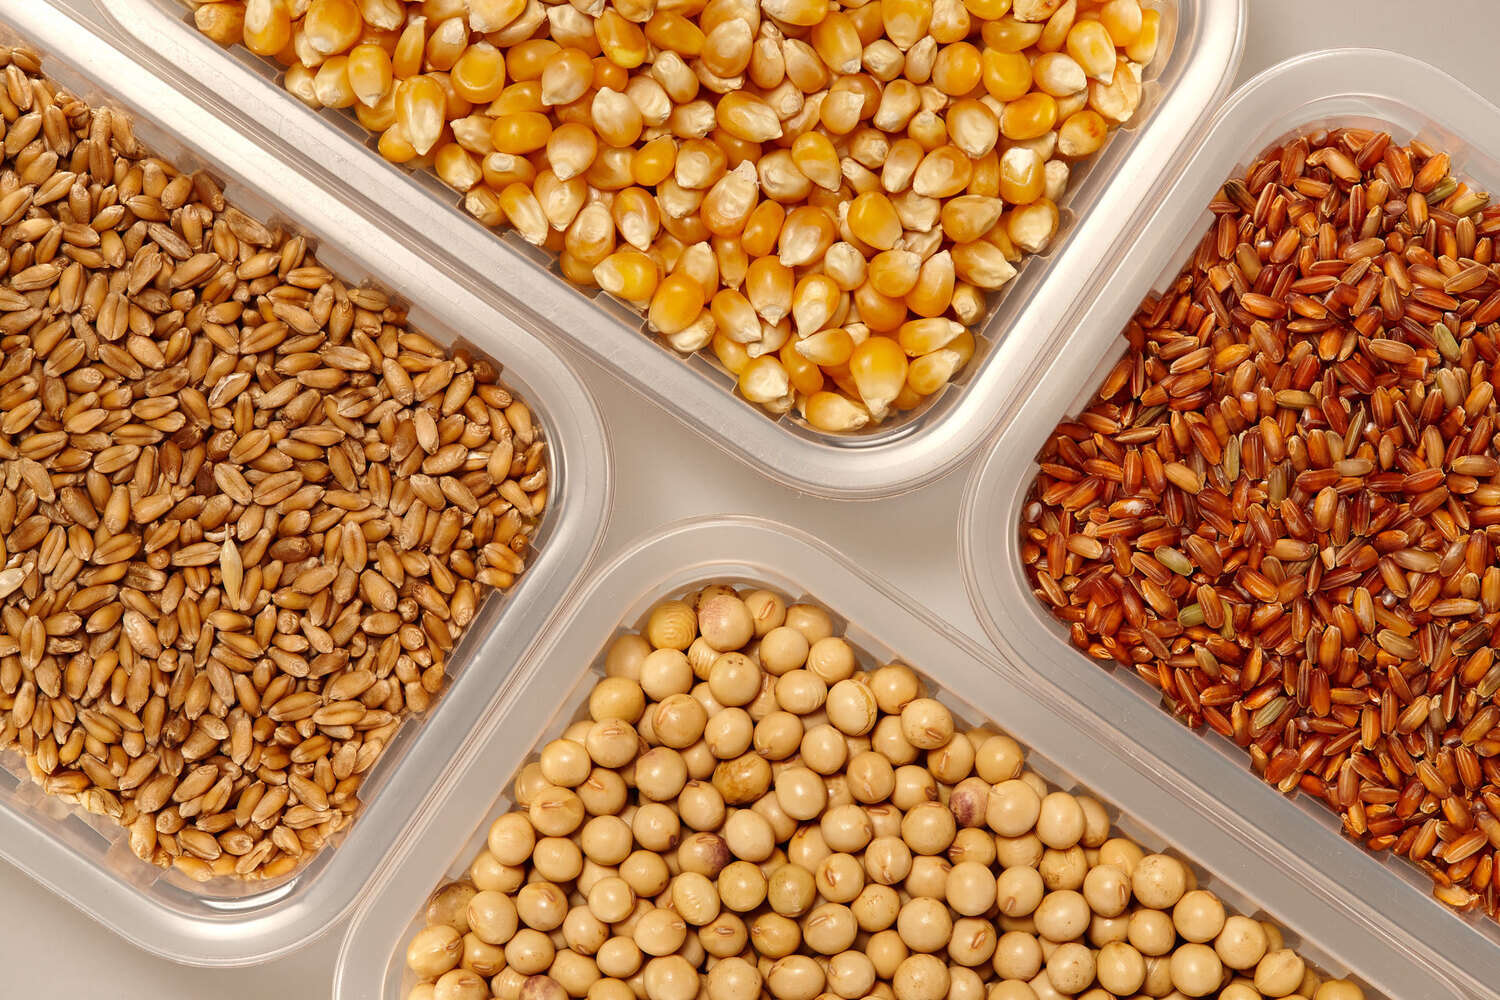
Types of Bulk Grains
When it comes to bulk grain storage, there are several popular options to consider. Each grain has unique characteristics and uses, allowing you to create a diverse and well-rounded pantry. Here are some common types of bulk grains:
- Rice: Rice is a staple grain in many cuisines around the world. It comes in various varieties, including long-grain, short-grain, brown rice, and wild rice. Rice is versatile, easy to cook, and has a long shelf life when stored properly.
- Beans: Beans are a fantastic source of protein and fiber. Popular varieties include black beans, pinto beans, kidney beans, and chickpeas. They can be cooked and used in various dishes such as soups, stews, and salads.
- Oats: Oats are a nutritious grain packed with dietary fiber, vitamins, and minerals. They are commonly used in breakfast dishes like oatmeal, granola, and baked goods. Rolled oats, steel-cut oats, and instant oats are the most common varieties available.
- Wheat: Wheat is a versatile grain that can be ground into flour for baking bread, pasta, and other baked goods. Hard wheat varieties like red wheat and durum wheat are best for bread-making, while soft wheat varieties are suitable for pastries and cakes.
- Quinoa: Quinoa is a protein-rich grain that has gained popularity in recent years. It is gluten-free and can be used as a substitute for rice or couscous. Quinoa is known for its nutty flavor and is a great addition to salads, stir-fries, and pilafs.
- Barley: Barley is a hearty grain with a slightly chewy texture. It is commonly used in soups, stews, and risottos. Barley is rich in fiber and nutrients, making it a healthy addition to your pantry.
These are just a few examples of the many bulk grains available for storage. Depending on your preferences and dietary needs, you can mix and match these grains to create a well-rounded pantry that meets your family’s nutritional requirements.
Now that we’ve explored the types of bulk grains, let’s move on to the factors you should consider before storing them.
Factors to Consider Before Storing Bulk Grains
Before you start storing bulk grains, it’s important to consider a few key factors to ensure proper storage and maintain the quality of the grains over time. Let’s take a look at these factors:
- Quality of the grains: It’s crucial to start with high-quality grains when building your bulk grain supply. Look for grains that are clean, free from pests or contamination, and have not been damaged during transportation or storage.
- Storage space: Assess the space you have available for storing bulk grains. It’s important to choose a cool, dry, and well-ventilated area to prevent moisture and pests from damaging the grains. Consider investing in storage containers or shelves to maximize space and keep the grains organized.
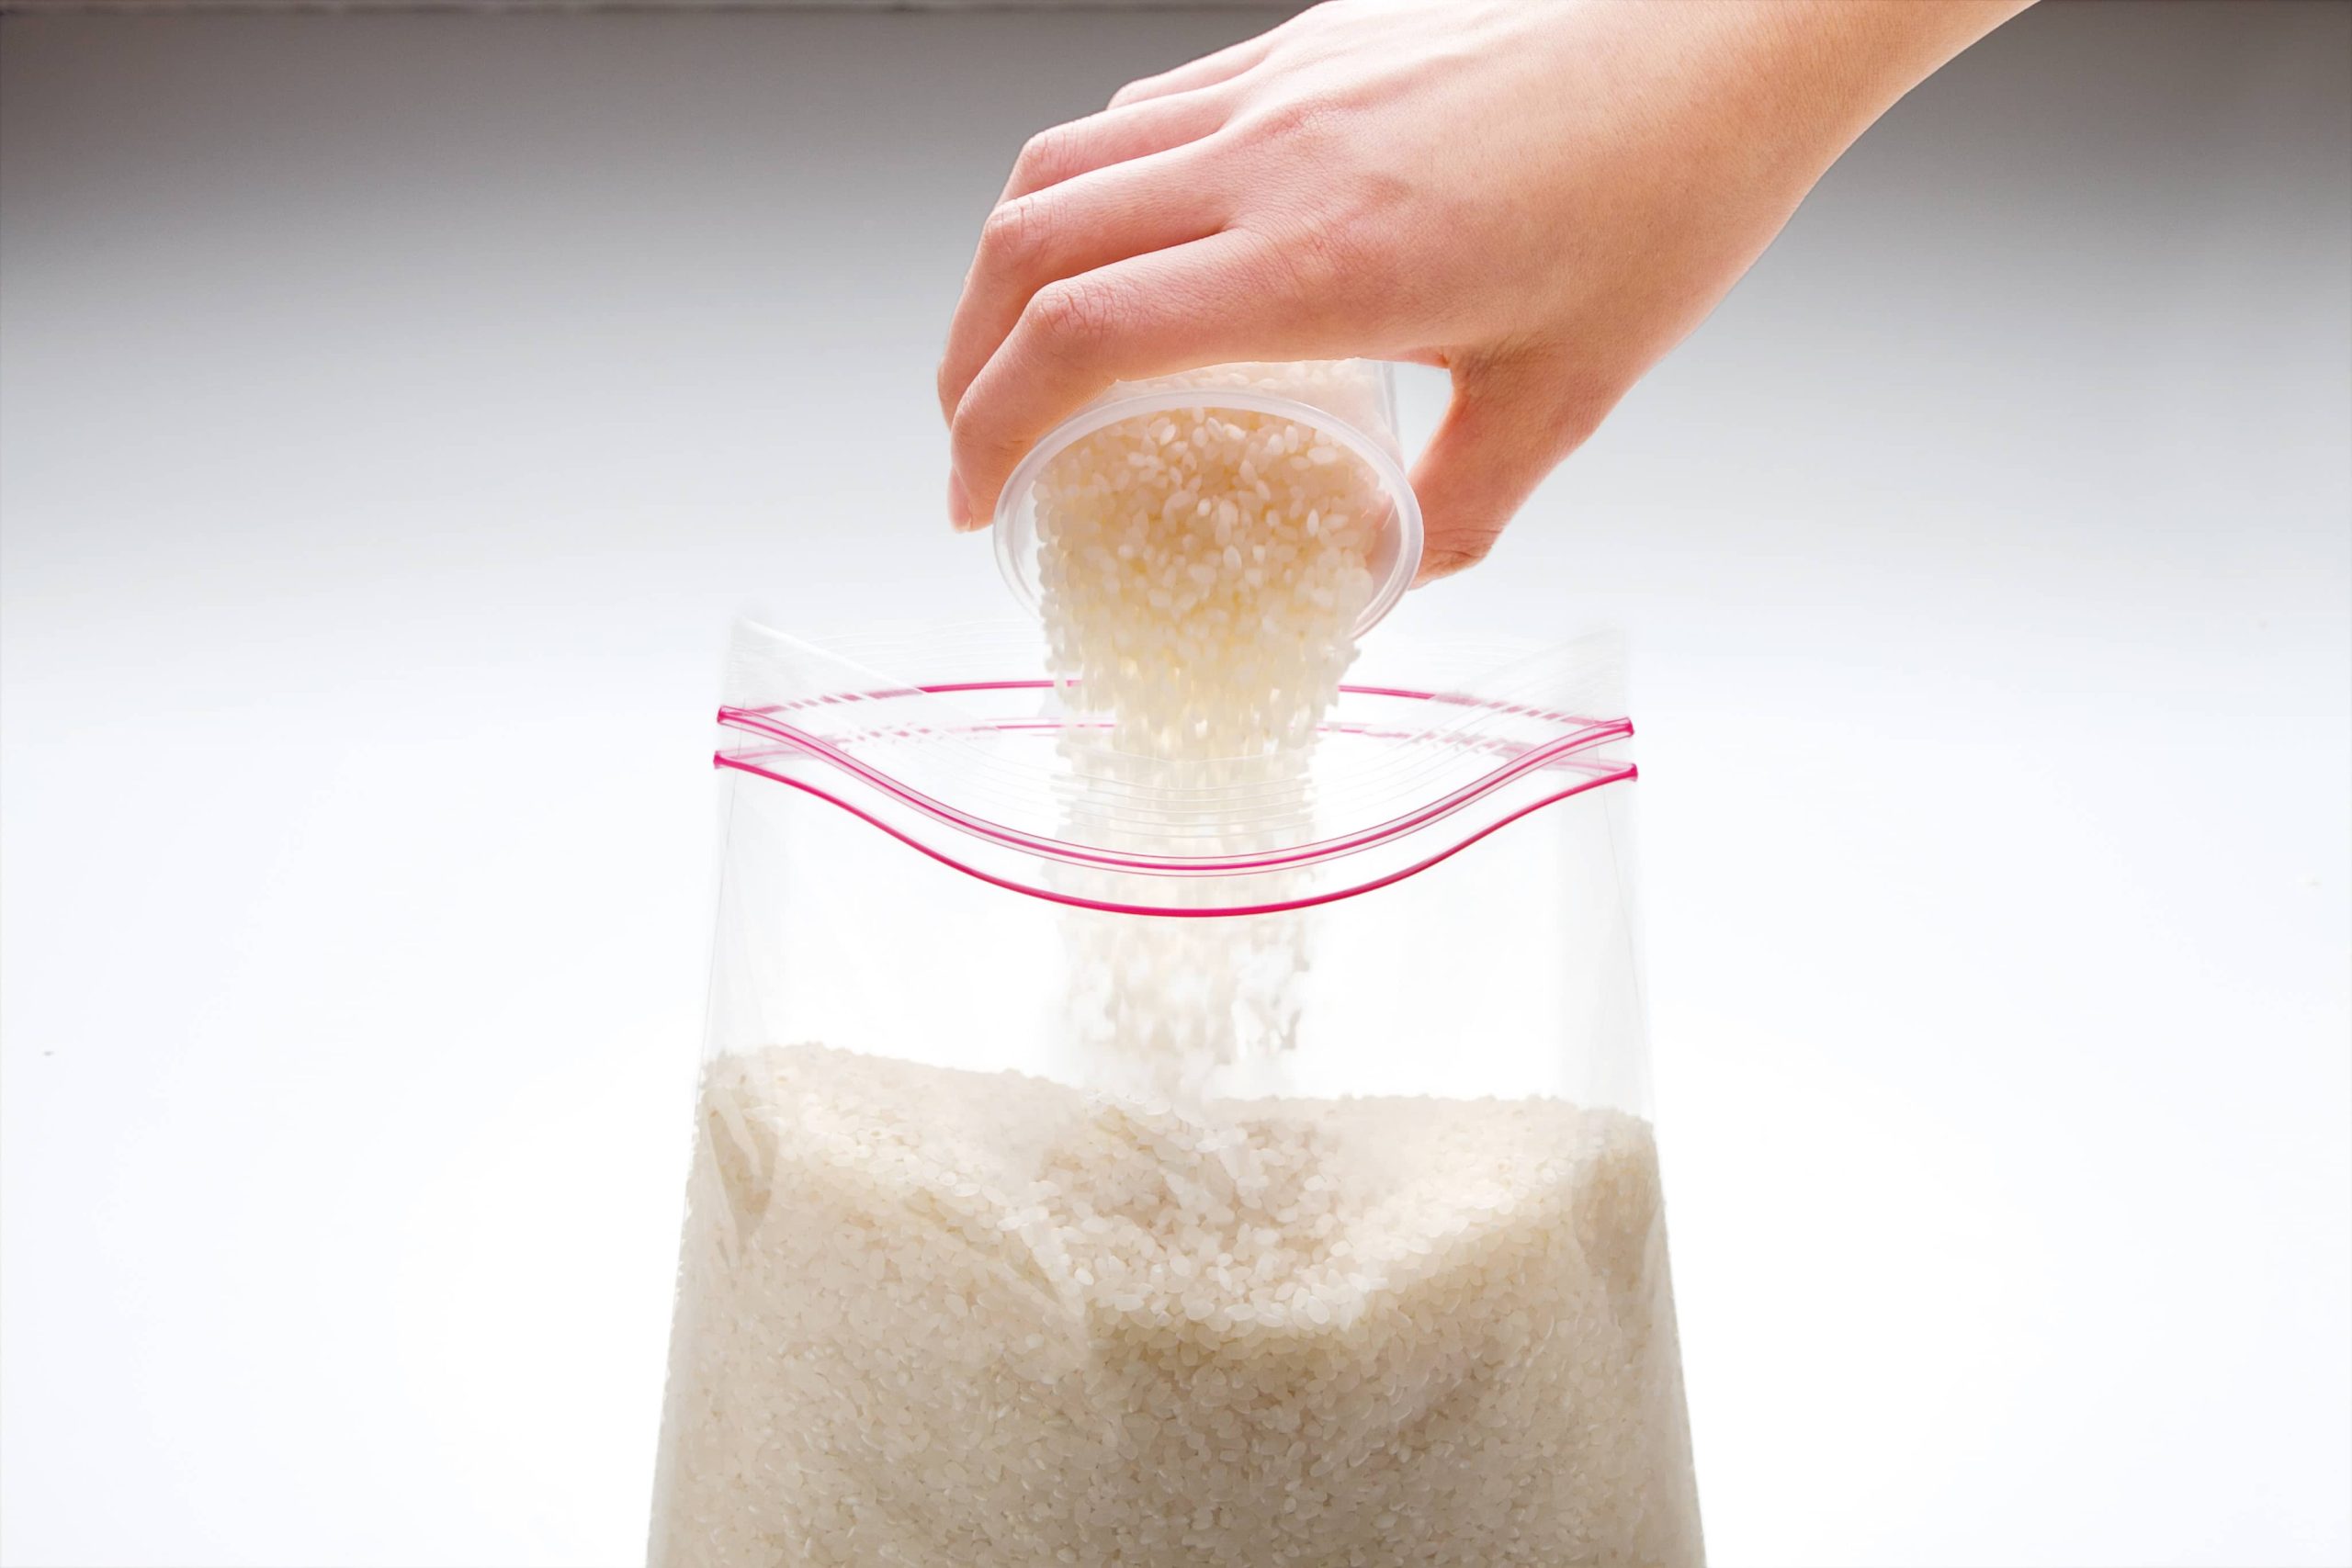
- Containers and packaging: The choice of containers can greatly impact the longevity of your bulk grains. Opt for food-grade, airtight containers or Mylar bags with oxygen absorbers to keep moisture and pests out. Avoid using containers made of materials that can transfer odors or contaminants to the grains.
- Labeling and inventory management: Keep track of the types of grains, purchase dates, and quantities stored. Label each container with this information to easily identify and rotate your stock. Consider using a spreadsheet or inventory management system to keep track of your bulk grain supply.
- Rotation of stock: When storing bulk grains, it’s important to practice a first-in, first-out approach. Use the oldest grains first to ensure freshness and prevent spoilage. Regularly check the condition of the grains and discard any that show signs of deterioration.
- Climate and temperature: The temperature and humidity levels in your storage area play a crucial role in preserving the quality of the grains. Aim for a temperature between 50-70°F (10-20°C) and a relative humidity of 10-15% to prevent mold growth and insect infestation. Avoid storing grains in areas prone to extreme temperature fluctuations.
- Pest control: Proper pest control is essential when storing bulk grains. Before storing the grains, ensure the storage area is clean and free from any existing pests. Consider using pest-proof containers, bay leaves, diatomaceous earth, or insect traps to deter pests and protect your grains.
By considering these factors before storing bulk grains, you can ensure the longevity and quality of your grain supply. Now that you’re aware of these considerations, let’s move on to the necessary preparations before storing bulk grains.
Preparation Before Storing Bulk Grains
Proper preparation is key to successfully storing bulk grains and maintaining their quality over time. Here are the essential steps you should take before storing bulk grains:
- Clean the storage containers: Thoroughly clean and sanitize your storage containers before filling them with grains. Remove any residue or contaminants that may affect the quality of the grains. Ensure the containers are completely dry before proceeding.
- Inspect the grains: Before storing bulk grains, carefully inspect them for any signs of pests, mold, or damage. Discard any grains that appear compromised to prevent the spread of contamination. It’s important to start with clean and healthy grains for long-term storage.
- Measure and portion: Determine the quantity of each grain you want to store. Consider your family’s consumption rate and storage space availability. It’s often helpful to portion the grains into smaller packages within the larger storage containers for easier access and rotation.
- Use oxygen absorbers: Oxygen absorbers are a valuable tool for extending the shelf life of bulk grains. Place one or more oxygen absorbers in each storage container to eliminate oxygen, which can cause spoilage and deterioration. Follow the instructions provided with the oxygen absorbers for the proper amount to use.
- Seal the containers: Ensure that the storage containers are properly sealed to maintain an airtight environment. This will prevent moisture, pests, and oxygen from entering and damaging the grains. Use airtight lids or Mylar bags with heat sealing for maximum protection.
- Label the containers: Clearly label each storage container with the type of grain, purchase date, and any other relevant information. This will make it easier to identify and rotate your stock, ensuring that the oldest grains are used first.
- Store in a suitable location: Find a suitable storage location that maintains a consistent temperature and humidity level. Avoid areas that are prone to drastic temperature fluctuations, direct sunlight, or excessive moisture. A cool, dry, and dark place is ideal for preserving the quality of the bulk grains.
By following these preparation steps, you’ll be well-equipped to store bulk grains effectively. Next, we’ll explore the different types of storage containers that are best suited for long-term grain storage.
Read more: How To Store Bulk Spices
Proper Storage Containers
The choice of storage containers is crucial for maintaining the quality and longevity of your bulk grains. Here are some key factors to consider when selecting the right containers:
- Food-grade containers: It is essential to use containers that are specifically designed for storing food. Look for containers that are labeled as “food-grade” or “food-safe” to ensure they meet the necessary standards for storing consumable items.
- Airtight seal: The containers should have an airtight seal to prevent moisture, pests, and oxygen from entering. This helps to maintain the freshness and quality of the grains over an extended period.
- Durable and sturdy: Choose containers that are durable and able to withstand the weight of the grains. Look for options made from high-quality materials such as heavy-duty plastic, glass, or metal. Avoid containers that may crack or break under pressure.
- Opaque or UV-resistant: Exposure to light can degrade the quality of grains over time. Opt for containers that are opaque or made from UV-resistant materials to protect the grains from harmful light exposure.
- Size and shape: Consider the size and shape of the containers based on the quantity and variety of grains you plan to store. Smaller containers allow for better portion control and ease of handling, while larger containers are suitable for bulk storage. Stackable containers can help maximize space efficiency.
- Easy to clean: Choose containers that are easy to clean and sanitize to maintain proper hygiene. Look for options that can be disassembled or have removable seals for thorough cleaning.
- Reusability: Select containers that can be reused for multiple purposes. Having reusable containers not only reduces waste but also provides cost savings in the long run.
Some popular options for bulk grain storage containers include food-grade plastic buckets with gamma-seal lids, glass jars with airtight lids, metal canisters, or Mylar bags with heat sealing. Each option has its advantages, so choose the one that best suits your storage needs and preferences.
Remember to properly clean and sanitize the containers before filling them with grains. This ensures that no contaminants or odors are transferred to the grains, preserving their quality and flavor.
Now that you know about the importance of proper storage containers, let’s move on to discussing the ideal storage location for your bulk grains.
Store bulk grains in airtight containers in a cool, dark place to maintain freshness and prevent pests. Label containers with the date of purchase for easy rotation.
Storage Location
The storage location you choose for your bulk grains is critical in maintaining their quality and longevity. Here are some factors to consider when selecting the ideal storage location:
- Temperature: It’s important to store bulk grains in a cool environment to prevent spoilage and preserve their nutritional value. The temperature should ideally be between 50-70°F (10-20°C). Avoid areas that are subject to extreme temperature fluctuations, such as near heating vents or outside walls.
- Humidity: Grain storage requires a dry environment to prevent mold growth and moisture absorption. Aim for a relative humidity of 10-15% if possible. Avoid storing grains in damp or humid areas such as basements, bathrooms, or near water sources.
- Light exposure: Grains are sensitive to light, which can degrade their quality and nutritional content over time. Choose a storage location that is dark or minimizes exposure to direct sunlight. If using transparent containers, consider storing them in a dark cupboard or covering them with a cloth or towel.
- Pest control: Choose a storage location that is free from pests and insects. Be cautious of storing bulk grains in areas prone to infestations, such as basements or garages. Take preventative measures such as sealing cracks, using pest-proof containers, and employing natural repellents like bay leaves or diatomaceous earth.
- Ventilation: Proper ventilation is essential to prevent moisture buildup and maintain air circulation. Ensure that the storage area has adequate ventilation, allowing for the release of excess moisture and the dissipation of any odors that may transfer to the grains.
- Accessibility: Consider how easily accessible the storage area is for regular inspection, rotation, and retrieval of grains when needed. It should be convenient to monitor the condition of the grains and to practice a first-in, first-out approach for efficient usage.
Based on these factors, some suitable storage locations for bulk grains include a dedicated pantry, a dry and well-ventilated cellar, or a climate-controlled storage room. If space is limited, you can also utilize closets, under-the-stair storage areas, or free-standing shelving units to create an organized grain storage space.
Remember to monitor the storage location periodically for any changes in temperature, humidity, and pest activity. Regular inspections will help you identify and address any issues promptly, ensuring the longevity of your bulk grain supply.
Now that we’ve discussed the importance of selecting the right storage location, let’s move on to understanding the role of temperature and humidity control in grain storage.
Temperature and Humidity Control
Proper temperature and humidity control is crucial for maintaining the quality and freshness of bulk grains during storage. Here’s what you need to know:
Temperature:
The ideal temperature range for storing bulk grains is between 50-70°F (10-20°C). Extreme heat or cold can affect the quality of the grains and shorten their shelf life. Here are some tips for temperature control:
- Keep bulk grains away from sources of heat, such as ovens, radiators, or direct sunlight.
- Avoid storing grains in areas prone to temperature fluctuations, such as garages or attics.
- Use a thermometer to monitor the temperature of the storage area and make necessary adjustments if needed.
Humidity:
The relative humidity (RH) in the storage area is equally important, as it affects moisture absorption and the potential growth of mold and bacteria. Here’s how to control humidity:
- Aim for a relative humidity of 10-15% in the storage area.
- Avoid storing bulk grains in damp or humid spaces, such as basements or bathrooms.
- Use dehumidifiers or moisture-absorbing products like silica gel packs to maintain low humidity levels.
- Ensure proper ventilation in the storage area to prevent moisture buildup.
Controlling temperature and humidity is essential for long-term grain storage. By maintaining the ideal conditions, you can minimize the risk of spoilage, mold growth, and insect infestation, ensuring that your bulk grains stay fresh and edible for an extended period.
Next, let’s discuss effective pest control measures to protect your bulk grains from unwanted critters.
Pest Control Measures for Bulk Grains
Maintaining proper pest control is essential when storing bulk grains. Insects, rodents, and other pests can quickly infest your grains and render them inedible. Here are some effective pest control measures to protect your stored bulk grains:
- Preventive measures: Minimize the risk of pests by keeping the storage area clean and free from food debris. Seal any entry points, including cracks, gaps, and openings, to prevent pests from accessing the grains. Regularly inspect the storage area for signs of pest activity and address any issues promptly.
- Use pest-proof containers: Opt for storage containers that are tightly sealed and specifically designed to keep pests out. Look for containers with gasket lids or gamma-seal lids that provide an airtight and secure seal. Avoid using plastic bags or containers that pests can easily chew through.
- Bay leaves: Place a few dried bay leaves in the storage containers. The strong scent of bay leaves acts as a natural repellent against pantry pests like weevils and moths. Replace the bay leaves every few months to maintain their effectiveness.
- Diatomaceous earth: Sprinkle food-grade diatomaceous earth around the storage area and containers. Diatomaceous earth is made from fossilized algae and works by dehydrating and killing pests. It is safe to use around food and is an effective natural pest control method.
- Traps and baits: Set up traps or use sticky strips to catch and monitor any pest activity in the storage area. You can also use non-toxic pest baits specifically designed for common grain pests. Follow the instructions carefully and place the traps or baits in strategic locations.
- Maintain cleanliness: Regularly clean and inspect the storage area, removing any spills or crumbs that might attract pests. Vacuuming or sweeping the area and wiping down the storage containers can help deter pests and prevent infestations.
- Rotate and use grains regularly: Practicing a first-in, first-out approach ensures that the oldest grains are used first, reducing the chances of pest infestation. Regularly check the condition of the stored grains and discard any that show signs of pest damage or deterioration.
By implementing these pest control measures, you can safeguard your bulk grains from unwanted critters and ensure they remain clean, safe, and ready for consumption.
Next, let’s discuss the importance of proper rotation and inventory management when it comes to storing bulk grains.
Read more: How To Store Bulk Pokemon Cards
Rotation and Inventory Management
Proper rotation and inventory management are essential aspects of storing bulk grains. By effectively managing your inventory and practicing a first-in, first-out (FIFO) approach, you can ensure the freshness and quality of your stored grains. Here’s how:
- Label and date: Clearly label each storage container with the type of grain and the date of purchase or storage. This helps you identify and track the age of the grains, ensuring that the oldest ones are used first.
- Inventory tracking: Keep a record of the quantity and variety of grains you have in storage. Maintain an inventory spreadsheet or use an inventory management system to track your stock. This helps you keep track of what needs to be replenished and prevents over-purchasing.
- Regular rotation: It’s important to regularly rotate your stored grains to ensure they are used before they expire. When you need to use grains, take from the containers that were stored first, following the FIFO principle. This prevents the accumulation of old or expired grains.
- Check for quality: Regularly inspect the condition of your stored grains for any signs of spoilage, pest infestation, or degradation. Discard any grains that show signs of deterioration or are no longer safe for consumption to maintain the overall quality of your supply.
- Consume and replenish: As you use grains from your storage supply, make a note to replenish them in a timely manner. This ensures that you always have a well-stocked pantry and prevents running out of essential grain staples.
- Monitor storage conditions: Keep an eye on the storage conditions, including temperature and humidity levels. Regularly check for any changes that might affect the quality of your grains, and make adjustments as necessary to maintain optimal storage conditions.
- Regular inventory reviews: Perform periodic reviews of your inventory to assess what grains are nearing expiration and need to be used soon. This helps you plan meals and incorporate stored grains into your regular cooking routine, avoiding unnecessary waste.
By practicing effective rotation and inventory management, you can maintain a fresh supply of bulk grains and reduce waste. Regularly consuming and replenishing your stock ensures that your stored grains are always current and ready for use.
Now that you understand the importance of rotation and inventory management, let’s move on to guidelines for properly handling bulk grains.
Guidelines for Proper Handling of Bulk Grains
Proper handling of bulk grains is essential for maintaining their quality and ensuring food safety. By following these guidelines, you can ensure that your grains remain fresh, free from contaminants, and safe for consumption:
- Wash hands: Always wash your hands thoroughly with soap and water before handling bulk grains. This helps prevent the transfer of bacteria or contaminants onto the grains.
- Inspect grains: Before using or storing bulk grains, carefully inspect them for any signs of pests, mold, or damage. Discard any grains that appear compromised to prevent contamination.
- Measure and portion: Measure the desired quantity of grains needed for a recipe or meal. Use a clean, dry measuring cup or kitchen scale to ensure accurate measurements.
- Store properly: Return unused grains promptly to their airtight storage containers to maintain freshness. Seal the containers tightly to prevent moisture, pests, and oxygen from entering.
- Avoid cross-contamination: Prevent cross-contamination by keeping different types of grains separate from one another. Use separate storage containers, utensils, and work surfaces to avoid mixing grains and potential allergic reactions or flavor transfers.
- Properly reseal storage bags: If using resealable bags, ensure they are properly sealed after each use to maintain freshness and prevent moisture or pest infiltration. Squeeze out any excess air before sealing the bag.
- Keep storage area clean: Regularly clean the storage area and storage containers to remove any spills, crumbs, or debris that may attract pests or contaminate the grains. Wipe down shelves, containers, and lids with a clean cloth or disinfectant as needed.
- Check for spoilage: Regularly inspect the stored grains for any signs of spoilage, such as off odors, mold growth, or insect infestation. Discard any grains that show signs of deterioration or contamination to ensure food safety.
- Practice efficient rotation: Continuously rotate your bulk grain supply using the first-in, first-out (FIFO) method. Use older grains before newer ones to maintain freshness and avoid waste.
- Properly cook grains: Follow the recommended cooking instructions and cook times for each type of grain to ensure they are cooked thoroughly and safe for consumption. Improperly cooked grains may pose a risk of foodborne illness.
By following these guidelines, you can handle bulk grains safely and maintain their quality throughout storage and preparation. Always prioritize food safety and hygiene to ensure the best outcomes when using your stored grains.
Now that you’re equipped with the knowledge of proper grain handling, let’s conclude our discussion.
Conclusion
Storing bulk grains is a practical and cost-effective way to ensure a steady supply of staple food items. By following the guidelines outlined in this article, you can effectively store and maintain the quality of your bulk grains for an extended period.
We explored the benefits of storing bulk grains, including cost savings, long shelf life, dietary versatility, food security, health benefits, and sustainability. These benefits make it a wise choice for those looking to be self-sufficient or save money on groceries.
We discussed the different types of bulk grains, such as rice, beans, oats, wheat, quinoa, and barley, each offering unique nutritional benefits and culinary possibilities.
Before storing bulk grains, it’s important to consider factors such as grain quality, storage space, containers, labeling, and inventory management. These considerations ensure that your grains are stored properly and in optimal conditions.
We provided guidelines for proper preparation, including cleaning containers, inspecting grains, measuring, and using oxygen absorbers to maintain quality. We also highlighted the importance of choosing suitable storage containers that are airtight, durable, and protect against light and moisture.
The storage location for bulk grains should be cool, dry, dark, and free from pests. Temperature and humidity control play a crucial role in preserving the quality of the grains, while pest control measures, such as using bay leaves and diatomaceous earth, help protect the grains from unwanted critters.
We emphasized the significance of rotation and inventory management to ensure that the oldest grains are used first and new stock is replenished. Proper handling of bulk grains, including washing hands, inspecting grains, and avoiding cross-contamination, is essential for food safety and maintaining freshness.
By following these guidelines, you can enjoy the cost savings, dietary versatility, and peace of mind that come with having a well-stocked pantry of bulk grains.
Remember, regular monitoring, inspection, and maintenance of your stored bulk grains are crucial in ensuring their longevity and quality. With proper storage and handling, you can have a sustainable and reliable supply of essential food items for you and your family.
So go ahead and start storing your bulk grains today, and reap the benefits of a well-stocked and sustainable pantry!
Frequently Asked Questions about How To Store Bulk Grains
Was this page helpful?
At Storables.com, we guarantee accurate and reliable information. Our content, validated by Expert Board Contributors, is crafted following stringent Editorial Policies. We're committed to providing you with well-researched, expert-backed insights for all your informational needs.


0 thoughts on “How To Store Bulk Grains”