
Articles
How To Store Hats DIY
Modified: January 8, 2024
Discover helpful DIY articles on how to store hats, including creative solutions and organizing tips. Keep your hats in pristine condition with these easy storage ideas.
(Many of the links in this article redirect to a specific reviewed product. Your purchase of these products through affiliate links helps to generate commission for Storables.com, at no extra cost. Learn more)
Introduction
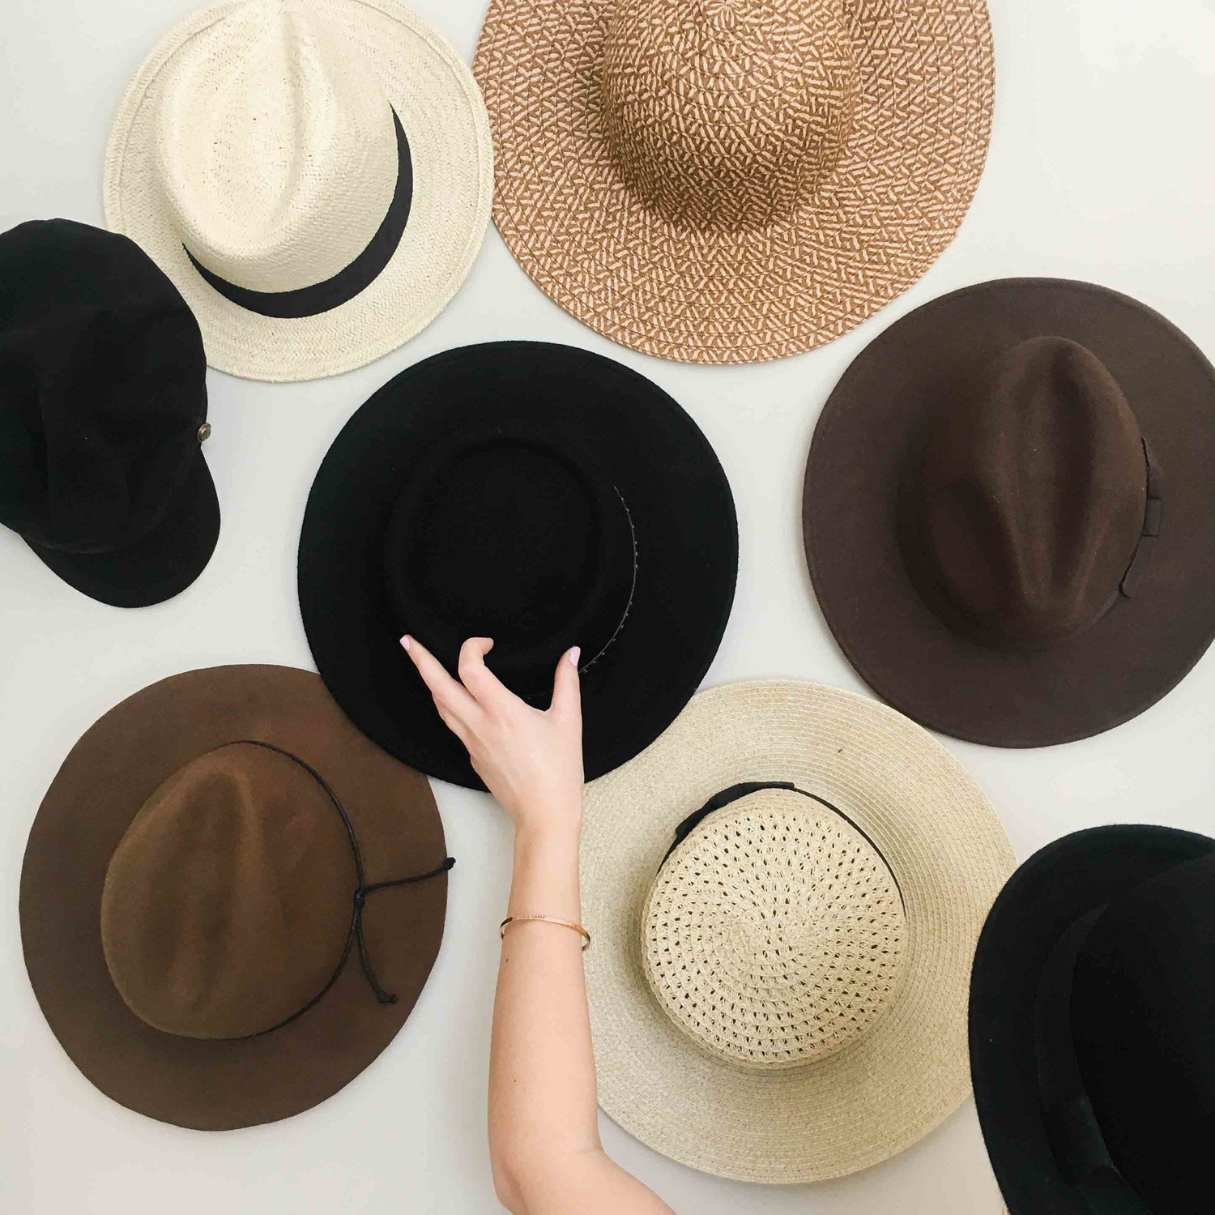
Whether you’re a hat enthusiast or simply someone looking to organize your hat collection, finding the right storage solution is essential to keep your hats in optimal condition. Hats come in various shapes, sizes, and materials, making it important to store them properly to prevent damage and maintain their shape.
In this article, we will explore different hat storage options and provide some DIY solutions that you can easily implement at home. By following these tips, you’ll be able to store your hats effectively, ensuring they are always ready to be worn for any occasion.
Before we dive into the various hat storage options, let’s quickly go over the materials you may need to properly store and organize your hats:
- Hat boxes
- Hat racks
- Hanging hat organizers
- Drawer dividers
- Wall-mounted hooks
- Shelf display
- Cardboard
- PVC pipes
- Repurposed hangers
- Wall grid
- And more!
Now, let’s explore the different hat storage options available in the market:
Key Takeaways:
- Proper hat storage is crucial for maintaining their shape and quality. Consider factors like dust protection, sunlight exposure, and proper ventilation to ensure your hats remain in pristine condition.
- Whether using ready-made storage solutions or DIY projects, take the time to organize and store your hats properly. This not only protects your hats from damage but also allows you to appreciate and enjoy your collection effortlessly.
Read more: How To Store Hats
Materials Needed
Before we delve into the various hat storage options, it’s helpful to gather the necessary materials. These items will assist you in effectively storing and organizing your hats:
- Hat boxes: Hat boxes are ideal for protecting your hats from dust, sunlight, and potential damage. Look for sturdy boxes that provide enough space to accommodate your hats without crushing them. Hat boxes often come in different sizes, allowing you to store multiple hats in one box.
- Hat racks: Hat racks are a popular choice for displaying and organizing hats, especially for those with a large hat collection. These racks can be freestanding or mounted to the wall, providing a convenient and visually appealing storage option. Look for hat racks that have adjustable hooks or shelves to accommodate hats of different sizes.
- Hanging hat organizers: Hanging hat organizers feature individual compartments or pockets where you can store your hats. These organizers can be hung in a closet or on a hook, making them a space-saving solution. Look for ones with clear pockets, so you can easily identify which hat is stored in each compartment.
- Drawer dividers: If you have some extra drawer space, consider using drawer dividers to keep your hats neatly organized. These dividers will prevent hats from getting crushed or tangled together, allowing for easy access and retrieval.
- Wall-mounted hooks: Wall-mounted hooks can be a simple yet effective way to store hats. You can easily install them on the wall and hang your hats, keeping them off the floor or other surfaces where they may get damaged. Use hooks that are sturdy enough to hold the weight of your hats.
- Shelf display: If you have some shelf space available, consider using it to display your hats. Use a shelf with enough clearance to avoid crushing or misshaping the hats, and arrange them in an aesthetically pleasing manner.
Now that you have gathered the necessary materials, let’s explore some of the popular hat storage options available in the market.
Hat Storage Options
When it comes to storing your hats, there are various options available to suit different needs and preferences. Let’s take a look at some of the popular hat storage options:
- Hat Boxes: Hat boxes are an excellent choice for storing and protecting your hats while keeping them dust-free. They come in a variety of sizes to accommodate different hat styles and can be stacked to save space.
- Hat Racks: Hat racks are a practical and stylish option for displaying and organizing your hats. You can choose from wall-mounted hat racks or freestanding ones, depending on your available space. Hat racks often have hooks or pegs that allow you to hang your hats while keeping them easily accessible.
- Hanging Hat Organizers: Hanging hat organizers are a versatile option that can be hung in a closet or on a hook. These organizers usually have multiple compartments or pockets to store individual hats, keeping them organized and easily visible. They are especially useful if you have limited shelf or floor space.
- Drawer Dividers: If you prefer storing your hats in a drawer, using dividers can help keep them separate and prevent them from getting damaged or misshapen. Drawer dividers are available in various sizes and materials, allowing you to create customized sections for each hat.
- Wall-Mounted Hooks: Wall-mounted hooks provide a convenient storage option, especially if you have a collection of hats that you frequently wear. Install hooks on the wall and hang your hats, keeping them within reach and adding a decorative touch to your space.
- Shelf Display: If you have some available shelf space, you can transform it into a stylish hat display. Use floating shelves or dedicated hat display shelves to showcase your hats, arranging them in an eye-catching manner. This option not only keeps your hats organized but also serves as a decorative element in your room.
Now that we have explored the different hat storage options available in the market, let’s move on to some creative DIY solutions for storing your hats.
Hat Boxes
Hat boxes are a classic and elegant option for storing and preserving your hats. They provide protection from dust, sunlight, and potential damage, helping to maintain the shape and quality of your hats over time. Here’s how you can effectively use hat boxes to store your hats:
Choose the Right Size: When selecting hat boxes, ensure they are large enough to comfortably accommodate your hats without squishing or altering their shape. Consider the size and style of your hats to determine the appropriate box dimensions. It’s better to choose a slightly larger box than a smaller one to avoid deformation.
Separate Each Hat: To prevent hats from rubbing against each other, place a layer of tissue paper or acid-free archival paper between each hat. This will help preserve the structure and prevent any color transfer or friction damage.
Secure the Hats: Once the hats are separated, secure them by gently placing a layer of tissue paper or acid-free archival paper over the top of each hat. This will provide an extra layer of protection and help keep the hats in place during storage.
Label the Boxes: To easily identify specific hats, consider labeling the boxes with a description or photo of the hats stored inside. This will save you time when searching for a particular hat and will help maintain organization within your hat collection.
Stacking the Boxes: If you have multiple hat boxes, stack them in a cool, dry place. Ensure that the boxes are stable and won’t topple over. Avoid placing heavy objects on top of the boxes to prevent crushing the hats inside.
Regular Cleaning: Remember to regularly clean the inside and outside of the hat boxes to keep them free from dust and dirt. Use a soft, lint-free cloth or a brush to gently remove any debris. Avoid using harsh cleaning agents that could damage the boxes or hats.
Hat boxes not only provide practical storage solutions but also add an elegant touch to your living space. Displaying a stack of beautifully designed hat boxes can become a statement piece in your room while ensuring the longevity of your valuable hat collection.
Now that you have learned about using hat boxes for hat storage, let’s explore other options you can consider for organizing your hats.
Hat Racks
Hat racks are a versatile and practical solution for storing and organizing your hats. They come in various styles and configurations, making them suitable for different spaces and hat collections. Here’s how you can effectively use hat racks to keep your hats easily accessible and well-organized:
Choose the Right Hat Rack: Consider the size and style of your hats when selecting a hat rack. Look for racks with adjustable hooks or shelves to accommodate different hat sizes and styles. Ensure the rack is sturdy enough to support the weight of your hats.
Mount on the Wall: If you have limited floor space, opt for a wall-mounted hat rack. Install it securely on a wall in your bedroom, closet, or entryway. This not only keeps your hats organized but also adds a decorative element to your space. Make sure the rack is installed at a height that allows your hats to hang freely without touching the floor or other objects.
Freestanding Hat Racks: If you have more space and prefer a portable option, choose a freestanding hat rack. These racks usually come with a sturdy base and multiple hooks or tiers to hold your hats. Place the rack in an area where it won’t obstruct movement, and arrange your hats in an aesthetically pleasing manner.
Group Hats by Style or Color: Organize your hats on the hat rack by grouping them according to their style or color. This makes it easier to find the hat you want to wear and adds a visually appealing aspect to your hat storage. You can separate them into categories such as wide-brimmed hats, fedoras, baseball caps, or by color coordination.
Utilize Hat Rack Accessories: Some hat racks come with additional accessories such as shelves, baskets, or hooks. Take advantage of these features to store hat accessories like hat pins, scarves, or small hat decorations. This helps to keep all your hat-related items in one place, making it convenient when you need to accessorize your hats.
Rotate Your Hat Display: To prevent hats from being constantly exposed to sunlight or pressure in the same spot, periodically rotate your hat display on the rack. This ensures even usage and helps maintain the shape and condition of your hats over time.
Hat racks not only provide practical storage solutions but also serve as a decorative element in your living space. Whether mounted on the wall or placed freestanding, they allow you to showcase your hat collection while keeping them easily accessible and organized.
Now that you have learned about hat racks, let’s explore other hat storage options you can consider for organizing your hats.
Read more: How To Store A Hat
Hanging Hat Organizers
Hanging hat organizers are a convenient and space-saving solution for storing and organizing your hats. They come in various designs and styles, providing individual compartments or pockets to keep your hats safe and easily accessible. Here’s how you can effectively use hanging hat organizers to streamline your hat collection:
Select the Right Hanging Hat Organizer: Look for a hanging hat organizer that has enough compartments or pockets to accommodate your hats. Opt for organizers made of durable and breathable materials, such as canvas or fabric, to allow for proper air circulation and prevent moisture buildup.
Hang it in Your Closet: Find a suitable spot in your closet to hang the organizer. Make sure it’s within reach and won’t interfere with your other clothing items. You can use a closet rod or a hook to hang the organizer securely.
Assign a Hat per Compartment: To keep your hats organized and prevent them from touching or getting tangled, assign one hat per compartment or pocket. This helps maintain the shape and condition of each hat and allows for easy retrieval when you want to wear a specific one.
Sort by Style or Season: If you have a large hat collection, consider sorting your hats in the hanging organizer by style or season. For example, you can dedicate one row or section for wide-brimmed hats, another for beanies, and another for caps. Alternatively, you can organize them by seasons, placing your summer hats together and your winter hats together.
Label the Compartments: If you prefer a more organized approach, you can label each compartment or pocket with the type or name of the hat stored inside. This makes it easier to locate a specific hat quickly, especially if you have a diverse hat collection.
Keep the Organizer Clean: Regular maintenance of the hanging hat organizer is essential to keep your hats in good condition. Remove any dust or debris from the organizer by gently wiping it with a damp cloth. If necessary, you can also machine wash some fabric organizers, following the manufacturer’s instructions.
Hanging hat organizers offer a practical and efficient way to store and display your hats while saving valuable closet or storage space. They provide easy access to your hats and allow you to see your entire collection at a glance, making it convenient to choose the perfect hat for any occasion.
Now that you have learned about hanging hat organizers, let’s explore other hat storage options you can consider for organizing your hats.
Drawer Dividers
If you prefer to store your hats in drawers and keep them neatly organized, drawer dividers are a practical solution. They help prevent hats from getting crushed or tangled together, allowing for easy access and retrieval. Here’s how you can effectively use drawer dividers to store your hats:
Select the Right Drawer Dividers: Choose drawer dividers that are adjustable and can fit the dimensions of your drawer. Look for dividers made of sturdy materials, such as plastic or wood, to provide stability and durability.
Measure Your Hats: Before purchasing drawer dividers, measure the dimensions of your hats to ensure they will fit within the compartments. You may need to adjust the dividers accordingly or select dividers with larger compartments for bigger hats.
Create Individual Sections: Install the drawer dividers in your drawer to create separate sections for each hat. Place them vertically or horizontally, depending on the shape and size of your hats. This will prevent hats from shifting or colliding with each other when opening and closing the drawer.
Group Similar Hats: Organize your hats within the sections by grouping them according to their style, material, or color. This helps you easily locate a specific hat when needed and makes it visually appealing when you open your drawer.
Utilize Additional Storage Space: If your drawer has extra space after arranging your hats, consider using that space to store hat accessories or smaller hats. Use small containers or fabric bins to keep these items separate and prevent them from getting lost or damaged.
Label the Sections: To enhance organization and quick identification, label each section with the type or style of hat it contains. You can use adhesive labels or small tags to easily identify each section at a glance.
Maintain Cleanliness: Regularly clean your drawer dividers and remove any dust or debris to keep your hats in a clean and pristine condition. If necessary, wipe the dividers with a damp cloth and allow them to dry before placing your hats back into the sections.
Drawer dividers offer a practical and space-saving solution for storing your hats while keeping them organized and easily accessible. With a well-arranged drawer, you can efficiently store and protect your hats, ensuring they maintain their shape and quality over time.
Now that you have learned about using drawer dividers for hat storage, let’s explore other hat storage options you can consider for organizing your hats.
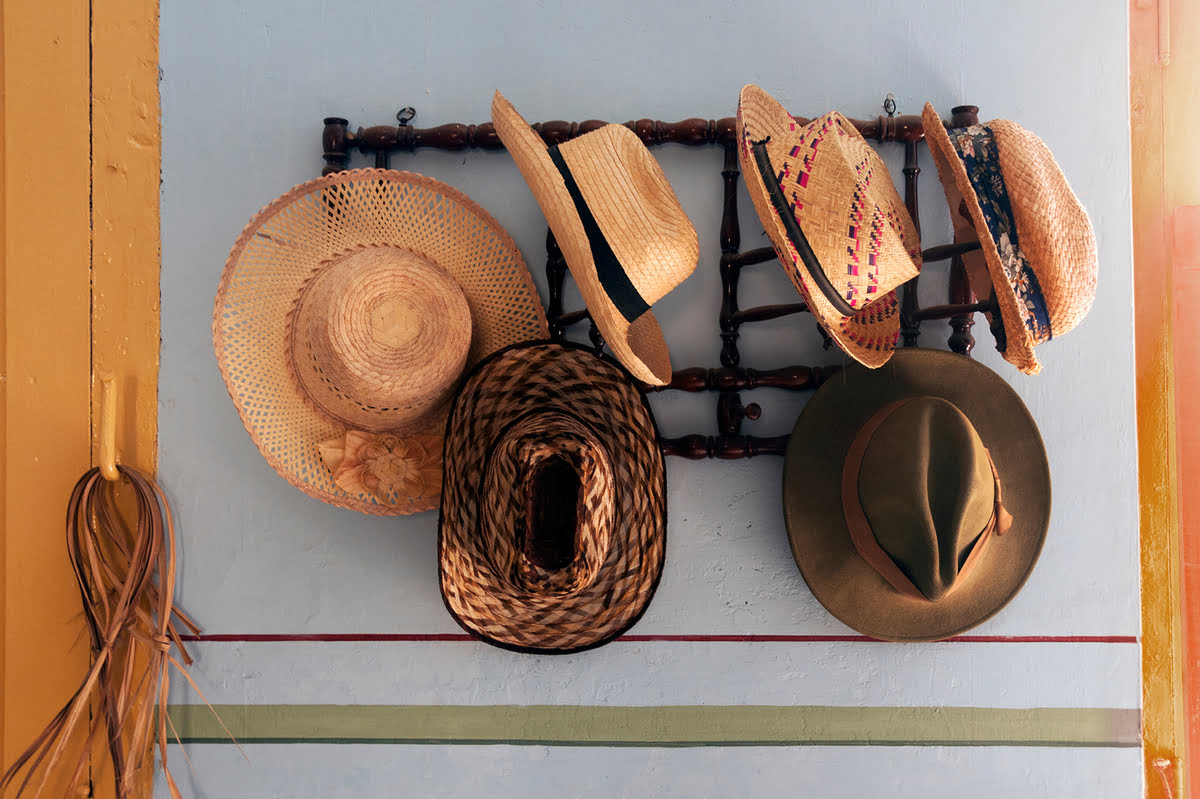
Wall-Mounted Hooks
Wall-mounted hooks provide a simple and effective way to store your hats while keeping them easily accessible and visible. They are particularly useful if you have limited floor or shelf space. Here’s how you can effectively use wall-mounted hooks to organize your hats:
Select Sturdy Hooks: Choose wall-mounted hooks that are strong and durable enough to hold the weight of your hats. Consider hooks made of materials like metal or wood, which are both sturdy and aesthetically pleasing.
Determine an Ideal Location: Identify a suitable location on your wall where you can install the hooks. This could be in your bedroom, closet, entryway, or any area that is easily accessible to you and doesn’t hinder movement.
Spacing and Placement: Plan the spacing and placement of the hooks based on the size of your hats. Leave enough room between each hook to prevent the hats from touching or getting crowded. Ensure that the hooks are mounted securely on the wall to avoid any accidents or damage.
Hang Hats with Care: Gently hang your hats on the wall-mounted hooks, making sure not to force or stretch them. Properly position each hat so that it hangs freely and maintains its shape. Avoid overloading or hanging too many hats on one hook, as this can cause the hats to become misshapen.
Group Hats by Style or Color: Arrange your hats on the wall-mounted hooks by grouping them according to their style, color, or occasion. This will make it easier to find a specific hat when you need it and add a visually appealing aspect to your wall display.
Rotate and Rearrange: Periodically rotate the hats on the hooks to ensure equal usage and prevent constant exposure to sunlight or pressure in the same spot. You can also rearrange the hats to create a fresh and dynamic display whenever you feel like changing up the look.
Decorative Display: Use the wall-mounted hooks as an opportunity to showcase your hat collection in a decorative way. Arrange the hats in an aesthetically pleasing pattern or create a unique design that complements the overall decor of your room.
Wall-mounted hooks offer a compact and visually appealing storage option for your hats. They not only keep your hats organized and easily accessible but also add a decorative element to your living space.
Now that you have learned about wall-mounted hooks for hat storage, let’s explore other hat storage options you can consider for organizing your hats.
Store hats by using a tension rod in a closet to hang them, or use a decorative hook rack on the wall. This keeps them organized and prevents damage.
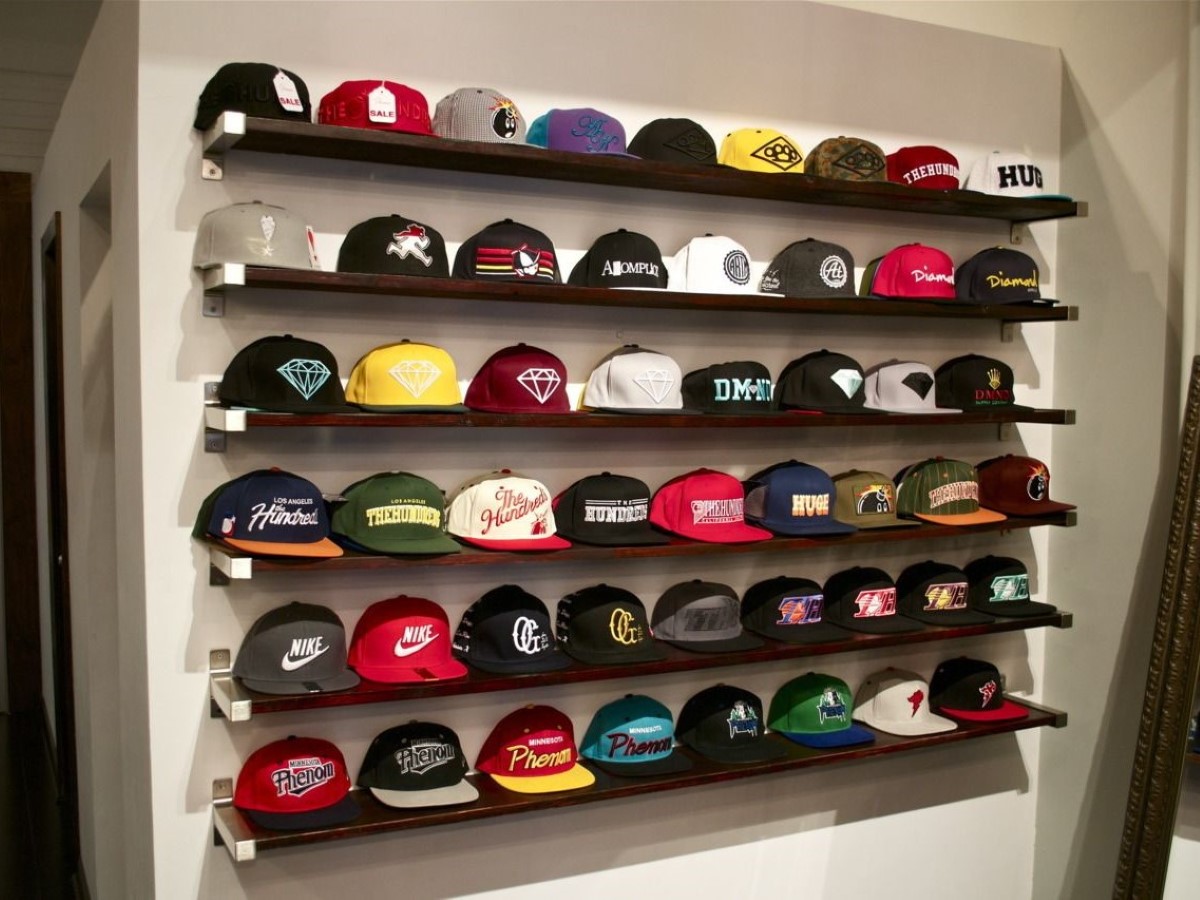
Shelf Display
Shelf displays are a stylish and versatile option for storing and showcasing your hat collection. They not only keep your hats organized but also serve as a decorative element in your room. Here’s how you can effectively use shelf displays to store and display your hats:
Select the Right Shelves: Choose shelves that are wide and deep enough to accommodate your hats without causing them to get squished or misshapen. Floating shelves or dedicated hat display shelves are ideal options for showcasing your hats.
Arrange Hats in a Visually Appealing Manner: Place your hats on the shelves in an aesthetically pleasing arrangement. Play with different heights and angles to create a dynamic display. You can stack hats on top of each other or arrange them side by side, depending on the style and size of your hats.
Group Hats by Style or Color: Organize your hats on the shelves by grouping them based on their style, material, or color. This not only adds visual interest but also makes it easier to locate a specific hat when you need it.
Utilize Hat Stand or Mannequin: To add a touch of flair to your shelf display, consider using a hat stand or mannequin. Simply place a hat on the stand or mannequin to create a visually striking focal point on your shelf. This also helps maintain the shape of the hat.
Rotate Your Hat Display: Periodically rotate the hats on the shelf display to evenly distribute sunlight exposure and prevent prolonged pressure on any one hat. This will help prolong the lifespan of your hats and ensure they retain their shape and quality.
Keep the Shelves Clean: Regularly dust and clean the shelves to keep your hats looking their best. Use a soft cloth or duster to gently remove any debris or dust that may accumulate. Avoid using harsh cleaning agents that could damage the hats.
Accessorize the Display: Enhance the aesthetic appeal of your shelf display by adding decorative accents or accessories. You can place small planters, picture frames, or other decorative items alongside your hats to create a visually appealing composition.
Shelf displays offer an elegant and organized way to store and show off your hat collection. They not only keep your hats within easy reach but also serve as a visually pleasing focal point in your room.
Now that you have learned about shelf displays for hat storage, you have a range of options to consider for organizing and showcasing your hats.
Read more: How To Store Fitted Hats
DIY Hat Storage Solutions
If you prefer a more hands-on approach, there are several DIY hat storage solutions that you can create at home. These solutions allow you to customize the storage according to your needs and add a personal touch to your hat organization. Here are some creative DIY hat storage ideas:
- Cardboard Hat Organizer: Repurpose cardboard boxes or cereal boxes into a DIY hat organizer. Cut the boxes into individual compartments, customize the sizes to fit your hats, and secure them with tape or glue. Stack the compartments in a larger box or on a shelf to store and organize your hats neatly.
- PVC Pipe Hat Rack: Use PVC pipes to create your own hat rack. Cut the pipes into equal lengths, and attach them together with pipe connectors and adhesive. Mount the PVC pipe rack on the wall or hang it from the ceiling, creating a unique and functional hat storage solution.
- Repurposed Hangers for Hat Display: Turn old wire hangers or wooden hangers into a hat display by reshaping them. Bend the hanger to form a curved shape, similar to the shape of a head. Hang the hangers on a rod or rail, and place your hats on them to create an organized and visually appealing hat display.
- Hat Wall Grid: Create a hat wall grid using wire mesh or a pegboard. Mount the mesh or pegboard on the wall, and attach hooks or hangers to hang your hats. This DIY hat storage solution allows you to customize the arrangement and easily access your favorite hats while adding a unique statement piece to your space.
These DIY hat storage solutions offer a creative and cost-effective way to organize your hats while unleashing your creativity. They are customizable to fit your space and can be tailored to match your personal style and preferences.
Remember to consider the size and weight of your hats when implementing these DIY solutions. Proper support and secure mounting are essential to ensure the longevity and protection of your hats.
Now that you have explored DIY hat storage solutions, you can choose the one that best fits your needs and embark on a fun and creative DIY project to organize your hat collection.
Cardboard Hat Organizer
A cardboard hat organizer is a simple and budget-friendly DIY solution to store and organize your hats. It allows you to take advantage of materials you may already have at home and customize the compartments based on the size and shape of your hats. Here’s how you can create a cardboard hat organizer:
- Gather Your Materials: Collect cardboard boxes or cereal boxes of various sizes, a ruler, a pencil, a utility knife, tape, and glue.
- Measure and Mark: Measure the dimensions of your hats to determine the size of the compartments needed. Using a ruler and a pencil, mark the measurements on the cardboard boxes.
- Cut out the Compartments: Use a utility knife to carefully cut along the marked lines and create the individual compartments. Ensure that the cuts are straight and even.
- Arrange the Compartments: Arrange the cardboard compartments inside a larger box or on a shelf, ensuring they fit snugly and securely.
- Secure the Compartments: Use tape or glue to secure the compartments in place, ensuring they don’t shift or move around when inserting or removing your hats.
- Label or Decorate: Optionally, you can label each compartment with the type or color of hat stored inside, or decorate the organizer to add a personal touch.
- Stack or Store: Stack the cardboard hat organizer in a cool, dry place or place it on a shelf, ensuring it is stable. You can also stack multiple layers of the cardboard compartments to accommodate a larger hat collection.
A cardboard hat organizer is not only a practical storage solution but also a creative way to repurpose materials and customize your hat organization. It allows you to organize your hats neatly while protecting them from dust and damage.
Remember to consider the weight and size of your hats when creating the compartments. Reinforce the cardboard if necessary to ensure it can support the weight of the hats without collapsing.
Now that you know how to create a cardboard hat organizer, you can start organizing your hats in a personalized and cost-effective way.
PVC Pipe Hat Rack
A PVC pipe hat rack is a creative and customizable DIY solution to store and display your hats. It is a versatile option that allows you to design a hat rack that fits your specific needs and hat collection. Here’s how you can create a PVC pipe hat rack:
- Gather Your Materials: Collect PVC pipes of various lengths, PVC connectors (elbows, tees, and couplings), PVC adhesive, a saw, a measuring tape, and sandpaper (optional).
- Measure and Plan: Measure the desired length and height of your hat rack. Consider the size and number of hats you want to accommodate.
- Cut the PVC Pipes: Use a saw to cut the PVC pipes to the desired lengths according to your measurements. Ensure that the cuts are straight and even.
- Assemble the Rack: Connect the PVC pipes using the PVC connectors. Use elbows to create corners and tees to create intersections. Apply PVC adhesive to secure the joints, ensuring they are strong and stable.
- Sand and Clean: If desired, use sandpaper to smooth any rough edges or sharp corners of the PVC pipes. This will ensure your hats glide on and off the rack smoothly.
- Mount the Rack: Decide whether you want to mount the PVC hat rack on a wall or keep it freestanding. If wall-mounted, use brackets or screws to securely attach the rack to the wall. If freestanding, ensure the base is stable and can support the weight of the hats.
- Arrange Your Hats: Place your hats on the PVC pipe hat rack by gently sliding the brim of each hat onto a pipe. Ensure the hats are evenly spaced and not overcrowded to prevent them from getting misshapen.
- Customize and Decorate: You can customize the appearance of your PVC pipe hat rack by painting the pipes or adding decorative elements such as ribbons, stickers, or fabric accents. This allows you to personalize the rack and make it blend seamlessly with your room decor.
A PVC pipe hat rack offers the advantage of customization, as it can be tailored to fit your available space and hat collection. It provides a sturdy and visually interesting solution to display and organize your hats while keeping them easily accessible.
Remember to consider the weight and size of your hats when designing the PVC pipe hat rack, ensuring the pipes and connections can support the hats securely.
Now that you have learned how to create a PVC pipe hat rack, you can enjoy a functional and unique storage solution for your hat collection.
Repurposed Hangers for Hat Display
Repurposing old wire or wooden hangers can provide a creative and cost-effective solution for displaying and organizing your hats. By reshaping the hangers, you can create a unique hat display that adds a touch of style to your space. Here’s how you can repurpose hangers for a hat display:
- Gather Your Materials: Collect wire or wooden hangers, pliers, and optional decorative elements such as paint, fabric, or ribbon.
- Reshape the Hangers: Using pliers, carefully reshape the hangers to create a curved shape similar to the shape of a head. This will provide a perfect foundation for showcasing your hats.
- Add Stability: To ensure the hangers remain stable, consider reinforcing them by twisting the ends of the hanger together using the pliers. This will prevent the hangers from rotating or falling apart when holding the hats.
- Personalize Your Hat Hangers: Get creative and personalize your hat hangers with decorative elements. You can paint the hangers in a color that matches your room decor, wrap them with fabric or ribbon to add texture, or attach small decorative accents for a unique touch.
- Display Your Hats: Hang your hats on the repurposed hangers by placing them over the curved part of the hanger. Ensure that each hat fits securely and maintains its shape.
- Hang the Hangers: Find a suitable spot to hang the repurposed hangers in your room or closet. You can use a wall-mounted hook, a clothing rod, or even attach them to a decorative display board.
- Arrange Your Hat Display: Arrange the hangers in an aesthetically pleasing manner. You can group hats by style, color, or occasion, creating a visually striking display that also makes it easier to find the hat you desire.
Repurposed hangers creatively transform into hat displays that showcase your collection while adding a unique touch to your space. This DIY solution is not only practical but also allows you to give new life to old hangers that would otherwise go to waste.
Remember to choose hangers that are strong and sturdy enough to support the weight of your hats. Reinforce the hangers if necessary to ensure they can safely hold your hats without bending or breaking.
Now that you know how to repurpose hangers for a hat display, you can proudly showcase your hats in an inventive and visually appealing way.
Read more: How To Store Caps And Hats
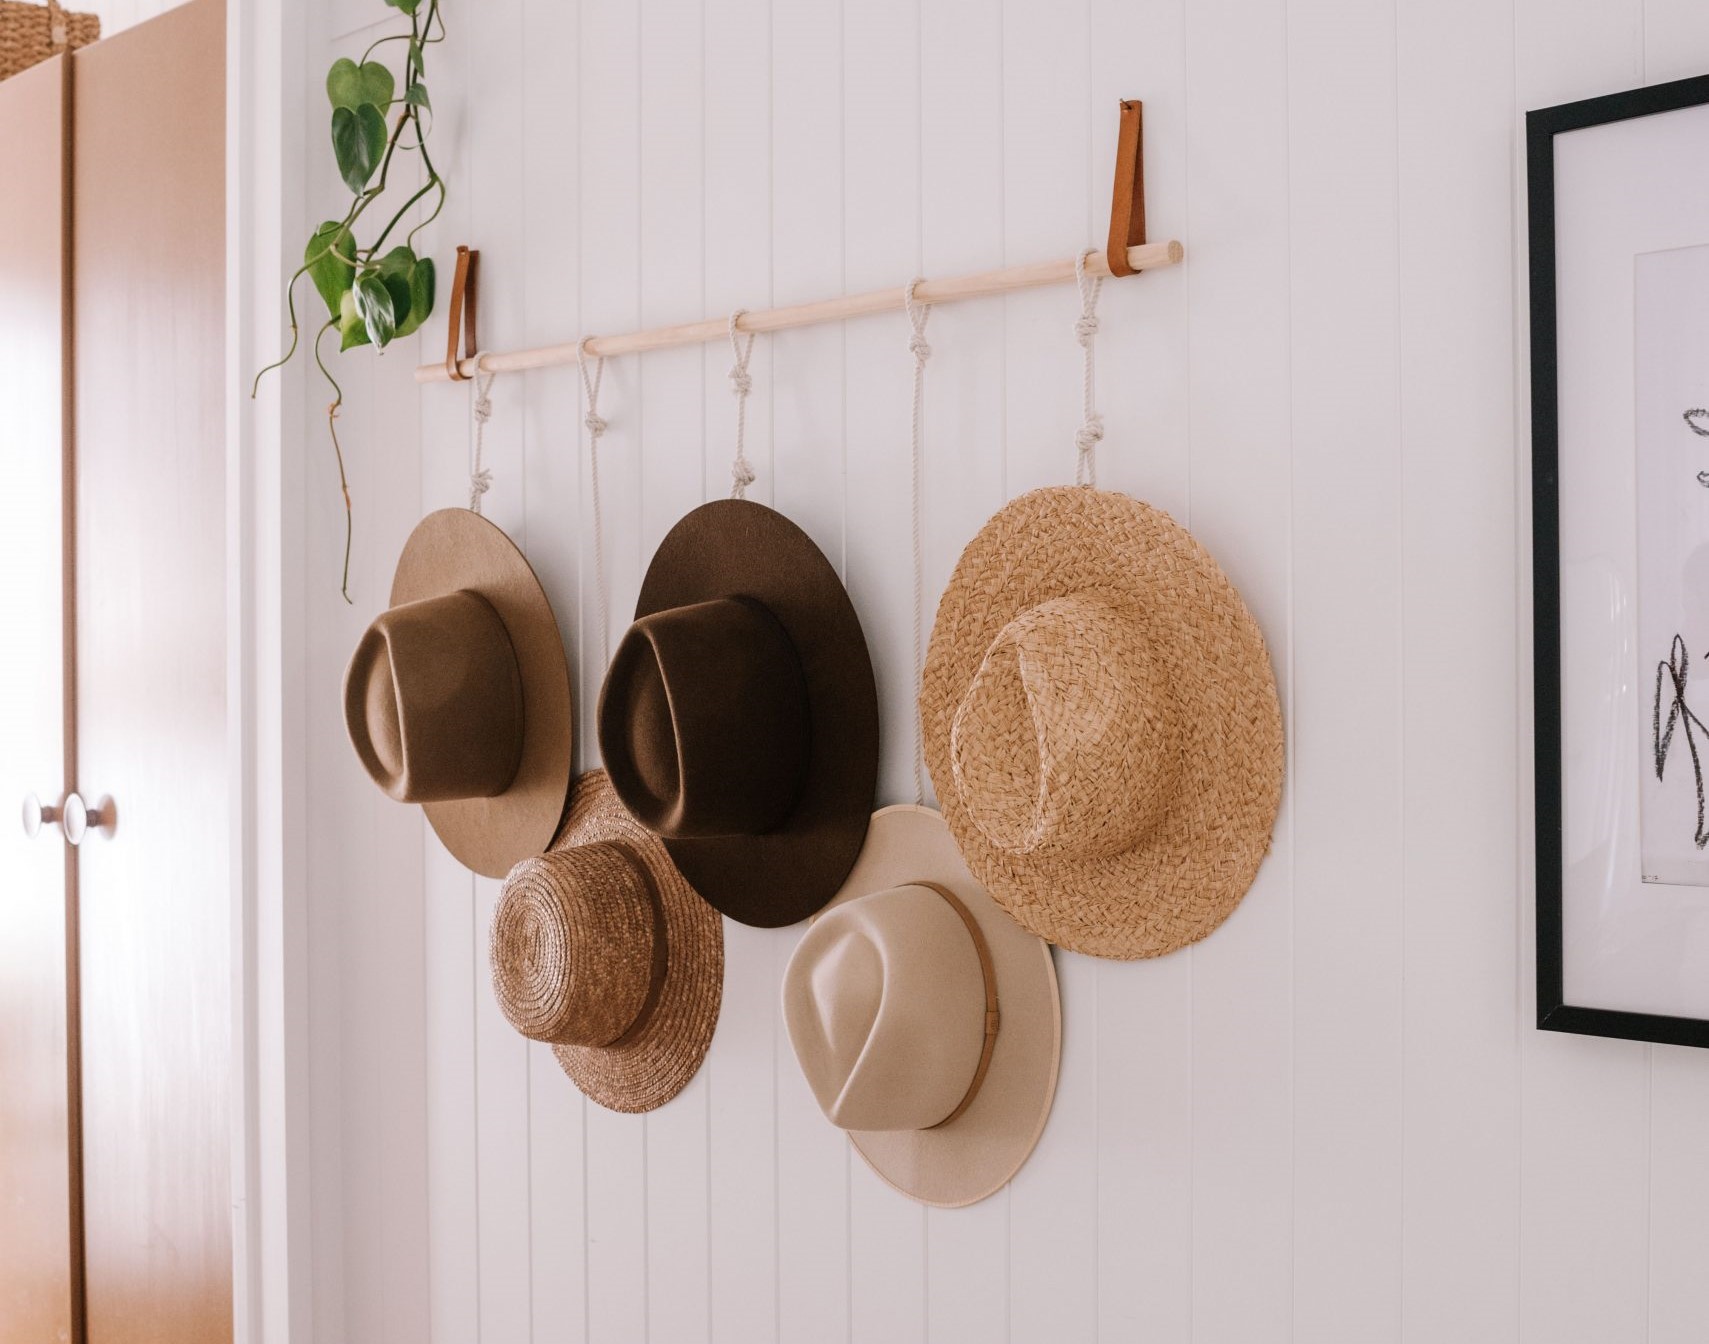
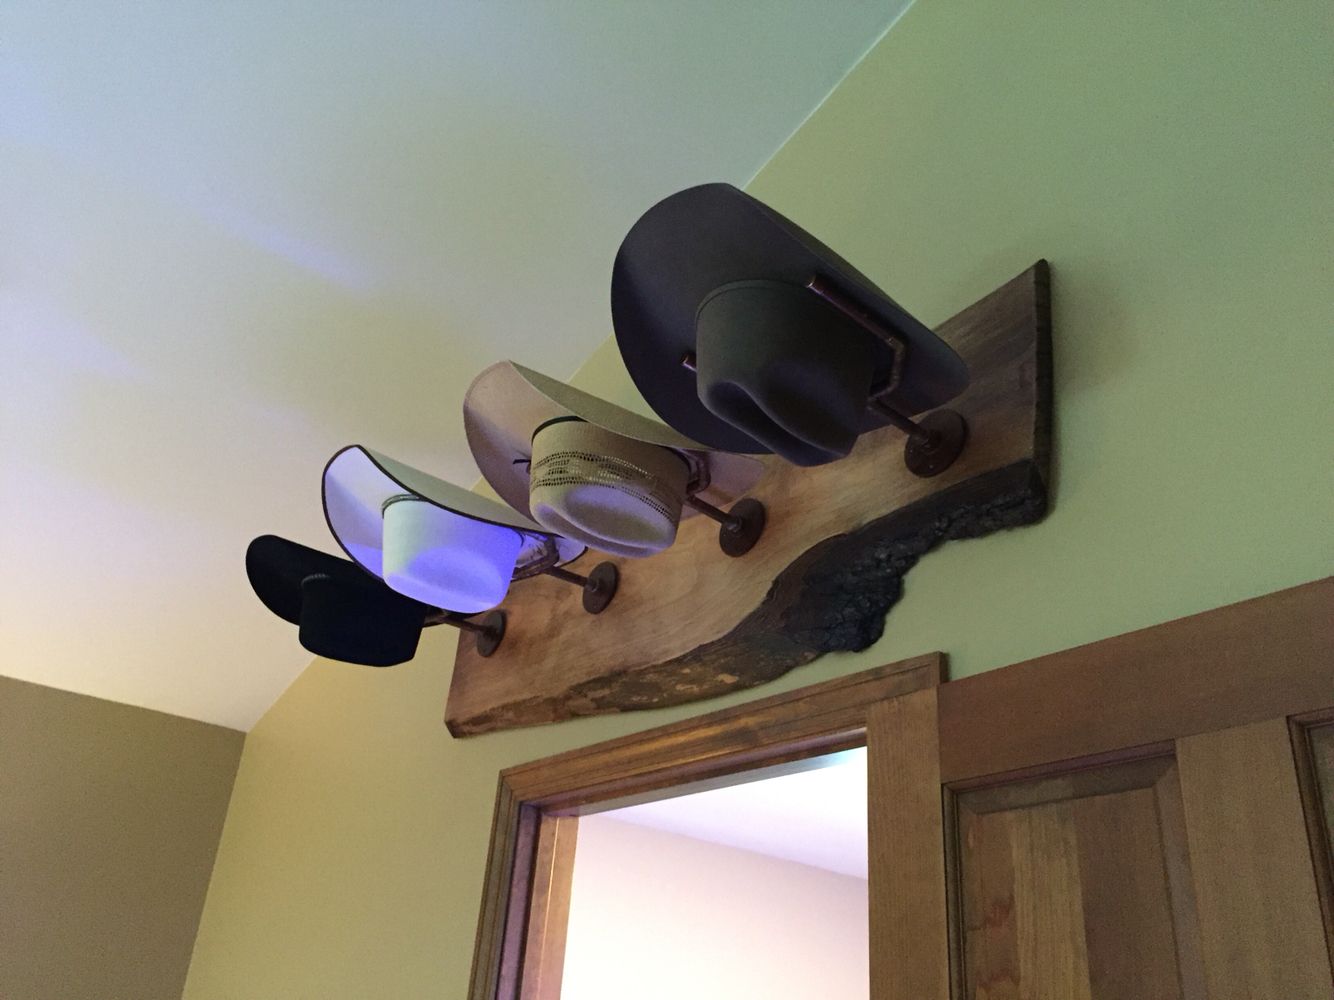
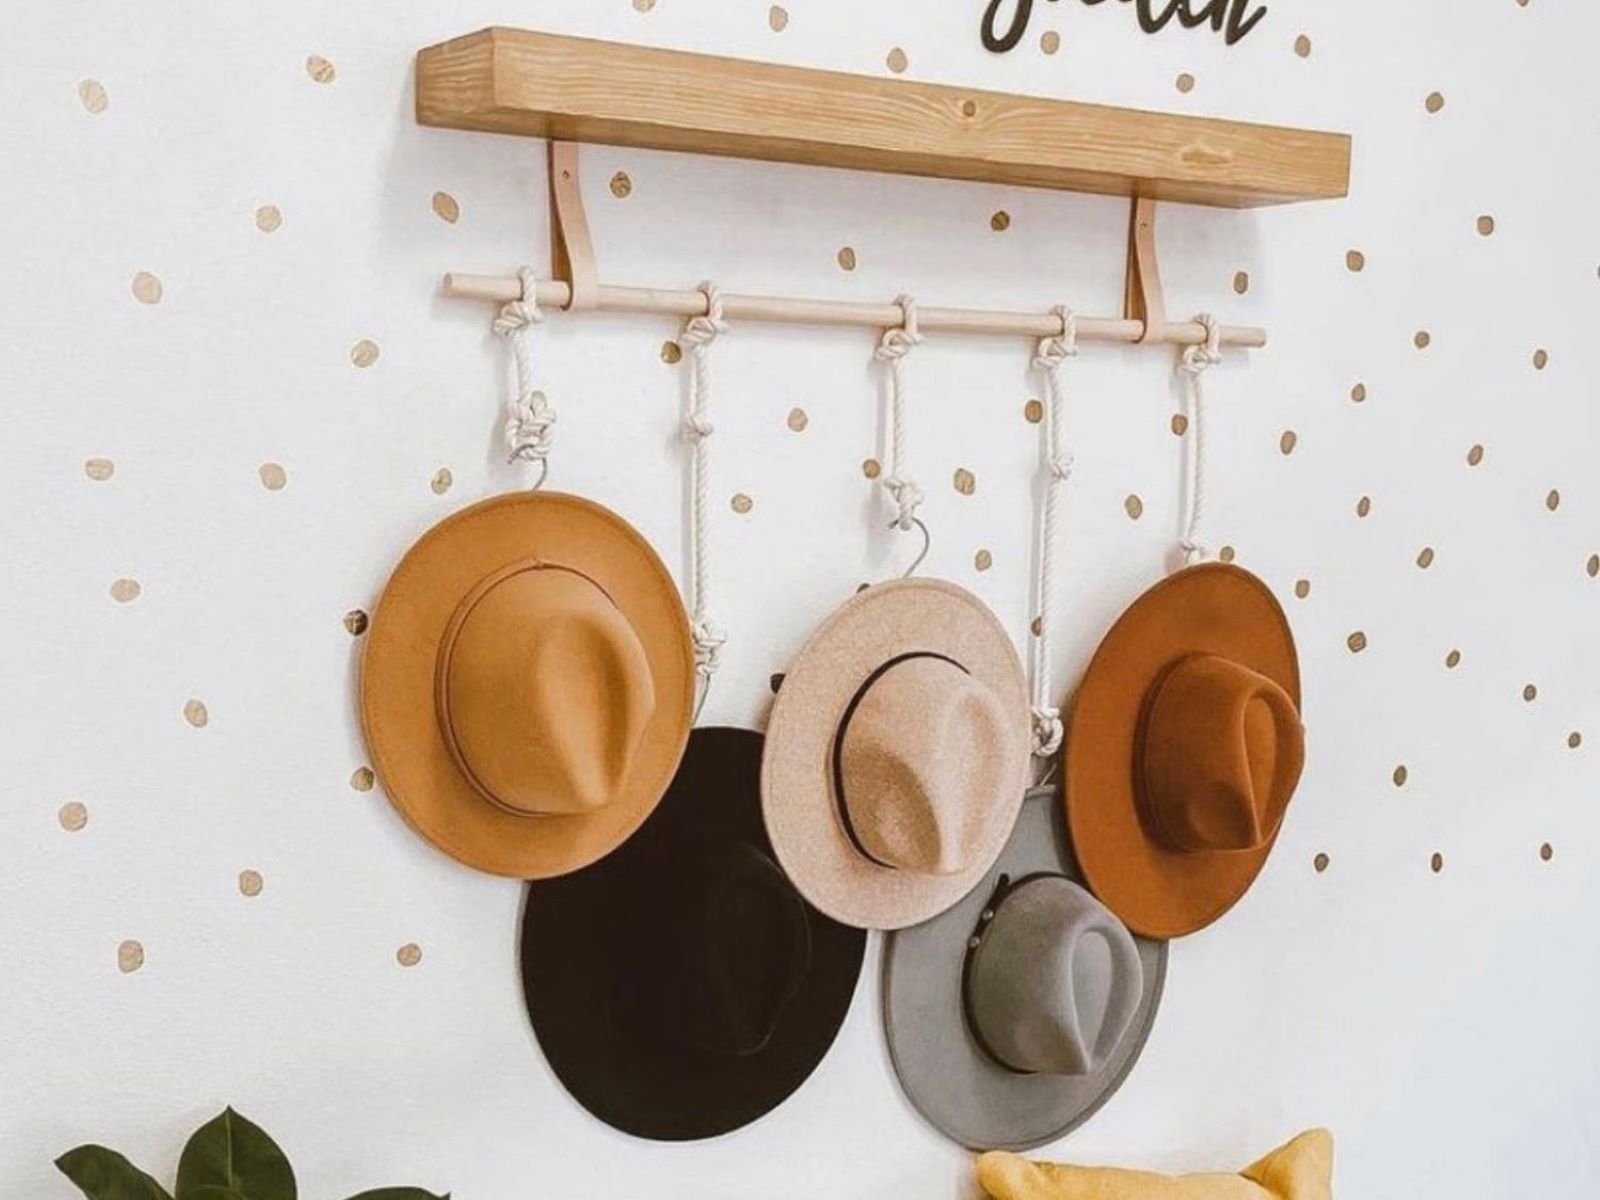
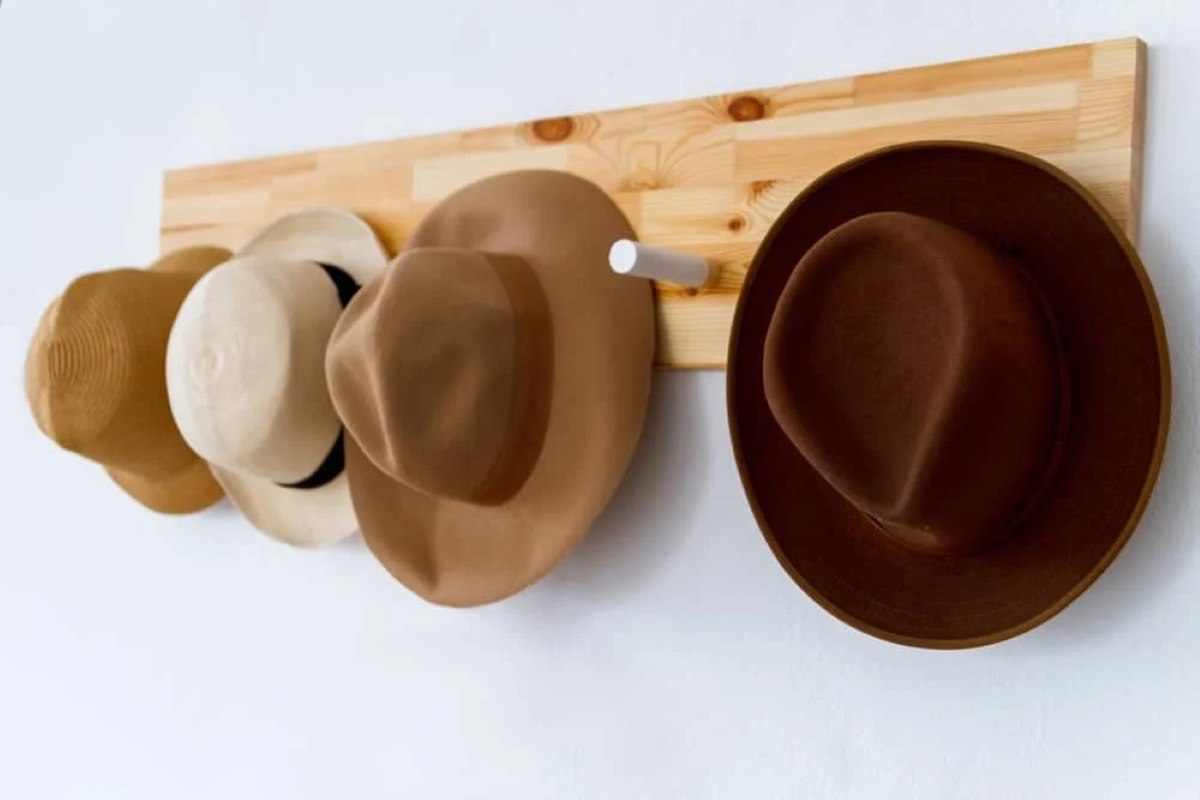
Hat Wall Grid
A hat wall grid is a versatile and visually stunning DIY solution to store and display your hats. By using wire mesh or a pegboard, you can create a hat storage system that not only keeps your hats organized but also serves as a unique wall decor. Here’s how you can create a hat wall grid:
- Gather Your Materials: Collect a wire mesh panel or a pegboard, mounting brackets or screws, a drill, hooks or hangers, and optional decorative elements.
- Prepare the Wall: Choose a wall where you want to install the hat wall grid. Make sure it is clean, smooth, and suitable for mounting the wire mesh panel or pegboard.
- Mount the Wire Mesh Panel or Pegboard: Use mounting brackets or screws to securely attach the wire mesh panel or pegboard to the wall. Ensure it is level and stable to support the weight of your hats.
- Arrange Hooks or Hangers: Determine where you want the hooks or hangers to go on the wire grid or pegboard. Space them evenly to accommodate your hats and allow for easy access.
- Hang Your Hats: Place your hats on the hooks or hangers, ensuring they are secure and properly positioned on the hat wall grid. Adjust the placement of the hats for an organized and visually appealing display.
- Add Decorative Elements: Enhance the aesthetics of your hat wall grid by adding decorative elements. You can attach fairy lights, small shelves, or other decorative items around the hats to create a visually striking composition.
- Customize the Display: Personalize your hat wall grid by painting the wire mesh or pegboard in a color that complements your room decor. You can also attach fabric or patterned paper to the background of the wire mesh or pegboard for added visual interest.
A hat wall grid not only provides a practical storage solution but also serves as an eye-catching display. It allows you to showcase your hat collection while using the wall space creatively.
Remember to secure the wire mesh panel or pegboard firmly to the wall to ensure the hats are held securely and the display remains stable. Regularly check the hooks or hangers to ensure they are securely attached.
Now that you know how to create a hat wall grid, you can enjoy a functional and visually appealing storage solution that adds a unique flair to your room.
Tips for Storing Hats Properly
Proper storage is essential to maintain the shape, condition, and longevity of your hats. Whether you’re using a hat box, hat rack, or any other storage method, consider these tips to ensure your hats are stored correctly:
- Keep Hats Clean: Before storing your hats, ensure they are clean and free from any dirt or debris. Brush off any loose particles or use a soft cloth to remove any surface dust. If needed, spot clean the hats according to the manufacturer’s instructions.
- Avoid Direct Sunlight: Prolonged exposure to sunlight can fade the color and weaken the fibers of your hats. Store them in a cool, dry place away from direct sunlight or use UV-protective covers if needed.
- Protect from Dust: Dust can accumulate on hats over time, so it’s important to store them in a way that prevents dust buildup. Consider using hat boxes or covers to shield your hats from dust and keep them looking fresh.
- Preserve Shape: To maintain the shape of your hats, avoid storing them in a cramped or tight space. Ensure there is enough room for the hats to retain their form without getting misshapen. Consider using hat stands or stuff the crown with tissue paper or acid-free archival paper to help it hold its shape.
- Separate Hats: To prevent hats from rubbing against each other, separate them with acid-free archival paper or tissue paper. This will help prevent color transfer and preserve the quality of each hat.
- Avoid Moisture: Moisture can damage hats, causing them to mold or lose their shape. Store your hats in a dry environment and avoid exposing them to areas of high humidity, such as bathrooms or basements.
- Rotate Hat Usage: If you have a collection of hats, it’s a good idea to rotate their usage. This allows the hats to rest and regain their shape before being worn again, preventing excessive wear on a single hat.
- Inspect Regularly: Periodically inspect your stored hats to check for any signs of damage, insect infestation, or changes in shape. Address any issues promptly to prevent further damage.
- Store Hat Accessories Separately: To keep your hat accessories, such as pins or scarves, organized and prevent them from tangling or damaging the hats, store them separately in small containers or pouches within your storage area.
Following these tips will help ensure your hats are stored properly, preserving their condition and allowing them to maintain their shape for years to come.
Remember to choose a storage method that suits your hat collection and available space while considering factors such as dust protection, sunlight exposure, and proper ventilation. By taking the time to store your hats correctly, you can extend their lifespan and enjoy them for many seasons to come.
With these tips in mind, you can confidently store your hats and have them ready to wear whenever you need to add a stylish touch to your outfit.
Conclusion
Properly storing your hats is essential to maintain their shape, quality, and style. With the various storage options available, you can find the perfect solution to suit your hat collection and space. Whether you choose hat boxes, hat racks, hanging organizers, drawer dividers, wall-mounted hooks, shelf displays, or opt for creative DIY solutions, these storage methods will help you keep your hats organized and easily accessible.
When storing your hats, remember to consider factors such as protection from dust, sunlight, and moisture. Take care to preserve the shape of your hats and keep them separated to prevent damage. Regularly inspect your hats and address any issues promptly to ensure their longevity.
In addition to practical storage, you can also incorporate elements of style and personalization into your hat storage solutions. Arrange your hats by style, color, or occasion to create visually appealing displays that also make it easy to find the hat you desire.
By following these tips and implementing proper storage techniques, you can ensure that your hat collection remains in pristine condition for years to come.
So, whether you opt for ready-made storage solutions or embark on creative DIY projects, take the time to organize and store your hats properly. Not only will this protect your hats from damage, but it will also allow you to appreciate and enjoy your collection effortlessly. So, put on your favorite hat confidently, knowing that it has been stored with care and ready to complement your style.
Frequently Asked Questions about How To Store Hats DIY
Was this page helpful?
At Storables.com, we guarantee accurate and reliable information. Our content, validated by Expert Board Contributors, is crafted following stringent Editorial Policies. We're committed to providing you with well-researched, expert-backed insights for all your informational needs.


0 thoughts on “How To Store Hats DIY”