Articles
How To Store Kimbap
Modified: February 29, 2024
Discover the best way to store kimbap with our helpful articles. Keep your delicious Korean rolls fresh and tasty for longer with these expert tips.
(Many of the links in this article redirect to a specific reviewed product. Your purchase of these products through affiliate links helps to generate commission for Storables.com, at no extra cost. Learn more)
Introduction
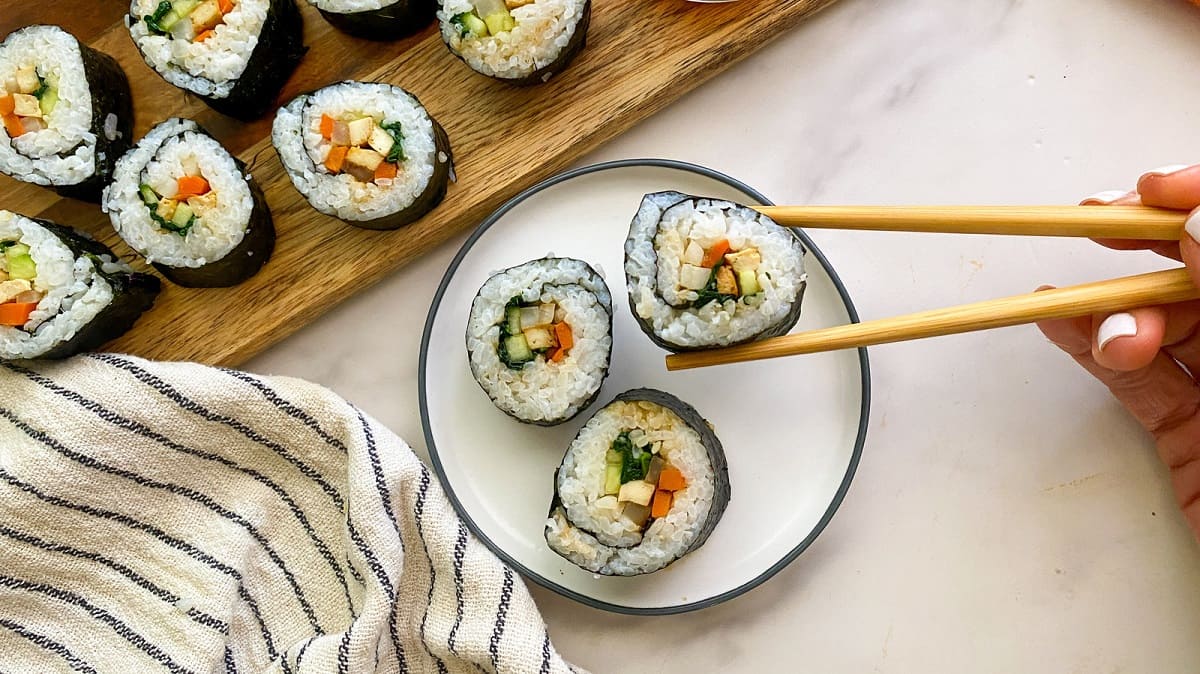
Kimbap, a popular Korean dish, is a delicious and nutritious combination of rice, vegetables, meat or seafood, and various seasonings, all tightly wrapped in dried seaweed. It is often enjoyed as a quick and convenient meal or snack. However, if you have made more kimbap than you can eat in one sitting, you may be wondering how to store it properly to maintain its freshness and flavor.
In this article, we will guide you through the process of storing kimbap, ensuring that it remains tasty and enjoyable for future consumption. From preparing the rice and fillings to wrapping and cutting the kimbap, we will cover all the essential steps. Additionally, we will provide you with some handy tips on how to keep your kimbap fresh for an extended period.
So, if you’re ready to learn the art of storing kimbap and ensuring that each bite is as delicious as the first, let’s dive right in!
Key Takeaways:
- Master the art of storing kimbap by preparing seasoned rice, assembling with assorted fillings, and wrapping tightly. Enjoy fresh kimbap for up to 3 days in the refrigerator or freeze for longer shelf life.
- Keep your kimbap fresh and flavorful by handling with clean hands, wrapping tightly to minimize air exposure, and labeling for easy tracking. Maximize shelf life and enjoy delicious kimbap anytime!
Read more: How To Store Store-Bought Bread
Equipment and Ingredients
Before we delve into the process of storing kimbap, let’s take a look at the essential equipment and ingredients you will need:
- A bamboo mat (also known as a sushi mat) – this will be used to roll the kimbap
- Plastic wrap or aluminum foil – to wrap and store the kimbap
- Dried seaweed (nori) – available in most Asian grocery stores or online
- Cooked rice – preferably short-grain rice, seasoned with a mixture of vinegar, sugar, and salt
- Assorted fillings – such as carrots, cucumber, spinach, pickled radish, omelet, and cooked protein (like beef, chicken, or seafood)
- Soy sauce – for serving
- Sesame oil and sesame seeds – for flavoring
Make sure to have all the necessary equipment and ingredients ready before you begin the kimbap-making process. This will help streamline the process and ensure that your kimbap turns out delicious and ready to be stored.
Now that you have gathered all the necessary equipment and ingredients, let’s move on to the next steps: preparing the rice and fillings.
Step 1: Preparing the Rice
The first step in making kimbap is preparing the rice. Here’s how you can do it:
- Start by cooking the rice. Use short-grain rice and follow the instructions on the package to achieve the desired texture. Once cooked, transfer the rice to a large mixing bowl.
- In a small bowl, mix together rice vinegar, sugar, and salt. The ratio is typically 1 tablespoon of rice vinegar, 1 teaspoon of sugar, and 1/2 teaspoon of salt for every 2 cups of cooked rice.
- While the rice is still hot, drizzle the vinegar mixture evenly over the rice. Gently fold and mix the rice using a wooden spoon or spatula, making sure each grain is coated with the vinegar mixture. This step will give the rice a slightly tangy flavor.
- Allow the rice to cool down to room temperature. To speed up the cooling process, you can fan the rice or gently stir it occasionally.
Properly seasoned rice is essential for delicious kimbap. By following these steps, you will achieve a flavorful and sticky rice base for your rolls.
Now that your rice is ready, let’s move on to the next step: preparing the fillings.
Step 2: Preparing the Fillings
Preparing the fillings for your kimbap is an important step to ensure a tasty and well-balanced roll. Here’s what you need to do:
- Wash and prepare your assorted vegetables and proteins. For vegetables like carrots and cucumbers, julienne them into thin, long strips. Blanch any vegetables that need to be cooked, such as spinach.
- If you’re using cooked proteins like beef, chicken, or seafood, shred or slice them into thin strips or bite-sized pieces.
- For added flavor, you can marinate the proteins with a mixture of soy sauce, sesame oil, garlic, and any other desired seasonings.
- Prepare any other fillings you enjoy, such as pickled radish or omelet. Slice them into thin strips or bite-sized pieces as well.
- Arrange all the prepared fillings neatly on individual plates or containers so that they are easily accessible when assembling the kimbap rolls.
The beauty of kimbap lies in its versatility, so feel free to experiment with different fillings and combinations to suit your taste preferences. Once you have all the fillings prepared and ready to go, it’s time to move on to the next step: assembling the kimbap.
Step 3: Assembling the Kimbap
Now that you have the rice and fillings ready, it’s time to assemble the kimbap rolls. Follow these steps for a successful and delicious outcome:
- Place a sheet of dried seaweed (nori) on a clean bamboo mat with the shiny side facing down.
- Wet your hands with water to prevent the rice from sticking. Take a handful of seasoned rice and spread it evenly on the seaweed, leaving about an inch of space at the top uncovered.
- Press down gently on the rice to ensure it sticks to the seaweed and creates a firm base for the fillings.
- Arrange the fillings in a straight line across the bottom third of the rice-covered seaweed. Be sure not to overstuff the kimbap as it can become challenging to roll.
- Hold onto the bamboo mat tightly and use your fingers to keep the fillings in place. Start rolling the kimbap away from you, using the bamboo mat to guide and tighten the roll. Apply gentle pressure to ensure the ingredients are tightly packed.
- Once you’ve rolled the kimbap, moisten the uncovered strip of seaweed lightly with water to seal the roll. Continue to roll until the seal is secure.
- Gently press the rolled kimbap to ensure it holds its shape. Repeat these steps for each roll.
Assembling kimbap may take some practice, but with time, you’ll become more skilled at creating perfectly rolled and beautifully presented kimbap. Now that you’ve assembled the rolls, let’s move on to the next step: wrapping and cutting.
Store kimbap in an airtight container or wrap it tightly in plastic wrap to prevent it from drying out. Keep it refrigerated and consume within 1-2 days for the best taste and texture.
Read more: How To Store Basil From Grocery Store
Step 4: Wrapping and Cutting
Once you have assembled the kimbap rolls, the next step is to wrap and cut them into bite-sized pieces. Here’s how to do it:
- Place a sheet of plastic wrap or aluminum foil on a clean surface.
- Transfer the rolled kimbap onto the plastic wrap, ensuring that the seam side is facing down.
- Wrap the kimbap tightly with the plastic wrap, making sure all edges are secured. This will help maintain the shape and prevent air from getting in.
- Repeat this process for each roll, wrapping them individually.
- Once wrapped, use a sharp knife to cut the kimbap into bite-sized pieces. Wet the knife with water before each cut to prevent the rice from sticking.
- Aim for bite-sized pieces, typically about 1 inch in width. You can adjust the size based on your preference.
- Unwrap the individual pieces before serving or storing.
Wrapping and cutting the kimbap not only improves its presentation but also helps to preserve its freshness. Now that you have wrapped and cut the kimbap, it’s time to move on to the final step: storing it.
Step 5: Storing the Kimbap
Now that you have prepared and assembled your delicious kimbap rolls, it’s important to store them properly to maintain their freshness and flavor. Follow these steps to store your kimbap:
- Wrap each individual kimbap roll tightly with plastic wrap or aluminum foil to prevent exposure to air.
- Place the wrapped rolls in an airtight container or zipper-lock bag.
- Store the container or bag in the refrigerator to keep the kimbap fresh and safe to consume.
Kimbap can be stored in the refrigerator for up to 2-3 days. However, for the best taste and texture, it is recommended to consume it within the first 24 hours.
If you are planning to store the kimbap for an extended period, you can also freeze it. Place the wrapped rolls in a freezer-safe container or freezer bag and store them in the freezer. Frozen kimbap can last up to a month.
When you’re ready to enjoy the stored kimbap, simply remove it from the refrigerator or freezer, let it thaw (if frozen), and remove the plastic wrap or aluminum foil before serving. The kimbap can be served cold or at room temperature.
Remember to discard any leftover kimbap that has been left unrefrigerated for too long or shows signs of spoilage, such as an off smell or color.
By following these storage guidelines, you can enjoy your homemade kimbap at any time, whether it’s a quick and satisfying meal or a delightful snack.
Tips for Keeping Kimbap Fresh
To ensure the freshness and quality of your stored kimbap, consider these helpful tips:
- Handle the kimbap with clean hands and utensils to prevent the spread of bacteria.
- Make sure the kimbap rolls are wrapped tightly to minimize air exposure, which can cause the rice to dry out.
- If you plan to store the kimbap for an extended period, freezing is a great option. Properly wrapped and frozen kimbap can last up to a month.
- If you’re storing a variety of kimbap with different fillings, label them with the ingredients and the date to keep track of freshness.
- Avoid leaving the kimbap at room temperature for too long, as it can lead to bacterial growth and spoilage.
- If you’re storing leftover kimbap that has already been sliced, you can separate the pieces with plastic wrap to prevent them from sticking to each other.
- Consider using airtight containers or zipper-lock bags specifically designed for food storage to maintain the freshness of the kimbap.
- If you prefer warm kimbap, you can briefly microwave the stored rolls before serving. However, be cautious not to overheat them as it may affect the texture of the seaweed or the fillings.
By following these tips, you can maximize the shelf life and maintain the deliciousness of your stored kimbap. Now that you’re equipped with the knowledge of how to keep your kimbap fresh, you can enjoy it whenever you crave a tasty and satisfying meal or snack.
Conclusion
Congratulations! You have learned how to store kimbap to keep it fresh and delicious for later enjoyment. By following the steps outlined in this guide, you can confidently prepare, assemble, and store your kimbap rolls with ease.
Remember, it all starts with properly preparing the rice and fillings, ensuring that each component is seasoned to perfection. Assembling the kimbap requires some practice, but with time, you’ll become more skilled at rolling a tight and beautiful kimbap.
Once the rolls are assembled, wrap them tightly in plastic wrap or aluminum foil and store them in an airtight container. If you’re planning to store them for longer periods, freezing is a great option.
When you’re ready to enjoy your stored kimbap, simply remove it from the refrigerator or freezer, let it thaw (if frozen), and unwrap it before serving. The kimbap can be enjoyed cold or at room temperature, giving you a convenient and flavorful meal or snack at any time.
Remember, freshness is key, so it’s best to consume the kimbap within 2-3 days of storing it in the refrigerator. If frozen, it can last up to a month. Be sure to discard any kimbap that shows signs of spoilage.
Now, armed with the knowledge and tips provided in this article, you can confidently make and store kimbap like a pro. Experiment with different fillings and combinations to create unique and flavorful rolls that will leave your taste buds satisfied.
So go ahead, impress family and friends with your kimbap-making skills, and enjoy the convenience and deliciousness of this beloved Korean dish!
Frequently Asked Questions about How To Store Kimbap
Was this page helpful?
At Storables.com, we guarantee accurate and reliable information. Our content, validated by Expert Board Contributors, is crafted following stringent Editorial Policies. We're committed to providing you with well-researched, expert-backed insights for all your informational needs.


0 thoughts on “How To Store Kimbap”