Articles
How To Store Lumber Outside
Modified: October 28, 2024
Learn the best methods for storing lumber outdoors in this comprehensive article. Discover how to protect your wood from the elements and keep it in optimal condition.
(Many of the links in this article redirect to a specific reviewed product. Your purchase of these products through affiliate links helps to generate commission for Storables.com, at no extra cost. Learn more)
Introduction
Welcome to the world of woodworking! Whether you’re a professional carpenter or a do-it-yourself enthusiast, storing lumber properly is essential to ensure the quality and longevity of your materials. While storing lumber indoors may be ideal, it’s not always feasible due to space constraints. In such cases, storing lumber outside becomes necessary.
Storing lumber outdoors poses its own set of challenges, such as exposure to the elements and the risk of damage from pests and decay. However, with proper planning and execution, you can create a storage system that effectively protects your lumber from these threats.
In this article, we will explore the factors to consider when storing lumber outside and provide practical tips on how to do it correctly. By following these guidelines, you can keep your lumber in excellent condition and ready for your next woodworking project.
Key Takeaways:
- Proper outdoor lumber storage requires consideration of weather, humidity, pests, and accessibility. Building a sturdy rack, covering lumber, and regular maintenance are key to preserving its quality and integrity.
- Selecting the right location, preparing the storage area, and implementing protective measures are crucial for outdoor lumber storage. Regular inspection and maintenance ensure the longevity of your materials.
Read more: How To Store Lumber In Garage
Factors to Consider for Outdoor Lumber Storage
Before you begin storing lumber outside, there are several important factors to consider. These factors will help ensure that your lumber remains in good condition and ready for use when you need it.
1. Weather: One of the primary concerns when storing lumber outdoors is exposure to the elements. Different types of weather, such as rain, snow, and direct sunlight, can have damaging effects on your lumber. It’s crucial to choose a location and implement protective measures to minimize the impact of extreme weather conditions.
2. Humidity and Moisture: Lumber is susceptible to moisture absorption, which can lead to warping, splitting, and mold growth. It’s essential to store your lumber in a dry area or take steps to protect it from excessive humidity. Proper ventilation and covering can help mitigate these risks.
3. Pest Control: Outdoor storage increases the risk of pests, such as termites and wood-boring insects, infesting your lumber. Inspect and treat your lumber regularly to prevent and combat any pest activity. Using treated lumber or applying an appropriate insecticide can also provide added protection.
4. Traffic and Accessibility: Consider the accessibility and convenience of your storage area. Make sure it’s easily accessible for transporting and retrieving the lumber as needed. Additionally, keep in mind any potential hazards like heavy traffic areas or the risk of theft if the storage area is not secure.
5. Quantity and Organization: Assess the amount of lumber you plan to store outside and plan accordingly. Proper organization and stacking can help maximize space and prevent damage. Grouping similar-sized lumber together will make it easier to locate specific pieces.
By considering these factors, you can make informed decisions when it comes to outdoor lumber storage. Taking the necessary precautions will help protect your investment and ensure that your lumber is in optimal condition when you’re ready to use it.
Selecting the Right Location
When it comes to storing lumber outside, the location you choose plays a crucial role in preserving the quality of your materials. Here are some key considerations when selecting the right location:
1. Level Ground: Ensure that the area where you plan to store your lumber is level. Uneven ground can result in instability and make it challenging to stack and organize your materials properly.
2. Drainage: Opt for an area that has good drainage to prevent water accumulation and potential water damage to your lumber. Avoid locations prone to flooding or that have poor drainage systems.
3. Shade: While direct sunlight can cause wood to fade and dry out, excessive shade may result in increased moisture and the growth of mold and mildew. Look for a location that provides a balance of shade and sunlight or consider using a cover to protect the lumber from prolonged exposure to the sun.
4. Accessibility: Choose a location that is easily accessible and convenient for transporting the lumber. Consider factors such as proximity to your workspace, driveway, or loading area. Easy accessibility will save you time and effort when moving the lumber.
5. Security: If security is a concern, select a location that is secure and well-monitored. Fencing or installing security cameras can add an extra layer of protection to deter theft or vandalism.
6. Proximity to Utilities: If your woodworking projects require electricity or water, consider the proximity of the storage location to these utilities. Having access to these utilities nearby can be helpful when you need to power tools or clean your lumber.
Keep these factors in mind when choosing the right location for your outdoor lumber storage. By selecting an optimal location, you can minimize potential risks and maximize the lifespan of your lumber.
Preparing the Storage Area
Once you have selected the ideal location for your outdoor lumber storage, it’s important to prepare the storage area to ensure the best conditions for preserving your materials. Here are some steps to consider when preparing the storage area:
1. Clear the Area: Remove any debris, rocks, or vegetation from the storage area. Clearing the space will make it easier to organize and access your lumber and prevent any unwanted pests or obstacles.
2. Level the Ground: Ensure that the ground in the storage area is level and even. This will provide stability for your lumber stack and prevent any leaning or collapsing. Use a shovel or rake to level the ground if necessary.
3. Install a Barrier: Consider placing a moisture barrier, such as a plastic sheet or tarp, between the ground and the lumber stack. This will help prevent ground moisture from seeping into the wood and causing damage.
4. Create Airflow: Adequate airflow is crucial in preventing moisture buildup and promoting proper drying of the lumber. Leave some space between the lumber stack and any surrounding structures or walls to allow air to circulate freely.
5. Pest Prevention: Take measures to prevent pests from infesting your lumber. Use gravel or a fine mesh screen as a barrier between the ground and the lumber stack to discourage pests from accessing the wood. Inspect the area regularly for signs of pest activity and address any issues promptly.
6. Consider Shelving or Pallets: If possible, elevate your lumber off the ground using shelving or pallets. This helps to further protect it from ground moisture and pests. Ensure that the shelving or pallets are sturdy and level to provide adequate support for the weight of the lumber.
By properly preparing the storage area, you can create a clean, dry, and well-ventilated space for your outdoor lumber storage. These preparations will help protect your lumber from moisture, pests, and other potential hazards, ultimately prolonging its lifespan and maintaining its quality.
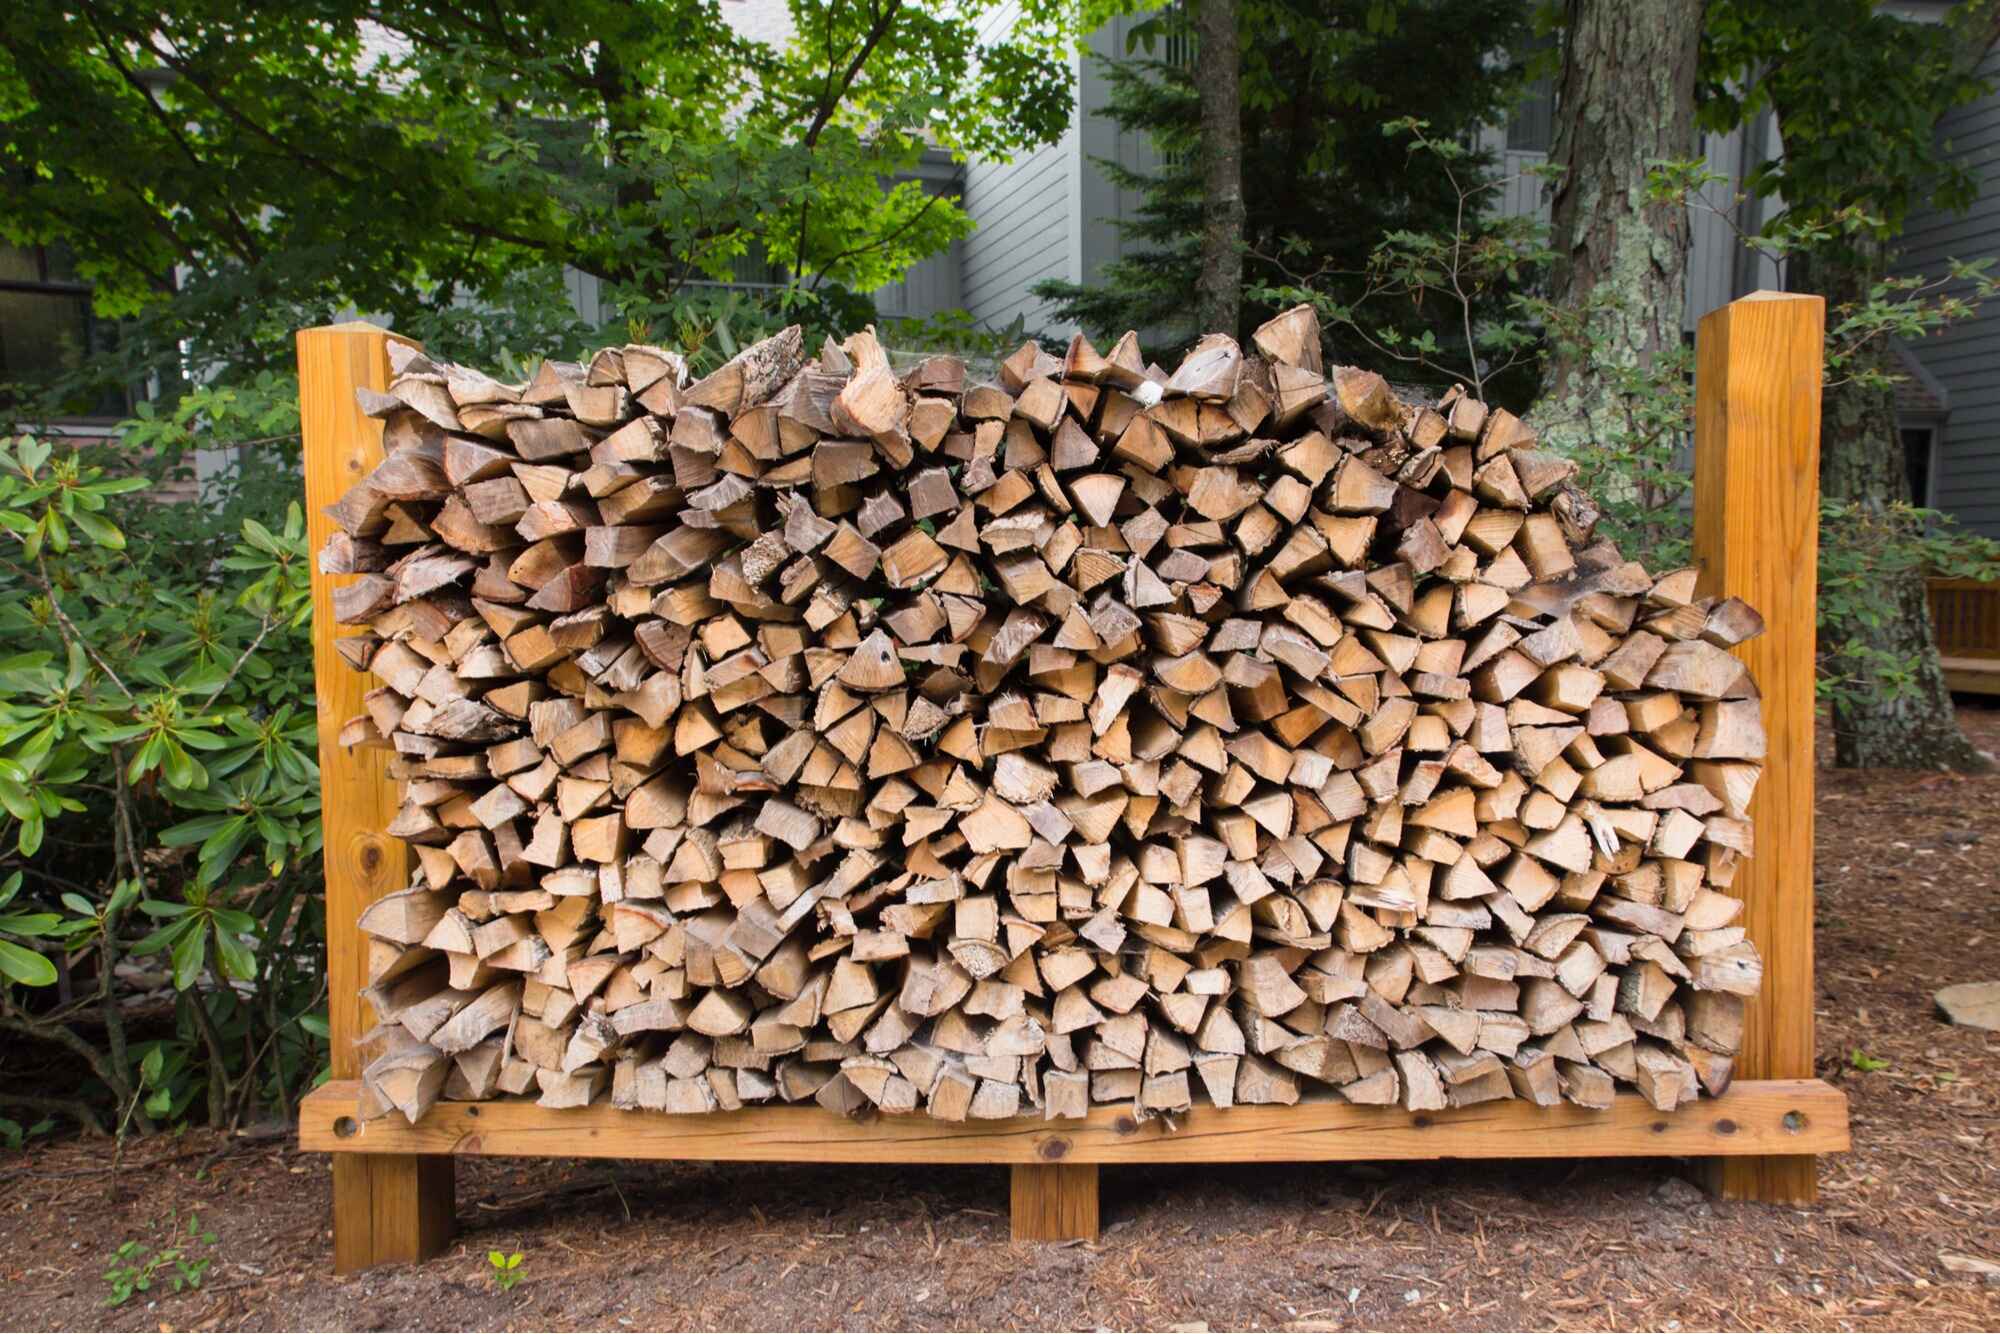
To store lumber outside, use a raised platform to keep it off the ground and cover it with a waterproof tarp to protect it from the elements. Rotate the lumber regularly to prevent warping.
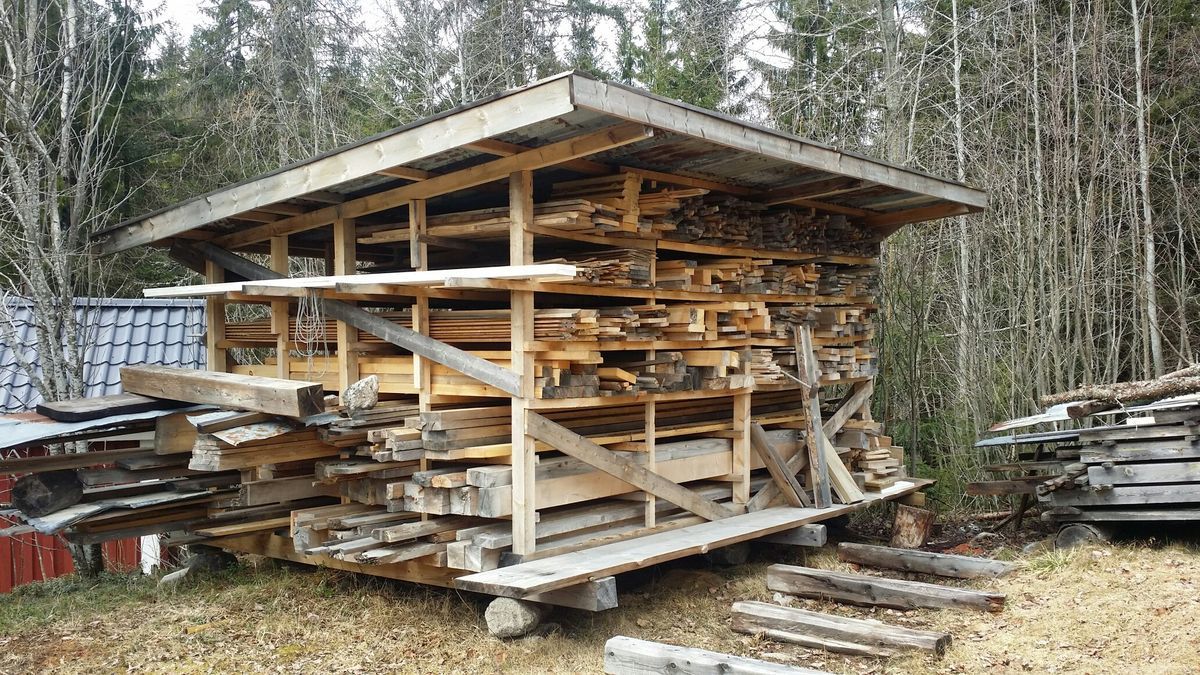
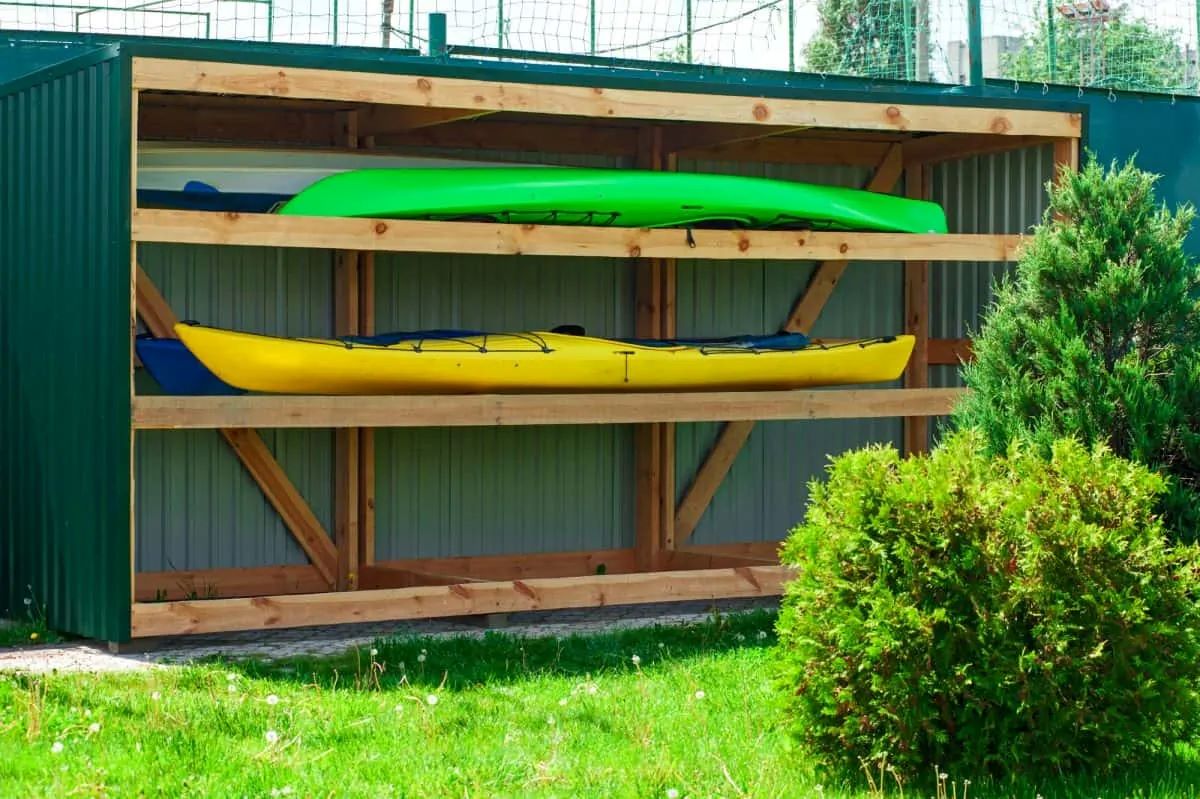
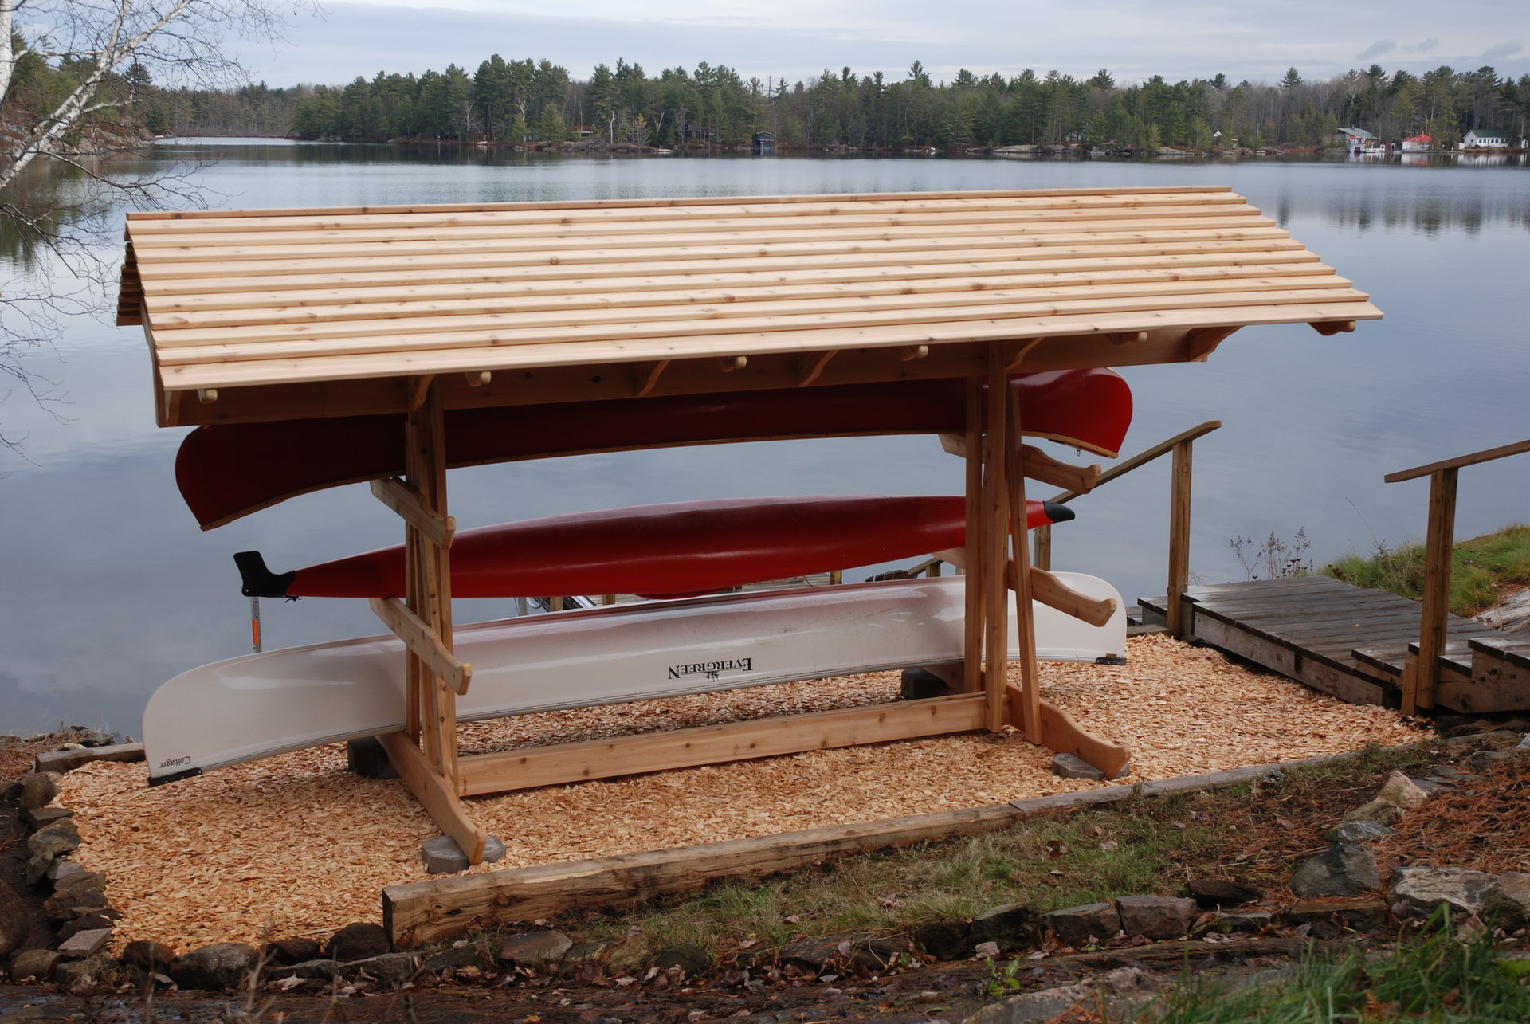
Building a Lumber Rack or Pallet System
Building a lumber rack or pallet system is an effective way to maximize space, organize your lumber, and protect it from potential damage. Here are steps to consider when constructing a lumber rack or pallet system:
1. Determine the Design: Decide on the design and dimensions of your lumber rack or pallet system based on the amount of lumber you plan to store and the available space. Consider factors such as weight capacity, ease of access, and stability.
2. Choose the Materials: Select materials that are sturdy, durable, and resistant to outdoor elements. Pressure-treated lumber or metal brackets can be used to construct the frame of the rack. Pallets made of hardwood or plastic are ideal for creating a pallet system.
3. Prepare the Site: Clear the area where you plan to build the rack or arrange the pallets. Ensure that the ground is level and free of any debris. This will provide a stable foundation for your lumber storage system.
4. Construct the Frame or Arrange the Pallets: If building a rack, assemble the frame according to your chosen design. Use screws or nails to secure the joints and ensure stability. If using pallets, arrange them side by side, ensuring they are level and stable. Secure the pallets together using straps or screws for added stability.
5. Install Cross Supports: To further strengthen the rack or pallet system, install cross supports between the vertical posts or pallets. These supports will help distribute the weight evenly and prevent sagging or warping.
6. Consider Accessibility: Plan the spacing between the levels of the rack or the arrangement of the pallets to allow easy access to each piece of lumber. Leave enough space for maneuvering and make sure the lumber is easily reachable.
7. Secure the Lumber: Once the rack or pallet system is constructed, start stacking your lumber onto the designated levels or pallets. Ensure that the lumber is stable and secure to prevent any accidents or collapse.
By building a well-designed and sturdy lumber rack or pallet system, you can effectively utilize the available space, keep your lumber organized, and protect it from potential damage. These installations provide a stable and accessible storage solution for your outdoor lumber.
Read more: How To Store Soil Outside
Covering and Protecting the Lumber
Properly covering and protecting your lumber is essential to shield it from the elements and minimize the risk of damage. Here are some tips to consider when covering and protecting your outdoor lumber:
1. Use Tarps or Plastic Sheeting: Cover your lumber stack with a tarp or plastic sheeting to protect it from rain, snow, and direct sunlight. Ensure the cover is securely fastened and extends beyond the edges of the lumber stack to prevent water from seeping in.
2. Leave Ventilation Gaps: When covering your lumber, create small gaps or openings to allow for ventilation. This will help prevent condensation and ensure that the wood can breathe, reducing the risk of mold or mildew growth.
3. Utilize Lumber Wraps: Consider using specialized lumber wraps or shrink wraps that are specifically designed to protect wood from moisture and UV exposure. These wraps create a barrier and provide additional protection against the elements.
4. Apply Waterproof Sealant: Prior to covering your lumber, apply a waterproof sealant to the ends and any exposed surfaces. This will help reduce moisture absorption and minimize the risk of warping or decay.
5. Store Lumber Horizontally: Whenever possible, store your lumber horizontally rather than vertically. This reduces the amount of surface area exposed to the elements, reducing the likelihood of moisture damage.
6. Inspect and Replace Covers: Regularly inspect the covers or wraps on your lumber stack and replace them if they become damaged or worn out. Continuously monitor the condition of the covering to ensure optimal protection for your lumber.
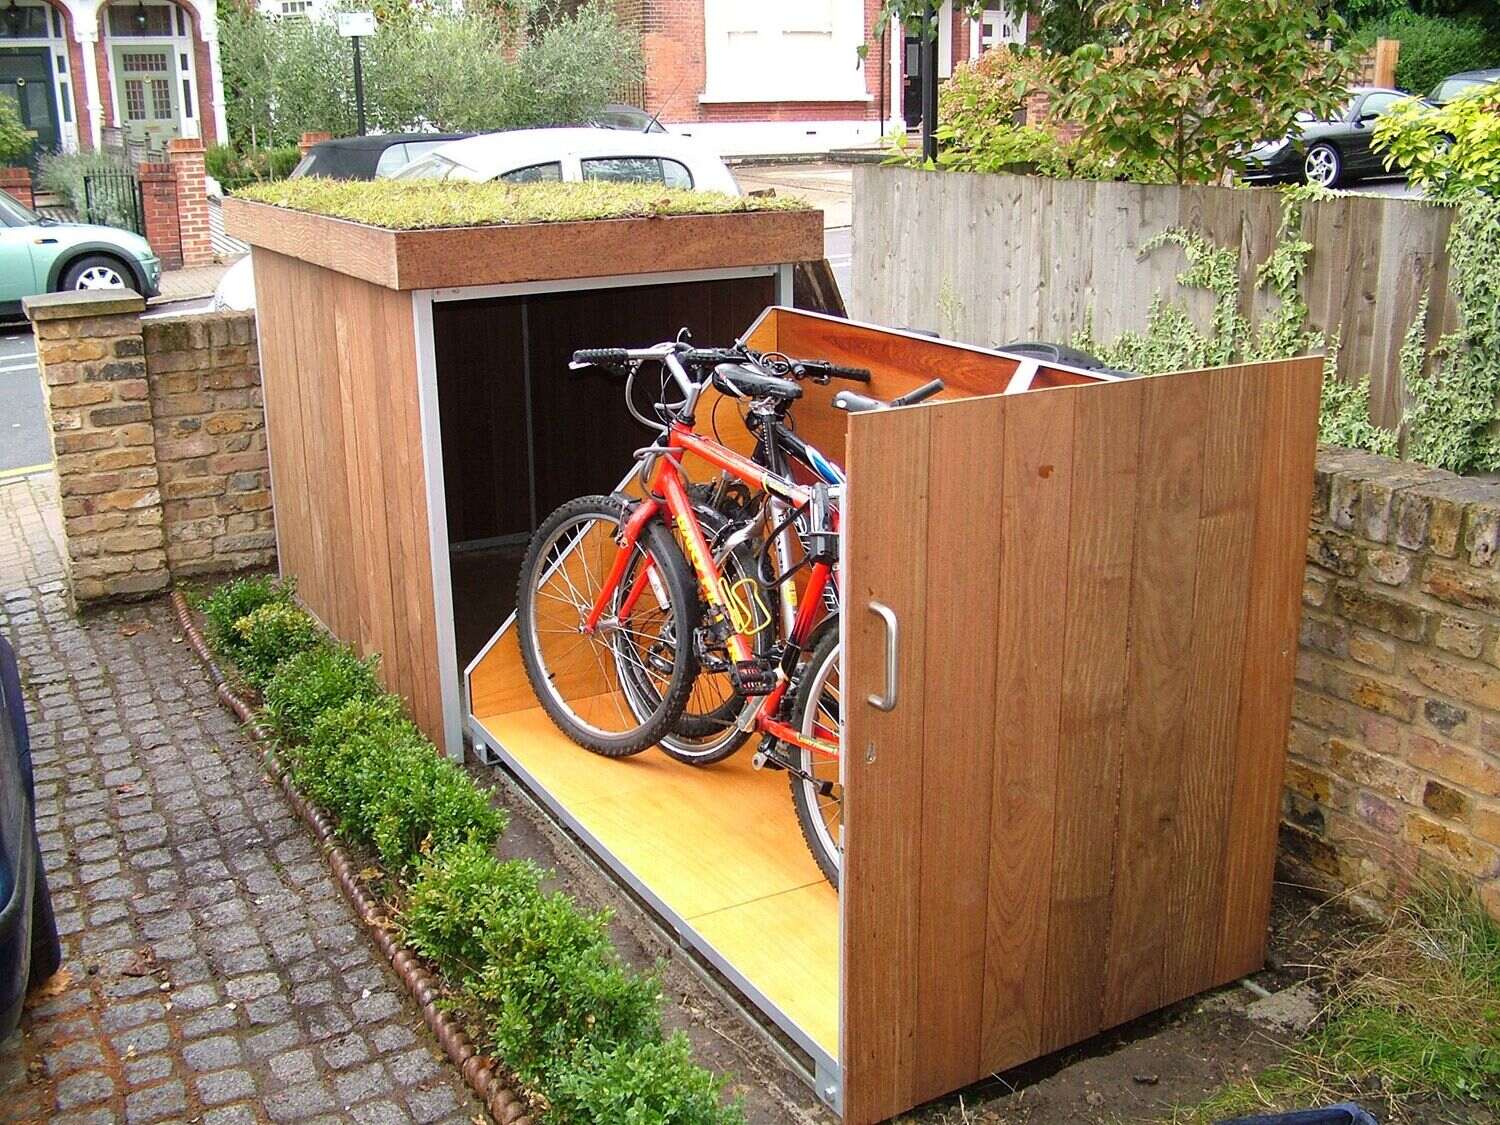
7. Consider Storage Shed or Canopy: If you have the space and resources, consider storing your lumber in a dedicated storage shed or under a canopy. These structures provide additional protection from rain, snow, and excessive sunlight.
By effectively covering and protecting your lumber, you can extend its lifespan and maintain its quality. Investing in the right covers and implementing proper storage techniques will go a long way in preserving your valuable materials.
Maintaining and Inspecting the Stored Lumber
Regular maintenance and inspection of your stored lumber are important to ensure its continued quality and longevity. Here are some key steps to take when maintaining and inspecting your stored lumber:
1. Regular Cleaning: Periodically clean your lumber stack to remove any dust, debris, or cobwebs that may have accumulated. Use a broom, brush, or air compressor to gently sweep or blow away any surface dirt. This will help keep your lumber in good condition and free from potential contaminants.
2. Check for Moisture: Monitor the moisture content of your stored lumber regularly. Use a moisture meter to check for excessive moisture levels, which can lead to warping, mold growth, and decay. Take appropriate steps to address any moisture-related issues promptly.
3. Inspect for Pests: Regularly inspect your lumber stack for signs of pest activity, such as sawdust, chew marks, or insect nests. If you notice any indications of pests, take immediate action to treat the affected area and prevent further damage.
4. Rotate the Stack: To minimize the risk of uneven moisture absorption and weight distribution, periodically rotate the lumber stack. This will ensure consistent exposure to air and prevent any localized issues such as warping or twisting.
5. Maintain Proper Ventilation: Adequate airflow is essential for preventing moisture buildup and maintaining optimal drying conditions for your lumber. Regularly check that the storage area provides sufficient ventilation and make adjustments if necessary.
6. Address Any Issues Promptly: If you notice any signs of decay, damage, or other issues during your inspections, take immediate action. Replace or repair damaged lumber, address insect or pest infestations, and make any necessary adjustments to your storage system.
7. Keep a Record: Establish a system to keep track of the inventory and condition of your stored lumber. This will help you identify any trends or patterns and ensure that you are maintaining an organized and well-maintained inventory.
By implementing a regular maintenance and inspection routine, you can catch and address potential issues before they worsen. This proactive approach will help you maintain the quality of your lumber and allow for smooth and successful woodworking projects.
Conclusion
Storing lumber outside may pose unique challenges, but with careful planning and proper execution, you can ensure that your materials remain in excellent condition. By considering factors such as weather, humidity, pests, and accessibility, you can make informed decisions when selecting a location and preparing the storage area.
Building a lumber rack or pallet system provides an organized and efficient solution for maximizing space and protecting your lumber. Properly covering and protecting the lumber with tarps, plastic sheeting, or specialized wraps will safeguard it from the elements and prevent moisture damage.
Maintaining and inspecting your stored lumber is essential to ensure its continued quality. Regular cleaning, checking for moisture levels, inspecting for pests, and addressing any issues promptly will help prolong the lifespan of your lumber and maintain its integrity.
In conclusion, storing lumber outside requires careful consideration and proactive measures. By implementing the guidelines and tips outlined in this article, you can successfully store and protect your lumber, allowing you to embark on your woodworking projects with confidence and ease.
Frequently Asked Questions about How To Store Lumber Outside
Was this page helpful?
At Storables.com, we guarantee accurate and reliable information. Our content, validated by Expert Board Contributors, is crafted following stringent Editorial Policies. We're committed to providing you with well-researched, expert-backed insights for all your informational needs.


0 thoughts on “How To Store Lumber Outside”