Articles
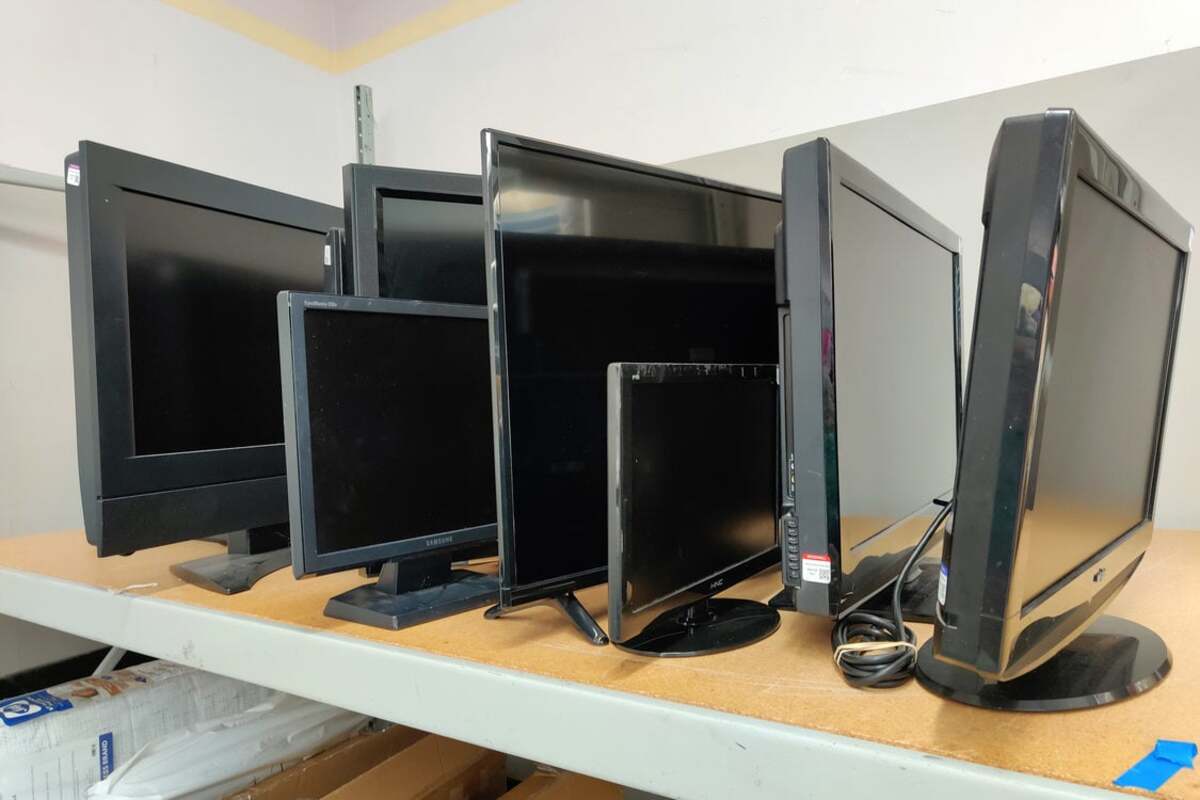
How To Store Computer Monitors
Modified: August 24, 2024
Looking for articles on how to store computer monitors? Find useful tips and tricks to safely store your computer monitors and protect them from damage.
(Many of the links in this article redirect to a specific reviewed product. Your purchase of these products through affiliate links helps to generate commission for Storables.com, at no extra cost. Learn more)
Introduction
Computer monitors are essential components of our everyday lives, providing us with visual displays of information, entertainment, and work tasks. Whether you’re moving to a new location, decluttering your workspace, or simply looking to store your computer monitors safely, it’s important to take the necessary precautions to protect these valuable devices.
In this article, we’ll provide you with helpful tips and guidelines on how to store computer monitors properly. From handling and transportation to cleaning and maintenance, we’ll cover everything you need to know to keep your monitors in excellent condition during storage.
Without further ado, let’s dive into the details of storing computer monitors effectively to ensure their longevity and optimal performance.
Key Takeaways:
- Handle and transport computer monitors with care to prevent damage. Use protective packaging, avoid stacking, and label boxes for safe transportation.
- Choose a clean, climate-controlled storage location and regularly check and clean monitors for long-term storage. Proper care ensures optimal performance and longevity.
Proper Handling and Transportation
When it comes to storing computer monitors, proper handling and transportation are crucial to prevent any damage. Here are some essential tips to keep in mind:
- Turn off and unplug: Before handling or moving your computer monitor, make sure to turn it off and unplug all cables.
- Use protective packaging: Wrap the monitor in an anti-static bag to protect it from static electricity. Then, place it in a sturdy box with adequate padding such as bubble wrap or foam.
- Label the boxes: Clearly label the boxes indicating that they contain fragile items. This will help you or anyone handling the boxes to exercise caution.
- Avoid stacking: If you need to stack multiple boxes, place the heaviest items at the bottom and avoid placing heavy objects on top of the monitor boxes.
- Secure the boxes: Ensure that the boxes are securely sealed with packaging tape to prevent any accidental openings during transportation.
Remember, these monitors are delicate electronic devices, and mishandling them can lead to screen damage or internal component failure. By following these handling and transportation tips, you can minimize the risk of any potential harm.
Cleaning and Maintenance
To keep your computer monitors in optimal condition during storage, it’s essential to clean and maintain them properly. Here are some guidelines to follow:
- Use the right cleaning materials: Avoid using harsh chemicals or abrasive materials that can damage the screen. Instead, opt for a microfiber cloth or screen cleaning solution specifically designed for electronic displays.
- Gently wipe the screen: Start by gently wiping the screen with the microfiber cloth in a circular motion. Avoid applying too much pressure, as it can potentially damage the screen or leave streaks.
- Clean the edges and frame: Use the screen cleaning solution or a mild detergent diluted with water to clean the edges and frame of the monitor. Be careful not to allow any liquid to seep into the monitor.
- Remove dust and dirt: Use a can of compressed air or a soft brush to remove any dust or dirt from the monitor’s crevices and vents. This will help prevent the accumulation of debris that can affect the monitor’s performance.
- Store in a dust-free environment: Before storing your monitors, make sure to clean the storage area and ensure it is free from dust. Dust particles can settle on the monitor’s screen and affect its clarity when in use.
Regular cleaning and maintenance not only keep your monitors looking pristine but also help in preventing dust buildup and potential damage. By incorporating these practices into your routine, you can ensure that your monitors are in the best possible condition during storage.
Storing CRT Monitors
If you have CRT (Cathode Ray Tube) monitors, they require some additional care during storage due to their bulkier and heavier nature. Here are some steps to follow:
- Handle with care: CRT monitors are more fragile than their LCD counterparts, so it’s important to handle them with extra caution. Avoid dropping or mishandling them to prevent damage to the internal components.
- Store upright: Unlike LCD monitors, CRT monitors should be stored upright to prevent any pressure on the screen. Lay them on a flat and stable surface, making sure they are secure and won’t topple over.
- Protect the screen: Place a soft cloth or foam padding between the screen and any objects or surfaces that may come into contact with it. This will help prevent scratches or pressure spots.
- Avoid extreme temperatures: CRT monitors are sensitive to temperature fluctuations, so store them in a climate-controlled environment. Avoid exposing them to extreme heat or cold, as it can affect their performance.
- Check the storage area: Ensure that the storage area is free from any liquids, as moisture can damage the internal components of the CRT monitor. Also, keep the area well-ventilated to prevent the buildup of humidity.
By adhering to these guidelines, you can ensure that your CRT monitors are protected and ready for use when you retrieve them from storage.
When storing computer monitors, always use the original packaging if possible. If not, use a sturdy, padded box and avoid stacking heavy items on top. Keep the monitor in a dry, climate-controlled environment to prevent damage.
Storing LCD/LED Monitors
Storing LCD (Liquid Crystal Display) or LED (Light-Emitting Diode) monitors requires a different approach compared to CRT monitors. Here are some steps to follow when storing your LCD/LED monitors:
- Use original packaging: If you still have the original packaging, it’s ideal for storing your LCD/LED monitor. The packaging is designed to provide maximum protection during transportation and storage.
- Wrap in a soft cloth: If you don’t have the original packaging, wrap the monitor in a soft cloth or anti-static bag to protect it from dust and scratches. Avoid using plastic wraps, as they can generate static electricity.
- Store in an upright position: LCD/LED monitors should be stored in an upright position to prevent any pressure on the screen. If using a box, ensure it is sturdy and provides enough cushioning to prevent movement.
- Avoid direct sunlight: When choosing a storage location, keep the monitor away from direct sunlight. Prolonged exposure to sunlight can cause damage to the screen and affect the colors and image quality.
- Protect from temperature extremes: LCD/LED monitors are sensitive to extreme temperatures. Keep them in a climate-controlled storage area to avoid any damage caused by heat or cold.
- Keep away from magnetic fields: Magnetic fields can interfere with the functionality of LCD/LED monitors. Store them away from any devices or objects that generate strong magnetic fields.
By following these guidelines, you can ensure that your LCD/LED monitors are stored safely and protected from any potential damage. This will help preserve their functionality and extend their lifespan.
Read more: How To Store A Computer
Choosing the Right Storage Location
When it comes to storing computer monitors, selecting the appropriate storage location is essential to ensure their safety and longevity. Here are some factors to consider when choosing the right storage location:
- Climate control: Opt for a storage unit or space that offers climate control. Extreme temperatures, humidity, and fluctuations can negatively impact the internal components of computer monitors. Maintaining a stable and controlled environment will help prevent any potential damage.
- Clean and dust-free: Ensure that the storage area is clean and free from dust and debris. Dust particles can settle on the monitor surfaces and affect their performance when in use. Regular cleaning and maintenance of the storage area will help preserve the quality of the monitors.
- Away from moisture: Moisture is the enemy of electronic devices. Avoid storing monitors in areas prone to moisture such as basements or areas with known water leaks. Moisture can cause irreparable damage to the internal components and lead to malfunctioning screens.
- Secure and protected: Choose a storage location that is secure and offers protection against potential hazards such as theft, vandalism, or accidental damage. This could involve using a lockable storage unit or keeping the monitors in a secure and monitored area within your home or office.
- Adequate space: Ensure that the storage area provides enough space for the monitors without crowding or stacking them excessively. This will help prevent any accidental damage while accessing or retrieving the monitors from storage.
By considering these factors, you can select a storage location that provides the ideal conditions for storing your computer monitors. This will safeguard them from potential damage and ensure that they remain in excellent working condition when you’re ready to use them again.
Considerations for Long-Term Storage
If you plan to store your computer monitors for an extended period, there are a few additional considerations to keep in mind to maintain their functionality and condition:
- Power off and unplug: Before storing the monitors, ensure that they are powered off and all cables are unplugged. This helps prevent any electrical issues or power surges during storage.
- Regularly check and clean: Make it a habit to periodically check on the monitors and clean them, even while in storage. This includes wiping away any dust that may have accumulated or using compressed air to remove debris from vents or crevices.
- Rotate and reposition: If you are storing your monitors in a single position for a long duration, consider rotating or repositioning them occasionally. This helps prevent any uneven pressure or screen discoloration that may occur due to prolonged static positioning.
- Monitor the storage environment: Keep an eye on the storage environment, especially if storing the monitors in a self-storage unit or an area without regular monitoring. Check for any signs of pest infestation, leaks, or temperature fluctuations that could potentially damage the monitors.
- Avoid stacking heavy items: If storing multiple monitors or other items on top, ensure that heavier items are not placed directly on top of the monitors. Excessive weight or pressure can lead to screen damage or distortion.
By taking these considerations into account, you can ensure that your computer monitors remain in good condition throughout the duration of their storage. Regular maintenance and monitoring will help mitigate any potential issues and preserve the longevity of the monitors.
Conclusion
Properly storing your computer monitors is crucial to protect them from damage and maintain their functionality. Whether you have CRT monitors or LCD/LED monitors, following the right steps can help prolong their lifespan and ensure their optimal performance.
Start by handling and transporting the monitors with care, using protective packaging and avoiding stacking heavy objects on top of them. Cleaning and maintenance are also essential to keep the screens clear and free from dust or debris.
If you have CRT monitors, store them upright and provide extra protection for the screen. LCD/LED monitors should be stored in their original packaging if available, or wrapped in a soft cloth or anti-static bag. Additionally, choose a storage location that is clean, climate-controlled, and secure to prevent any potential damage.
For long-term storage, regularly check and clean the monitors, rotate or reposition them, and monitor the storage environment for any signs of issues. Avoid stacking heavy items on top and ensure that the monitors are properly powered off and unplugged.
By following these guidelines, you can ensure that your computer monitors remain in excellent condition during storage and are ready for use whenever you need them. Take the time to store them properly, and you’ll reap the benefits of long-lasting and high-performing monitors.
Remember, each monitor is an investment, and taking care of them will save you money in the long run. So, apply these storage tips, and enjoy the peace of mind knowing that your computer monitors are safe and secure.
Frequently Asked Questions about How To Store Computer Monitors
Was this page helpful?
At Storables.com, we guarantee accurate and reliable information. Our content, validated by Expert Board Contributors, is crafted following stringent Editorial Policies. We're committed to providing you with well-researched, expert-backed insights for all your informational needs.


0 thoughts on “How To Store Computer Monitors”