
Articles
How To Store Scoby After First Fermentation
Modified: January 6, 2024
Learn the best ways to store your scoby after completing the first fermentation process. Our articles provide helpful tips and insights to ensure your scoby remains healthy and active.
(Many of the links in this article redirect to a specific reviewed product. Your purchase of these products through affiliate links helps to generate commission for Storables.com, at no extra cost. Learn more)
Introduction
When it comes to brewing kombucha, one essential element is the SCOBY, which stands for Symbiotic Culture of Bacteria and Yeast. The SCOBY is responsible for transforming sweet tea into the tangy and fizzy fermented beverage that many people love. After the first fermentation process, you may find yourself wondering what to do with the SCOBY. Storing it properly is crucial to maintain its health and flavor for future batches.
Why is it important to store SCOBY after the first fermentation? Well, the SCOBY is a living organism that needs to be nurtured and taken care of. By storing it correctly, you can preserve its vitality and ensure that it remains active for future brews. Additionally, storing the SCOBY properly prevents contamination and spoilage, which can affect the quality of your kombucha.
Understanding SCOBY is key to maintaining and storing it effectively. The SCOBY is a thick, rubbery mat that floats on the surface of the kombucha during fermentation. It is composed of a symbiotic relationship between various strains of bacteria and yeast. These microorganisms consume the sugar in the tea and produce organic acids, enzymes, and other compounds that give kombucha its distinct tangy flavor.
Now that you understand the importance of storing SCOBY after the first fermentation and have a basic understanding of what it is, let’s delve into the steps to store your SCOBY properly.
Key Takeaways:
- Properly storing your SCOBY after the first fermentation is essential to maintain its health, prevent contamination, and save money by reusing it for future batches of delicious kombucha.
- Understanding the role of SCOBY, cleaning and sanitizing equipment, and following proper storage techniques are crucial for ensuring the longevity and vitality of your SCOBY, leading to successful kombucha brewing adventures.
Read more: How To Store A Scoby
Why is it important to store SCOBY after the first fermentation?
After the first fermentation is complete, you may be left with a healthy and thriving SCOBY. Storing it correctly is crucial to maintain its vitality and ensure its continued use for future batches of kombucha. Here are a few reasons why it’s important to store your SCOBY:
- Preserving SCOBY health: The SCOBY is a living organism that needs proper care and maintenance. By storing it in the right conditions, you can preserve its health, allowing it to remain active and continue fermenting tea into kombucha. This ensures that your SCOBY stays vibrant and continues to produce high-quality brews.
- Contamination prevention: Storing your SCOBY correctly helps prevent contamination from unwanted bacteria or molds. When exposed to unsanitary conditions or improper storage, the SCOBY can be susceptible to contamination. This can negatively impact the flavor and quality of the kombucha and may even render the SCOBY unusable.
- Economical advantages: Storing your SCOBY allows you to brew multiple batches of kombucha without having to continuously obtain a new SCOBY. By properly storing and caring for your SCOBY, you can save money and reduce waste in the long run.
- Experimentation and sharing: If you have a healthy SCOBY, it opens up opportunities for experimentation and sharing with others. Storing your SCOBY makes it easier to explore different flavors, brewing techniques, and even share starter cultures with friends and fellow kombucha enthusiasts.
By recognizing the importance of storing your SCOBY after the first fermentation, you can ensure its longevity and maintain the quality of your kombucha brews. Now, let’s move on to understanding how to store the SCOBY properly to achieve these benefits.
Understanding SCOBY
Before delving into the process of storing SCOBY, it’s important to have a good understanding of what SCOBY is and how it functions in kombucha brewing.
SCOBY, an acronym for Symbiotic Culture of Bacteria and Yeast, is a rubbery and gelatinous mat that forms on the surface of the kombucha during fermentation. It plays a vital role in the transformation of sweet tea into the tangy and effervescent beverage known as kombucha.
A SCOBY is composed of a complex community of microorganisms, including different strains of bacteria and yeast. These microorganisms work together symbiotically, each playing a specific role in the fermentation process.
The bacteria present in the SCOBY are responsible for the initial breakdown of the sugars in the tea, converting them into various organic acids. This acidification process gives kombucha its characteristic tangy flavor. Additionally, the bacteria help create a protective barrier on the surface of the SCOBY, preventing harmful bacteria and molds from contaminating the brew.
The yeast in the SCOBY, on the other hand, are responsible for the secondary fermentation that produces carbonation. They consume the organic acids produced by the bacteria and convert them into carbon dioxide and alcohol. This results in the fizzy nature of kombucha.
Together, the bacteria and yeast in the SCOBY create a balanced ecosystem that promotes the fermentation process and imparts the unique flavors and characteristics to each batch of kombucha.
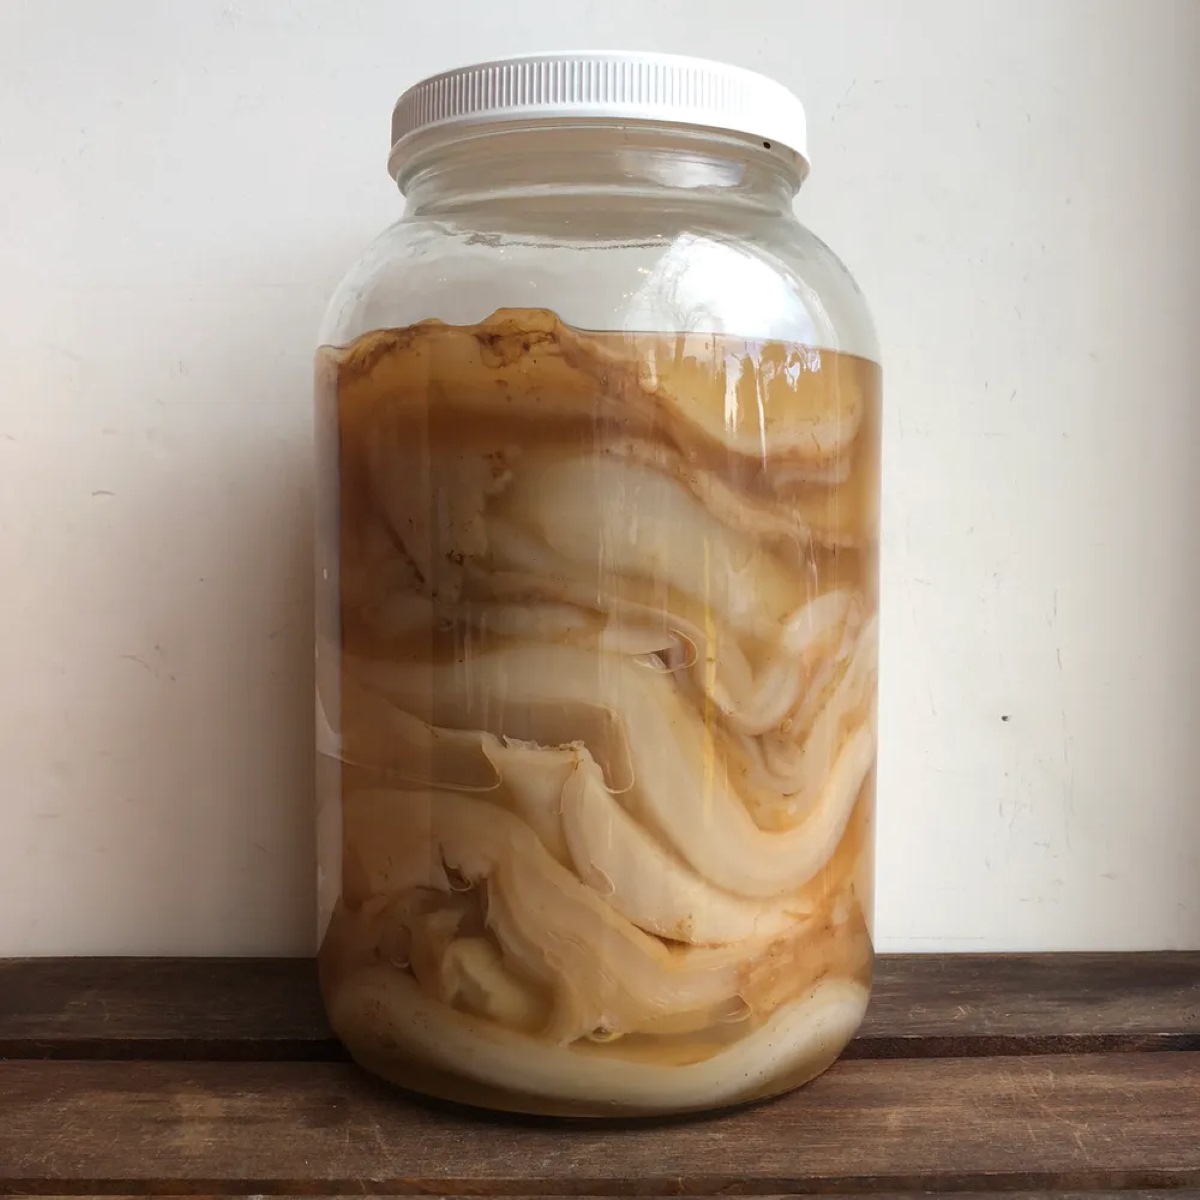
It’s important to note that SCOBYs vary in appearance, ranging from thin and translucent to thick and opaque. The color can also vary, with SCOBYs ranging from white to beige or even brown. These variations are largely influenced by the specific strains of bacteria and yeast present in the SCOBY as well as environmental factors.
Now that you have a better understanding of what SCOBY is and its role in kombucha brewing, let’s move on to the steps you need to follow to store your SCOBY after the first fermentation.
Steps to store SCOBY after first fermentation
Storing your SCOBY properly after the first fermentation is essential for maintaining its health and ensuring its viability for future batches of kombucha. Follow these steps to store your SCOBY effectively:
- Cleaning and sanitizing equipment: Before handling your SCOBY, it’s crucial to ensure that all the equipment you’ll be using is clean and sanitized. This includes your hands, jars, utensils, and any other containers or tools you’ll be using during the storage process. Use hot water and mild dish soap to clean them, and then sanitize them by rinsing with a diluted solution of white vinegar or a food-grade sanitizer.
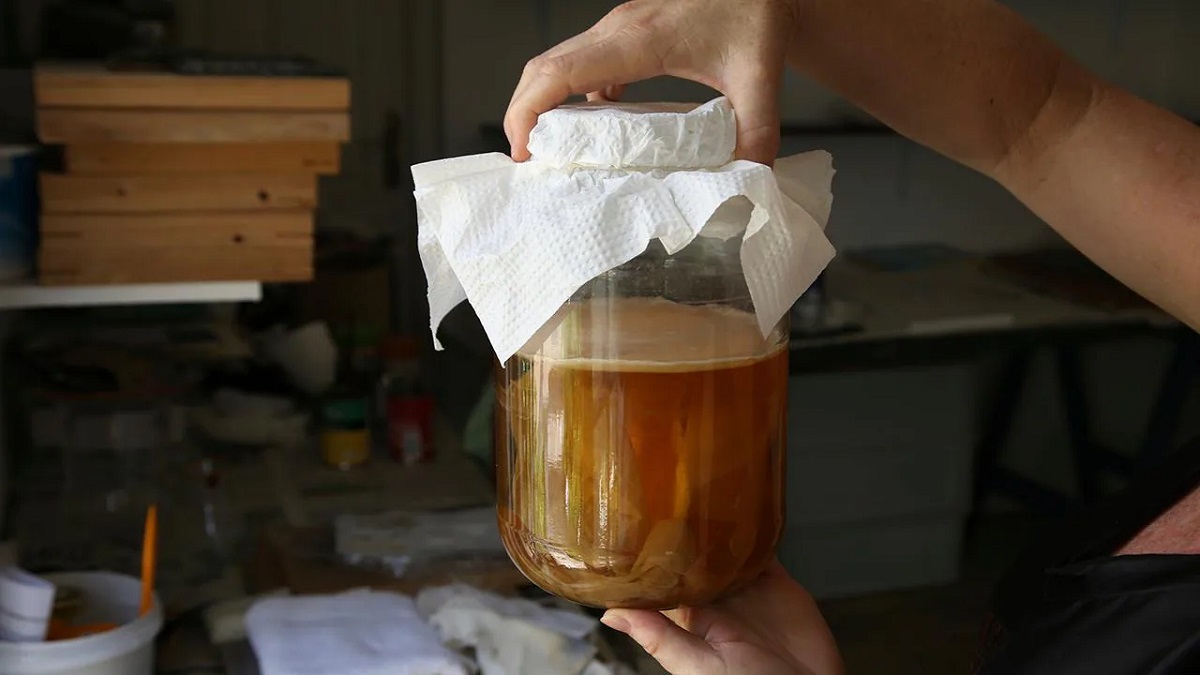
- Preparing the storage container: Select a clean and airtight container for storing your SCOBY. Glass jars or food-grade plastic containers work well. Make sure the container is large enough to accommodate the SCOBY along with enough liquid to keep it submerged.
- Transferring the SCOBY: Gently remove the SCOBY from the fermented kombucha and place it in the prepared storage container. Avoid squeezing or pressing the SCOBY too firmly, as this can damage its structure.
- Storing the SCOBY: Once the SCOBY is in the container, pour enough fermented kombucha over it to completely submerge it. The kombucha acts as a protective environment for the SCOBY, helping to maintain its health and vitality. Seal the container tightly to keep out any contaminants and store it in a cool and dark place, such as a pantry or cupboard.
- Monitoring the SCOBY: Periodically check on the SCOBY during storage to ensure that it remains healthy. Look for any signs of mold or discoloration, as this may indicate contamination. If you notice any issues, it’s best to discard the SCOBY and start with a fresh one.
Remember, while your SCOBY is in storage, it will continue to settle and may change appearance. This is normal and doesn’t necessarily indicate any issues with its health. When you’re ready to brew another batch of kombucha, simply remove the SCOBY from storage and use it as you would in the first fermentation process.
By following these steps, you can store your SCOBY effectively, ensuring its continued vitality and ability to produce delicious kombucha for many brews to come.
Cleaning and sanitizing equipment
Properly cleaning and sanitizing your equipment is a crucial step when storing your SCOBY after the first fermentation. This ensures that your SCOBY remains healthy and protected from any potential contaminants. Follow these steps to clean and sanitize your equipment:
- Gather your equipment: Before you begin, gather all the equipment you will be using, including jars, utensils, and any other containers or tools that will come into contact with the SCOBY or the kombucha.
- Cleaning: Start by rinsing all equipment thoroughly with hot water to remove any visible dirt or residue. Then, use a mild dish soap or detergent to clean the equipment. Scrub the surfaces with a brush or sponge to ensure thorough cleaning. Pay close attention to areas that may have come into direct contact with the SCOBY, such as the inside of jars or utensils.
- Rinsing: After cleaning, rinse all equipment with hot water to remove any soap residue. Make sure to rinse thoroughly to avoid leaving any traces of detergent, as this can be harmful to the SCOBY.
- Sanitizing: The next step is to sanitize the equipment to kill any remaining bacteria or mold spores that may be present. There are several options for sanitizing your equipment:
- White vinegar: Dilute white vinegar with an equal amount of water and use this solution to rinse and sanitize the equipment. Leave the vinegar solution in contact with the equipment for a few minutes, then rinse thoroughly with hot water.
- Food-grade sanitizer: Another option is to use a food-grade sanitizer that is specifically designed for cleaning and sanitizing food-contact surfaces. Follow the instructions provided by the manufacturer to properly sanitize your equipment.
- Drying: After sanitizing, allow the equipment to air dry completely. Avoid using towels or cloths to dry the equipment, as they can introduce additional bacteria or contaminants.
- Storage: Once the equipment is dry, store it in a clean and dry place until you are ready to use it again. Keep it protected from dust, dirt, and any potential contaminants.
Whichever method you choose, ensure that all surfaces of the equipment come into contact with the sanitizing solution. This includes the inside and outside of jars, utensils, and any other tools used in the kombucha brewing process.
By following these cleaning and sanitizing steps, you can ensure that your equipment is free from any harmful bacteria or contaminants, providing a safe environment for your SCOBY during storage. Remember to repeat this process each time you handle the equipment to maintain cleanliness and protect the health of your SCOBY.
After the first fermentation, store the SCOBY in a glass jar with enough kombucha to cover it. Keep it at room temperature or in the fridge for up to 4 weeks.
Read more: How To Store Scoby In Fridge
Preparing the storage container
Choosing the right storage container and properly preparing it is crucial when storing your SCOBY after the first fermentation. Here are the steps you can follow to ensure your storage container is suitable for preserving the health and vitality of your SCOBY:
- Selecting a container: Choose a storage container that is clean, airtight, and made of a material that is safe for food storage. Glass jars or food-grade plastic containers are commonly used for storing SCOBY. Avoid containers made of reactive materials, such as metal or ceramic, as they can affect the fermentation process and the health of the SCOBY.
- Sizing the container: Select a container that is large enough to comfortably fit your SCOBY and provide enough space for the liquid to cover it completely. The SCOBY should have enough room to float without being squeezed or pressed tightly against the sides of the container.
- Cleaning the container: Before using the storage container, make sure it is thoroughly cleaned. Wash it with hot water and mild dish soap to remove any dirt or residue. Scrub the container with a brush or sponge to ensure proper cleaning, paying attention to hard-to-reach areas.
- Sanitizing the container: After cleaning, sanitize the storage container to eliminate any potential contaminants. You can use methods such as rinsing it with a diluted white vinegar solution or using a food-grade sanitizer specifically designed for cleaning food-contact surfaces. Follow the instructions provided by the manufacturer for the best results.
- Drying the container: Once the storage container is cleaned and sanitized, allow it to air dry completely. Place it upside down on a clean drying rack or towel to ensure all moisture is removed. Make sure the container is completely dry before proceeding to the next step.
- Sealing the container: Prior to storing your SCOBY, ensure that the container is properly sealed or closed with an airtight lid. This will prevent any unwanted air, contaminants, or pests from entering the container and affecting the SCOBY during storage.
By following these steps, you can ensure that your storage container is clean and ready to provide a safe environment for your SCOBY during the storage period. Remember to clean and sanitize the container before each use to maintain a healthy brewing environment for your kombucha.
Transferring the SCOBY
Once you have prepared the storage container, it’s time to transfer the SCOBY from the fermented kombucha to the container for storage. Follow these steps to ensure a smooth and safe transfer:
- Gather your equipment: Before transferring the SCOBY, gather the necessary equipment, including a clean utensil or your hands (make sure to wash your hands thoroughly), and the prepared storage container.
- Prepare a clean surface: Find a clean and sanitized surface to work on, such as a clean countertop or a cutting board. This will provide a clean area for transferring the SCOBY.
- Remove excess liquid: Carefully lift the SCOBY out of the fermented kombucha. Allow the excess liquid to drain off the SCOBY back into the container. It’s okay if some liquid remains on the SCOBY, but try to remove as much as possible to prevent the storage container from becoming too diluted.
- Inspect the SCOBY: Take a moment to inspect the SCOBY for any signs of mold, discoloration, or unusual growth. A healthy SCOBY should have a smooth texture and be mostly beige or tan in color. If you notice any signs of contamination or if the SCOBY looks off, it’s best to discard it and start with a fresh SCOBY.
- Place in the storage container: Gently transfer the SCOBY into the prepared storage container. Be careful not to squeeze or press the SCOBY too firmly, as this can damage its structure. Ideally, the SCOBY should float on top of the liquid in the container.
- Add fermented kombucha: Pour enough fermented kombucha from the first fermentation batch into the storage container to completely submerge the SCOBY. The kombucha acts as a protective environment for the SCOBY, helping to maintain its health and vitality during storage.
- Seal the container: Once the SCOBY is in the container and covered with enough fermented kombucha, seal the container with an airtight lid. This will prevent any contaminants from entering the container and affecting the SCOBY during storage.
Remember to work meticulously and keep everything clean and sanitized throughout the transfer process to minimize the risk of contamination. Properly transferring the SCOBY into the storage container is essential for its health and the quality of your future kombucha brews.
Now that the SCOBY is safely transferred and stored, it’s time to move on to the next step in the process: actually storing the SCOBY to ensure its longevity and vitality.
Storing the SCOBY
Now that you have transferred your SCOBY to the storage container, it’s important to ensure that it is stored properly to maintain its health and vitality. Follow these steps to store your SCOBY effectively:
- Select a suitable storage location: Find a cool and dark place to store your SCOBY. It’s best to keep it away from direct sunlight and extreme temperature fluctuations, as these can affect the SCOBY’s health. A pantry or cupboard can be a good storage spot.
- Keep the storage container airtight: Ensure that the storage container is tightly sealed to prevent any air, contaminants, or pests from entering. This will help maintain a clean and controlled environment for the SCOBY during storage.
- Avoid disturbance: Once the SCOBY is in the storage container, avoid unnecessary movement or disturbance. This can disrupt the SCOBY’s growth and fermentation process, which may lead to decreased vitality and quality in future batches.
- Monitor the SCOBY: While the SCOBY is in storage, periodically check on its condition. Look for any signs of mold, discoloration, or unusual odor. If you notice any abnormalities, it’s best to discard the SCOBY and start with a fresh one.
- Storage duration: It is generally recommended to store the SCOBY for no longer than a few weeks to a couple of months. Over time, the SCOBY may become weaker and less effective in fermenting tea into kombucha. Therefore, it’s ideal to use the stored SCOBY within a reasonable period for optimal results.
By following these steps, you can ensure that your SCOBY remains healthy and ready for future batches of delicious kombucha. Remember to maintain a clean and controlled environment, and regularly monitor the SCOBY to ensure its well-being during storage.
When you’re ready to brew another batch of kombucha, simply retrieve the SCOBY from storage, along with some of the liquid from the storage container. Use them as you would in the initial fermentation process to continue brewing your delicious kombucha.
Now that you know the steps to store your SCOBY after the first fermentation, you can confidently maintain its health and viability for future kombucha brewing adventures.
Frequently Asked Questions about Storing SCOBY
Storing a SCOBY after the first fermentation can raise some questions and uncertainties. Here are answers to some frequently asked questions about storing SCOBY:
- How long can I store a SCOBY?
- What should I do if my SCOBY develops mold during storage?
- Can I store multiple SCOBYs together?
- Can I store the SCOBY in the refrigerator?
- Can I use the liquid from the storage container as starter liquid for a new batch of kombucha?
- Do I need to refresh the storage container with fresh kombucha periodically?
The recommended storage duration for a SCOBY is typically a few weeks to a couple of months. Over time, the SCOBY may lose its vitality and effectiveness in fermenting tea into kombucha. It’s best to use the SCOBY within a reasonable period to ensure optimal results.
If you notice mold growth on your SCOBY during storage, it’s important to discard the SCOBY. Mold contamination can affect the quality of your future batches and pose health risks. Start with a fresh SCOBY and ensure proper storage conditions to avoid mold growth.
Yes, you can store multiple SCOBYs together in the same container, as long as there is enough space for each SCOBY to float without being too crowded. However, it’s important to ensure that each SCOBY is healthy and free from mold or other contaminants before storing them together.
While it’s possible to store the SCOBY in the refrigerator, it is generally not recommended. The cold temperatures can slow down the fermentation process and affect the SCOBY’s health. It’s best to store the SCOBY in a cool and dark place outside of the refrigerator.
Absolutely! The fermented liquid in the storage container is known as “starter liquid” and can be used to kickstart a new batch of kombucha. It contains live bacteria and yeast that will help initiate the fermentation process in the new batch.
It’s generally not necessary to refresh the storage container with fresh kombucha during the storage period. The fermented kombucha in the container serves as a protective environment for the SCOBY. However, if the liquid starts to evaporate or reduces significantly, you can add some fresh brewed and cooled sweetened tea to maintain enough liquid for the SCOBY.
Remember, understanding the proper storage techniques and staying attentive to the condition of your SCOBY will help ensure successful kombucha brewing in the future. If you have any other questions or concerns, don’t hesitate to reach out for further guidance or support.
Now that you have answers to these frequently asked questions, you are well-equipped to store your SCOBY with confidence and embark on your kombucha brewing journey.
Read more: How To Store Scoby Long Term
Conclusion
Storing your SCOBY after the first fermentation is a crucial step in maintaining its health and vitality for future batches of delicious kombucha. By following the proper steps and techniques, you can ensure that your SCOBY remains active and ready to ferment sweet tea into tangy and fizzy kombucha.
Throughout this article, we’ve explored why it’s important to store SCOBY after the first fermentation, the basics of understanding SCOBY and its role in kombucha brewing, as well as the step-by-step process of storing the SCOBY effectively.
Cleaning and sanitizing your equipment, preparing a suitable storage container, transferring the SCOBY gently, and storing it in a cool and dark place are all key factors in maintaining the SCOBY’s health and quality during storage. Monitoring the SCOBY for any signs of mold or contamination is also important to ensure that only a healthy SCOBY is used for future brews.
We’ve also addressed frequently asked questions about storing SCOBY, providing answers and clarifications on various aspects of the storage process.
By investing time and effort into proper storage techniques, you can prolong the life of your SCOBY, brew numerous batches of kombucha, save money, and even share your starter cultures with others.
Now, armed with the knowledge and understanding of how to store your SCOBY after the first fermentation, you can embark on your kombucha brewing journey with confidence, knowing that your SCOBY will remain vibrant and ready to transform sweet tea into a delightful and refreshing probiotic beverage. Cheers to your successful kombucha brewing adventures!
Frequently Asked Questions about How To Store Scoby After First Fermentation
Was this page helpful?
At Storables.com, we guarantee accurate and reliable information. Our content, validated by Expert Board Contributors, is crafted following stringent Editorial Policies. We're committed to providing you with well-researched, expert-backed insights for all your informational needs.


0 thoughts on “How To Store Scoby After First Fermentation”