Articles
How To Store Snacks In Pantry
Modified: August 17, 2024
Learn how to store snacks in your pantry with these helpful articles. Find tips and tricks to keep your favorite snacks fresh and organized.
(Many of the links in this article redirect to a specific reviewed product. Your purchase of these products through affiliate links helps to generate commission for Storables.com, at no extra cost. Learn more)
Introduction
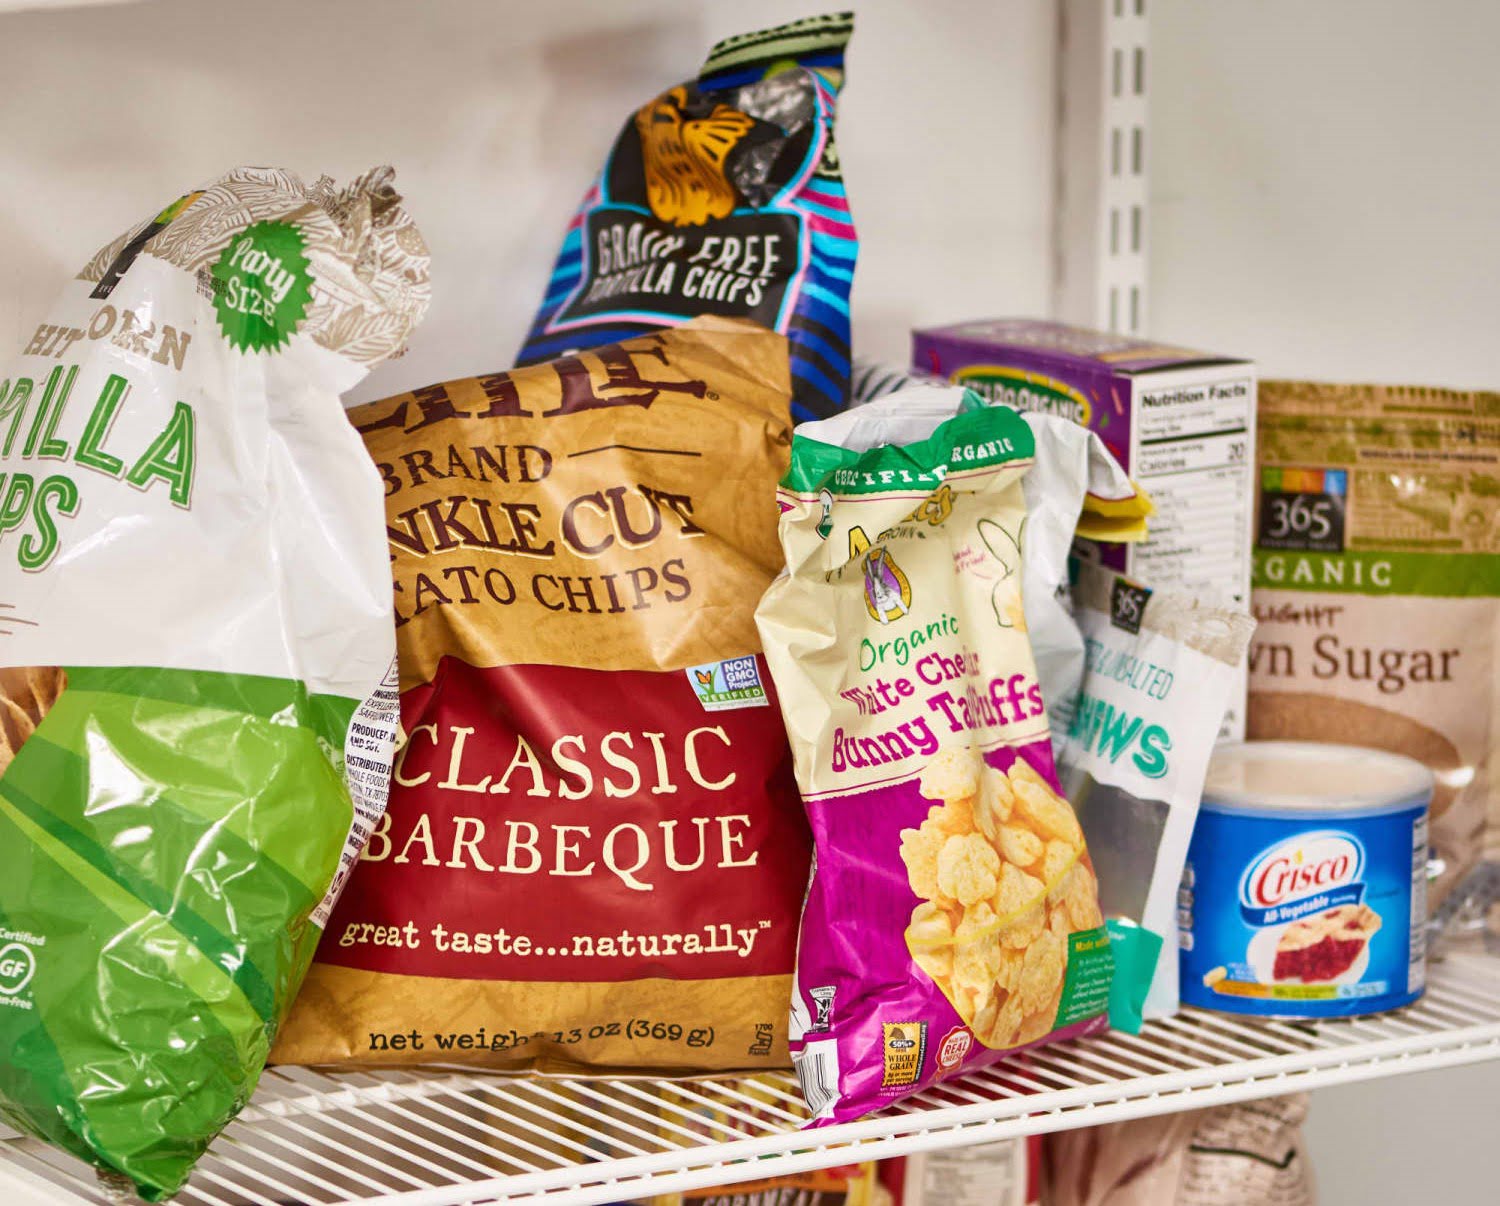
When it comes to keeping snacks in your pantry, proper storage is key. Not only does it help to maintain the freshness and quality of the snacks, but it also maximizes the available space and makes it easier for you to find what you need. A well-organized pantry with neatly stored snacks can save you time and effort when it comes to meal planning and snack choices. Whether you’re a snack enthusiast or a busy parent trying to keep a variety of treats on hand, following a few simple steps can help you store snacks in your pantry more effectively.
In this article, we will explore the benefits of properly storing snacks in the pantry and guide you through the step-by-step process of organizing your pantry, choosing the right containers, keeping snacks fresh, labeling and categorizing snacks, rotating snacks, storing snacks for easy access, and creating a snack inventory. By the end of this article, you will have all the knowledge you need to create a well-organized and deliciously stocked pantry.
Key Takeaways:
- Properly storing snacks in the pantry offers benefits such as preserving freshness, reducing food waste, and promoting healthy snacking. Organizing, labeling, and rotating snacks are key to an efficient and enjoyable snacking experience.
- Creating a well-organized pantry with the right containers, fresh snacks, and easy access can save time, reduce food waste, and enhance meal planning. Implementing rotation techniques and maintaining a snack inventory ensures a satisfying snacking experience.
Read more: How To Organize Snacks In Pantry
Benefits of Properly Storing Snacks in the Pantry
Properly storing snacks in your pantry offers a multitude of benefits. Let’s explore some of the key advantages:
- Preserves Freshness: One of the main benefits of proper snack storage is that it helps to preserve their freshness for longer periods. Using airtight containers and keeping snacks away from moisture and heat can prevent them from becoming stale or spoiled.
- Reduces Food Waste: When snacks are stored haphazardly, it’s easy to lose track of expiration dates, resulting in wasted food. By organizing snacks and implementing rotation techniques, you can stay on top of expiration dates and consume the oldest snacks first, reducing food waste.
- Maximizes Space: Keeping your snacks properly stored in the pantry allows you to maximize the available space. By using stackable containers or utilizing vertical space with shelves or racks, you can create more room and efficiently store a variety of snacks.
- Easier Meal Planning: When your pantry is well-organized with snacks readily visible and accessible, it becomes easier to plan your meals and snacks. This saves you time when creating grocery lists and helps you easily identify what snacks are available, preventing any last-minute trips to the store.
- Promotes Healthy Snacking: With a well-organized pantry, you can categorize snacks based on their nutritional value. This makes it easier to locate and choose healthier options when you’re craving a snack. Additionally, having a variety of snacks readily available can help you avoid impulsive snacking on less nutritious options.
- Saves Money: Properly storing snacks can help you save money in several ways. First, by preventing snacks from going stale or spoiling, you can reduce the need to throw away expired food. Second, by knowing what snacks you have on hand, you can avoid unnecessary duplicate purchases during grocery shopping trips.
- Convenience and Accessibility: Storing snacks in an organized manner makes them more accessible and convenient for you and your family. Whether you’re grabbing a quick snack on the go or preparing a snack for your kids, having snacks easily visible and within reach saves time and effort.
By understanding the benefits of properly storing snacks in the pantry, you can create an organized and efficient snack storage system that enhances freshness, minimizes food waste, and simplifies your snacking experience.
Step 1: Organizing the Pantry
An organized pantry is the foundation of effective snack storage. Follow these steps to get your pantry in order:
- Empty and clean: Start by removing all items from your pantry. Wipe down the shelves and clean any spills or crumbs to create a fresh canvas.
- Sort and declutter: Take this opportunity to sort through all the snacks and remove any expired or stale items. Donate any unopened snacks that you no longer want or need.
- Group similar items: Categorize your snacks based on type, such as chips, cookies, nuts, or granola bars. This will make it easier to find what you need and ensure your pantry remains organized in the long run.
- Create zones: Divide your pantry into zones based on the frequency of use. Place frequently accessed snacks at eye level or within easy reach, while less frequently consumed snacks can be stored on higher or lower shelves.
- Utilize storage solutions: Invest in storage solutions such as clear bins, stackable containers, or adjustable shelves to maximize space and keep snacks neatly organized.
- Label shelves: Use labels or sticky notes to identify each zone or category in your pantry. This will help you and your family members quickly locate specific snacks and maintain the organization.
- Consider visibility: Arrange snacks with their labels facing forward, ensuring that you can easily see what you have at a glance and avoid forgetting about items hidden at the back.
- Maintain regularly: Make it a habit to frequently tidy up your pantry and reorganize as needed. This will help you stay on top of expirations, maintain an organized space, and make any necessary adjustments to accommodate new snacks or changes in your snacking habits.
By following these steps and organizing your pantry effectively, you will create a well-structured and easily accessible storage system for your snacks.
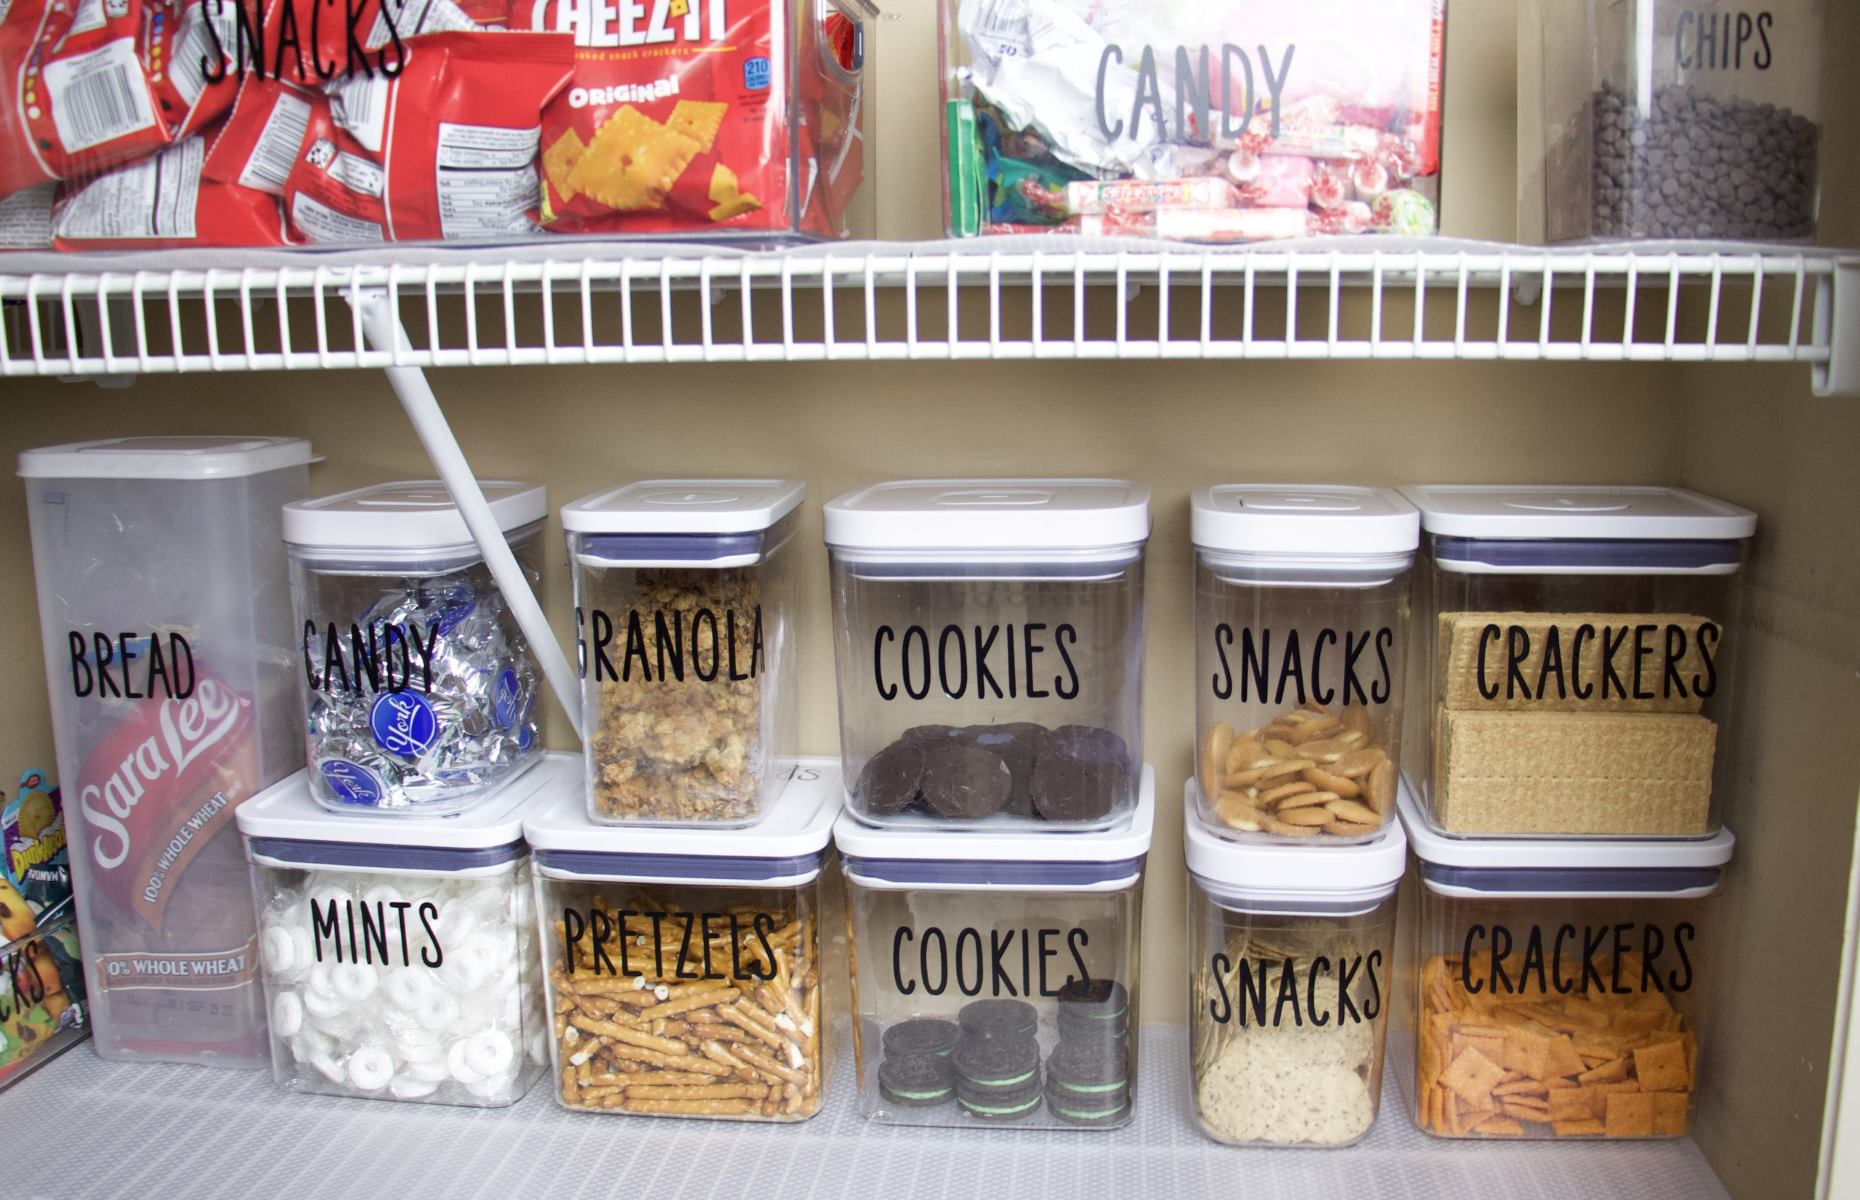
Step 2: Choosing the Right Containers
Choosing the right containers for storing your snacks is crucial for maintaining their freshness and organization. Here are some tips to help you select the best containers:
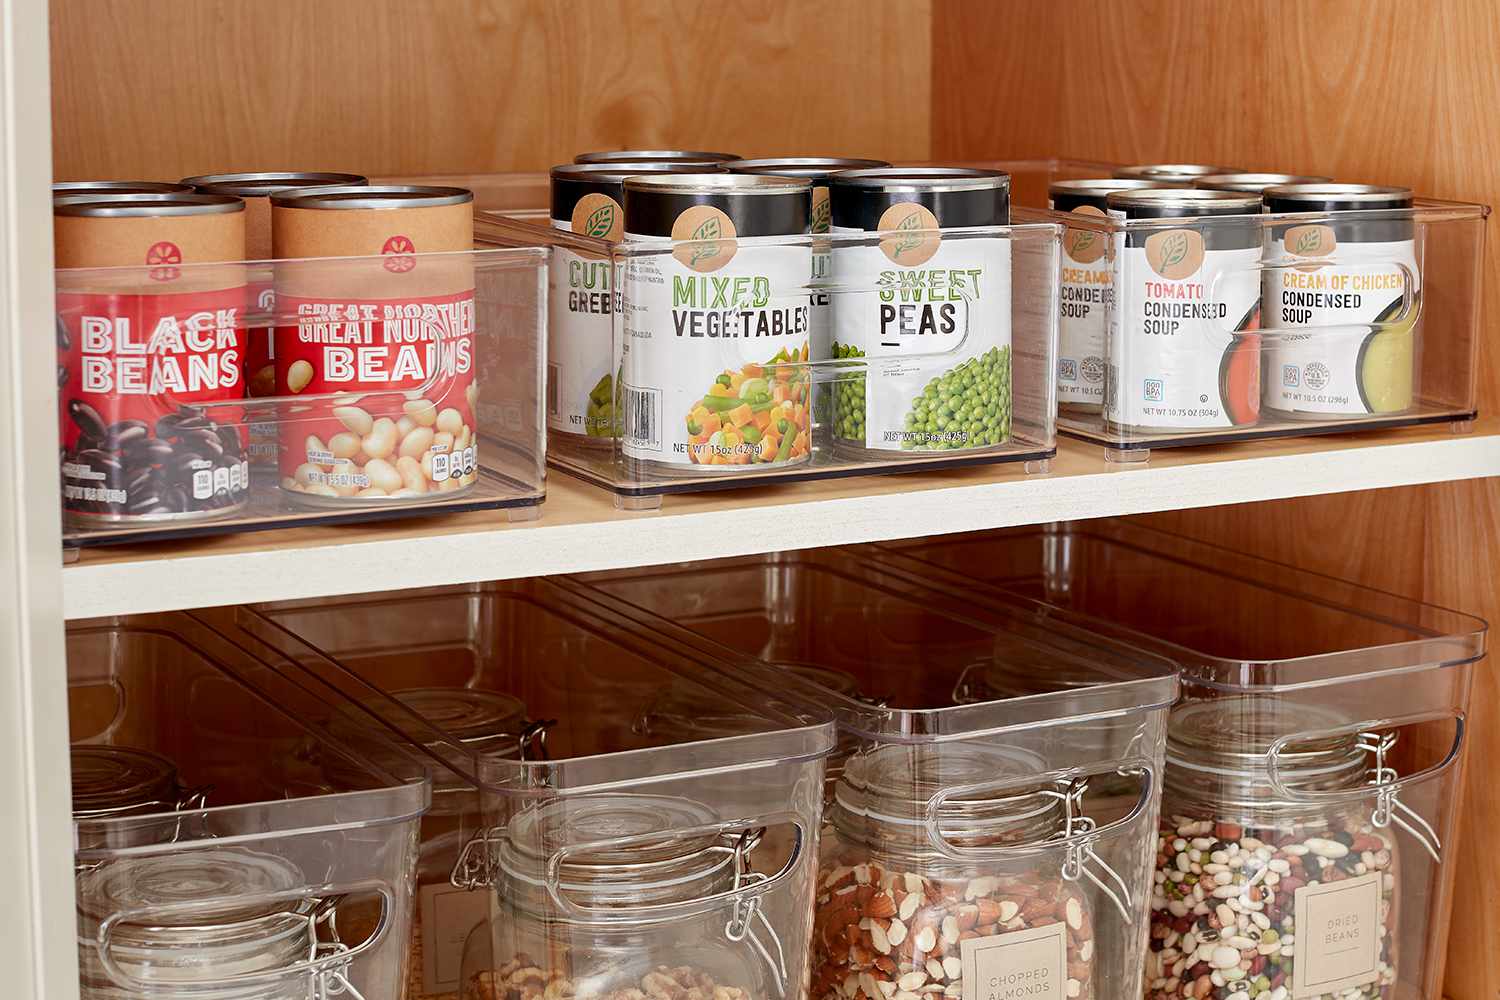
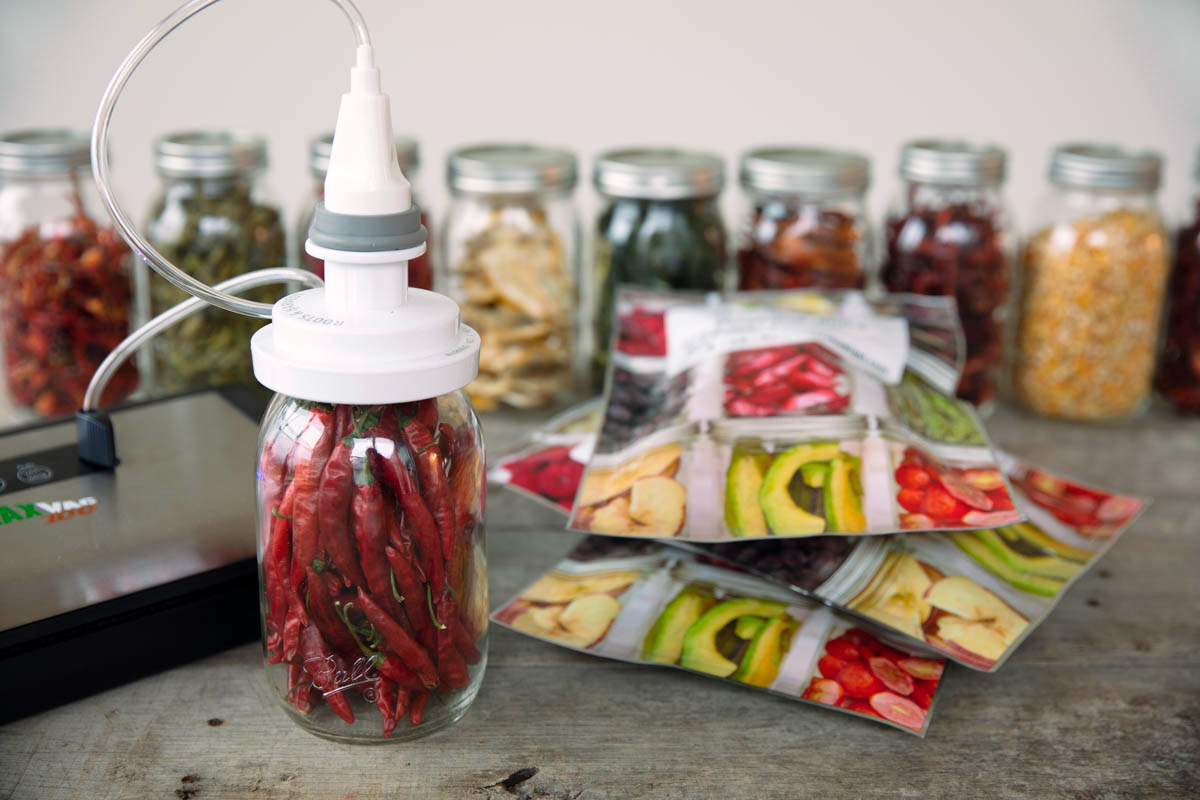
- Airtight and sealable: Opt for containers that have airtight seals to keep snacks fresh and protect them from moisture and air exposure. This helps to prolong their shelf life and maintain their flavor and texture.
- Clear and transparent: Select containers that are clear or transparent so you can easily see the contents without having to open them. This allows for quick identification of snacks and eliminates the need to browse through multiple containers.
- Uniform sizes: Using containers that are of similar sizes can help maximize space in your pantry. They can be easily stacked or placed side by side, creating a tidy and organized appearance.
- Easy to open/close: Look for containers with user-friendly features such as snap-on lids or easy-to-open mechanisms. This ensures quick and hassle-free access to your snacks.
- Durable and long-lasting: Invest in containers made from sturdy materials that are built to last. This will prevent them from breaking or cracking over time and ensure that your snacks are stored safely.
- Space-saving options: Consider using collapsible or nestable containers that can be conveniently stored when not in use. This helps to optimize space in your pantry and makes it easier to organize and rearrange snacks as needed.
- Easy to clean: Choose containers that are dishwasher safe or easy to clean by hand. This makes maintenance a breeze, saving you time and effort in the long run.
- Label-friendly: Look for containers with smooth surfaces that allow easy application and removal of labels. This is particularly helpful if you prefer to label your snacks for easy identification.
Remember to consider the size and shape of your pantry shelves when choosing containers. Optimize space by selecting containers that fit well and utilize available vertical or under-shelf space.
By carefully selecting the right containers for your snacks, you can ensure that they stay fresh, well-organized, and easily accessible in your pantry.
Step 3: Keeping Snacks Fresh
Maintaining the freshness of your snacks is essential for a satisfying snacking experience. Follow these tips to keep your snacks fresh:
- Store in a cool, dry place: Keep snacks away from heat sources and direct sunlight, as they can accelerate spoilage. Find a cool and dry area in your pantry to store your snacks.
- Use airtight containers: As mentioned earlier, airtight containers are key in preserving the freshness of snacks. Ensure all snacks are stored in containers with secure seals to keep out air and moisture.
- Avoid storing near strong odors: Certain snacks, such as cookies or crackers, can absorb odors easily. Keep them away from pungent foods like onions or spices to prevent flavor contamination.
- Consider specialized storage: Some snacks have specific requirements to maintain their freshness. For example, storing chips in chip clips or resealable bags and cookies in cookie jars can help preserve their texture and flavor.
- Use moisture absorbers: If you live in a humid environment, consider adding moisture-absorbing packets or silica gel packets to your snack containers. These will help prevent snacks from becoming stale or soft due to high humidity.
- Avoid freezing certain snacks: While freezing can extend the shelf life of some snacks, it can negatively affect the texture and taste of others. Items like potato chips or crackers may become soggy when thawed, so it’s best to avoid freezing them.
- Reseal opened bags: Snacks that come in resealable bags, such as pretzels or popcorn, should be tightly sealed after each use. This will prevent air from entering and keep the snacks fresh for longer.
- Monitor expiration dates: Regularly check the expiration dates of your snacks and consume them before they expire. Rotate your snacks accordingly to ensure older ones are used first.
- Consider bulk storage: For large quantities of snacks, consider dividing them into smaller portions and storing them individually. This helps to minimize exposure to air and maintain the freshness of the remaining snacks.
- Be mindful of temperature changes: Avoid drastic temperature changes in your pantry, as they can cause moisture accumulation or condensation inside containers. This can lead to spoilage or loss of quality.
By implementing these practices, you can ensure that your snacks stay fresh and delicious for an extended period, allowing you to enjoy them to the fullest.
To store snacks in the pantry, use airtight containers to keep them fresh longer and prevent pests. Organize snacks by type and label containers for easy access.
Read more: How To Store Snacks In Your Room
Step 4: Labeling and Categorizing Snacks
Labeling and categorizing your snacks is an effective way to keep your pantry organized and make it easy to locate specific snacks. Follow these steps to effectively label and categorize your snacks:
- Create snack categories: Group your snacks into categories based on their types, such as chips, cookies, granola bars, or nuts. This will help you quickly identify where each snack belongs and streamline the organization process.
- Use clear labels: Label each category with clear and easily readable labels. You can use adhesive labels, sticky notes, or label makers to mark the shelves or containers where the snacks belong.
- Consider color coding: To further enhance organization, assign a specific color to each snack category. This can be done by using colored labels or placing snacks in colored containers. This visual distinction makes it even easier to identify and retrieve specific snacks.
- Include expiration dates: For snacks without clearly labeled expiration dates, add small labels with the date of purchase or the expiration date. This will help you keep track of the shelf life of each snack and ensure you consume them while they are still fresh.
- Arrange snacks by category: Once you have labeled your snack categories, arrange the snacks within each category in a logical order. This can be alphabetical, by brand, or by your personal preference. Consistency in arrangement makes it easier for both yourself and others to locate specific snacks.
- Label individual snack containers: If you have different containers for each snack, such as separate containers for different types of nuts, label the individual containers. This clarifies what each container holds and avoids confusion.
- Review and update labels regularly: Periodically check your labels to ensure they are still accurate and up to date. Remove labels for snacks that are no longer stored in the pantry and update labels if the location or contents of a category change.
- Consider a digital inventory: For larger pantries or those with a wide variety of snacks, consider creating a digital inventory. This can be a spreadsheet or a pantry organization app where you list all the snacks you have, along with their categories. This makes it easy to search and track what snacks you have on hand.
By labeling and categorizing your snacks, you can easily maintain an organized pantry, quickly find specific snacks, and streamline your shopping and meal planning process.
Step 5: Rotating Snacks
Rotating your snacks is essential to ensure that older snacks are consumed first and to prevent wastage. Follow these steps to effectively rotate your snacks:
- Date your snacks: When you purchase or open a new package of snacks, write the date of purchase or the expiration date on the packaging. This will help you keep track of the age of each snack.
- Place older snacks in front: When organizing your pantry, make sure to place snacks with the nearest expiration dates towards the front. This way, they are easily visible and more likely to be consumed first.
- Follow the “First in, First out” (FIFO) method: When adding new snacks to your pantry, place them behind the existing snacks of the same type. When you reach for a snack, grab the one that is closest to its expiration date.
- Regularly check expiration dates: Take the time to periodically check the expiration dates of your snacks. As the expiration date approaches, move those snacks to the front of the pantry to ensure they are consumed before they go bad.
- Consider donation: If you have snacks that are approaching their expiration date and you know you won’t be able to consume them in time, consider donating them to local food banks or charitable organizations. This helps to reduce food waste and ensures that others in need can benefit from these snacks.
- Track expiration dates digitally: If you have a large variety of snacks or struggle to remember expiration dates, consider creating a digital inventory where you can easily track expiration dates. This can be a simple spreadsheet or a pantry organization app that alerts you when snacks are nearing their expiration date.
- Review and discard expired snacks: Regularly review your pantry to identify snacks that have passed their expiration dates. Discard any expired snacks to maintain the freshness and quality of your stocked snacks.
- Train family members: Teach your family members or anyone else who accesses the pantry about the importance of rotating snacks. Encourage them to follow the FIFO method and inform them of the location of new snacks to ensure proper rotation.
By implementing these rotation techniques, you can ensure that your snacks are consumed in a timely manner, reducing waste and maximizing freshness.
Step 6: Storing Snacks for Easy Access
Storing snacks in a way that allows for easy access is essential for a convenient snacking experience. Follow these steps to ensure your snacks are easily reachable:
- Group snacks by type: Keep similar snacks together and create designated areas or shelves for each type. For example, have a shelf for chips, another for cookies, and another for granola bars.
- Arrange snacks by frequency of use: Place snacks that are frequently consumed within easy reach. This may include snacks like grab-and-go granola bars or single-serving packages that are popular choices for quick snacks.
- Utilize clear containers or jars: If possible, store snacks in clear containers or jars to easily see what is inside without having to open them. This makes it easier to identify the snack you want and prevents the need to rummage through multiple containers.
- Use tiered shelves or risers: Tiered shelves or risers can help maximize space and visibility. They allow you to stack snacks without obscuring each other, making it easier to locate and access the snacks you want.
- Consider snack baskets or bins: Group snacks together in baskets or bins based on themes or preferences. For example, create a “sweet treats” basket or a “healthy snacks” bin. This makes it even easier to grab a snack that fits your current craving or dietary preference.
- Label shelves or containers: Labeling your shelves or containers can provide visual cues and make it easier to locate specific snacks. Use clear and easily readable labels to identify each section or category.
- Keep frequently used snacks at eye level: Place the snacks you and your family reach for the most at eye level, where they are easily visible and accessible. This saves time and eliminates the need to search through the pantry for your favorite treats.
- Consider pull-out shelves or baskets: If your pantry layout allows, consider installing pull-out shelves or baskets. These create easier access to snacks stored at the back, as they slide out for better visibility and reach.
- Regularly restock and organize: Take the time to restock your snacks and reorganize your pantry regularly. This will ensure that your most desired snacks are always readily available and easy to find.
- Involve family members: Encourage everyone in your household to follow the organization system and put snacks back in their designated spots after use. This helps to maintain the order and accessibility of your pantry.
By storing your snacks in a way that allows for easy access, you can quickly satisfy your cravings and streamline your snacking routine.
Step 7: Creating a Snack Inventory
Creating a snack inventory is a helpful step to keep track of the snacks you have on hand. Follow these steps to create a comprehensive snack inventory:
- List all snack categories: Start by listing all the snack categories you have in your pantry. This can include chips, cookies, nuts, granola bars, and any other types of snacks you regularly stock.
- Include specific snack varieties: Within each snack category, list the specific varieties or brands you have. For example, under cookies, you may have chocolate chip, oatmeal raisin, and sandwich cookies.
- Determine the quantity of each snack: Record the quantity of each snack you currently have in your inventory. This could be the number of packages or the weight of the snacks, depending on how you prefer to track your inventory.
- Note any expiration dates: Take note of the expiration dates for each snack. This will help you be aware of snacks that need to be consumed sooner rather than later. Update the expiration dates as you restock or consume snacks.
- Organize the inventory: Arrange your inventory in a clear and logical manner. You can use a spreadsheet, a notes app, or even a simple pen and paper to list your inventory. Group snacks by category and consider adding columns for quantity and expiration date.
- Regularly update the inventory: Make it a habit to update your snack inventory regularly. Add new snacks as you purchase them and remove snacks as you consume or discard them. This ensures that your inventory remains accurate and up to date.
- Use the inventory for meal planning and shopping: Refer to your snack inventory when planning meals or making grocery lists. Knowing what snacks you already have on hand will prevent unnecessary duplicate purchases and help you plan meals that incorporate your existing snack selection.
- Consider a digital inventory: For a more organized and easily accessible inventory, consider using digital tools such as pantry organization apps or spreadsheets. These tools often have features that allow you to easily update quantities and expiration dates as needed.
- Share the inventory with family members: If you live with others, consider sharing the snack inventory with them. This helps to ensure everyone is aware of what snacks are available and avoids confusion or duplicate purchases.
- Review and adjust inventory as needed: Regularly review your snack inventory and adjust it as you make changes to your snack selection or purchase new snacks. This will help you maintain an accurate and useful inventory system.
By creating a snack inventory, you can easily track and manage your snack selection, avoid running out of your favorite treats, and streamline your meal planning and shopping process.
Read more: How To Store Bread In Pantry
Conclusion
Storing snacks in your pantry may seem like a simple task, but taking the time to properly organize and store them can make a significant difference in freshness, accessibility, and overall enjoyment. By following these steps outlined in this article, you can create a well-organized snack storage system that maximizes space, reduces food waste, and saves you time and effort in locating your favorite treats.
Starting with organizing your pantry, decluttering and categorizing snacks sets the foundation for a streamlined storage system. Choosing the right containers, such as airtight and transparent ones, allows you to keep snacks fresh and easily visible, while labeling and categorizing snacks provides quick reference and helps you navigate your pantry with ease.
Rotating snacks based on expiration dates prevents waste and ensures you consume the oldest snacks first. Storing snacks for easy access, arranging them by category and frequency of use, further enhances convenience and saves valuable time. Creating a snack inventory helps you stay organized and plan meals effectively, while digital tools can streamline the process even further.
By implementing these steps and techniques, you can maintain a well-stocked and efficiently organized pantry, ensuring that your snacks remain fresh, accessible, and enjoyable. Not only will this make your snacking experience more convenient, but it can also help you save money by reducing food waste and unnecessary purchases.
So, take the time to implement these steps, and elevate your snack storage game. A well-organized, easily accessible, and fresh pantry will not only make your snacking more enjoyable but also provide you with a sense of satisfaction and efficiency in your daily life.
Now that you've mastered snack storage, why not take your organizational skills to the next level? For those looking to spruce up their food storage areas, our guide on Pantry Organization will show you efficient ways to arrange your pantry closet. If space is tight, our tips on Kitchen Organization offer smart, space-saving strategies that can transform even the smallest of kitchens into a model of efficiency. Both articles are packed with practical advice to help you maintain an orderly and attractive kitchen.
Frequently Asked Questions about How To Store Snacks In Pantry
Was this page helpful?
At Storables.com, we guarantee accurate and reliable information. Our content, validated by Expert Board Contributors, is crafted following stringent Editorial Policies. We're committed to providing you with well-researched, expert-backed insights for all your informational needs.

0 thoughts on “How To Store Snacks In Pantry”