Home>Articles>12 Amazing Cartridge Alignment Protractor for 2025
Articles
12 Amazing Cartridge Alignment Protractor for 2025
Modified: June 10, 2025
Discover the top 12 cartridge alignment protractors for 2025. Achieve precise, optimal sound reproduction with these amazing tools.
(Many of the links in this article redirect to a specific reviewed product. Your purchase of these products through affiliate links helps to generate commission for Storables.com, at no extra cost. Learn more)
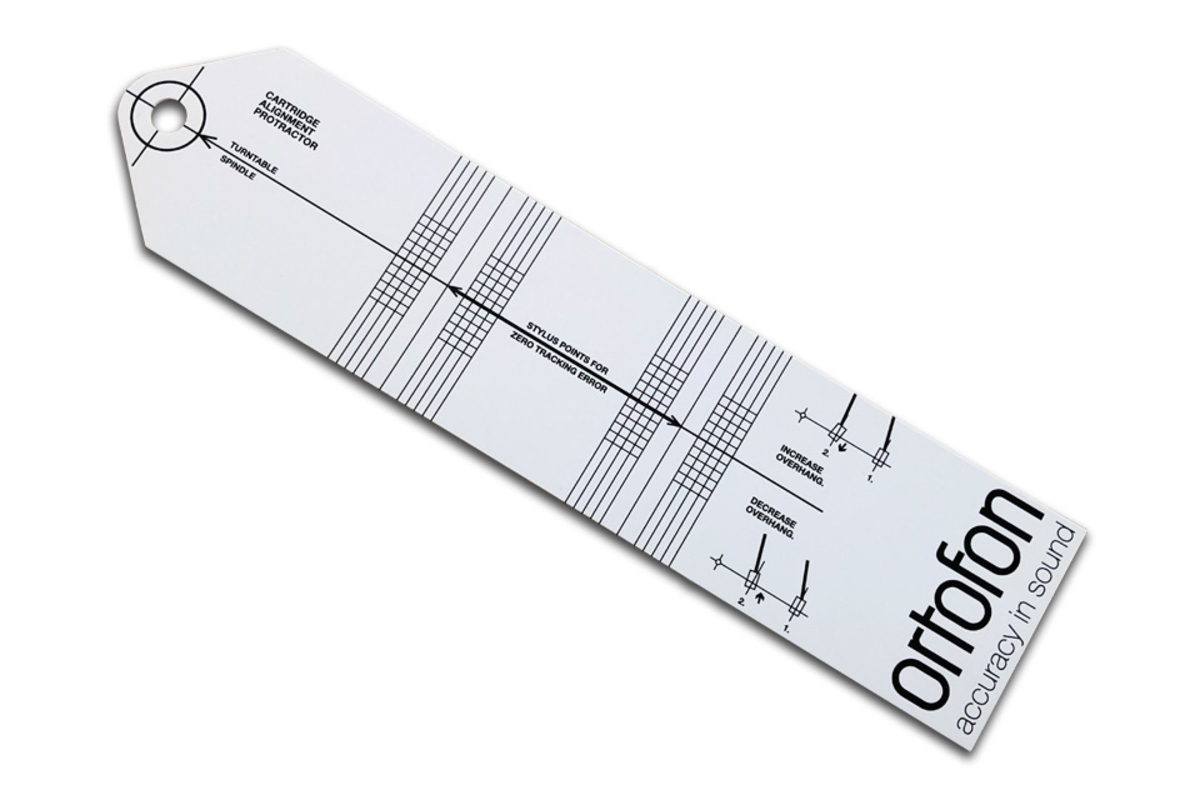
12 Amazing Cartridge Alignment Protractor for 2025If you're an avid vinyl collector or hi-fi enthusiast, ensuring the precise alignment of your turntable's cartridge is crucial for optimal sound quality. In the realm of cartridge alignment tools, the year 2025 is set to introduce a range of innovative options. These cutting-edge alignment protractors offer a remarkable degree of accuracy and ease of use, helping you fine-tune your vinyl setup to perfection. From high-precision laser-guided models to versatile digital options, the 12 amazing cartridge alignment protractors for 2025 promise to revolutionize the way you experience music on vinyl. Prepare to witness the future of cartridge alignment technology and elevate your listening experience to new heights.

Overall Score: 8.5/10
The Turntable Phono Cartridge Stylus Alignment Protractor Tool Mirror is a must-have for anyone looking to achieve professional phono cartridge alignment. This tool allows amateurs to achieve precise alignment, resulting in better sound quality and longer stylus life. Made of durable 2mm ABS plastic with a mirrored finish, this tool provides a clear bottom view and top view simultaneously, allowing for easy and precise adjustment of your cartridge/stylus. The attractive blister packaging also makes it a great gift option. The tool comes in a sleek grey color and has dimensions of 6.00Lx1.00Wx1.00H. Customers have rated it 4.6 out of 5 stars.
Key Features
- Lets an amateur do professional phono cartridge alignment
- Gives precise alignment for better sound and longer stylus life
- Made of durable 2mm ABS plastic with mirrored finish
- Allows you to precisely adjust your cartridge/stylus by providing clear bottom view and top view simultaneously
- Attractive blister packaging makes for a great gift
Specifications
- Color: Grey
- Dimension: 6.00Lx1.00Wx1.00H
Pros
- Easy to use and understand
- Effective in improving audio quality
- Well-made and durable
Cons
- Mirror finish makes alignment difficult to ascertain
- Black lines on the tool are hard to see
The Turntable Phono Cartridge Stylus Alignment Protractor Tool Mirror is a valuable tool for anyone looking to optimize their turntable setup. While the mirror finish may make alignment a bit challenging, its other features more than compensate for this minor drawback. With this tool, even amateurs can achieve professional-level alignment, resulting in noticeably improved sound quality and longer stylus life. The high customer rating speaks to the effectiveness and reliability of this product. Whether you’re a casual listener or an audiophile, this tool will significantly enhance your vinyl listening experience. It’s a worthwhile investment for anyone who wants their turntable to perform at its best.

Overall Score: 9/10
The Mobile Pro Shop Turntable Azimuth Cartridge Alignment Protractor Set is a premium tool for aligning your cartridge and setting up your turntable to ensure optimal sound quality. Made of high-quality acrylic, this set includes an alignment protractor and an azimuth ruler. The protractor provides improved visibility for cartridge alignment, eliminating tracking errors and over-shoot distortion. The azimuth ruler helps you achieve the correct vertical tracking angle. It is easy to use, with instructions printed on the protractor. By using this set, you can reduce distortion, prevent damage to your vinyl, and enhance your music quality. With a 30-day return policy, you can buy with confidence. Overall, this set is a must-have for anyone serious about their vinyl listening experience.
Key Features
- Made of premium acrylic material
- High contrast cartridge alignment protractor
- Azimuth ruler for vertical tracking angle
- Easy to use with clear instructions
- Reduces distortion and damage to vinyl
- 30-day return policy
Specifications
- Dimension: 2.13Lx0.91Wx8.43H
- Size: VTA Bundle Pack
Pros
- High-quality material
- Improved visibility for alignment
- Reduces distortion and damage
- Easy to use with clear instructions
- 30-day return policy
Cons
- Difficult to read print on acrylic
- Spindle hole may be too tight for some turntables
- Hard to see markings on azimuth ruler in certain setups
The Mobile Pro Shop Turntable Azimuth Cartridge Alignment Protractor Set is a highly recommended tool for vinyl enthusiasts. Made of premium acrylic, this set provides improved visibility for cartridge alignment and azimuth adjustment, resulting in enhanced sound quality. While there may be some limitations with readability in certain setups, overall, this set offers excellent value for its price. By aligning your cartridge and setting up your turntable properly, you can greatly improve your vinyl listening experience. Don’t hesitate to try this product and enjoy the music with reduced distortion and damage to your vinyl. Upgrade your setup with the Mobile Pro Shop Turntable Azimuth Cartridge Alignment Protractor Set.

Overall Score: 8.5/10
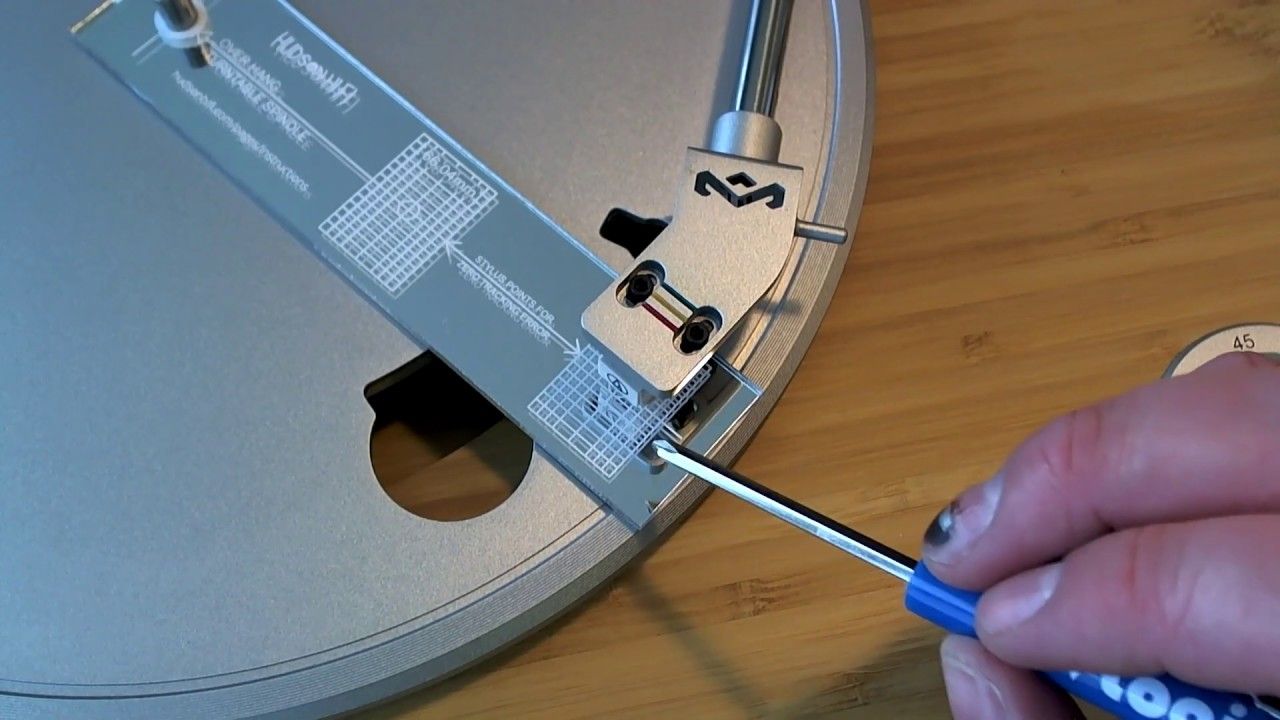
The WHYHKJ Cartridge Alignment Protractor Tool is a must-have for any vinyl enthusiast looking to achieve optimal sound quality. This tool helps eliminate tracking errors, adjust the overhang, and avoid over-shoot distortion, resulting in high-quality sound reproduction. With its easy-to-use design, simply place the protractor on your turntable platter and adjust your cartridge until the stylus rests exactly on the center of the bulls eye. You can also check the cartridge alignment with the inner set of grid lines. Made with durable materials, this tool ensures precise calibration and long-lasting performance. Enhance your vinyl listening experience with the WHYHKJ Cartridge Alignment Protractor Tool.
Key Features
- Eliminate tracking errors
- Adjust overhang
- Avoid over-shoot distortion
- Easy-to-use design
- Durable materials
Specifications
- N/A
Pros
- Improves sound quality
- Accurate cartridge alignment
- Easy to follow instructions
- Durable construction
Cons
- Limited specifications provided
The WHYHKJ Cartridge Alignment Protractor Tool is a valuable accessory for vinyl enthusiasts who prioritize optimal sound quality. With its easy-to-use design and precise calibration capabilities, this tool ensures accurate cartridge alignment and eliminates tracking errors. Although the limited specifications may be a drawback for some users, the overall performance and durable construction make it a reliable option for any turntable setup. Enhance your vinyl listening experience and enjoy high-quality sound reproduction with the WHYHKJ Cartridge Alignment Protractor Tool.

Overall Score: 8/10
The Turntable Phonograph LP Phono Cartridge Stylus Alignment Protractor Tool (Protactor Mirrored) is a useful accessory for anyone who wants to accurately align the cartridge on their turntable. It provides improved visibility and eliminates tracking errors, making it easy to achieve perfect alignment. The protractor works with any 1/2" mounted cartridge and can be used with an S-Shaped arm. It comes with a link to a turntable setup guide with instructions printed directly on the protractor. The mirrored v2 design adds to its functionality, allowing for easier needle visibility. Overall, it is an essential tool for vinyl enthusiasts and hobbyists in the pursuit of optimal sound quality.
Key Features
- Mirrored cartridge alignment protractor provides improved visibility
- Eliminate tracking errors
- Works with any 1/2" mounted cartridge
- Link to turntable setup guide with instructions included
- Can be used with an S-Shaped arm
Specifications
- Color: Mirrored v2
- Dimension: 2.00Lx3.50Wx1.56H
- Size: Protactor Mirrored
Pros
- Improved visibility for cartridge alignment
- Eliminates tracking errors
- Can be used with different cartridge mounts
- Includes turntable setup guide with instructions
Cons
- Mirrored lines can be visually confusing
- Reflection and markings may be hard to see together
The Turntable Phonograph LP Phono Cartridge Stylus Alignment Protractor Tool is a must-have for vinyl enthusiasts and turntable hobbyists. Its mirrored design provides improved visibility for alignment, ensuring optimal sound quality. The tool is easy to use and eliminates tracking errors, allowing for precise cartridge alignment. It works with various cartridge mounts and can be used with an S-Shaped arm, catering to different setups. While the mirrored lines can be visually confusing, this tool remains a valuable accessory for achieving perfect alignment. Overall, it is a reliable and essential tool for those looking to enhance their vinyl listening experience.

Overall Score: 8.5/10
The Turntable Cartridge Alignment Protractor Mat is a high-quality calibration distance gauge tool for adjusting vinyl records. Made of durable and non-slip acrylic material, this mat provides a good and accurate calibration effect. It is easy to use, with one side providing a diagram for cartridge alignment. The mat is printed using the latest UV printing technology for high accuracy. It also comes with a non-slip mat for turntable alignment. Overall, it is a useful tool for turntable enthusiasts to ensure precise cartridge alignment and optimal performance.
Key Features
- Acrylic LP Vinyl Pickup Calibration
- Applications for skidding force and head calibration
- Easy to Use with alignment diagram
- High Quality and High Accuracy
- Package Includes non-slip mat
Specifications
- Color: White
- Quantity: 1
- Dimension: 12.60Lx3.94Wx3.15H
Pros
- Durable and non-slip acrylic material
- Easy and accurate cartridge alignment
- High-quality UV printing for accuracy
- Includes non-slip mat for turntable alignment
Cons
- Hard to see stylus on corresponding dots
- No instructions included
- Black ink may protrude and grab the diamond
The Turntable Cartridge Alignment Protractor Mat is a must-have tool for turntable enthusiasts who value precise cartridge alignment. While it may lack instructions and the stylus dots can be difficult to see, its overall performance and quality make it a worthwhile investment. The high-quality acrylic material ensures durability and non-slip properties, while the UV printing technology guarantees accuracy. The additional non-slip mat for turntable alignment is a bonus. With this protractor mat, users can easily and effectively calibrate their vinyl records, resulting in improved sound quality and reduced vinyl wear. Despite its few drawbacks, the Turntable Cartridge Alignment Protractor Mat offers great value for money.

Overall Score: 8.5/10
The Amador Store Turntable Phono Cartridge Stylus Alignment Protractor Tool is a must-have for any vinyl record enthusiast. Made of transparent acrylic material, this tool ensures a horizontal balance of the cartridge when viewed from the front, determining the angle at which the stylus sits on the record groove. With highly accurate tone arm alignment, this tool reduces friction, noise, and eliminates tracking errors to deliver high-quality sound. The package contains an Alignment Protractor, VTA Azimuth ruler, and a user guide book to simplify the alignment process. Buy with confidence as The Amador Store provides excellent customer service and a satisfaction guarantee.
Key Features
- Made of transparent acrylic material with clearly defined lines
- Reduces friction, noise, and eliminates tracking errors
- Maximizes turntable and tone arm performance
- Package contains Alignment Protractor, VTA Azimuth ruler, and user guide book
- Sincere customer service and satisfaction guarantee
Specifications
- Color: Cartridge Alignment Tool Set
Pros
- Accurate alignment for optimal sound quality
- Well-made and easy to use
- Package includes both alignment gauges
Cons
- Black lines on tool may be difficult to see
- Price is considered high by some
- Limited selection of songs for demonstration
The Amador Store Turntable Phono Cartridge Stylus Alignment Protractor Tool is an essential tool for vinyl record enthusiasts. With its transparent acrylic design and accurate alignment capabilities, it enhances the performance of turntables and tone arms, resulting in high-quality sound reproduction. The package includes all the necessary tools and a user guide book to ensure ease of use. While the black lines on the tool may pose visibility challenges for some users, the overall quality and functionality of this product make it a worthwhile investment. The Amador Store’s commitment to customer satisfaction adds further value to this alignment tool.

Overall Score: 8.5/10
The Acrylic Turntable Mat Cartridge Alignment Protractor Phonograph Cartridge Alignment Tool is a high-quality calibration distance gauge tool for adjusting vinyl records. Made of durable, firm, and nonslip acrylic material, this tool provides accurate calibration and a wonderful effect. It features a one-sided alignment mat with a diagram for cartridge alignment, making it easy to use and providing precise alignment in under 5 minutes. The mat is printed using the latest UV printing technology for accuracy and longevity. With dimensions of approximately 29.5cm in diameter and 0.2cm in thickness, this tool is suitable for turntable accessories. Overall, it's a valuable tool for vinyl enthusiasts and offers great value for the money.
Key Features
- Acrylic LP Vinyl Pickup Calibration
- Turntable Cartridge Alignment Protractor Mat Applications
- Easy to Use Anti-sliding LP Vinyl Record Pickup Calibration Plate
- High Quality and High Accuracy Acrylic Turntable Mat
- Package includes Pickup Calibration and Turntable Cartridge Alignment Protractor Mat
Specifications
- Color: White
- Dimension: 13.78Lx9.84Wx0.35H
Pros
- Durable and nonslip acrylic material
- Easy and quick to use, providing precise alignment
- Printed using UV technology for accuracy and longevity
Cons
- No anti-skate dial for precise adjustment
- Side B anti-skate does not work effectively
- No instruction manual included
The Acrylic Turntable Mat Cartridge Alignment Protractor is a valuable tool for vinyl enthusiasts, offering precise alignment for turntable cartridges. The durable and nonslip acrylic material ensures longevity, and the UV printing technology provides accurate calibration. Although it lacks an anti-skate dial and an instruction manual, the overall performance and ease of use make it a great tool for adjusting vinyl records. Whether you’re a beginner or an experienced user, this affordable and practical tool will enhance your vinyl listening experience. Give your cartridge the proper alignment it deserves and elevate your turntable setup with the Acrylic Turntable Mat Cartridge Alignment Protractor.

Overall Score: 8/10
Ensure your vinyl records are protected and experience high-quality sound with the Cartridge Alignment Protractor. This tool helps in calibrating your turntable by aligning the cartridge accurately. A poorly aligned cartridge can cause damage to your vinyl collection and lead to distortion. The protractor is compatible with record players featuring a 9-inch tonearm. Made of acrylic, it comes with a 7mm center hole and dimensions of 211.5*50.5*0.45mm. The protractor includes a printed scale and reference tangent for precise head correction. It is an essential tool for vinyl enthusiasts looking to maintain their turntable's performance.
Key Features
- Package includes: a piece of Cartridge Alignment Protractor
- Material: Acrylic Size: 211.550.50.45mm Center Hole: 7mm
- Protect records: Avoid needle drag and groove damage
- Compatibility: Suitable for turntables with 9-inch tonearm
- Easy to use: Protractor with printed scale for accurate correction
Specifications
- Size: B
Pros
- Accurate alignment for new stylus
- Well-made and durable
- Convenient and portable design
Cons
- Reflections on lines cause confusion
- Plastic surface is slick for stylus positioning
The Cartridge Alignment Protractor is a valuable tool for vinyl enthusiasts who want to ensure the longevity and optimal performance of their turntables. With its precise alignment capabilities, this protractor helps protect your vinyl collection from unnecessary damage and distortion. While the mirrored surface may cause slight inconvenience, its compact size and easy-to-use design make it a handy accessory to have. If you’re looking for a reliable and durable cartridge alignment tool, the Cartridge Alignment Protractor is definitely worth considering.

Overall Score: 8.5/10
The Turntable Cartridge Alignment Protractor Mat is a convenient tool for calibrating vinyl records and adjusting turntable accessories. Made of high-quality acrylic material, this mat is durable, firm, and non-slip. It features a blank side A to test the skidding force of the stylus and adjust the antiskating, while side B is used for calibrating the head. With its light and accurate design, it works with all turntables and tonearms, providing a good calibration effect. The alignment mat also includes alignment points and instructions to align the cartridge in under 5 minutes. This practical turntable accessory is perfect for replacing old or broken mats and makes a great gift for audiophiles, DJs, and vinyl record player lovers.
Key Features
- Useful calibration distance gauge tool
- Made of high-quality acrylic material
- Light and accurate design
- Easy to use with clear instructions
- Perfect replacement for old or broken mats
Specifications
- Color: White
- Dimension: 13.78Lx7.87Wx0.47H
- Size: Free size
Pros
- Durable and non-slip acrylic material
- Convenient for anti-skating setup
- Compatible with all turntables and tonearms
- Clear instructions for easy installation
- Great gift for audiophiles and vinyl lovers
Cons
- Print marks may be slightly off
- Lacks additional instructional sheet
- Somewhat expensive compared to alternatives
- Does not come with a record jacket
The Turntable Cartridge Alignment Protractor Mat is a valuable tool for any vinyl enthusiast looking to achieve optimal sound quality. Its high-quality acrylic construction and accurate design make it a reliable choice for calibrating turntables. While there may be some minor printing issues and the lack of an instruction sheet, these are outweighed by its ease of use and compatibility with various devices. The mat’s versatility and ability to improve anti-skating setup make it a worthwhile investment. Additionally, its suitability as a gift for audiophiles and vinyl record lovers adds to its appeal. Overall, the Turntable Cartridge Alignment Protractor Mat is a must-have accessory for achieving precise and enjoyable vinyl playback.

Overall Score: 8/10
The Axiom Turntable Cartridge Stylus Alignment Protractor Set is a high-quality vinyl record player phono cartridge alignment protractor and VTA azimuth ruler. Made of premium acrylic material, this set is easy to use and fits most phonographs. It improves visibility and reduces tracking errors, ensuring high-quality sound without over-shoot distortion. The set is highly convenient and comes with instructions for easy usage. By aligning your cartridge, you can eliminate distortion, prevent damage to your vinyl grooves, reduce friction, and balance out skating force. The Axiom Set is an essential tool for accurately tracing the groove and minimizing distortion. With elegant design and durability, Axiom aims for complete customer satisfaction.
Key Features
- Made of premium acrylic material
- Improves visibility and reduces tracking errors
- Convenient and easy to use
- Eliminates distortion and prevents damage to grooves
- Enhances the quality of music
Specifications
- Color: Transparent
Pros
- Premium material and well-built
- Improves phono cartridge performance
- Essential tool for accurate alignment
- Nice design and proper markings
- Great value for the price
Cons
- Vertical tracking gauge ink could have better visibility
- Lack of instructions for inexperienced users
- Quality issues reported by some customers
The Axiom Turntable Cartridge Stylus Alignment Protractor Set is an excellent tool for any vinyl record enthusiast. Made of premium acrylic material, it is durable and easy to use. With improved visibility and reduced tracking errors, it ensures high-quality sound without distortion. The set includes everything you need to align your cartridge and enhance the quality of your music. Although it lacks instructions for beginners, the Axiom Set is a valuable investment for experienced users looking to accurately trace grooves and minimize distortion. Despite some quality issues reported by a few customers, the majority of buyers appreciate the product’s design, performance, and value for the price. Overall, the Axiom Set is a solid choice for anyone looking to optimize their vinyl record player experience.

Overall Score: 8/10
The Turntable Cartridge Alignment Protractor Mat is a professional tool designed to provide precise alignment for phono-cartridges, resulting in better sound quality and longer stylus life. Made of durable and nonslip acrylic material, this calibration plate adjustment tool offers easy to use and dual precise alignment points. Side A is used for testing the skidding force of the stylus, while Side B is used for calibrating the head. With this protractor tool, even amateurs can achieve professional phono-cartridge alignment. The package includes 1 x Pickup Calibration. Improve your turntable experience with this essential accessory.
Key Features
- High Material: Made of acrylic material, durable, firm and nonslip.
- Easy To Use: Dual Precise Alignment Points to Properly Align your phono-cartridge
- Double Sides: Side A is used to test the skidding force of stylus, Side B is used to calibrate the head.
- Professional Tools: Lets an amateur do professional phono-cartridge alignment. Gives precise alignment for better sound and longer stylus life.
- Package includes: 1 x Pickup Calibration
Specifications
- Color: White
- Dimension: 12.60Lx3.94Wx3.15H
Pros
Cons
The Turntable Cartridge Alignment Protractor Mat is a must-have for any vinyl enthusiast who wants to optimize their turntable setup. With its durable acrylic material and dual precise alignment points, this tool allows both amateurs and professionals to achieve precise phono-cartridge alignment. The two-sided design provides convenience and accuracy for testing the skidding force of the stylus and calibrating the head. By using this protractor mat, you can improve sound quality and extend the life of your stylus. Overall, this accessory is a valuable investment for any turntable user seeking optimal performance and longevity. Upgrade your vinyl listening experience with the Turntable Cartridge Alignment Protractor Mat.

Overall Score: 8/10
The Turntable Cartridge Alignment Protractor Mat is a high-quality tool designed for checking the correct speed and angle of rotation of record players. It is perfect for both home use and professional repair stores. This alignment protractor mat is a must-have for record player enthusiasts and makes for an excellent housewarming gift. The tool is incredibly easy to use, even for beginners, and features smoothly polished edges that ensure a comfortable grip. With its high accuracy and practicality, this turntable cartridge alignment protractor mat is sure to be popular among music lovers.
Key Features
- High accuracy for checking correct speed and angle
- Perfect for home use and professional repair stores
- Great gift for record player enthusiasts
- Simple to operate and easy to learn
- Slip-free edges for user safety
Specifications
- Dimension: 0.00Lx0.00Wx0.00H
Pros
- Provides high accuracy for checking turntable performance
- Suitable for both home and professional use
- Makes a great gift for music enthusiasts
- Easy to use, even for beginners
Cons
- Limited information available about specific dimensions
The Turntable Cartridge Alignment Protractor Mat is a practical and reliable tool for anyone who wants to ensure accurate performance from their record player. It is designed with both convenience and precision in mind, making it suitable for both casual users and professionals. The slip-free edges offer a comfortable and safe grip during operation, and its high accuracy ensures optimal speed and angle alignment. It may be helpful to have more detailed dimensions provided, but overall, this alignment protractor mat is a great addition to any vinyl lover’s collection of accessories.
Buyer's Guide: Cartridge Alignment Protractor
Whether you're a vinyl enthusiast or a professional DJ, ensuring accurate cartridge alignment is essential for optimal sound quality and performance. A cartridge alignment protractor is a small but mighty tool that can help you achieve precise alignment with ease. Here's a comprehensive buyer's guide to help you choose the right cartridge alignment protractor for your needs:
Read also: 13 Amazing Cartridge Protractor for 2025
Why do you need a cartridge alignment protractor?
- Enhanced sound quality: A properly aligned cartridge brings out the best in your vinyl records, maximizing fidelity and minimizing distortion.
- Extended record and stylus life: Accurate alignment eliminates excessive wear and reduces the chance of damaging your precious vinyl collection or stylus.
- Improved tracking: Correct alignment ensures that your stylus accurately tracks the grooves, minimizing skipping or mistracking issues.
- Reduced distortion: When the stylus is aligned correctly, it engages with the record grooves at the optimal angle, minimizing distortion and surface noise.
- Ease of use: A cartridge alignment protractor simplifies the alignment process, making it accessible to both beginners and experienced users.
- Compatibility: Cartridge alignment protractors are designed to work with a wide range of turntables and cartridges, so you can find one that suits your specific setup.
Factors to consider before purchasing a cartridge alignment protractor
- Material: Look for a protractor made from durable, high-quality materials to ensure long-term accuracy and reliability.
- Compatibility: Check if the protractor is compatible with your turntable's tonearm length and cartridge mounting type (e.g., standard, P-mount).
- Design: Opt for a protractor with clear markings, easy-to-read instructions, and user-friendly design features like cutouts for easy stylus visibility.
- Accuracy: Choose a protractor that provides precise alignment measurements and offers versatile adjustment options to cater to various tracking forces and alignments.
- Portability: Consider the size and portability of the protractor, especially if you plan to take it with you for DJ gigs or vinyl listening sessions outside your home.
- User reviews: Read customer reviews to gain insights into the protractor's performance, durability, and ease of use. Real experiences can help you make an informed decision.
- Price: Set a budget and compare prices across multiple brands and models, ensuring you get the best value for your money without compromising on quality.
Frequently Asked Questions about 12 Amazing Cartridge Alignment Protractor For 2025
While many protractors are designed to work with a wide range of turntables, it’s crucial to ensure compatibility with your specific turntable’s tonearm length and cartridge mounting type.
It’s recommended to align your cartridge when setting up a new turntable or cartridge, after changing your stylus, or if you notice any sound quality issues such as distortion or mistracking.
Most protractors come with detailed instructions and can be used with basic tools like a small screwdriver or stylus force gauge. However, it’s essential to follow the specific instructions provided with the protractor you choose.
While precise alignment is crucial for optimal sound quality, it may not be the sole solution to all potential sound issues. Factors like stylus condition, cartridge quality, and record condition also play a role.
Signs of misalignment include distorted or muffled sound, excessive surface noise, tracking issues, inconsistent channel balance, or visible lateral movement of the stylus while playing a record.
Some protractors offer specific alignment options for P-mount cartridges, which have a standardized mounting system. Look for protractors that mention compatibility with P-mount cartridges.
In such cases, reaching out to the turntable manufacturer or seeking assistance from audio professionals can help you find alternative alignment methods specific to your turntable model.
While digital protractors and smartphone apps can provide measurement assistance, their accuracy may vary. It’s recommended to use dedicated cartridge alignment protractors for the best results.
Proper cartridge alignment is essential regardless of the cartridge cost. Regardless of budget, alignment ensures optimal performance and protects your vinyl records.
In addition to the protractor, it’s beneficial to have a stylus force gauge, turntable leveling tools, and an anti-static brush to maintain an optimal vinyl playback environment.
Was this page helpful?
Trust Storables.com for unbiased and honest product reviews. Our reviews are rigorously assessed by our Expert Board Contributors and adhere to strict Editorial Standards. We ensure that each review is transparent and trustworthy, helping you make informed purchasing decisions.


0 thoughts on “12 Amazing Cartridge Alignment Protractor for 2025”