
Articles
What Do Pantry Moths Eggs Look Like
Modified: May 6, 2024
Learn about pantry moth eggs and what they look like in your home. Proper home maintenance can help prevent infestations and keep your pantry pest-free.
(Many of the links in this article redirect to a specific reviewed product. Your purchase of these products through affiliate links helps to generate commission for Storables.com, at no extra cost. Learn more)
Introduction
Welcome to our guide on pantry moth eggs! If you’ve ever encountered these pesky little insects in your kitchen, you know how vital it is to identify and eliminate their eggs to prevent a full-blown infestation. Pantry moths, also known as Indian meal moths or pantry beetles, are common household pests that are often found in dry food products like flour, rice, cereal, and grains.
In this article, we will delve into the world of pantry moths, exploring their life cycle, the appearance of their eggs, where to find them, and most importantly, how to get rid of them. We will also provide some useful tips on preventing future infestations so you can keep your pantry moth-free for good.
So, whether you’re dealing with a current infestation or simply want to know what to look out for, read on to learn all about pantry moth eggs and how to effectively eliminate them. Let’s dive in!
Key Takeaways:
- Keep your pantry moth-free by identifying and eliminating their tiny, irregular, cream-colored eggs, typically found in food packaging, corners, and crevices. Regular cleaning and proper food storage are key to prevention.
- Take swift action to get rid of pantry moth eggs by discarding infested food, thorough cleaning, freezing or heating infested items, and using sticky traps. Implement preventive measures like proper food storage and regular inspections to maintain a pantry moth-free environment.
Read more: What Do Carpet Moths Look Like
What are pantry moths?
Pantry moths, scientifically known as Plodia interpunctella, are commonly found household pests that belong to the family Pyralidae. These insects are small, typically measuring around 8-10mm in length, with a wingspan of about 15-20mm. Although they are poor flyers, they can still manage to infest your pantry and cause significant damage to your stored food products.
These moths are often mistaken for small butterflies due to their similar shape and appearance. They have a distinctive pattern on their wings, featuring a combination of grayish-brown and bronze tones. This pattern helps them blend seamlessly with their surroundings, making it easier for them to hide from predators and humans alike.
Like other moths, pantry moths undergo a complete metamorphosis, which includes four distinct life stages: egg, larvae, pupae, and adult. It is during the larval stage that pantry moths cause the most damage as they feed on various dry food items found in your pantry.
It’s important to note that pantry moths are not harmful to humans. Although consuming contaminated food can be unpleasant and lead to digestive issues, they do not transmit any diseases. However, their presence can be a nuisance and cause significant economic loss as they contaminate and ruin large quantities of food.
Now that we have a better understanding of what pantry moths are, let’s explore their life cycle in more detail to understand why it is essential to identify and eliminate their eggs.
Life cycle of pantry moths
To effectively combat pantry moths, it’s crucial to understand their life cycle. By doing so, you can pinpoint the most vulnerable stage and take appropriate preventive measures to break the cycle and eliminate these pesky pests from your kitchen.
The life cycle of pantry moths encompasses four distinct stages: egg, larvae, pupae, and adult. Let’s take a closer look at each stage:
1. Egg: The life cycle begins with the female pantry moth laying eggs. The eggs are tiny, measuring only around 0.5mm in size. They are usually laid individually or in small clusters, usually near a food source. The eggs are pale white and may be difficult to spot, especially when attached to a surface or hidden in crevices. It takes approximately 4-10 days for the eggs to hatch.
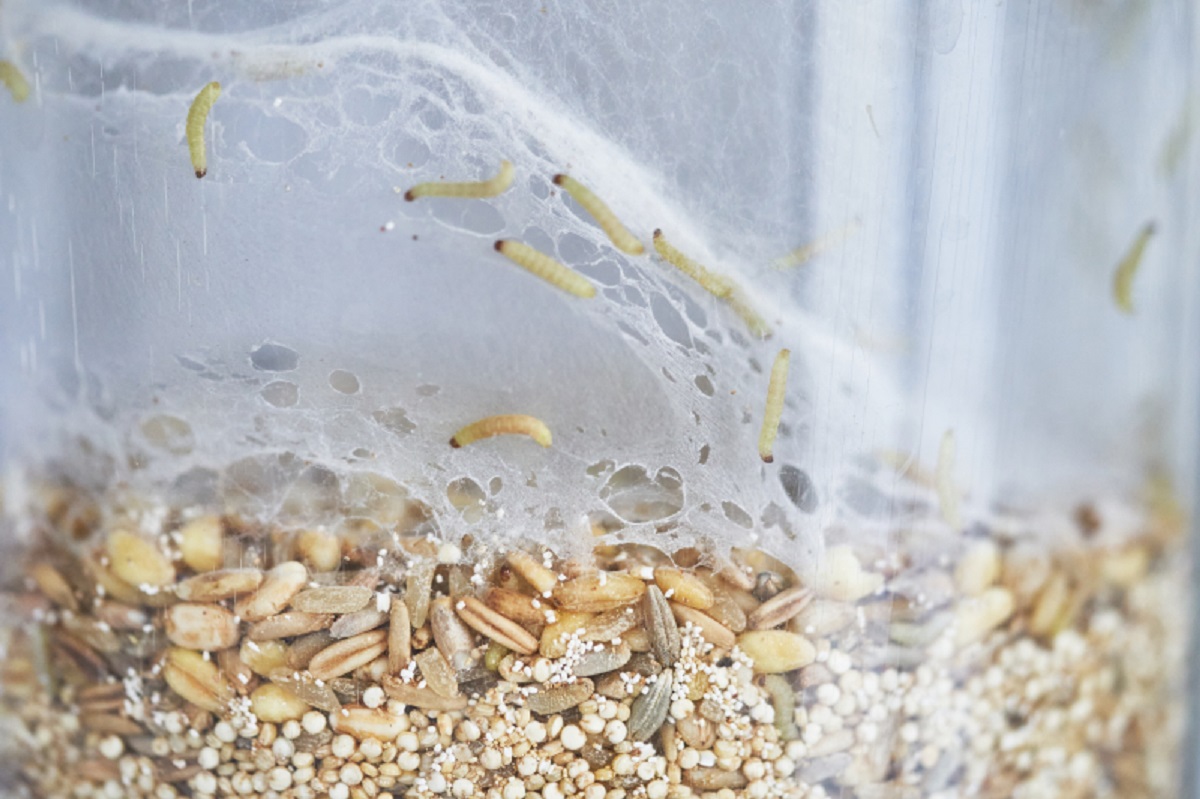
2. Larvae: After the eggs hatch, larvae emerge. The larvae of pantry moths are commonly known as “pantry moth worms” or “mealworms.” They resemble small caterpillars, typically measuring between 12-20mm in length. The larvae are creamy-white in color with brownish heads. They are voracious eaters and feed on dry food products such as flour, grains, cereals, nuts, spices, and pet food. The larvae go through several instars, growing larger with each stage. The larval stage can last anywhere from 2-6 weeks depending on the environmental conditions and food availability.
3. Pupae: Once the larvae are fully grown, they spin a silk cocoon or webbing to protect themselves while they undergo the pupal stage. The pupae are usually brownish and measure around 10-15mm in length. The pupal stage lasts for approximately 1-2 weeks, during which the larvae undergo metamorphosis and transform into adults.
4. Adult: After the pupal stage, adult pantry moths emerge from the cocoon. The adults have distinctive wings with a span of 15-20mm. The wings are characterized by a combination of grayish-brown and bronze tones, which allow them to blend in with their surroundings. Adult pantry moths do not feed and have a short lifespan of only 1-2 weeks. Their sole purpose is to reproduce and continue the life cycle by laying eggs.
Understanding the life cycle of pantry moths is vital for effective pest control. By targeting the eggs and larvae, you can disrupt their life cycle and prevent infestation. In the next section, we will delve into how to identify pantry moth eggs so you can take swift action to eliminate them from your pantry.
Identifying pantry moth eggs
Identifying pantry moth eggs is crucial in preventing the infestation of these pesky insects in your kitchen. By recognizing the appearance and typical locations where pantry moth eggs are found, you can take immediate action to eliminate them before they hatch and cause further damage to your stored food items.
Pantry moth eggs are incredibly small and can be challenging to detect with the naked eye. They typically measure around 0.5mm in size, making them almost invisible without close inspection. However, there are some key indicators that can help you identify pantry moth eggs:
1. Clusters or individual eggs: Pantry moth eggs are usually laid in small clusters or individually. They may be attached to the surface of food packaging, crevices, or cracks in your pantry shelves, or hidden in the folds of paper or cardboard boxes.
2. White or cream color: Pantry moth eggs are pale white or cream in color. Their small size and coloration can make them blend in with the background, making them even harder to spot.
3. Irregular shape: Pantry moth eggs have an irregular shape, resembling tiny grains of rice or sesame seeds. They are not perfectly round or uniform, which helps distinguish them from other debris or particles in your pantry.
4. Sticky or glue-like texture: Pantry moth eggs are often laid with a sticky substance that helps them adhere to surfaces. This adhesive quality can cause the eggs to stick firmly to packaging or crevices, making them more challenging to remove.
To identify pantry moth eggs, it’s best to thoroughly inspect your pantry and food storage areas. Check the corners and edges of shelves, inspect food packaging, and look for any signs of small clusters or individual eggs. Pay close attention to areas where dry food items are stored, as these are the preferred feeding grounds for pantry moth larvae.
It’s important to note that visually identifying pantry moth eggs alone may not be enough to confirm an infestation. If you spot eggs or have previously encountered pantry moths in your kitchen, it’s advisable to thoroughly inspect all stored food items for signs of larvae or webbing, as this will indicate an active infestation.
Now that you have an idea of how pantry moth eggs look, let’s explore the typical locations where you are likely to find them in your pantry.
Appearance of pantry moth eggs
Pantry moth eggs have a distinct appearance that sets them apart from other debris or particles in your pantry. Although they are incredibly small, measuring around 0.5mm in size, their unique characteristics can help you identify them and take appropriate measures to eliminate them before they hatch.
The eggs of pantry moths are typically pale white or cream in color. They have a slightly translucent appearance, making them blend in with the background of the surfaces they are laid on. Due to their tiny size and light color, pantry moth eggs can easily go unnoticed unless you specifically look closely.
In terms of shape, pantry moth eggs are irregular. They are not perfectly round or uniform, distinguishing them from other common debris or particles found in your pantry. Instead, they resemble small grains of rice or sesame seeds. This irregular shape is a key characteristic that can help you differentiate between pantry moth eggs and other small objects in your pantry.
Another important aspect of pantry moth eggs is their sticky or glue-like texture. The female pantry moth lays the eggs with a natural adhesive substance that helps them stick to surfaces. This sticky quality allows the eggs to adhere to the packaging of food items, corners of shelves, cracks in pantry walls, or even the folds of paper or cardboard boxes. It can make them quite challenging to remove without proper cleaning methods.
While pantry moth eggs are incredibly small and may seem insignificant on their own, it’s important to note that each egg has the potential to hatch into a pantry moth larvae, which can cause significant damage to your stored food items.
Given their small size and often hidden locations, visually identifying pantry moth eggs may require a thorough inspection of your pantry and food storage areas. It’s advisable to carefully examine corners, edges, and surfaces of shelves, as well as inspect all food packaging for any signs of small clusters or individual eggs.
Now that you know how pantry moth eggs look, let’s explore the typical locations where you are likely to find them in your pantry.
Pantry moth eggs are tiny, white, and oval-shaped, usually found in clusters on food packaging or in crevices. To prevent infestation, regularly clean and inspect your pantry, and store food in airtight containers.
Read more: What Do Flea Eggs Look Like On Furniture
Where pantry moth eggs are typically found
Pantry moth eggs can be found in various areas of your pantry and kitchen where dry food products are stored. These resilient pests can lay their eggs in hidden corners, crevices, and even on the packaging of your food items. Understanding the typical locations where pantry moth eggs are found is essential in effectively eliminating them and preventing future infestations.
Here are some common areas to check for pantry moth eggs:
- Food packaging: Pantry moth eggs can be found on the packaging of dry food items such as flour, rice, cereal, grains, nuts, spices, and pet food. Check for eggs that may be attached to the inner surfaces or seams of bags, boxes, or containers.
- Corners and edges of shelves: Pantry moths often lay their eggs in hidden corners and edges of pantry shelves, where debris and food particles can accumulate. Thoroughly inspect these areas, paying particular attention to cracks, gaps, and crevices.
- Cracks and gaps in pantry walls: Pantry moth eggs can be found in small cracks and gaps in pantry walls or backsplash areas. Carefully examine these areas, as eggs may be hidden from plain sight.
- Folds of paper or cardboard boxes: Pantry moths can lay their eggs in the folds and seams of paper or cardboard boxes, especially if they contain dry food items. Check these areas thoroughly, as eggs may be well-concealed within the packaging materials.
- Behind appliances: Pantry moths may find their way behind kitchen appliances such as refrigerators, ovens, or microwaves. These areas provide dark, secluded spaces where eggs can be laid and go unnoticed.
It’s important to note that pantry moths are capable of laying eggs in multiple locations within your pantry. Therefore, it’s crucial to conduct a comprehensive inspection of all potential areas where eggs may be present.
If you discover pantry moth eggs, it’s essential to take immediate action to eliminate them and prevent further infestation. This can include removing and discarding infested food items, thoroughly cleaning and vacuuming your pantry, and implementing preventive measures to deter pantry moths from returning.
By being diligent in your inspection and proactive in your approach, you can effectively prevent pantry moth eggs from hatching and causing further damage to your stored food items.
Next, let’s explore some effective methods to get rid of pantry moth eggs and prevent future infestations.
How to get rid of pantry moth eggs
When dealing with pantry moth eggs, it’s crucial to take immediate action to prevent a full-blown infestation. While the eggs themselves may be small and challenging to spot, eliminating them is essential to stop the life cycle of pantry moths and protect your stored food items. Here are some effective methods to get rid of pantry moth eggs:
- Identify and discard infested food items: Inspect all food packages in your pantry and discard any that show signs of pantry moth eggs or larvae. It’s crucial to remove potential food sources to prevent the eggs from hatching and infesting other items.
- Thoroughly clean and vacuum: Empty and clean your pantry, paying close attention to corners, shelves, and cracks where pantry moth eggs may be hiding. Vacuuming can help remove eggs, larvae, and any food debris that may attract pantry moths.
- Wipe down surfaces: Use a damp cloth or sponge to wipe down pantry shelves, walls, and other surfaces to eliminate any remaining eggs or larvae. Adding a mild detergent or vinegar to the cleaning solution can help deter pantry moths.
- Freeze or heat treat infested items: If you suspect that certain food items may be infested with pantry moth eggs, you can try freezing them for at least four days or heating them in the oven at a temperature above 120°F (49°C) for 30 minutes. These extreme temperatures can kill eggs and larvae.
- Use sticky traps: Sticky traps or pheromone traps can be effective in catching adult pantry moths and preventing them from laying eggs. Place these traps in your pantry and near potential infestation sites to capture any lingering adult moths.
- Seal cracks and gaps: Inspect your pantry for any cracks, gaps, or openings where pantry moths may enter. Seal these areas with caulk or weather stripping to prevent future infestations.
- Implement proper food storage: Store dry food items in airtight containers made of glass, plastic, or metal to prevent pantry moths from accessing your food. This will help contain any potential infestations and make it harder for eggs to be laid.
- Maintain cleanliness and hygiene: Regularly clean your pantry, wipe down shelves, and remove any spills or crumbs that could attract pantry moths. Practice good hygiene in your kitchen and regularly inspect stored food items for signs of infestation.
It’s important to note that effective control of pantry moth eggs may require a combination of methods and ongoing preventive measures. Regular monitoring and maintenance of your pantry will help ensure that any new infestations are caught early and promptly addressed.
If despite your best efforts, pantry moth infestation persists or becomes overwhelming, it may be necessary to seek professional pest control services to assess and treat the situation effectively.
By following these steps and implementing preventive measures, you can eliminate pantry moth eggs and keep your pantry moth-free in the long run.
In the next section, we will discuss some practical tips to prevent pantry moth infestations and ensure the long-term protection of your pantry.
Preventing pantry moth infestations
Prevention is key when it comes to avoiding pantry moth infestations. By implementing a few simple habits and preventive measures, you can significantly reduce the chances of pantry moths finding their way into your kitchen. Here are some practical tips to prevent pantry moth infestations:
- Inspect and quarantine new food items: Before bringing in new food items into your pantry, carefully inspect the packaging for any signs of damage or pests. Quarantine new items in a separate area for a few days to ensure they are free of pantry moths before adding them to your main food storage area.
- Store food properly: Transfer dry food items into airtight containers made of glass, plastic, or metal. This prevents pantry moths from accessing your food and laying eggs. Be sure to label containers with the contents and expiration dates.
- Keep a clean pantry: Regularly clean your pantry by wiping down shelves, vacuuming corners, and removing any food debris or spills. Pantry moths are attracted to food particles, so keeping your pantry clean and free of crumbs is key to minimizing their presence.
- Practice first-in, first-out (FIFO) rotation: When purchasing new groceries, use the “first-in, first-out” rule to rotate your food items. Place newer items behind older ones, ensuring that older items are used before their expiration dates. This helps prevent food from sitting unused for extended periods, reducing the chances of pantry moth infestations.
- Regularly check for signs of infestations: Conduct routine inspections of your pantry for any signs of pantry moth eggs, larvae, or adult moths. Promptly take action if any infestation is detected, eliminating affected food items and cleaning the area thoroughly.
- Maintain good kitchen hygiene: Clean up spills and crumbs immediately, both inside and outside your pantry. Pantry moths are attracted to food residue, so keeping a clean kitchen will make it less enticing for them to enter.
- Seal entry points: Inspect your pantry and kitchen for any cracks, gaps, or openings where pantry moths can enter. Seal these areas with caulk or weather stripping to prevent their access.
- Use natural deterrents: Herbs and spices such as bay leaves, lavender, and mint have been known to deter pantry moths. Place these items in your pantry to help repel these pests.
- Regularly clean behind appliances: Move kitchen appliances away from the wall periodically and clean behind them. Pantry moths may find shelter in these hidden spaces, so regular cleaning is essential.
By incorporating these preventive measures into your routine, you can greatly reduce the risk of pantry moth infestations in your kitchen. Stay vigilant and take swift action at the first signs of potential infestation to prevent the problem from escalating.
Remember, prevention is always easier than dealing with a full-blown infestation. By practicing these habits and maintaining a clean and organized pantry, you can keep your kitchen pantry moth-free and ensure the longevity of your stored food items.
Now let’s wrap up our guide on pantry moth eggs and infestations.
Conclusion
Pantry moth eggs can be a nuisance in any kitchen, but with proper knowledge and preventive measures, you can effectively eliminate them and prevent infestations. Understanding the life cycle of pantry moths, identifying their eggs, and knowing where to find them are crucial in tackling these pests head-on.
By thoroughly inspecting your pantry, discarding infested food items, and implementing proper cleaning and storage practices, you can greatly reduce the chances of pantry moth eggs hatching and causing damage to your stored food items.
Regular maintenance and cleanliness, along with sealing potential entry points, are essential for long-term prevention. By practicing these habits and incorporating natural deterrents, you can ensure a pantry moth-free environment and protect the well-being of your kitchen.
Remember, prevention is the key to avoiding pantry moth infestations. Stay vigilant, conduct routine inspections, and take immediate action at the first signs of eggs or larvae. By doing so, you can maintain a clean and pest-free pantry that keeps your food safe and enjoyable.
We hope that this guide has provided you with valuable information on identifying pantry moth eggs and implementing effective control measures. By following these guidelines, you can keep your pantry moth-free and enjoy peace of mind in your kitchen.
So, take charge of your pantry, implement these preventive strategies, and say goodbye to pantry moth eggs once and for all!
Curious about keeping your pantry clean and safe? Once you've learned about the eggs of pantry moths, why not dive deeper into keeping these pests at bay? Our experts share invaluable tips on effective pest control that will ensure your kitchen remains moth-free. Also, discover savvy strategies for food storage, crucial for maintaining freshness and minimizing waste as we move into 2024. Both guides are packed with practical advice tailored to enhance your home's efficiency and hygiene.
Frequently Asked Questions about What Do Pantry Moths Eggs Look Like
Was this page helpful?
At Storables.com, we guarantee accurate and reliable information. Our content, validated by Expert Board Contributors, is crafted following stringent Editorial Policies. We're committed to providing you with well-researched, expert-backed insights for all your informational needs.


0 thoughts on “What Do Pantry Moths Eggs Look Like”