Articles
What Is A Temperature Quilt
Modified: October 20, 2024
Discover the fascinating world of temperature quilts with our informative articles. Explore different designs, patterns, and techniques to create your own unique masterpiece.
(Many of the links in this article redirect to a specific reviewed product. Your purchase of these products through affiliate links helps to generate commission for Storables.com, at no extra cost. Learn more)
Introduction
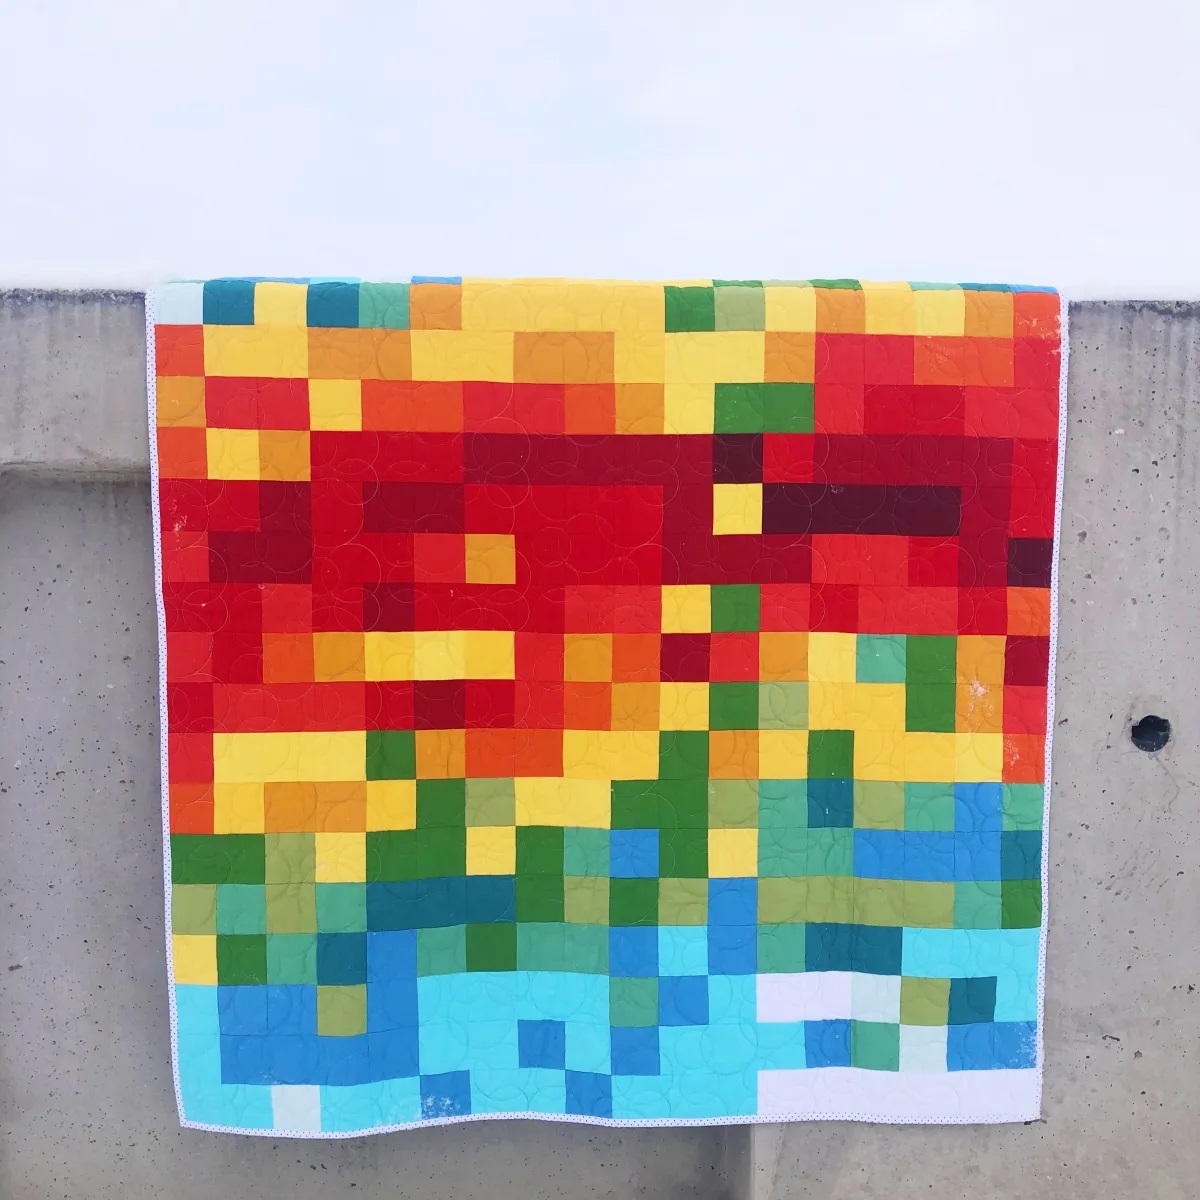
A temperature quilt is a unique and creative way to record and display temperature data over a specific period of time. It combines the artistry of quilting with the practicality of tracking and visualizing temperature variations. Temperature quilts have gained popularity among quilting enthusiasts and weather enthusiasts alike, as they offer a compelling and beautiful representation of climate patterns.
In this article, we will explore the fascinating world of temperature quilts, their purpose, and how they are created. Whether you are a seasoned quilter or new to the craft, understanding temperature quilts can unlock an exciting and personalized way to document temperature changes throughout the year.
Key Takeaways:
- Temperature quilts offer a creative and personalized way to visually represent climate patterns and weather fluctuations through the art of quilting, combining artistry with scientific data visualization.
- By carefully planning, gathering accurate data, and embracing imperfections, temperature quilting becomes a rewarding journey that captures the essence of temperature patterns and showcases creativity in a tangible and beautiful quilt.
Read more: What Is A Quilt
Understanding Temperature Quilts
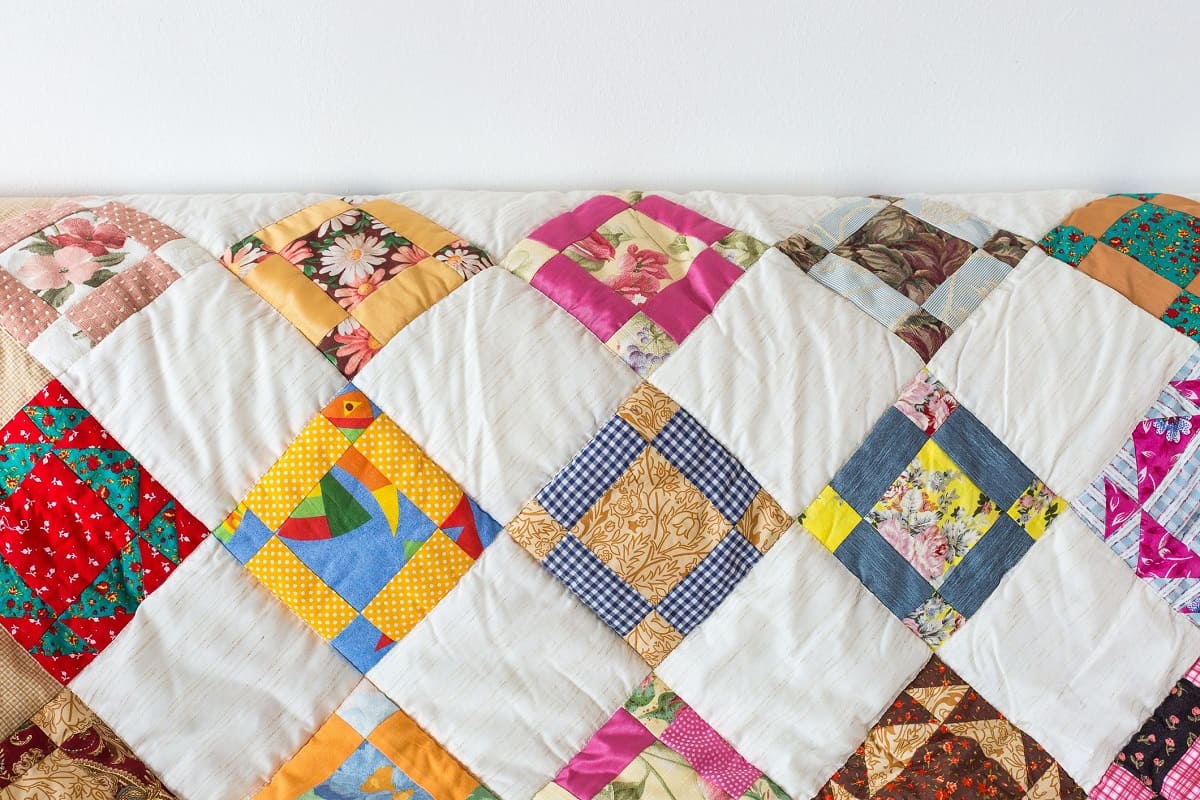
Temperature quilts are unique in that they are not just a means of creating a beautiful textile piece, but also a way to capture and visualize data. Each section or block of the quilt represents a specific temperature range, allowing the viewer to visually track temperature patterns and fluctuations over time.
One of the key aspects of a temperature quilt is the color scheme. Different colors are assigned to different temperature ranges, creating a visual representation of the varying temperatures throughout the year. For example, cooler temperatures may be represented by blues and purples, while warmer temperatures may be represented by yellows and oranges.
The design and layout of a temperature quilt can vary based on personal preference. Some quilters choose to create a daily quilt, where each block represents a single day’s temperature. Others may opt for a monthly quilt, where each block represents the average temperature of the month. The choice ultimately depends on the desired level of detail and the availability of temperature data.
Creating a temperature quilt requires careful planning and data collection. Quilters often rely on publicly available weather data or personal temperature recordings to determine the temperature range for each color. This data is then used as a guide when selecting fabric for the quilt.
Temperature quilts are not only visually appealing but serve as a memento of specific weather patterns or memorable events that occurred during that time. They can be a beautiful addition to your home decor or a heartfelt gift for a friend or family member.
How Temperature Quilts Work
Temperature quilts work on the principle of assigning specific colors to different temperature ranges, allowing for a visual representation of temperature patterns over time. By tracking and recording daily or monthly temperature data, quilters can create a unique and personalized quilt that tells the story of changing weather conditions.
The first step in creating a temperature quilt is to determine the temperature ranges and associated colors. This can be done by referring to historical weather data or by recording temperature data yourself. For example, you may decide to use five temperature ranges, such as below freezing, cold, mild, warm, and hot, and assign a different color to each range.
Once the temperature ranges and colors are established, the next step is to collect temperature data. This can be done by referring to a weather website, using a personal weather station, or simply recording daily temperatures from a trusted source. It is important to record the highest and lowest temperature for each day or month, as well as the average temperature.
With the temperature data in hand, it’s time to start creating the quilt. Each block or section of the quilt represents a specific time period, such as a day or month, and is filled with the corresponding color based on the recorded temperature. Quilters can choose from a wide array of quilting techniques, such as patchwork, applique, or even embroidery, to bring their temperature quilt to life.
The arrangement of the blocks can vary depending on personal preference. Some quilters prefer a random placement, allowing for a dynamic and energetic design, while others may opt for a more structured layout, with blocks arranged by month or temperature range. The choice of layout depends on the desired visual impact and the story the quilt is meant to convey.
Once the blocks are assembled, the quilt can be finished with batting, backing fabric, and binding to create a cozy and functional textile piece. The finished temperature quilt not only serves as a work of art but also as a unique representation of temperature data, capturing the ebb and flow of the seasons and the changing climate.
Whether you are a seasoned quilter or new to the craft, creating a temperature quilt can be a rewarding and fulfilling experience. It allows you to combine your passion for quilting with a scientific and artistic approach to data visualization. So gather your materials, collect your temperature data, and embark on the journey of creating your very own temperature quilt.
Choosing and Collecting Data
Choosing and collecting accurate temperature data is a crucial step in creating a temperature quilt. It ensures that your quilt accurately represents the temperature patterns over the desired time period. Here are some tips to help you choose and collect the data for your temperature quilt:
1. Reliable Data Sources: Start by identifying reliable sources of temperature data. You can use weather websites, local weather stations, or even personal weather monitoring devices to gather temperature information. Make sure to choose a source that provides accurate and detailed temperature data for your area.
2. Time Period: Determine the time period you want to cover with your temperature quilt. It can be a single year, a specific season, or even a longer period of time. Selecting the time frame will help you collect the necessary temperature data within that duration.
3. Frequency: Decide on the frequency of temperature recordings. You can choose to record daily temperatures, monthly averages, or even weekly highs and lows. The frequency will depend on the level of detail you want to capture in your temperature quilt.
4. Recording Method: Decide how you will record the temperature data. You can manually record the temperatures in a journal or spreadsheet, or use automated devices or apps that monitor and record temperature readings for you. Ensure that your chosen method is convenient and accurate.
5. Temperature Range: Determine the temperature ranges for each color in your quilt. You can create a simple five-range system, such as below freezing, cold, mild, warm, and hot, or customize the ranges based on the temperature patterns in your region. Assign a unique color to each range to create visual contrast in your quilt.
6. Additional Data: Consider including additional data, such as rainfall or humidity, alongside the temperature data in your quilt. This can provide a more comprehensive representation of the weather conditions during the selected time period.
7. Data Accuracy: Ensure the accuracy of the temperature data you collect. Double-check your recordings, compare them with other sources, and correct any errors or inconsistencies. Accurate data will help you create a more accurate and meaningful temperature quilt.
By carefully choosing and collecting temperature data, you can create a temperature quilt that tells the story of climate patterns and weather conditions over a specific time period. Remember to keep track of your data, have fun with the process, and enjoy the creative journey of temperature quilting.
Selecting Quilt Colors
Choosing the right colors for your temperature quilt is an important step in creating a visually appealing and meaningful representation of temperature variations. The colors you select will not only determine the aesthetic appeal of your quilt but also play a key role in communicating temperature patterns. Here are some tips to help you select quilt colors for your temperature quilt:
1. Temperature Range: Start by determining the temperature ranges you want to represent in your quilt. This will depend on the climate of your region and the temperature variations you are likely to encounter. For example, you may assign a cool color like blue to represent lower temperatures and a warm color like red to represent higher temperatures.
2. Color Symbolism: Consider the symbolism associated with different colors. Cooler colors like blue and green are often associated with lower temperatures, while warmer colors like red, orange, and yellow are associated with higher temperatures. You can leverage this symbolism to create a visual connection between the colors and the temperature ranges.
3. Color Contrast: Aim for contrast between the colors to make your temperature quilt visually striking. This will allow the different temperature ranges to stand out and be easily distinguishable. Choose colors that are distinctly different from each other to create a clear visual separation.
4. Color Gradation: Consider using shades and tints of a single color to represent a temperature range. This can create a gradient effect that visually represents the gradual change in temperature. For example, you can use lighter shades of blue to represent cooler temperatures and darker shades to represent warmer temperatures.
5. Consider Personal Preference: Take into account your personal preferences when selecting colors for your quilt. Choose colors that resonate with you and evoke the desired emotions or feelings. This will make your temperature quilt more meaningful and enjoyable to create and showcase.
6. Fabric Selection: When selecting fabrics for your quilt, consider using solid-colored fabrics or fabrics with minimal patterns. This will ensure that the colors are clearly visible and the temperature patterns are easily discernible. Fabrics with different textures can add an interesting visual dimension to your quilt as well.
7. Test Color Combinations: Before finalizing your color choices, it is a good idea to test different color combinations. Lay out fabric swatches or create a sample block to see how the colors interact with each other. Make adjustments as needed to create a visually cohesive and balanced color palette.
Remember, the colors you choose for your temperature quilt are a personal choice, and there is no right or wrong answer. Follow your intuition, have fun with the process, and let your creativity shine through as you select the perfect colors for your temperature quilt.
Read more: What Temperature Should A Kegerator Be
Planning the Quilt Layout
Planning the layout of your temperature quilt is an exciting part of the quilting process. It involves visualizing how the temperature blocks will come together to create a cohesive and visually appealing design. Here are some tips to help you plan the quilt layout for your temperature quilt:
1. Consider Quilt Size: Determine the size of your quilt based on your intended use and available space. Consider whether you want a small lap quilt, a bed-sized quilt, or a wall hanging. Knowing the desired size will help you plan the number of temperature blocks needed for your quilt.
2. Block Size and Shape: Decide on the size and shape of your temperature blocks. The block size can be determined based on the level of detail you want to capture. For example, if you want to represent daily temperature data, you may choose smaller blocks. If you prefer monthly temperature data, larger blocks may be appropriate.
3. Organization and Arrangement: Decide on the organization and arrangement of the temperature blocks in your quilt. You can opt for a structured layout, such as rows or columns, or a more abstract arrangement, such as scattering the blocks randomly. Consider how the arrangement will visually represent the temperature patterns over time.
4. Creating a Temperature Calendar: Consider creating a temperature calendar to guide the placement of your temperature blocks. This can be a visual representation of the months or days of the year, with each block positioned in the corresponding spot. A temperature calendar can help maintain a sense of order and organization in your quilt layout.
5. Visual Flow: Pay attention to the visual flow of your quilt layout. Organize the temperature blocks in a way that creates a pleasing visual harmony. Consider the arrangement of colors, the distribution of temperature ranges, and the overall composition of the design. Visual flow will ensure that your temperature quilt is visually appealing and appealing to the eye.
6. Balancing Colors: Ensure a balance of colors throughout your quilt layout. Distribute the different temperature ranges evenly to create a harmonious color palette. Avoid clustering blocks of the same color in one area and aim for an even distribution of colors across the quilt.
7. Keeping Records: As you plan the quilt layout, keep detailed records of the temperature ranges and their corresponding colors. This will help you stay organized and avoid confusion during the quilting process.
Planning the layout of your temperature quilt is both a creative and strategic process. Take your time, experiment with different arrangements, and trust your instincts. The layout you choose will ultimately showcase your temperature data in a visually stunning and meaningful way.
When creating a temperature quilt, consider using a color chart to assign a different color to each temperature range. This will help you easily track and visualize the temperature changes throughout the year.
Temperature Calendar Key
A temperature calendar key is an essential component of a temperature quilt. It acts as a legend that explains the temperature ranges assigned to the different colors used in the quilt. Creating a temperature calendar key ensures that viewers can easily interpret the temperature patterns represented in your quilt. Here are some tips to help you create a temperature calendar key:
1. Temperature Ranges: Begin by determining the temperature ranges you want to represent in your quilt. These ranges will vary based on your climate and personal preferences. Assign a unique color to each temperature range to create visual contrast and distinguishability in your quilt.
2. Color Code: Create a simple color code that correlates the assigned colors to the corresponding temperature ranges. You can use a small fabric swatch or a colored square to represent each color. Label each swatch or square with the temperature range it represents for clarity.
3. Temperature Labels: Include temperature labels alongside each color to provide additional context and make it easier for viewers to understand the temperature ranges. For example, you can have labels like “Below Freezing,” “Cold,” “Mild,” “Warm,” and “Hot” to describe the associated temperature ranges.
4. Placement and Format: Decide where and how you want to include the temperature calendar key in your quilt. It could be positioned at the bottom or side of the quilt, incorporated within a border, or even added as a separate hanging tag. Consider how it will best complement the overall design and visual flow of your quilt.
5. Clarity and Readability: Ensure that the temperature calendar key is clear and easy to read. Use legible fonts or handwriting and consider the size of the labels and color swatches. Choose a design that is visually appealing while still allowing for clear interpretation of the temperature ranges.
6. Consistency: Maintain consistency between the temperature calendar key and the actual colors used in the quilt. Double-check that the colors in the key match the colors assigned to the temperature ranges in the quilt. Consistency will ensure accurate interpretation and understanding of the temperature patterns in your quilt.
7. Include Additional Information: Consider including additional information in the temperature calendar key to enhance the viewer’s understanding of the quilt. You could include the time period covered by the quilt, the location or weather station used for temperature data, or any significant weather events that occurred during that period.
By creating a temperature calendar key, you provide viewers with a valuable guide to interpreting the temperature patterns in your quilt. It adds depth and context to your quilt and enhances the overall storytelling aspect of your temperature quilt creation.
Assembling the Quilt
Assembling the temperature quilt is an exciting stage of the quilting process. It involves piecing together the temperature blocks to create a cohesive and visually appealing quilt top. Here are the steps to guide you through the assembly process:
1. Block Layout: Before you start sewing, lay out all the temperature blocks according to your planned quilt layout. Take your time to arrange them in the desired order, ensuring a visually pleasing composition.
2. Sewing Technique: Choose a sewing technique that suits your style and quilting preferences. You can opt for traditional piecing where individual blocks are sewn together using a quarter-inch seam allowance. Alternatively, you can explore techniques like foundation paper piecing or appliqué to add design elements to your temperature quilt.
3. Seam Allowance: When sewing the blocks together, use a consistent quarter-inch seam allowance to ensure that all seams align accurately. This will create a neat and professional finish for your temperature quilt.
4. Pressing Seams: After each seam is sewn, press the seams to one side or open them, depending on your preference and the thickness of the fabric. Pressing the seams properly will help your quilt lie flat and give it a polished look.
5. Sashing and Borders: Consider adding sashing strips or borders between the temperature blocks to create separation and add visual appeal to your quilt top. Coordinate the color and width of the sashing and borders with the overall design of your temperature quilt.
6. Quilt Backing and Batting: Once the quilt top is assembled, choose a suitable backing fabric and batting. The backing fabric should be larger than the quilt top to allow for seam allowances and quilting. Layer the backing fabric, batting, and quilt top to prepare for the quilting process.
7. Basting: Secure the layers of the quilt together by basting. This can be done using safety pins or basting spray, ensuring that the layers are smooth and wrinkle-free.
8. Quilting: Choose a quilting technique that suits your skill level and desired effect. This can be hand quilting, machine quilting, or even long-arm quilting. Quilt using straight lines, free-motion designs, or any other quilting pattern that enhances the overall look of your temperature quilt.
9. Binding: Finish the quilt by adding a binding around the edges. Cut binding strips from coordinating fabric, fold and press them in half lengthwise, and attach them to the quilt using a sewing machine or hand stitching.
10. Labeling and Finishing Touches: Consider adding a label to your temperature quilt, including your name, the year, and any other details you’d like to include. This will serve as a lasting reminder of your creation. Add any additional finishing touches, such as embroidery or embellishments, to personalize your quilt further.
Assembling the temperature quilt requires attention to detail and a careful approach. Take your time, enjoy the process, and celebrate the achievement of bringing all the temperature blocks together to create a beautiful and meaningful quilt.
Displaying and Interpreting the Quilt
Displaying and interpreting a temperature quilt is an exciting part of the quilting journey. It allows you to showcase your creation and share the story of temperature variations in a visually appealing way. Here are some tips on displaying and interpreting your temperature quilt:
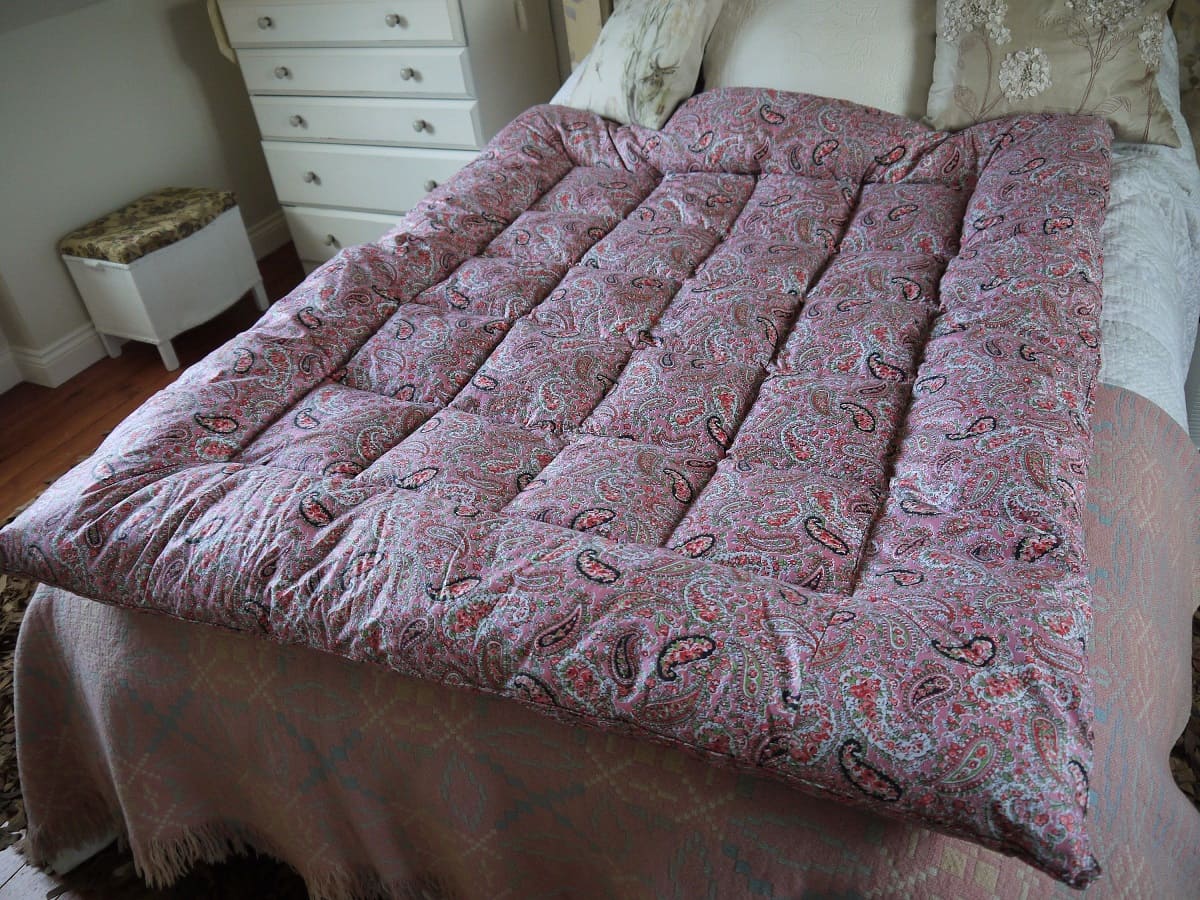
1. Choosing the Right Location: Select a prominent location to display your temperature quilt, such as a living room wall, bedroom, or even a dedicated quilting space. Make sure it is easily visible and accessible for viewers to appreciate the quilt’s beauty and the patterns it represents.
2. Hanging or Draping: Decide whether to hang your temperature quilt on a wall or drape it over a piece of furniture. Wall hanging allows for easy visibility, while draping can add a cozy and inviting touch. Consider the size and weight of your quilt to determine the most appropriate display method.
3. Supporting Structures: Use quilt hangers, hooks, or rods to securely hold your temperature quilt in place when hanging it on a wall. Alternatively, use a quilt stand or a decorative ladder to drape the quilt over for an attractive and functional display.
4. Lighting: Consider the lighting in the display area to enhance the visibility and overall impact of your temperature quilt. Natural light or well-placed spotlights can highlight the colors and details of the quilt, making it more visually appealing.
5. Interpretative Signage: Create a small interpretative sign or label to accompany your temperature quilt. This can include information about the time frame covered, the meaning of the assigned colors, and any significant weather events that occurred during that period. This will help viewers understand and appreciate the quilt’s significance.
6. Sharing the Story: When displaying your temperature quilt, take the opportunity to share the story behind it. Explain the inspiration, the colors chosen, and the significance of the temperature patterns. Encourage viewers to engage in conversation and ask questions, fostering a deeper appreciation for the craftsmanship and creativity involved in making the quilt.
7. Interpretation and Reflection: Encourage viewers to interpret and reflect on the temperature patterns represented in your quilt. Discuss the changes in temperature over time, the impact of seasons, or climate variations. Each quilt is unique, and interpreting the temperature data can lead to fascinating insights and conversations.
Displaying and interpreting your temperature quilt allows you to share your creativity, craftsmanship, and the story behind its creation. It also provides an opportunity for connection and conversation with others who appreciate the artistry and the science behind temperature quilting.
Tips and Tricks for Temperature Quilting
Temperature quilting is a unique and creative endeavor that requires careful planning and execution. Here are some tips and tricks to make your temperature quilting experience successful and enjoyable:
1. Plan Ahead: Take the time to carefully plan your temperature quilt before starting. Decide on the time period, temperature ranges, and color scheme that best represent your climate and personal preferences.
2. Gather Accurate Data: Ensure you collect accurate temperature data to reflect the actual temperature patterns. Use reliable weather sources or your personal weather station for precise temperature recordings.
3. Use Color Cards or Swatches: Create a color card or swatch of the assigned color for each temperature range. This will serve as a visual reference throughout the quilting process and help ensure consistency in color selection.
4. Organize Temperature Blocks: Label each temperature block with the corresponding temperature range to maintain order during the quilting process. This will prevent confusion and make it easier to assemble the blocks correctly.
5. Keep Detailed Records: Maintain a detailed record of the temperature data, color assignments, and any other relevant information. This will be valuable for future reference and ensuring accuracy when interpreting the quilt’s temperature patterns.
6. Embrace Imperfections: Don’t stress too much about achieving perfect temperature measurements or color choices. Quilting is a creative expression, and small deviations can lend character and charm to your temperature quilt.
7. Experiment with Quilting Techniques: Explore different quilting techniques to add texture and depth to your temperature quilt. Consider incorporating free-motion quilting, hand quilting, or even using decorative stitches to enhance the overall design.
8. Incorporate Personal Touches: Add personalized elements to your temperature quilt that reflect your interests or local environment. This could include appliqué shapes representing local landmarks, embroidered weather symbols, or even fabric scraps with personal significance.
9. Seek Inspiration and Support: Join temperature quilting communities online or attend quilting workshops to learn from others and gather inspiration. Share your progress, ask for advice, and celebrate the accomplishments of fellow temperature quilters.
10. Enjoy the Process: Remember to have fun and enjoy the process of temperature quilting. It’s a creative journey that allows you to blend artistry with scientific data. Embrace the experience and take pride in the unique quilt you will create.
By following these tips and tricks, you can embark on your temperature quilting journey with confidence and create a beautiful and meaningful quilt that captures the essence of temperature patterns and showcases your creativity.
Conclusion
Temperature quilting offers a unique and creative way to capture and interpret temperature data through the art of quilting. By assigning colors to temperature ranges, temperature quilts become visual representations of climate patterns and weather fluctuations. They showcase the beauty of both the quilted textile and the data it represents.
Throughout this article, we’ve explored the various aspects of temperature quilting, from understanding the concept and how it works, to choosing colors, planning the layout, and assembling the quilt. Each step in the process contributes to the creation of a temperature quilt that tells a story of temperature variations over a specific period of time.
Temperature quilts not only serve as functional textile pieces but also capture memories and preserve a unique perspective on the weather. They can be a personal expression of creativity, a conversation starter, or a thoughtful gift for a weather enthusiast. The possibilities for customization and interpretation are endless.
As you embark on your temperature quilting journey, remember to gather accurate data, choose colors that resonate with you, and plan your quilt layout thoughtfully. Embrace imperfections and enjoy the process of bringing your temperature quilt to life. Share the story behind your quilt and invite others to interpret and appreciate the temperature patterns it represents.
Temperature quilting is more than just a craft—it is a fusion of art, science, and personal expression. It allows us to explore the interconnectedness of nature and creativity, resulting in a tangible and beautiful representation of temperature data. So, gather your materials, collect your data, and embark on the adventure of temperature quilting to create a unique and visually captivating quilt that tells the story of changing temperatures.
Frequently Asked Questions about What Is A Temperature Quilt
Was this page helpful?
At Storables.com, we guarantee accurate and reliable information. Our content, validated by Expert Board Contributors, is crafted following stringent Editorial Policies. We're committed to providing you with well-researched, expert-backed insights for all your informational needs.


0 thoughts on “What Is A Temperature Quilt”