
Articles
11 Amazing Outdoor Faucet Cover for 2025
Modified: June 10, 2025
Protect your outdoor faucets from freezing and damage with these 11 amazing outdoor faucet covers. Keep your faucets in top condition in 2025.
(Many of the links in this article redirect to a specific reviewed product. Your purchase of these products through affiliate links helps to generate commission for Storables.com, at no extra cost. Learn more)
Are you looking for the perfect faucet cover to protect your outdoor water supply from extreme weather conditions? Look no further! In this article, we will explore 11 amazing outdoor faucet covers that are set to dominate the market in 2025. These innovative covers are designed to provide excellent insulation and prevent freezing during the winter months, ensuring your faucets stay in prime condition. Whether you need a cover for a standard faucet or a specialized option for unique setups, we have got you covered. Get ready to discover the best and most reliable outdoor faucet covers for the upcoming year.

Overall Score: 9/10
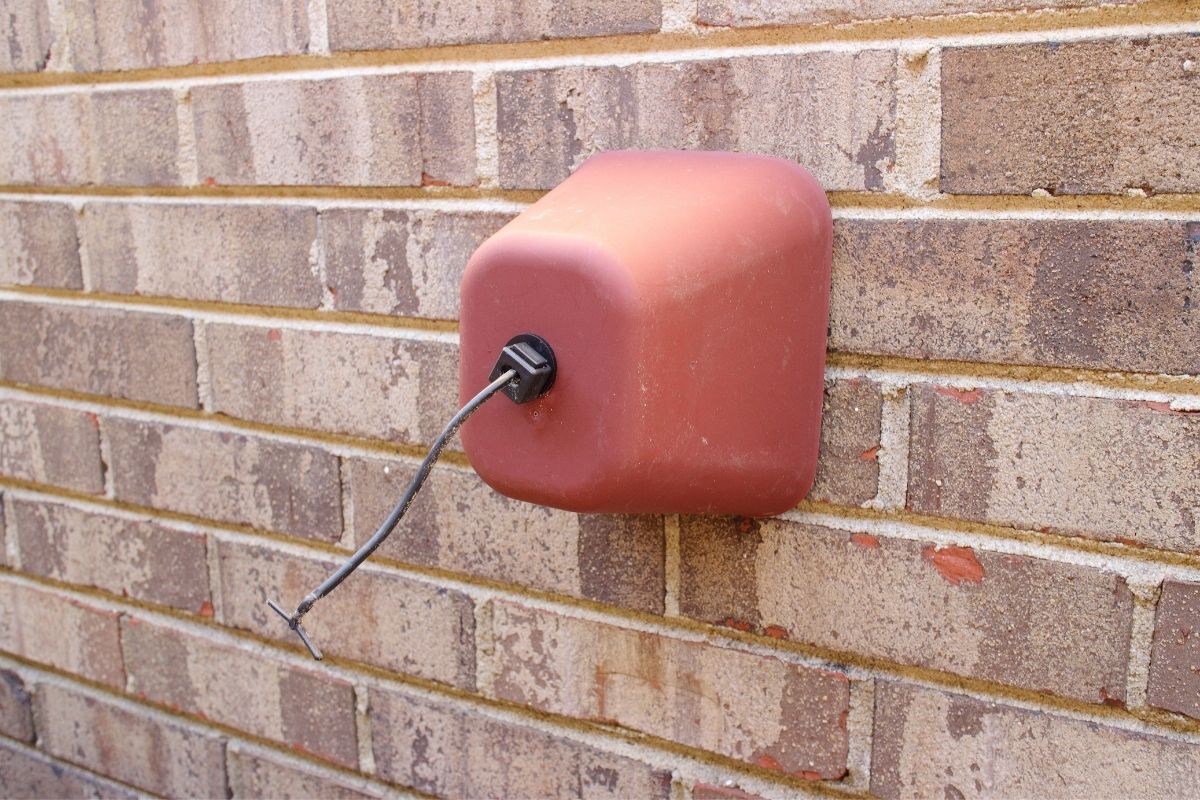
The ArtiGifts Pro Outdoor Faucet Cover Socks offer reliable protection against freezing winter weather for various faucet types. Made with heavyweight polyester pongee waterproof fabric and special PP insulated cotton, these covers are super waterproof and provide excellent insulation. The unique covering-wall patent design ensures a firm and close fit, effectively isolating snow, wind, and water. With a flexible string tie system, installation and removal are quick and easy. These faucet covers are backed by a 100% satisfaction guarantee and are designed to last. However, some users have noted that the size may not be sufficient for certain faucets and the thin material may not be as durable as other options.
Key Features
- -❤SUPER WATERPROOF & INSULATION – the outside spigot covers were made of heavyweight polyester pongee waterproof fabric and special PP insulated cotton, which possess the characteristic of good water proof and insulation to guard against severe weather in winter such as freezing rain and snow.
- -❤UNIVERSAL DIMENSION – the faucet protector measures of 5.9" W x 7.7" H, and thickness of 1.4”, works well with various faucet types, such as garden spigots, hose bibs, water tap, keep faucets protected in freezing weather.
- -❤UNIQUE COVERING-WALL PATENT DESIGN – with this covering-wall clipping patent design, the great cover sock not only covers the faucet firmly, but also be great for against the wall closely. That means the snow/wind/water are isolated well and keep outdoor faucet insulated and waterproof.
- -❤ FLEXIBLE STRING TIE SYSTEM – come with string tie, you can extremely easy to install or take off from your faucet within a few seconds, much easier to use than some foam covers or hook & loop tape styles.
- -❤SATISFACTION GUARANTEE – Arti Gifts products are design to last, so we proudly offer a 100% risk-free satisfaction guarantee. If you experience any issue with this product, you can return it for repair, replacement or fully refund.
Specifications
- Color: Black
- Dimension: 5.90Lx1.40Wx7.70H
- Size: 2 Pieces
Pros
- Super waterproof and insulation properties
- Universal dimension fits various faucet types
- Unique covering-wall patent design for better insulation
- Flexible string tie system for easy installation
- 100% satisfaction guarantee
Cons
- Small size may not provide sufficient freeze protection
- Thin material may not be as durable as other options
Overall, the ArtiGifts Pro Outdoor Faucet Cover Socks provide reliable winter freeze protection for various faucet types. The super waterproof and insulation properties, along with the unique covering-wall patent design, make them an effective choice. The flexible string tie system adds to their convenience. While the small size and thin material may be drawbacks, they generally perform well and have received positive reviews from users. With a score of 9 out of 10, these faucet covers are a worthy investment for keeping your outdoor faucets protected during the winter months.

Overall Score: 8/10
The Thermwell Frost King FC2 Plastic Faucet Cover is a must-have product for protecting outdoor faucets during the winter season. With its hard outer plastic shell and poly foam inner cover, this faucet cover effectively insulates and prevents freezing, wind, and chill. It is easy to install and provides long-lasting insulation. The dark red color adds a touch of style to any outdoor space. Although the label can be difficult to remove, this cover is still highly recommended by customers for its durability and effectiveness in preventing burst pipes. With a customer rating of 4.6/5, this faucet cover is a reliable and affordable solution for protecting your outdoor faucets.
Key Features
- Hard outer plastic shell
- Insulates and protects regular and stand outdoor faucets
- Easy to install
Specifications
- Color: Dark Red
- Dimension: 6.00L x 4.50W x 5.00H
- Size: Single
Pros
- Durable and long-lasting
- Effectively prevents freezing
- Stylish dark red color
Cons
- Difficult to remove the label
- Pull strap may break
The Thermwell Frost King FC2 Plastic Faucet Cover is an excellent choice for protecting your outdoor faucets during the winter season. Its hard outer plastic shell and poly foam inner cover provide insulation and prevent freezing, wind, and chill. Despite the difficulty in removing the label and the possibility of the pull strap breaking, this faucet cover is highly recommended by customers due to its durability and effectiveness. The dark red color adds a stylish touch to any outdoor space. With a customer rating of 4.6/5, it is a reliable and affordable solution for preventing burst pipes. Invest in this faucet cover and enjoy the peace of mind it brings.
")
Overall Score: 9/10
Protect your outdoor faucets from the harsh winter weather with these high-quality and durable faucet cover socks. These covers are designed with superior protection in mind, featuring a thick design that prevents freezing and bursting in winter and protects against sun exposure and rust in summer. The covers are constructed with multiple layers of waterproof materials, ensuring they remain durable and reusable season after season. With quick and easy installation using Velcro straps, these faucet cover socks are a convenient solution to protect your outdoor faucets. Each pack includes 2 covers and they work well with various faucet types.
Key Features
- High Compatibility
- Quick & Easy Installation
- Superior Protection
- Super Waterproof & Insulation
Specifications
- Color: Matte Black
- Dimension: 9.00Lx6.00Wx2.30H
- Size: 6"W x 9"H 2Pieces
Pros
- Highly compatible with various faucet types
- Thick and durable design for superior protection
- Quick and easy installation with Velcro straps
- Waterproof and insulated construction for all seasons
Cons
- May need to check regularly when used with chewy pets
- Some users found them a little flimsy
The Outdoor Faucet Covers Socks for Winter are a reliable and effective solution to protect your outdoor faucets. With their high compatibility and thick design, they provide superior protection against freezing, sun exposure, and rust. The quick and easy installation using Velcro straps makes them convenient to use, and their waterproof and insulated construction ensures durability. While they may require regular checks when used with pets that chew, the overall quality and performance of these faucet cover socks make them a worthwhile investment. Keep your outdoor faucets in great condition and prevent costly repairs with these reliable covers.
")
Overall Score: 8/10
The Frost King FC1 Outdoor Foam Faucet Cover is a must-have product to protect your outdoor faucets from extreme temperatures. With a 5/8-inch expanded polystyrene shell and a 3/4-inch one piece foam gasket, this cover provides excellent insulation and prevents freezing. It comes fully assembled and is reusable season after season. The gray color and medium size make it suitable for most outdoor faucets. Customer reviews praise its effectiveness in preventing freezing and its easy installation. However, some users have found that it may not fit well over certain spigots. Overall, with its affordable price and top-notch performance, the Frost King FC1 Outdoor Foam Faucet Cover is a great investment to keep your outdoor faucets protected during the cold winter months.
Key Features
- Protects outdoor faucets from extreme temperatures
- 5/8-inch expanded polystyrene shell
- 3/4-inch one piece foam gasket
- Comes fully assembled
- Reusable season after season
Specifications
- Color: Gray
- Size: Medium
Pros
- Good protection against the cold
- Easy to install
- Affordable price
- Reusable
Cons
- May not fit well over certain spigots
- Cord may become brittle after prolonged use
The Frost King FC1 Outdoor Foam Faucet Cover provides reliable protection against freezing temperatures. Its durable construction and easy installation make it a convenient choice for homeowners. While it may not fit all spigots perfectly, it offers great value for the price. With a high customer rating and positive reviews, this faucet cover is a must-have for those looking to prevent frozen faucets. Winter can be harsh on outdoor plumbing, but with the Frost King FC1 Outdoor Foam Faucet Cover, you can enjoy peace of mind knowing that your faucets are well-insulated and protected.

Overall Score: 9/10
The POROLIR Outdoor Faucet Covers provide excellent freeze protection for your outdoor faucets. Made with high-quality anti-freeze and waterproof material, these covers are suitable for all seasons. The design includes a three-layer construction with a 420d Oxford protective waterproof coating, thick insulating cotton, and I9OT polyester taffeta lining. With a universal size of 8.5" H x 6.1" W, they fit most types of faucets. The covers are easy to install with strong Velcro straps and can be folded for storage. They are also reusable, durable, and easy to clean. Protect your outdoor faucets from freezing, bursting, rust, and rot with the POROLIR outdoor faucet covers.
Key Features
- Universal size fits most types of faucets
- Made with anti-freeze and waterproof material
- Excellent protection for all seasons
- Easy to install with strong Velcro straps
- Reusable, durable, and easy to clean
Specifications
- Color: Black
- Size: 8.5" H x 6.1" W
Pros
- Provides excellent freeze protection
- Universal size fits most types of faucets
- Easy to install and use
- Reusable and durable
- Stain resistant color
Cons
- May not provide enough insulation for prolonged extreme cold
- Limited user reviews available
The POROLIR Outdoor Faucet Covers offer reliable freeze protection for your outdoor faucets. With their high-quality construction and universal size, they are a practical and easy-to-use solution. The covers are made with anti-freeze and waterproof material, ensuring excellent performance in all seasons. Installation is quick and hassle-free with the strong Velcro straps, and the covers can be folded for convenient storage. They are also reusable and easy to clean. While there may be some limitations in extreme cold temperatures, overall, the POROLIR outdoor faucet covers are a great investment to protect your outdoor faucets from freezing, bursting, rust, and rot.

Overall Score: 8/10
The Frost King FC14A Foam Faucet Cover in Grey is a must-have for protecting outdoor faucets from the freezing, wind, and chill of winter. Made in the USA, these foam covers are easy to install and provide energy-efficient and eco-friendly protection. This pack includes 4 covers, ensuring you have enough for multiple faucets. The gray color adds a sleek touch to your outdoor fixtures. With dimensions of 6.25Lx5.50Wx5.50H, these covers fit most standard faucets. Although they may be smaller and less durable than some options, they still offer adequate protection. The Frost King FC14A Foam Faucet Cover is a reliable choice for keeping your outdoor faucets safe during the winter season.
Key Features
- Protects outdoor faucets from freezing, wind and chill
- Easy to install
- Eco Friendly Option and Energy Efficiency
- 4 Pack
- Made in the USA
Specifications
- Color: Gray
- Dimension: 6.25Lx5.50Wx5.50H
Pros
- Good value for the winter months
- Easy to use and install
- Provides great cold weather protection
- 4 Pack offers extra value
- Made in the USA
Cons
- One cover was damaged upon arrival
- Strings attached to covers may rot and break
- Foam may crack if not handled carefully
- Smaller and less sturdy compared to some covers
- The ring may be too small to fit securely around some faucet handles
The Frost King FC14A Foam Faucet Cover offers an affordable and practical solution for protecting outdoor faucets during the winter months. With its easy installation and eco-friendly design, it provides peace of mind knowing that your faucets are safeguarded from freezing temperatures. While it may not be the most durable option on the market, the 4 pack ensures you have spares if needed. Keep in mind the smaller size and the possibility of the foam cracking if mishandled. Overall, this faucet cover delivers on its purpose effectively and is a worthwhile investment for any homeowner looking to protect their outdoor faucets from the harsh winter weather.

Overall Score: 8/10
Prepare your garden for winter with the Trenton Gifts Thinsulate Faucet Socks. These faucet socks are a must-have tool to add to your winterizing kit. They are designed to keep spigots insulated and prevent damage that can result from freezing. Made with 3M Thinsulate insulation, these faucet socks are heavy duty yet lightweight. Protect your outdoor faucets from freezing and avoid costly repairs due to burst pipes. The faucet socks are quick and easy to install, requiring no cutting off of the water supply. Simply cover the faucet with the sock and secure it with the Velcro fastener. With a color of blue and dimensions of 6.00Lx4.00Wx1.00H, these faucet socks are a convenient and reliable solution for winterizing your home.
Key Features
- Prepare your garden for winter
- 3M Thinsulate insulation
- Prevent freezing pipes
- Protects against broken valves
- Quick and easy to connect
Specifications
- Color: Blue
- Dimension: 6.00Lx4.00Wx1.00H
- Size: One Size
Pros
- Easy to install
- Durable materials
- Works in freezing temperatures
- Covers faucet up to the wall
- Good insulation
Cons
- May be too small for some faucets
The Trenton Gifts Thinsulate Faucet Socks are a practical and effective solution for winterizing outdoor faucets. With their 3M Thinsulate insulation and easy installation, these faucet socks provide excellent protection against freezing pipes and broken valves. The durable materials and Velcro fastener ensure a long-lasting and secure fit. While there have been some complaints about the size being too small for certain faucets, most users have found these socks to be reliable in preventing freezing even in extreme temperatures. Overall, the Trenton Gifts Thinsulate Faucet Socks are a smart investment for anyone looking to winter-proof their garden and avoid costly repairs.

Overall Score: 8/10
The Outdoor Faucet Covers for Winter are a must-have for protecting your outdoor faucets from freezing during the cold months. With a large size suitable for almost every standard outdoor faucet, these covers are easy to use and install. Made of premium material with a waterproof coating, they keep out rain, snow, and ice, ultimately saving you from expensive repair fees. The faucet covers can be used in all seasons, providing antifreeze protection and shielding the tap from sunlight and rust. Each pack includes 2 covers, and the product comes with excellent customer service. The covers have received high ratings from customers, with an average score of 4.5 out of 5.
Key Features
- Large size suitable for almost every standard outdoor faucet
- Easy to use and install without tools or screws
- Made of premium material with waterproof coating
- Offers protection from rain, snow, and ice
- Can be used in all seasons and reused
- 2 pack includes excellent customer service
Specifications
- Color: Black
- Dimension: 8.60Lx7.00Wx2.50H
- Size: 2 Pack
Pros
- Easy to use and install
- Durable and well-made
- Reasonably priced
- Provides effective freeze protection
- Suitable for various weather conditions
Cons
- Not very thick, requires additional insulation in extreme cold
The Outdoor Faucet Covers for Winter are a convenient and reliable solution for protecting your outdoor faucets from freezing. With their easy installation and durable construction, they offer peace of mind during cold weather conditions. While they may not be the thickest covers available, they still provide effective freeze protection and are suitable for various weather conditions. With a reasonable price and excellent customer service, these faucet covers are a worthwhile investment. Say goodbye to wrapping towels and duct tape around your faucets and upgrade to these reusable and convenient covers.

Overall Score: 8/10
The Feeke Outdoor Faucet Covers are designed to protect your outdoor water faucets from freezing during winter. Made of waterproof and insulation materials, these faucet socks provide 100% insulation even in harsh weather conditions. They are easy to slip on and take off, with a built-in strap for secure fastening. One size fits most standard faucets, eliminating the need for size research. The faucet covers are made of high-quality materials and offer excellent customer service with a full refund guarantee. With a customer rating of 4.6/5, these faucet socks have received positive reviews for their effectiveness in preventing freezing. However, some reviewers noted that they may not be suitable for extreme cold temperatures.
Key Features
- Anti-Frozen and Waterproof
- Easy to Use
- One Fits Most
- High Quality Material
- Excellent Customer Service
Specifications
- Color: Black
- Size: Standard
Pros
- Waterproof and insulation materials
- Easy to slip on and take off
- One size fits most standard faucets
- High-quality materials
- Excellent customer service
Cons
- May not be suitable for extreme cold temperatures
The Feeke Outdoor Faucet Covers offer reliable protection against freezing for your outdoor water faucets. With their waterproof and insulation materials, these faucet socks ensure that your faucets remain undamaged during harsh weather conditions. They are easy to use, fitting most standard faucets with a secure strap fastening. The high-quality materials provide excellent insulation, and the company’s commitment to customer service is commendable. While they may not be ideal for areas with extremely cold temperatures, the Feeke Outdoor Faucet Covers are an effective and affordable solution for preventing freezing and costly repairs. Invest in these faucet socks to protect your outdoor faucets and save money in the long run.

Overall Score: 8.3/10
The Hometopia Outdoor Faucet Cover for Winter provides reliable protection for your outdoor faucets during extreme weather conditions. It measures 7.5 inches in width and 9.5 inches in height, making it compatible with various faucet types. The cover is easy to install and remove, simply sliding onto the faucet and fastening it with Velcro straps and a cord. Its very thick design offers superior protection against freezing in winter and prevents the faucets from the damaging effects of the sun or rust in summer. The outer surface is made of 420D Oxford protection water coating and the middle is filled with special PP insulated cotton, providing effective insulation. The cover is waterproof and keeps the faucet dry and warm. It comes in a set of 2 and is backed by a lifetime service guarantee.
Key Features
- -❄【High Compatibility】– Faucet covers for winter measures 7.5"W x 9.5"H
- -❄【Easy To Install and Remove】– Spicket cover outside No more tools and screws
- -❄【Superior Protection】– Very thick faucet cover design
- -❄【Against freezing & Waterproof Material】– Outside faucet cover freeze protection outer surface is 420D Oxford protection water coating
- -❄【Please confirm again】— Our water faucet covers for outside size and packaging is 7.5" Wx9.5" H, Set of 2
Specifications
- Color: Black
- Dimension: 3.00Lx7.10Wx10.80H
Pros
- High compatibility with various faucet types
- Easy installation and removal
- Thick design for superior protection
- Waterproof material prevents rainwater from entering
- Comes in a set of 2
Cons
- Velcro ribbons may be difficult to tighten
- Less insulation compared to other covers
The Hometopia Outdoor Faucet Cover for Winter offers reliable and convenient protection for outdoor faucets. Its high compatibility, easy installation, and thick design make it a practical choice. The waterproof and insulated materials ensure effective freeze protection in winter and prevent damage from the elements in summer. Although the Velcro ribbons may be a bit difficult to tighten and the insulation could be improved, overall, this faucet cover provides good value for its price. With a customer rating of 4.6/5, it has received positive feedback for its functionality. Keep your outdoor faucets safe and secure with the Hometopia Outdoor Faucet Cover for Winter.

Overall Score: 8/10
The GonLei Outdoor Faucet Cover is designed to protect outdoor faucets from rain, wind, sun, rust, and rot, providing year-round protection. It is made of heavy-duty waterproof polyester outer cloth and filled with extra thick insulating cotton, offering resistance against severe weather such as freezing rain, ice, and snow. The cover is easy to use, with reflective Velcro straps to ensure a tight fit. It comes in a universal size that fits various outdoor faucets, and it is reusable and tear-resistant. The GonLei team offers excellent customer service, promising repair, replacement, or a full refund in case of any quality issues.
Key Features
- Year-round protection against moisture and cold
- Waterproof and tear-resistant design
- Universal size fits different outdoor faucets
- Easy to use with reflective Velcro straps
- Excellent customer service
Specifications
- Color: Blue
- Size: 2 pack
Pros
- Provides year-round protection for outdoor faucets
- Heavy-duty and waterproof design
- Easy to install and stays securely in place
- Great customer service
Cons
- Thinner than expected
- Relatively expensive compared to some alternatives
The GonLei Outdoor Faucet Cover is a reliable and durable option for protecting outdoor faucets from harsh weather conditions. With its heavy-duty construction and easy installation, it offers year-round protection and peace of mind. The reflective Velcro straps ensure a snug fit, and the excellent customer service provided by the GonLei team adds to the overall satisfaction. Although it may be thinner than expected, it still performs its intended function effectively. While the price may be slightly higher compared to some alternatives, the quality and durability justify the investment. If you’re looking for a dependable outdoor faucet cover, the GonLei cover is a great choice.
Outdoor Faucet Cover Buyer's Guide
Benefits of Outdoor Faucet Covers
- Protects outdoor faucets from freezing during cold weather
- Prevents damage to the faucet and pipes
- Extends the lifespan of the faucet
- Saves money on costly repairs or replacements
- Reduces the risk of leaks and water damage to your property
Factors to Consider Before Buying an Outdoor Faucet Cover
- Material: Choose a cover made of durable and weather-resistant material, such as heavy-duty vinyl or thick foam.
- Size: Ensure the cover fits your specific faucet size to provide complete protection.
- Design: Opt for a cover with a secure closure mechanism or drawstring to effectively seal the faucet and keep out moisture and insects.
- Insulation: Look for covers that offer insulation to maintain a consistent temperature around the faucet and prevent freezing.
- Easy installation: Select a cover that is easy to install and remove to simplify your outdoor maintenance routine.
- Durability: Consider covers with reinforced stitching or strong construction that can withstand harsh weather conditions.
Types of Outdoor Faucet Covers
- Foam Insulated Covers: These covers feature a thick foam layer that provides excellent insulation to prevent freezing. They are often easy to install and remove, making them a popular choice for many homeowners.
- Hard Shell Covers: Made from durable plastic or metal, these covers provide solid protection against external elements. They are typically more robust and long-lasting compared to other types of covers.
- Sock or Sleeve Covers: These covers are designed to slide over the faucet like a sock or sleeve. They are often made of materials like neoprene or fleece and provide basic insulation and protection against freezing temperatures.
- Magnetic Covers: These covers attach to the metal body of the faucet using magnets, ensuring a secure fit and preventing cold air from seeping in. They are typically easy to install and remove.
- Multi-Purpose Covers: Some covers serve a dual purpose, protecting not only the faucet but also nearby pipes or hose connections. These versatile covers provide comprehensive protection against freezing and potential damage.
Tips for Using Outdoor Faucet Covers
- Before installing a cover, make sure to disconnect any hoses or attachments from the faucet.
- Clean and dry the faucet before placing the cover to prevent dirt or moisture from causing damage.
- Securely fasten the cover to ensure it stays in place during storms or strong winds.
- Regularly inspect the cover throughout the winter season to ensure it has not loosened or shifted.
- If your area experiences extremely cold temperatures, consider using additional insulation, such as heat tape or pipe sleeves, for added protection.
Read also: 15 Amazing Faucet Hole Cover for 2025
Frequently Asked Questions about 11 Amazing Outdoor Faucet Cover For 2025
Outdoor faucet covers provide insulation to maintain a consistent temperature around the faucet, preventing freezing by reducing exposure to cold air.
While a plastic bag may offer temporary protection, it is not specifically designed to prevent freezing or provide insulation. It is best to invest in a proper outdoor faucet cover for long-term, reliable protection.
Yes, you can leave the faucet cover on during warmer seasons. It won’t interfere with the faucet’s functionality, and it can provide additional protection against exposure to sunlight, dust, or debris.
The lifespan of an outdoor faucet cover depends on its quality and durability. Inspect the cover regularly for signs of wear and tear, such as cracks or loose stitching. If it shows significant damage, it is recommended to replace it for optimal protection.
It is essential to choose a cover that fits each specific faucet size. While some covers may have adjustable closures, it is generally recommended to use appropriately sized covers for the best protection and insulation.
Was this page helpful?
Trust Storables.com for unbiased and honest product reviews. Our reviews are rigorously assessed by our Expert Board Contributors and adhere to strict Editorial Standards. We ensure that each review is transparent and trustworthy, helping you make informed purchasing decisions.


0 thoughts on “11 Amazing Outdoor Faucet Cover for 2025”