Home>Gardening & Outdoor>Outdoor Recreation & Activities>What Tools Do I Need To Take Apart A Trampoline
Outdoor Recreation & Activities
What Tools Do I Need To Take Apart A Trampoline
Modified: October 20, 2024
Discover the essential tools required for dismantling a trampoline and ensure a smooth outdoor recreation and activities experience. Get expert tips and advice now!
(Many of the links in this article redirect to a specific reviewed product. Your purchase of these products through affiliate links helps to generate commission for Storables.com, at no extra cost. Learn more)
**
Introduction
**
Welcome to the exciting world of trampoline disassembly! Whether you’re moving to a new home, replacing your trampoline, or simply need to store it for the winter, knowing how to take apart a trampoline is essential. While the process may seem daunting at first, with the right tools and a bit of know-how, you’ll be able to disassemble and reassemble your trampoline with ease.
In this guide, we’ll walk you through the step-by-step process of disassembling a trampoline, provide essential safety precautions, and highlight the necessary tools you’ll need for the job. By the end, you’ll feel confident in your ability to tackle this task and gain a deeper understanding of your beloved trampoline’s construction.
Key Takeaways:
- Essential tools for trampoline disassembly include socket wrench set, screwdrivers, spring pulling tool, rubber mallet, wire cutters, gloves, safety goggles, container for small components, and step ladder.
- Safety precautions for trampoline disassembly involve enlisting assistance, clearing the area, using protective gear, minding the springs, watching out for pinch points, and securing loose components.
Read more: What Hand Tools Do I Need As A Mechanic
Safety Precautions
Before embarking on the trampoline disassembly journey, it’s crucial to prioritize safety. Trampolines, with their springs, metal frames, and tensioned fabric, present potential hazards if not approached with care. Here are some essential safety precautions to keep in mind:
1. Enlist Assistance: Trampolines can be heavy and unwieldy, so having a helping hand or two can make the process smoother and safer. Enlist the help of a friend or family member to assist with lifting and maneuvering the trampoline components.
2. Clear the Area: Ensure the disassembly area is free from obstacles and clutter. This will minimize the risk of tripping or bumping into objects while handling trampoline parts.
3. Use Protective Gear: Wear sturdy gloves to protect your hands from sharp edges and pinch points. Additionally, consider wearing safety goggles to shield your eyes from debris and dust that may be dislodged during the disassembly process.
4. Mind the Springs: Trampoline springs are under tension and can cause injury if mishandled. Exercise caution when detaching the springs and use appropriate tools to prevent accidental release of tension.
5. Beware of Pinch Points: Trampoline frames and components may have pinch points that can catch fingers or clothing. Stay mindful of these areas and handle the parts with care.
6. Secure Loose Components: As you disassemble the trampoline, securely store the nuts, bolts, and other small components in a labeled container to prevent them from getting lost and posing a hazard.
By adhering to these safety precautions, you'll create a secure environment for disassembling your trampoline, minimizing the risk of accidents or injuries. Now that safety is at the forefront, let's dive into the essential tools needed for a successful trampoline disassembly.
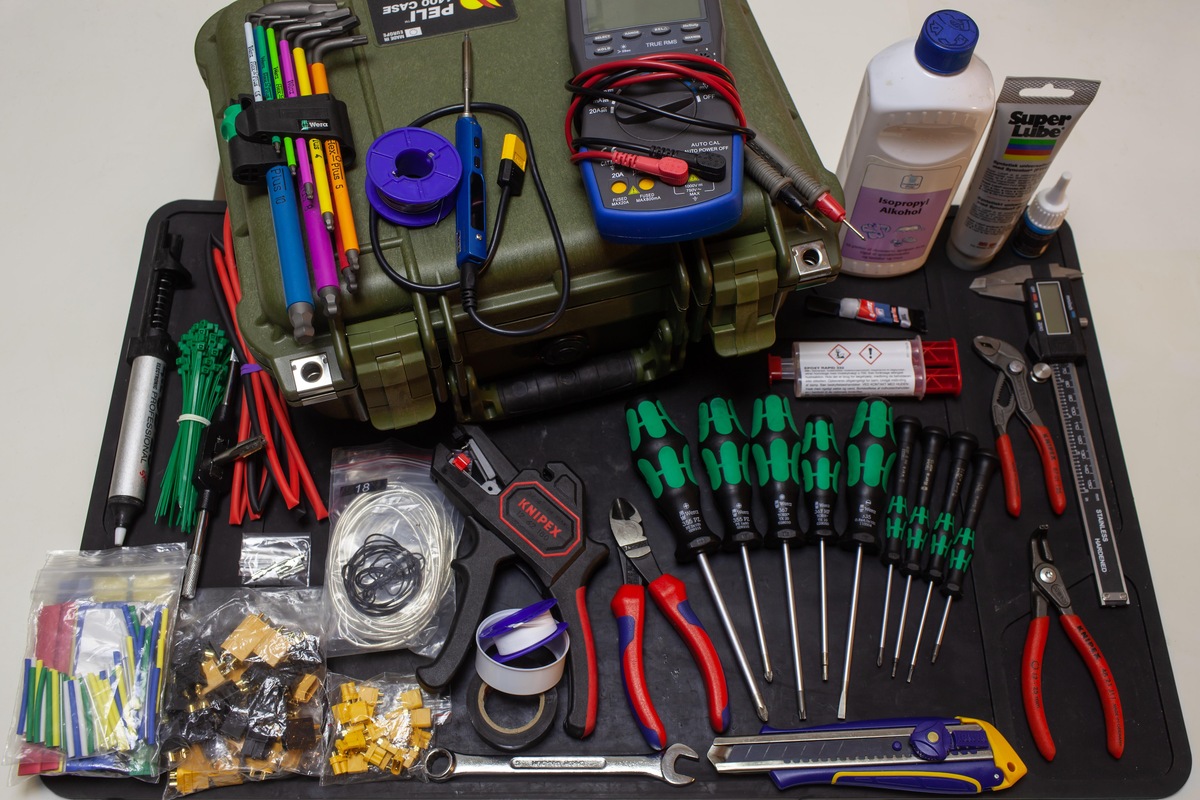
Necessary Tools
Before you begin disassembling your trampoline, it’s essential to gather the necessary tools to ensure a smooth and efficient process. Here’s a comprehensive list of the tools you’ll need:
- Socket Wrench Set: A socket wrench set with various socket sizes will allow you to easily remove nuts and bolts from the trampoline frame and legs.
- Phillips and Flat-Head Screwdrivers: These versatile tools will come in handy for removing screws and other fasteners securing the trampoline components.
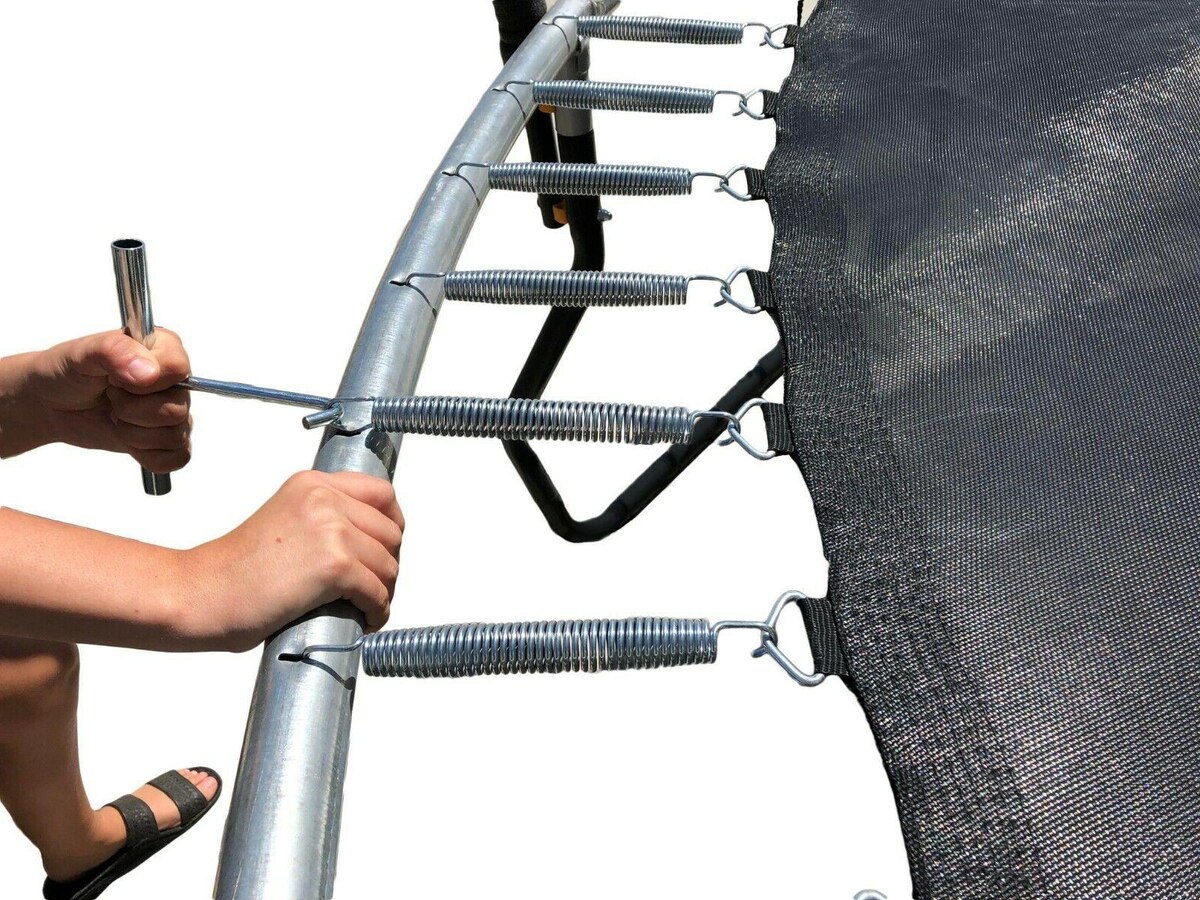
- Spring Pulling Tool: As trampoline springs are under tension, a spring pulling tool will assist in safely detaching the springs from the frame and mat.
- Rubber Mallet: A rubber mallet can be used to gently tap and dislodge stubborn components without causing damage.
- Wire Cutters: In some cases, wire cutters may be necessary to snip zip ties or wires securing the trampoline mat to the frame.
- Protective Gloves: Sturdy gloves will protect your hands from sharp edges, pinch points, and dirt during the disassembly process.
- Safety Goggles: Safety goggles will shield your eyes from debris and potential hazards while working on the trampoline.
- Container for Small Components: A container with compartments or zip-lock bags will keep nuts, bolts, and small trampoline components organized and prevent them from getting lost.
- Step Ladder: Depending on the trampoline’s size, a step ladder may be necessary to reach higher areas for disassembly.
By ensuring you have these essential tools on hand, you’ll be well-equipped to tackle the disassembly process with confidence. With safety precautions in place and the necessary tools at your disposal, you’re ready to embark on the step-by-step guide to disassembling your trampoline.
Make sure to have a spring puller, a wrench, and a screwdriver on hand when taking apart a trampoline. These tools will help you safely and efficiently disassemble the trampoline.
Step-by-Step Guide to Disassembling a Trampoline
Now that you have the necessary tools and safety precautions in place, it’s time to embark on the trampoline disassembly process. Follow these step-by-step instructions to effectively disassemble your trampoline:
- Clear the Area: Begin by removing any surrounding obstacles and ensuring there is ample space to work around the trampoline.
- Remove the Safety Enclosure (if applicable): If your trampoline is equipped with a safety enclosure, detach it from the frame according to the manufacturer’s instructions.
- Detach the Mat: Starting at one end of the trampoline, carefully remove the springs from the frame using a spring pulling tool. Work your way around the trampoline, gradually releasing the tension from the springs until the mat is free.
- Disassemble the Frame: Using the appropriate tools, such as a socket wrench set and screwdrivers, remove the bolts and screws securing the frame and legs. As you disassemble the frame, have a friend or family member assist in holding and stabilizing the components.
- Label and Store Components: As you dismantle the trampoline, label the components and store the nuts, bolts, and small parts in a secure container to prevent them from getting misplaced.
- Inspect and Clean: Take this opportunity to inspect the trampoline components for any signs of wear or damage. Additionally, clean the frame, mat, and other parts as needed before storage or reassembly.
- Secure and Store: Once disassembled, securely store the trampoline components in a dry and sheltered area, ensuring they are protected from the elements.
Following these steps will enable you to safely and methodically disassemble your trampoline, setting the stage for a successful reassembly in the future. With the trampoline components safely stored, let’s explore some valuable tips for reassembling the trampoline when the time comes.
Tips for Reassembling the Trampoline
When the time comes to reassemble your trampoline, the following tips will help streamline the process and ensure a successful outcome:
- Refer to the Manual: If available, consult the trampoline’s manual or assembly instructions to guide you through the reassembly process. This will provide valuable insights and ensure that the trampoline is reassembled correctly.
- Inspect Components: Before reassembly, thoroughly inspect each trampoline component for any signs of wear, damage, or corrosion. Address any issues before proceeding with the reassembly.
- Organize Hardware: Lay out the nuts, bolts, and other hardware in an organized manner, ensuring that you have all the necessary components before beginning the reassembly.
- Enlist Assistance: Just as during disassembly, having a helping hand or two can greatly facilitate the reassembly process. Enlist the assistance of a friend or family member to hold components in place and provide support as needed.
- Follow a Systematic Approach: Begin by assembling the frame and legs, then attach the mat and secure the springs. Following a systematic approach will help prevent errors and ensure that each step is completed accurately.
- Check Tension and Alignment: When attaching the mat and springs, ensure that the tension is evenly distributed and that the mat is aligned properly. This will contribute to the trampoline’s stability and performance.
- Double-Check Fastenings: Once the trampoline is reassembled, double-check all fastenings and connections to ensure they are secure. This includes verifying that the frame, legs, and safety enclosure (if applicable) are firmly in place.
- Test the Trampoline: After reassembly, perform a thorough inspection and conduct a test bounce to ensure that the trampoline is functioning as expected and that all components are securely in place.
By adhering to these tips, you’ll be well-prepared to navigate the reassembly process with confidence, ultimately restoring your trampoline to its fully functional and enjoyable state. With the trampoline successfully reassembled, you’ll be ready to resume the excitement of bouncing and playing in no time.
Read more: What Tools Do I Need For Woodworking
Conclusion
Congratulations on mastering the art of trampoline disassembly and reassembly! By following the safety precautions, gathering the necessary tools, and embracing the step-by-step guide provided, you’ve gained the knowledge and confidence to navigate this process effectively.
Remember, safety should always be the top priority when handling trampoline components. Enlisting assistance, using protective gear, and maintaining a clear and organized work area are essential practices to ensure a safe and successful disassembly and reassembly experience.
As you embark on this journey, whether it’s for relocation, maintenance, or storage purposes, the skills you’ve acquired will serve you well in preserving the longevity and functionality of your trampoline. Additionally, the tips for reassembly will guide you through the process with ease, ensuring that your trampoline is restored to its optimal state for enjoyment and recreation.
With your newfound expertise, you can approach trampoline disassembly and reassembly as a rewarding and empowering task, knowing that you have the necessary knowledge and tools to tackle it effectively. Whether you’re a trampoline enthusiast, a parent, or a homeowner, these skills will prove invaluable in maintaining and caring for your trampoline in the years to come.
So, as you bid farewell to your disassembled trampoline for now, or eagerly anticipate its reassembly, take pride in your newfound proficiency and the care you’ve invested in your beloved recreational equipment. Here’s to many more years of bouncing fun and enjoyment on your trampoline!
Frequently Asked Questions about What Tools Do I Need To Take Apart A Trampoline
Was this page helpful?
At Storables.com, we guarantee accurate and reliable information. Our content, validated by Expert Board Contributors, is crafted following stringent Editorial Policies. We're committed to providing you with well-researched, expert-backed insights for all your informational needs.


0 thoughts on “What Tools Do I Need To Take Apart A Trampoline”