Home>Articles>8 Superior Honeywell Home Security System for 2024
Articles
8 Superior Honeywell Home Security System for 2024
Modified: January 11, 2024
Looking for the best honeywell home security system for 2023? Explore our top 8 superior options to keep your home safe and secure. Choose Honeywell for reliable protection.
(Many of the links in this article redirect to a specific reviewed product. Your purchase of these products through affiliate links helps to generate commission for Storables.com, at no extra cost. Learn more)
Introducing the ultimate guide to the top 8 Superior Honeywell Home Security Systems for the year 2023. In an increasingly connected world, protecting our homes and loved ones has become more crucial than ever. With cutting-edge technology and innovative features, Honeywell continues to lead the way in the home security industry. From state-of-the-art cameras to sophisticated alarm systems, these Honeywell options offer unparalleled peace of mind. Stay ahead of the curve and discover the best Honeywell Home Security Systems for 2023.

Overall Score: 8.5/10
The Honeywell RCHSPIR1 Smart Home Security Motion Sensor is a wireless, easy-to-install motion sensor that alerts you to any motion within a 40 ft. range. With its tamper-proof smart technology and long battery life of up to 3 years, you can trust that you'll be notified of any activity in your home day or night. The sensor is pet-friendly and ignores background motion, ensuring that you're only alerted to what matters. It communicates wirelessly using the Honeywell Secure Wiselink Protocol and can be easily extended with other Honeywell Smart Home Security accessories. Keep your home secure and enjoy peace of mind with the Honeywell RCHSPIR1 Smart Home Security Motion Sensor.
Key Features
- EASY, DIY INSTALLATION – No wires, no screws
- LONG-RANGE SENSITIVITY – Tamper-proof smart technology alerts you to motion from across the room within a 40 ft. range
- ALERT NIGHT & DAY – Infrared motion detection with a battery that lasts up to 3 years
- PET-FRIENDLY SMART DETECTION – Ignores background motion like fans, robot vacuums, or pets up to 79 lb (36 kg)
- COMPLETELY WIRELESS – Communicates wirelessly and efficiently using Honeywell Secure Wiselink Protocol
- Up to 40 ft detection (12 M)
- EXTEND YOUR SYSTEM WITH ACCESSORIES – All Honeywell Smart Home Security accessories require a connection to the Honeywell Camera Base Station
- Honeywell Smart Home Security Base Station Required
Specifications
- Color: White
- Dimension: 3.42Lx2.02Wx1.48H
Pros
- Easy adhesive mounting for fast installation
- Long battery life of up to 3 years
- Pet-friendly and ignores background motion
- Wireless communication for convenience
- Extensible with other Honeywell accessories
Cons
- Requires Honeywell Smart Home Security Base Station
- Limited detection range of 40 ft. (12 m)
The Honeywell RCHSPIR1 Smart Home Security Motion Sensor offers an efficient and convenient way to monitor motion in your home. With its wireless and tamper-proof design, it provides peace of mind when it comes to security. The long battery life and pet-friendly detection make it a reliable choice. However, it is important to note that it requires the Honeywell Smart Home Security Base Station and has a limited detection range of 40 ft. Overall, it is a great addition to any smart home security system.

Overall Score: 8/10
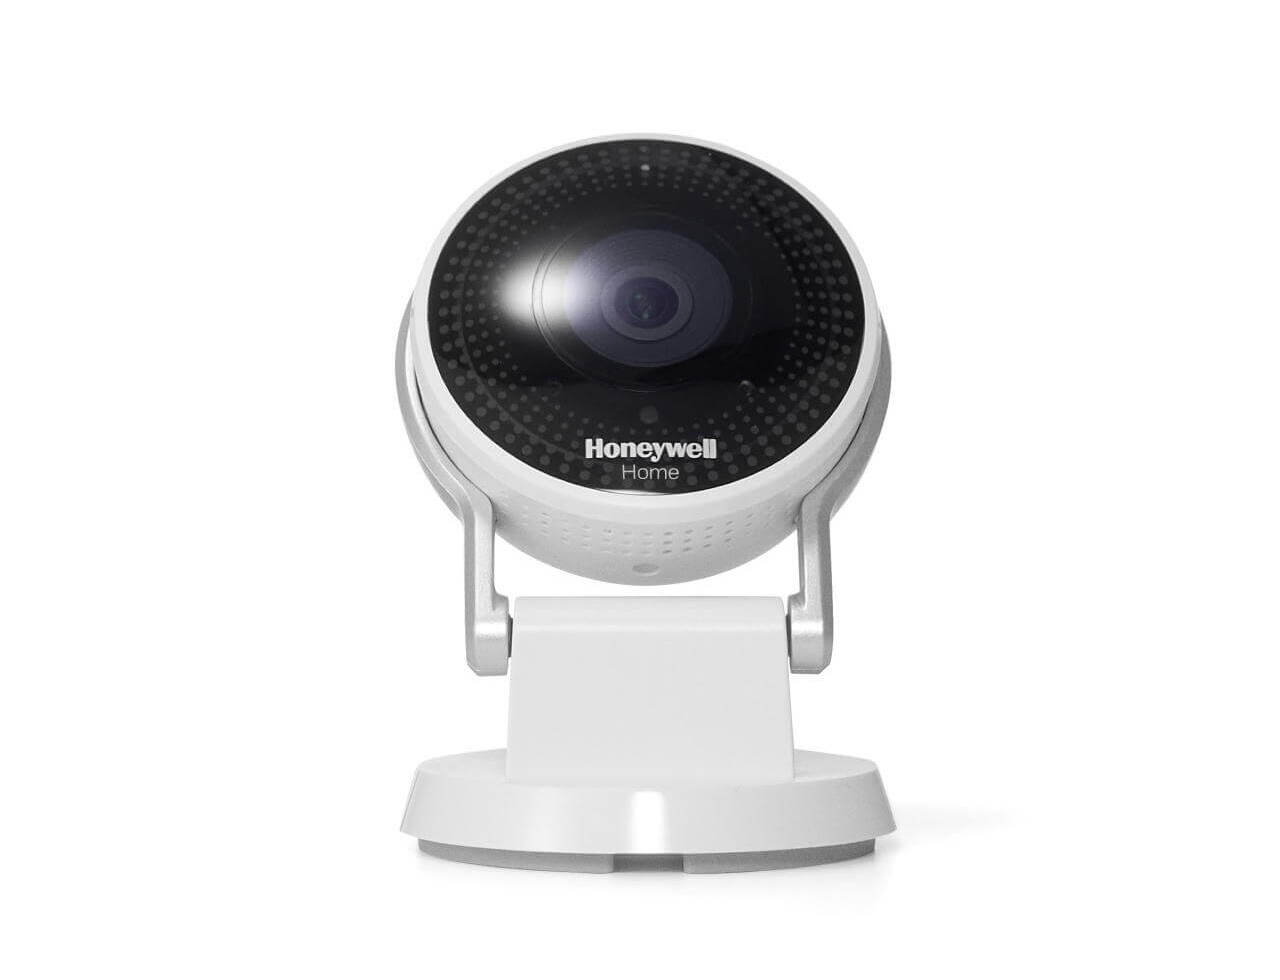
The Honeywell Home C1 Indoor Wi-Fi Security Camera is a versatile and intelligent camera that provides reliable home security. It features intelligent sound detection, allowing the camera to recognize specific sounds such as smoke and carbon monoxide alarms and send mobile alerts when detected. With geofence technology, the camera can automatically turn on or off based on your location. The camera offers free cloud and SD storage, allowing you to stream and download clips of the past 24 hours. It also includes 8 GB SD card for backup. Additional features include 2-way talk, night vision, and flexible mounting options. The Honeywell Home C1 Indoor Wi-Fi Security Camera is compatible with Alexa.
Key Features
- Intelligent Sound Detection
- Versatile Control Options
- Free Cloud and SD Storage
- 2 Adjustable Alert Zones
- Additional Features: 2-Way Talk, Night Vision, and Flexible Mounting Options
- Works with Alexa
Specifications
- Color: White
- Dimension: 7.00Lx7.00Wx6.25H
- Size: 1 Count (Pack of 1)
Pros
- Intelligent sound detection for enhanced security
- Adapts to your location using geofence technology
- Free cloud and SD storage
- Includes 8 GB SD card for backup
- Customizable alert zones for personalized security
- Works with Alexa for convenient control
Cons
The Honeywell Home C1 Indoor Wi-Fi Security Camera offers advanced features such as intelligent sound detection and versatile control options. It provides reliable security with free cloud and SD storage, along with the ability to customize alert zones. The camera also works with Alexa for convenient control. While there may be some minor drawbacks, overall, the Honeywell Home C1 is a solid choice for those seeking a dependable indoor security camera.

Overall Score: 8/10
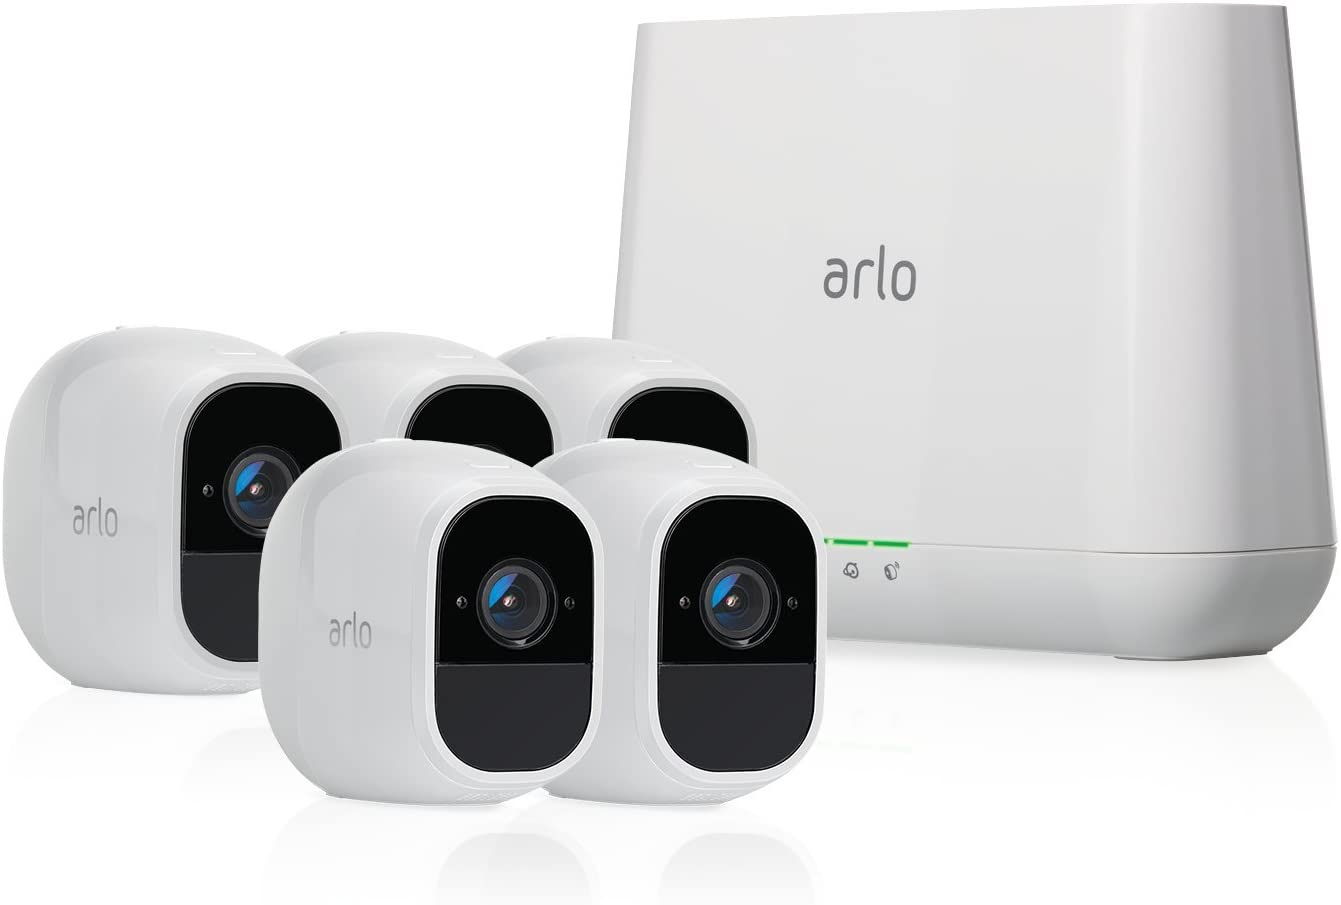
The Honeywell Home Smart Home Security Starter Kit in gray is a do-it-yourself home security system that can be set up quickly and easily. It allows you to monitor your home from anywhere, change modes automatically, and receive alerts for open doors and windows. With smart motion detection and night vision, it can capture crisp 1080p HD videos with full audio. The system also integrates with compatible smart devices and services, and features voice control through Alexa. The kit includes a camera base station, key fob, and two access sensors for doors and windows. The gray color adds a sleek and modern touch to your home security setup.
Key Features
- Do-it-yourself home security with easy setup
- Motion detection and night vision for HD video recording
- Smart home integration with compatible devices and services
- Voice control with Alexa
- Includes camera base station, key fob, and access sensors
Specifications
- Color: Gray
- Dimension: 7.30Lx3.60Wx3.60H
Pros
- Quick and easy setup
- Crisp 1080p HD videos with full audio
- Integration with compatible smart devices and services
- Convenient voice control through Alexa
Cons
- Outdoor sensors sold separately
- Limited color options
The Honeywell Home Smart Home Security Starter Kit provides a reliable and convenient way to enhance your home security. With its easy setup, motion detection, and integration with other smart devices, you can have peace of mind knowing that your home is protected. The crisp HD video quality and night vision capabilities ensure that you can capture any unexpected activity around your property. The voice control feature through Alexa adds an extra layer of convenience and accessibility. The only downsides are the need to purchase outdoor sensors separately and the limited color options. Overall, this kit delivers on its promise of a smart and effective home security solution.

Overall Score: 7.2/10
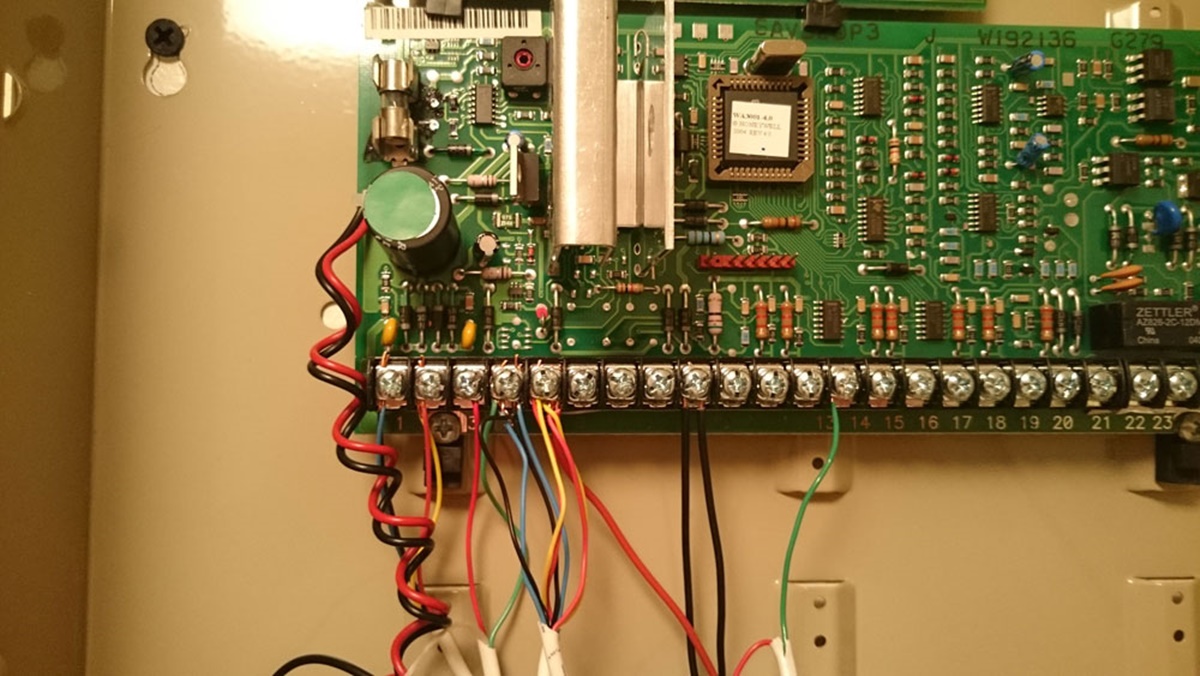
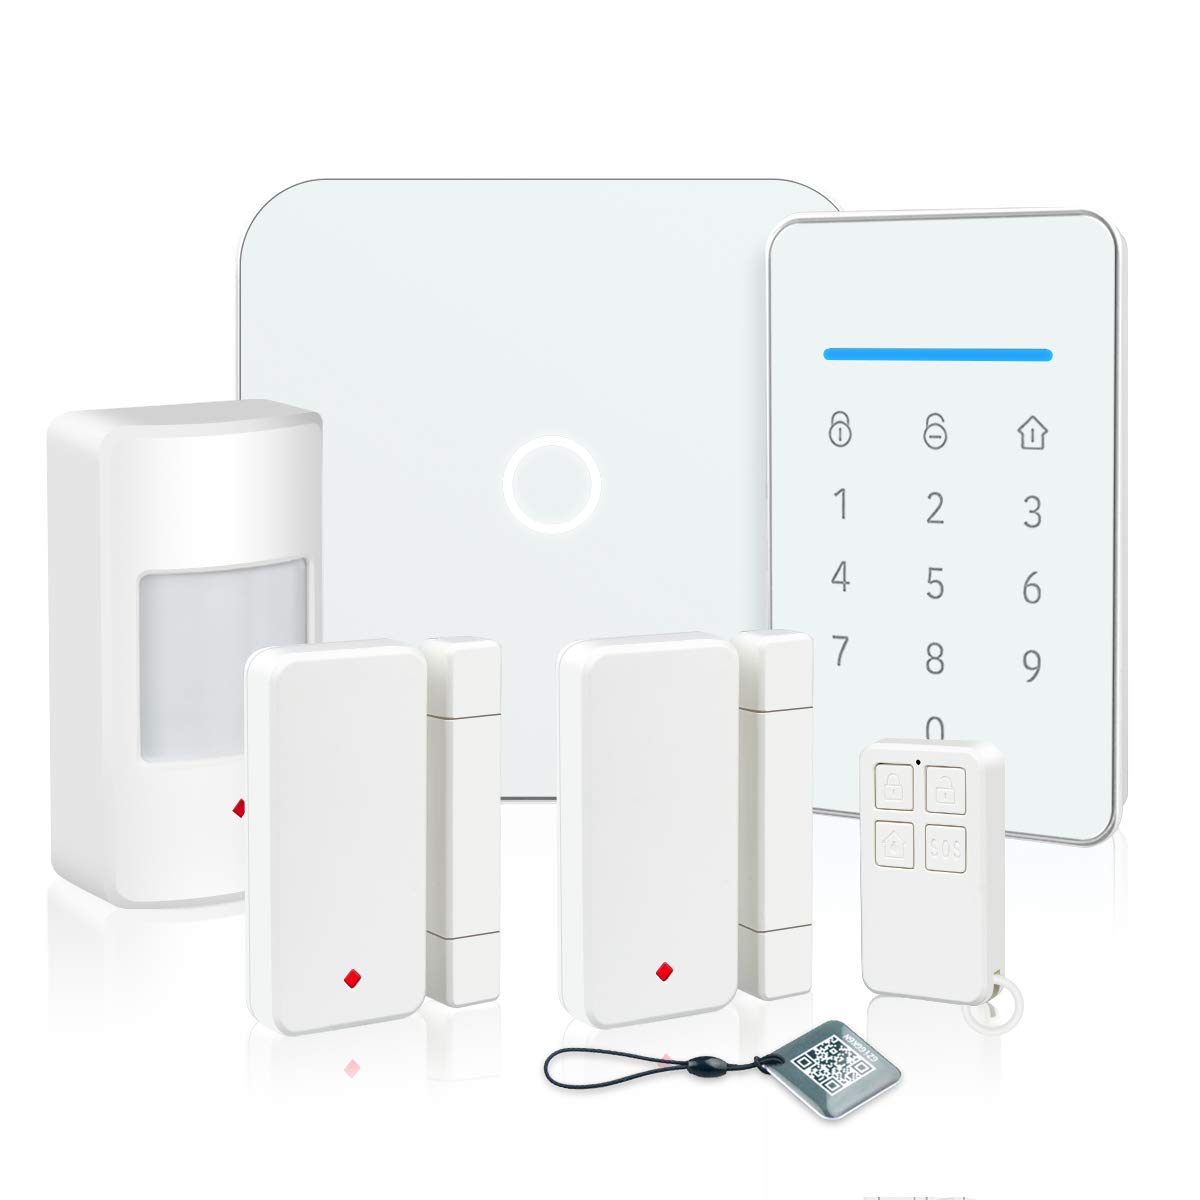
The Honeywell Ademco V20P60PK Vista-20P Intrusion Kit is a comprehensive security system for both commercial and residential use. It includes a Vista-20P Control Panel, 6160 Alpha Keypad, Wave2 Siren, IS2535PIR motion sensor, battery, cord, and jack. This kit provides everything you need to set up a secure alarm system. The Vista-20P Control Panel features 8-Zone functionality, ensuring thorough coverage of your property. The 6160 Alpha Keypad is an alphanumeric keypad that allows easy interaction with the control panel. With a sleek white design, this security kit blends seamlessly into any space. While there have been some complaints about complex programming and incomplete components, many users have found this kit to be efficient and cost-effective for their security needs.
Key Features
- Vista-20P Control Panel
- 6160 Alpha Keypad
- Wave2 Siren
- IS2535PIR motion sensor
- Battery, cord, and jack
Specifications
- Color: White
Pros
- Comprehensive security system
- Suitable for commercial and residential use
- Easy-to-use alphanumeric keypad
- 8-Zone functionality for thorough coverage
- Sleek design
Cons
- Complex programming
- Incomplete components
- Limited keypad configuration options
The Honeywell Ademco V20P60PK Vista-20P Intrusion Kit offers a comprehensive security solution for both commercial and residential properties. With its included control panel, keypad, siren, motion sensor, and other components, it provides everything needed to set up a reliable alarm system. While some users have experienced challenges with programming and found the kit to be incomplete, many have praised its efficiency and cost-effectiveness. The 8-Zone functionality ensures thorough coverage, and the sleek white design blends seamlessly into any space. Overall, this kit is a solid choice for those looking for a reliable and affordable security system.

Overall Score: 8/10
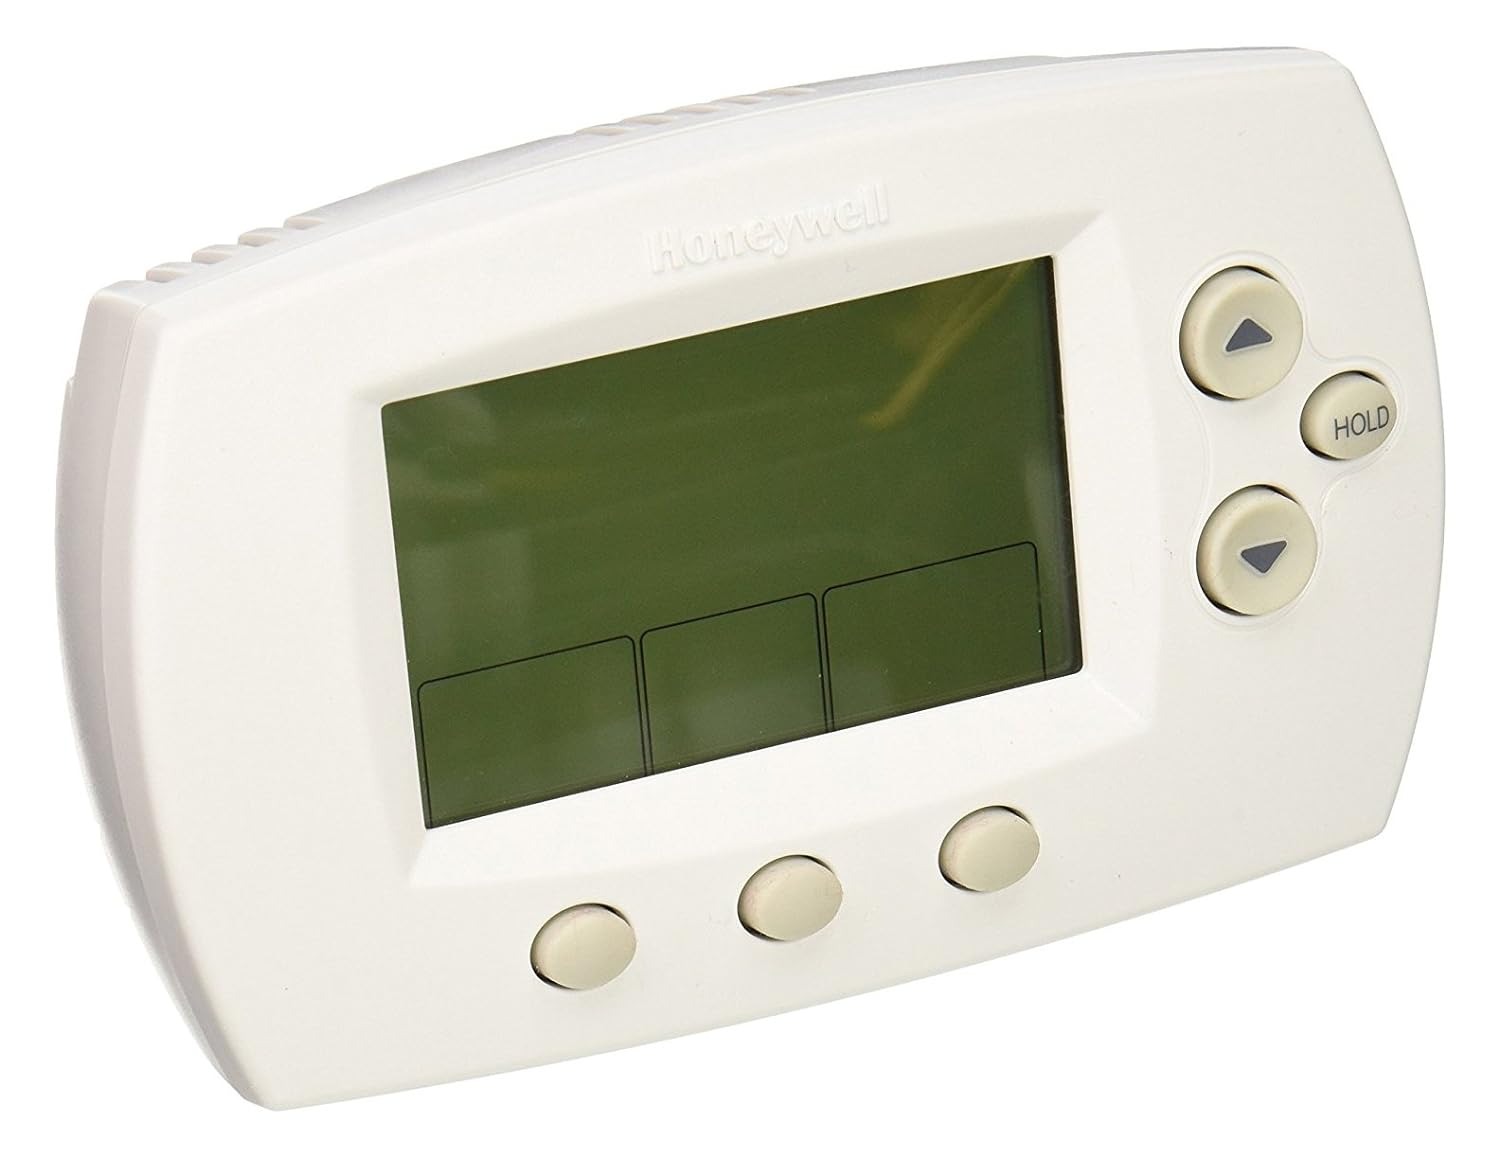
The Intrusion Honeywell 6290W Touch Center 7" Color Wireless Touchscreen Keypad Alarm Control is a sleek and high-tech addition to any home or office security system. With its 7" color touchscreen display and voice capabilities, this keypad control offers a user-friendly and intuitive interface for managing your alarm system. The white color adds a clean and modern touch to your space. Easily arm and disarm your system, view status updates, and control various features with just a touch. This wireless touchscreen keypad is a reliable and convenient solution for keeping your property safe and secure.
Key Features
- 7" color touchscreen keypad with voice capabilities
- Sleek and modern white design
- Easy arming, disarming, and system control
- Wireless and convenient solution
Specifications
- Color: White
Pros
- User-friendly and intuitive interface
- Sleek and modern design adds aesthetic value
- Voice capabilities for added convenience
Cons
- Limited compatibility with certain alarm systems
- Price may be higher compared to basic keypads
The Intrusion Honeywell 6290W Touch Center 7″ Color Wireless Touchscreen Keypad Alarm Control is a standout option for those looking for a modern and reliable alarm control. Its touchscreen display and voice capabilities make it easy to navigate and operate, while the sleek white design adds a touch of elegance to any space. With its wireless functionality, this keypad control offers convenience and flexibility. Although it may not be compatible with all alarm systems and comes at a slightly higher price point, the overall performance and features make it a worthwhile investment for enhancing your security system.

Overall Score: 7.5/10
The Honeywell Home RCHS5200WF Smart Home Security Base Station is a DIY home security system that can be set up in minutes. It allows you to keep watch from anywhere, and can even change modes automatically through geofencing. With smart motion detection and night vision, it can send HD video clips in crisp 1080P HD with full audio when unexpected activity is sensed. The base station integrates with compatible smart devices and services, including Alexa, and can even use outdoor sensors and Z-Wave lights to deter intruders. It also offers 24-hour encrypted cloud storage and has expandable capabilities to suit your home and needs. Additionally, it features a 147° wide-angle lens, two-way audio, and can play music and audio books controlled from your smart device.
Key Features
- DIY HOME SECURITY – Set up in minutes to keep watch from anywhere, or let it alert you as needed. Using geofencing, it can even change modes automatically as you come and go.
- SENSES MOTION, SENDS HD VIDEO – Stays alert day or night with smart motion detection and night vision. If it senses unexpected activity, it records a video clip in crisp 1080P HD, with full audio.
- SMART HOME INTEGRATION – It’s easy to connect compatible smart devices and services from brands like and Google. With outdoor sensors (sold separately), your system can even use sounds and Z-Wave lights to deter intruders.
- VOICE CONTROL + ALEXA – Change modes with your voice, and talk to built-in Alexa to check the weather.
- 24-Hour encrypted cloud storage included
- EXPANDABLE SYSTEM – Grow the system to suit your home & needs
- 147° Wide-Angle lens & Two-Way audio
- MUSIC AND AUDIO BOOK PLAYER – Play your favorite music, listen to the radio or enjoy audio books, all controlled from your smart device.
Specifications
- Color: Gray
- Dimension: 7.30Lx3.60Wx3.60H
- Size: 1 Count (Pack of 1)
Pros
Cons
The Honeywell Home RCHS5200WF Smart Home Security Base Station offers an easy-to-install DIY home security solution. With features like motion sensing, HD video recording, and smart home integration, it provides comprehensive protection. The expandable system allows you to customize it according to your needs, while the wide-angle lens and two-way audio enhance its functionality. The inclusion of encrypted cloud storage ensures the security of your recordings. The ability to control and play music through the device adds convenience and entertainment. Overall, this smart home security base station is a reliable and versatile option for those looking to safeguard their homes.

Overall Score: 8/10
The Honeywell Lynx Touch L5210 Wireless Security Alarm Slim Line Kit with 3GL GSM & Zwave Module is a comprehensive security alarm system that provides wireless protection for your home or office. It features a slim design, allowing it to blend seamlessly into any setting. With the included 3GL GSM and Zwave module, you can easily integrate it with other smart devices in your home. The system is easy to install and offers advanced features such as remote control through a smartphone app and real-time notifications. Its white color adds a touch of elegance to the overall aesthetic. Keep your property secure with this reliable and versatile security alarm kit.
Key Features
- Slim design for seamless integration
- Includes 3GL GSM and Zwave module
- Easy installation
- Smartphone app for remote control
- Real-time notifications
Specifications
- Color: White
Pros
- Sleek and slim design
- Easy integration with other smart devices
- Convenient smartphone control
- Real-time notifications for enhanced security
Cons
- May require professional installation for optimal functionality
- Some users may find the initial setup process complicated
The Honeywell Lynx Touch L5210 Wireless Security Alarm Slim Line Kit with 3GL GSM & Zwave Module offers an effective and aesthetically pleasing solution for securing your home or office. Its slim design allows it to seamlessly blend into any environment, while the included 3GL GSM and Zwave module ensures compatibility with other smart devices. The smartphone app and real-time notifications provide convenient control and enhanced security. While some users may require professional installation for optimal functionality and the initial setup process may be slightly complicated, the overall performance and features make it a reliable choice for comprehensive home or office security. Keep your property safe with this versatile and intuitive security alarm kit.

Overall Score: 8/10
The Honeywell LYNX Touch 5210 is a versatile all-in-one wireless home and business alarm control system. With integrated Z-Wave support, this control system allows for seamless control of compatible home automation devices such as thermostats, door locks, lights, and more. It is also compatible with WiFi and can be connected to mobile iOS and Android devices via the LYNX Connect app. The system supports alarm reporting, two-way voice communication, and can be connected to a central station for monitoring. It has a built-in 85 dB sounder with voice siren and supports alarm outputs for burglary, panic, fire, and carbon monoxide alarms. The control system is programmable and can be easily set up using the intuitive interface. It has a compact design and comes with a backup battery for continued operation in case of power outages.
Key Features
- Wi Fi & ZWAVE Compatible (SOLD SEPARATELY – NOT INCLUDED)
- L5210 All-In-One Home and Business Control System
- Integrated Z-Wave Support via L5100-ZWAVE Z-Wave Control Module for L5210 (SOLD SEPARATELY – NOT INCLUDED)
- Wi-Fi via L5100-WIFI Wi-Fi IP Communication Module for L5210 (SOLD SEPARATELY – NOT INCLUDED)
- Honeywell 3GL Communications GSM radio (SOLD SEPARATELY – NOT INCLUDED)
- Up to three thermostats with 1°F and 0.5°C set points
- Four door locks with jammed locks reported to Honeywell Total Connect Remote Services
- Supports up to 40 devices such as lights, switches, and lamp modules
- Supports 20 scenes, 20 rules or event-based actions, and 20 schedules or time-based actions
- Touch activated radio registration
- Built-in 85 d B sounder with voice siren
Specifications
- N/A
Pros
- Versatile all-in-one control system for home and business
- Compatible with Z-Wave and Wi Fi for home automation
- Supports alarm reporting and two-way voice communication
- Compact design with backup battery
- Easy to program with intuitive interface
Cons
- Z-Wave, Wi Fi, and GSM modules sold separately
- Limited specifications information available
The Honeywell LYNX Touch 5210 is a reliable and flexible alarm control system for both home and business use. With its support for Z-Wave and WiFi, it offers seamless integration with various home automation devices, allowing users to control and monitor their security and comfort from anywhere. The system provides reliable alarm reporting and two-way voice communication, ensuring prompt response in case of emergencies. Its compact design and backup battery make it suitable for installations where space is limited and power outages may occur. Although some additional modules are required for certain functionalities, overall, the Honeywell LYNX Touch 5210 offers a comprehensive solution for securing and managing residential and commercial properties.
Buyer's Guide: Honeywell Home Security System
Whether you're looking to enhance the security of your home or protect your loved ones and valuable possessions, a Honeywell home security system is a reliable choice. With a range of features and options available, finding the right system can be overwhelming. Fear not, for we have crafted this comprehensive buyer's guide to help you make an informed decision. Here's what you need to know:
Read more: Honeywell: How To Add Wireless Security
Key Considerations
- System Type
- Determine whether you need a professionally monitored system or a self-monitoring one.
- Consider the level of control you desire over your system, as well as any associated monthly fees.
- Assess the specific needs of your home to determine the necessary components.
- Ensure the system offers key components like control panels, sensors, cameras, and alarms.
- Consider the expandability of the system to accommodate your future security needs.
- Explore whether the system allows for easy integration with additional devices and accessories.
- Decide between a wireless or wired system based on your preferences and home structure.
- Wireless systems offer flexibility, easy installation, and mobility, while wired systems may provide more reliability.
- Determine if the system is compatible with popular smart home platforms like Amazon Alexa or Google Home.
- Check for features like mobile app control, voice activation, and integration with other smart devices.
- Research the reputation of the security system's manufacturer for reliability and customer service.
- Learn about warranty terms, technical support availability, and ease of system troubleshooting.
Benefits of Honeywell Home Security Systems
- Proven track record of reliability and performance in the security industry.
- Wide range of security components and systems to suit various home configurations.
- Advanced features like motion detection, voice control, and video surveillance.
- User-friendly interfaces and intuitively designed control panels for ease of operation.
- Integration with Honeywell Total Connect, providing remote access and control via smartphones.
- Option to choose between DIY installation or professional installation services.
- Highly reputable customer support and technical assistance.
- Compatibility with other smart home devices and platforms, expanding the capabilities of your security system.
Frequently Asked Questions about 8 Superior Honeywell Home Security System For 2024
Yes, Honeywell offers DIY installation kits with user-friendly instructions. However, professional installation services are also available for those who prefer assistance.
Yes, Honeywell home security systems can be integrated with popular smart home platforms, including Amazon Alexa.
It depends on the specific system and monitoring plan you choose. Some systems require monthly fees for professional monitoring services.
Yes, through the Honeywell Total Connect mobile app, you can remotely monitor and control your security system using your smartphone or tablet.
Yes, Honeywell offers pet-friendly motion sensors that can differentiate between human movement and that of your furry friends.
Yes, Honeywell systems are designed to be scalable, allowing you to expand and add additional components as your security needs evolve.
The warranty period may vary depending on the specific system and components, so it’s best to refer to the manufacturer’s documentation for accurate information.
Yes, Honeywell offers technical support to assist customers with any queries or troubleshooting needs regarding their home security systems.
The choice between wired and wireless systems depends on personal preference and home structure. Wired systems are generally considered more reliable, while wireless systems offer flexibility and easy installation.
Honeywell home security systems are designed to be compatible with various smart home devices, allowing for seamless integration with your existing automation setup.
Was this page helpful?
Trust Storables.com for unbiased and honest product reviews. Our reviews are rigorously assessed by our Expert Board Contributors and adhere to strict Editorial Standards. We ensure that each review is transparent and trustworthy, helping you make informed purchasing decisions.


0 thoughts on “8 Superior Honeywell Home Security System for 2024”