Home>Ideas and Tips>Backyard Horseshoe Pit Construction: Classic Outdoor Game Setup
Ideas and Tips
Backyard Horseshoe Pit Construction: Classic Outdoor Game Setup
Published: September 3, 2024
Learn how to build a backyard horseshoe pit with our step-by-step guide. Perfect for family fun and outdoor entertainment!
(Many of the links in this article redirect to a specific reviewed product. Your purchase of these products through affiliate links helps to generate commission for Storables.com, at no extra cost. Learn more)
Introduction
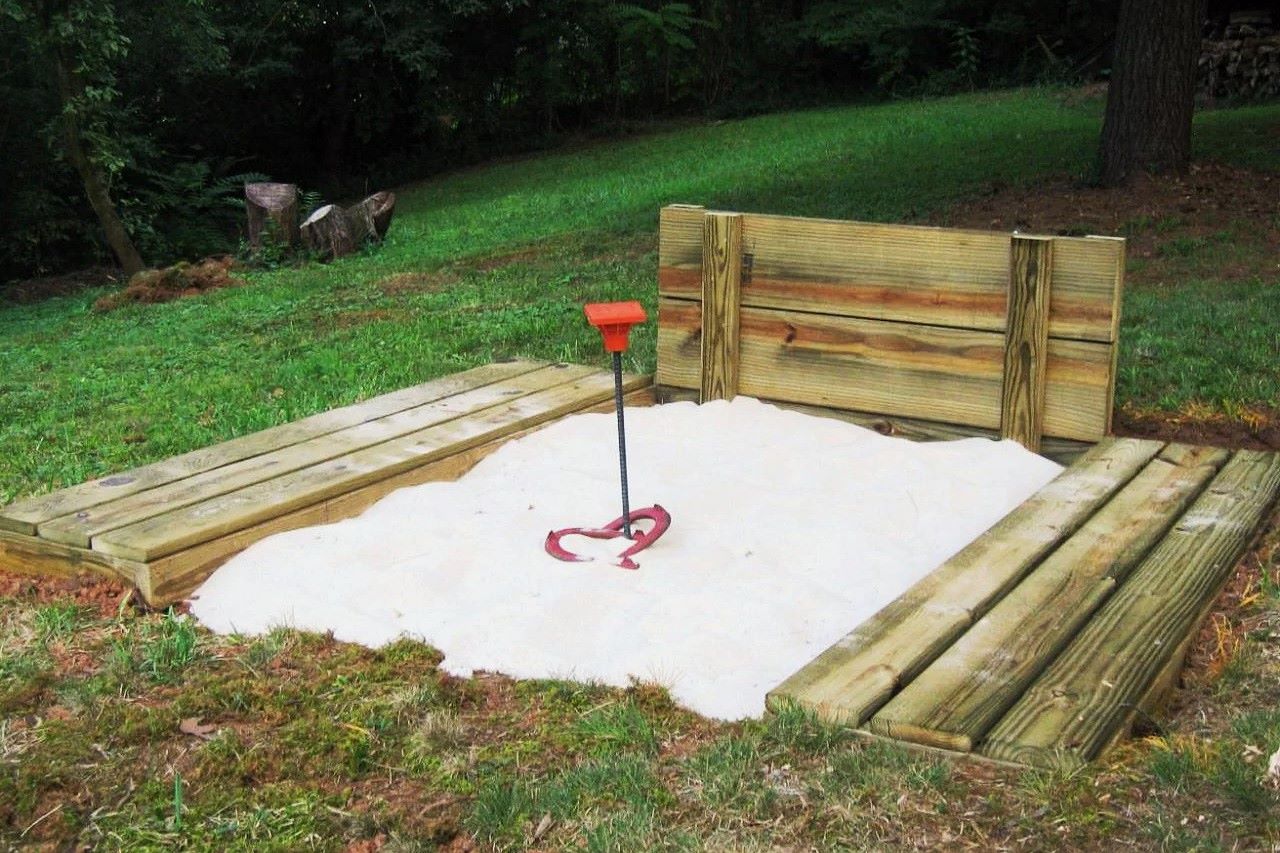
Creating a backyard horseshoe pit is an excellent way to enhance your outdoor space and provide entertainment for all ages. This classic game is not only fun but also encourages social interaction and physical activity. In this article, we will guide you through the process of building a horseshoe pit, from selecting the right materials to constructing the pit itself. Whether you're a seasoned DIY enthusiast or just starting out, this step-by-step guide will help you create a regulation-sized horseshoe pit that will be the envy of your neighborhood.
Why Build a Horseshoe Pit?
Horseshoe pitching is a timeless game that has been enjoyed by generations. It's a great way to spend quality time with family and friends, promoting social interaction and friendly competition. Here are some reasons why you should consider building a horseshoe pit in your backyard:
- Family Fun: Horseshoe pitching is a game that can be played by people of all ages. It's an excellent activity for family gatherings, birthday parties, and other social events.
- Physical Activity: Pitching horseshoes requires some physical effort, which can help keep you active and healthy.
- Outdoor Entertainment: A well-built horseshoe pit can be a focal point in your backyard, providing endless hours of entertainment and enjoyment.
Materials Needed
Before you start constructing your horseshoe pit, it's essential to gather all the necessary materials. Here’s a list of what you'll need:
Tools
- Drill with 5/16” bit
- 2 to 3 lb. hammer
- Square shovel
- Post hole diggers (if making raised backstop)
- Measuring tape
- Level
- Spray paint or marking chalk
Materials
- (10) 8’ landscaping timbers
- (12) 12” galvanized spike nails
- (24) 8” galvanized spike nails
- (8) 5” lag screws (if a raised backstop is constructed)
- Landscaping fabric (optional)
- 10 bags of play sand
- 36” stakes (2)
- 8’ 2×6 pressure-treated lumber boards (2)
- Moist blue clay or other cushioning substances
Choosing the Right Location
The location of your horseshoe pit is crucial for its functionality and safety. Here are some tips to help you choose the perfect spot:
- Level Ground: The area should be relatively level to ensure that the stakes stand upright without leaning.
- Low Traffic: Avoid areas with high foot traffic to prevent damage to the pit.
- North/South Orientation: Orienting your pits in a north/south direction can help you play comfortably all day.
- Proximity to Power Lines: Be mindful of underground utilities and avoid areas near power lines or other hazards.
Marking and Digging the Pit
Once you've selected the perfect location, it's time to mark and dig the pit.
Step-by-Step Guide
- Decide on Pit Dimensions: For a regulation-sized pit, measure between 31 to 36 inches wide and 43 to 72 inches long. We recommend making yours 36 inches wide and 48 inches long.
- Mark Corners: Use four of the 12-inch spikes to mark the corners of the pit. Measure both diagonals and compare the distances to ensure square corners.
- Lay Out Pit Area: Use chalk or spray paint to mark lines between the spikes, outlining the pit area.
- Dig Pit: Go around the perimeter of the pit with a square shovel, cutting straight into the earth to establish a clean line. The pit doesn’t need to be very deep; about 2 inches is sufficient.
- Level Pit: Observe the slope of the area and dig deeper on the uphill side if necessary. Check your progress with a level.
Driving the Stakes
The stakes should be 40 feet apart and lean forward slightly towards each other. Here’s how you can drive them into the ground:
- Measure Distance: Measure off 40 feet between two points in your yard.
- Drive Stakes: Drive two 36-inch stakes into the ground at a 12-degree angle from vertical until 14 inches remain above ground. Each stake should lean towards the opposite stake.
- Anchor Stakes: If necessary, weld a steel plate across the bottom of each stake for better anchorage.
Preparing the Pit Area
After driving the stakes, it's time to prepare the pit area.
- Loosen Soil: Loosen the top 2 to 4 inches of soil around each stake with a shovel.
- Create Pit Border: Create a 32”x45” pit area around each stake using 2×6 pressure-treated lumber or landscape timbers as borders.
- Line with Sand: Line the pit with play sand or moist blue clay to minimize damage to your yard.
Building a Raised Backstop (Optional)
If you want to add an extra layer of functionality and safety, consider building a raised backstop.
- Post Hole Diggers: Use post hole diggers if making raised backstop.
- Lag Screws: Use 5” lag screws for securing raised backstop timbers.
- Timber Placement: Place timbers around the pit area, securing them with lag screws.
Final Touches
Once your pit is constructed, here are some final touches you can add:
- Foul Lines: Place foul lines at 27 and 37 feet from each stake according to NHPA rules.
- Pitching Platforms: Add long, narrow pitching platforms on both sides of the pits for contestants.
- Moisture Retention: Use moist blue clay or other cushioning substances in the pit for better shoe retention.
Rules of Play
Horseshoe pitching has its own set of rules that ensure fair play and enjoyment for all participants. Here are some basic rules:
- Court Layout: The required court layout consists of two stakes fastened securely in the ground 40 feet apart.
- Stake Placement: Each stake should be placed in the center of a “pit” measuring between 43 and 72 inches long and between 31 and 36 inches wide.
- Pitching Shoes: Use manufactured horseshoes weighing approximately 2-1/2 pounds with openings no greater than 3-1/2 inches.
- Scoring: The object of the game is to pitch the horseshoe so that it comes to rest encircling the stake; failing in that, it comes to rest within six inches of the stake.
- Gameplay: Each contestant pitches two shoes in succession while their opponent quietly stands behind their platform.
Conclusion
Building a backyard horseshoe pit is an enjoyable DIY project that can bring endless hours of fun and social interaction to your outdoor space. By following these steps and tips, you'll be able to create a regulation-sized horseshoe pit that meets all NHPA standards while providing a safe and enjoyable environment for players of all ages. Whether you're hosting family gatherings or friendly competitions, your new horseshoe pit will be the perfect addition to any backyard.
Additional Tips and Resources
- Rent Tools: If you don't have all the tools needed handy, consider renting them from your local hardware store.
- Order Materials Online: If you can't visit your local hardware store, order your materials online and have them delivered quickly.
- Check Local Rules: Familiarize yourself with local rules and regulations regarding backyard games.
- NHPA Resources: Visit the National Horseshoe Pitchers Association (NHPA) website for detailed court construction articles and official playing rules.
By following these guidelines and tips, you'll be well on your way to creating a classic backyard horseshoe pit that will be enjoyed by generations to come. Happy pitching
Was this page helpful?
At Storables.com, we guarantee accurate and reliable information. Our content, validated by Expert Board Contributors, is crafted following stringent Editorial Policies. We're committed to providing you with well-researched, expert-backed insights for all your informational needs.

0 thoughts on “Backyard Horseshoe Pit Construction: Classic Outdoor Game Setup”