Home>Ideas and Tips>Upgrading Your Home’s Exterior With DIY Green Roof System
Ideas and Tips
Upgrading Your Home’s Exterior With DIY Green Roof System
Published: September 4, 2024
Learn how to enhance your home's exterior with a DIY green roof system. Discover the benefits, steps, and cost considerations for a sustainable upgrade.
(Many of the links in this article redirect to a specific reviewed product. Your purchase of these products through affiliate links helps to generate commission for Storables.com, at no extra cost. Learn more)
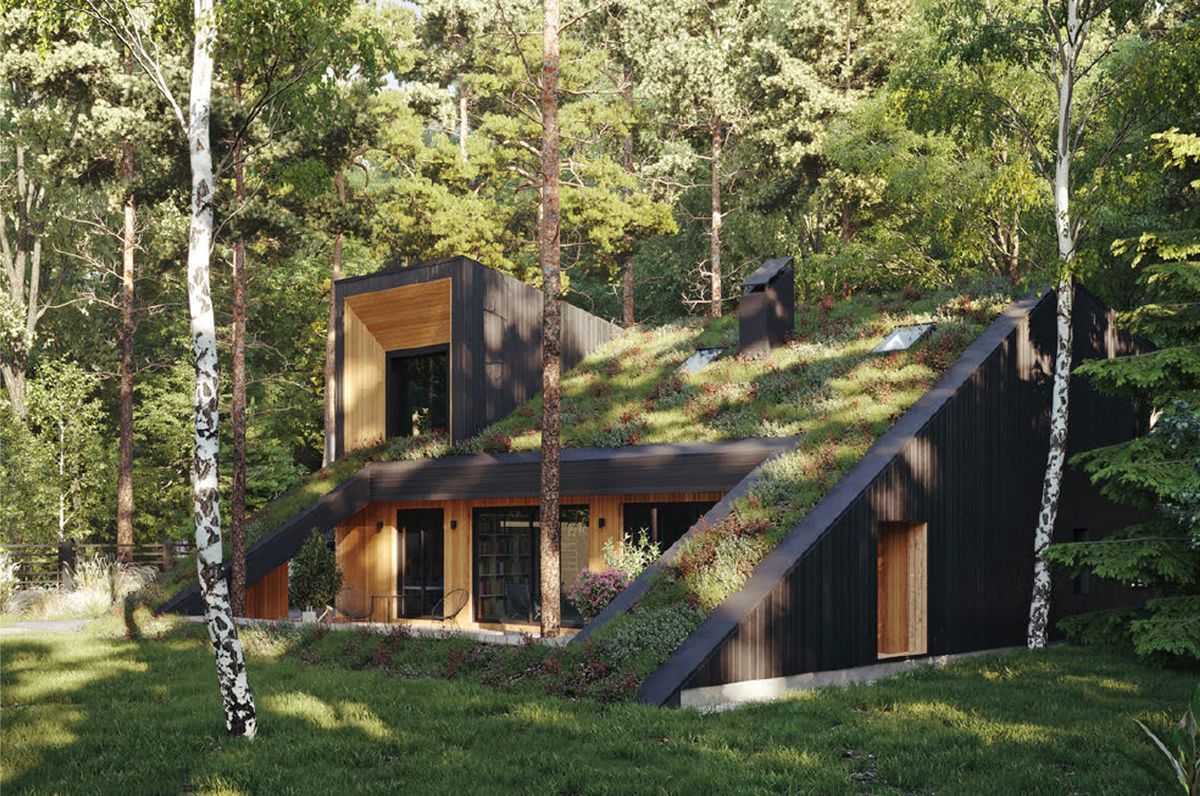
In the quest for sustainable living and enhancing the aesthetic appeal of our homes, green roofs have emerged as a popular choice. These innovative roofing systems not only provide environmental benefits but also offer a unique opportunity to create a lush, green space right on top of your house. While installing a full-fledged green roof can be a complex and expensive endeavor, incorporating basic green roof concepts into your home's exterior can be both practical and beautiful. In this article, we will delve into the world of green roofs, exploring their benefits, components, and how you can create a DIY green roof system that suits your needs and budget.
What Is a Green Roof?
A green roof, also known as a living roof or eco-roof, is essentially a vegetative layer grown on a rooftop. This innovative approach to roofing combines modern technology with age-old practices to create a sustainable and attractive roof covering. Green roofs typically consist of several layers, including a waterproofing membrane, root barrier, drainage layer, filter fabric, growing medium, and vegetation. This carefully engineered system ensures proper water management, plant growth, and protection of the underlying roof structure.
Benefits of Green Roofs
Green roofs offer a multitude of benefits that make them an attractive option for homeowners and building owners alike.
Environmental Benefits
- Stormwater Management: Green roofs help manage stormwater runoff by absorbing rainwater instead of spilling it off onto nonporous surfaces like concrete. This reduces the amount of pollutants that enter local rivers and streams.
- Air Quality Improvement: The vegetation on a green roof absorbs carbon dioxide and releases oxygen, contributing to cleaner air quality.
- Biodiversity: Green roofs create wildlife habitats, helping pollinators and birds, which adds biodiversity to the neighborhood.
Energy Efficiency
- Insulation: The natural insulation provided by the vegetation and growing medium helps regulate indoor temperatures. This reduces the need for heating in winter and cooling in summer, leading to significant energy savings.
- Heat Flow Reduction: Studies have shown that extensive green roofs can reduce heat flow through the roof by 75% during summer months and retain heat in winter, reducing heating costs.
Aesthetic Appeal
- Visual Attraction: Green roofs create attractive, leafy views from the second and third floors of a building, making them a beautiful addition to any home or commercial space.
- Urban Heat Island Mitigation: By providing additional green space, green roofs help mitigate the urban heat island effect, making cities cooler and more livable.
Components of a Green Roof
Understanding the components of a green roof is crucial for both professional installations and DIY projects.
- Waterproofing Membrane: This layer prevents water from penetrating the roof structure and causing damage. High-quality, root-resistant waterproofing membranes are essential for protecting buildings from moisture damage.
- Root Barrier: This layer prevents roots from growing into the underlying roof structure, ensuring that the waterproofing membrane remains intact.
- Drainage Layer: This layer allows excess water to drain off the roof, preventing waterlogging and ensuring proper water management.
- Filter Fabric: This layer filters out debris and prevents it from entering the drainage system, ensuring that the growing medium remains clean and free from obstructions.
- Growing Medium: This layer provides a suitable environment for plant growth. It can be made from various materials such as soil, compost, or specialized growing mediums designed for rooftop gardens.
- Vegetation: The final layer consists of plants that are specifically chosen for their ability to thrive in rooftop conditions. These plants can range from sedum and succulents to grasses and trees.
DIY Green Roof System: A Step-by-Step Guide
While professional installations are recommended for larger structures, you can still incorporate basic green roof concepts into your home's exterior. Here’s a step-by-step guide to creating a DIY green roof system:
Step 1: Assess Your Roof
Before starting your DIY project, it’s essential to assess your roof's structural integrity and determine if it can support the additional weight of a green roof. The weight of a green roof can vary significantly depending on the depth of the growing medium and the type of plants used. Typically, a green roof with four inches of soil adds around 30 pounds per square foot when fully saturated.
Step 2: Choose the Right Plants
Select plants that are specifically designed for rooftop gardens and can thrive in the local climate. Hardy, low-maintenance plants like sedum, succulents, and grasses are ideal for DIY projects. Ensure that the plants you choose are matched to your microclimate and will stay small to avoid overwhelming the space.
Step 3: Prepare the Roof
- Clean the Roof: Clear the roof of any debris, old roofing materials, or obstructions.
- Inspect for Leaks: Check for any existing leaks in the roof and address them before proceeding.
- Apply Waterproofing Membrane: Apply a high-quality waterproofing membrane to protect the roof from moisture damage.
Step 4: Install Drainage and Filter Layers
- Drainage Layer: Install a drainage layer to ensure excess water can drain off the roof.
- Filter Fabric: Place a filter fabric over the drainage layer to prevent debris from entering the drainage system.
Step 5: Add Growing Medium
- Choose Growing Medium: Select a suitable growing medium that is well-matched to your plants. This can be a mix of soil, compost, and other specialized materials.
- Apply Growing Medium: Spread the growing medium evenly over the roof, ensuring it is at the recommended depth for your chosen plants.
Step 6: Plant Vegetation
- Plant Selection: Plant your chosen vegetation, ensuring they are spaced correctly to allow for proper growth.
- Irrigation System: Install an irrigation system to provide the necessary water for plant growth. This can be a simple drip irrigation system or a more complex network of pipes and sprinklers.
Step 7: Maintenance
- Regular Watering: Regularly water your plants, especially during hot summer months.
- Fertilization: Fertilize your plants regularly to keep them healthy and thriving.
- Pruning: Prune your plants regularly to maintain their shape and promote healthy growth.
Cost Considerations
While a full-fledged green roof can be expensive, incorporating basic green roof concepts into your home's exterior can be more affordable. The cost of a green roof varies widely depending on the type of green roof, the size and scale of the project, and where you live. Here are some estimated costs:
- Professional Installation: The cost of a professionally installed green roof can range from $30 to $50 per square foot, with costs varying widely depending on the complexity of the project.
- DIY Project: For a smaller DIY project like a shed or balcony, you can expect to spend around $30 per square foot, which puts the total for an 8-ft. x 10-ft. shed at around $2,500.
Challenges and Considerations
While creating a DIY green roof system is feasible, there are several challenges and considerations to keep in mind:
- Structural Integrity: Ensure that your roof can support the additional weight of a green roof. Consult with an engineer if necessary.
- Waterproofing: A high-quality, root-resistant waterproofing membrane is essential to protect your roof from moisture damage.
- Drainage System: A proper drainage system is crucial to prevent waterlogging and ensure that excess water can drain off the roof.
- Root Damage: A root barrier is necessary to prevent roots from growing into the underlying roof structure.
- Safety Measures: Always use safety measures such as scaffolding and other access equipment when working on your roof.
Conclusion
Incorporating a green roof into your home's exterior is not only an environmentally friendly choice but also an aesthetically pleasing one. While professional installations are recommended for larger structures, basic green roof concepts can be applied to smaller spaces like balconies and sheds. By following the steps outlined above and considering the challenges and cost implications, you can create a beautiful and sustainable green roof that enhances both your home's appearance and its environmental footprint.
Whether you're looking to reduce your carbon footprint, create a wildlife habitat, or simply enjoy a lush green space from your living room window, a DIY green roof system is an excellent way to upgrade your home's exterior while contributing to a more sustainable future.
Was this page helpful?
At Storables.com, we guarantee accurate and reliable information. Our content, validated by Expert Board Contributors, is crafted following stringent Editorial Policies. We're committed to providing you with well-researched, expert-backed insights for all your informational needs.


0 thoughts on “Upgrading Your Home’s Exterior With DIY Green Roof System”