Home>Ideas and Tips>Upgrading Your Home’s Exterior With DIY Rainwater Harvesting System
Ideas and Tips
Upgrading Your Home’s Exterior With DIY Rainwater Harvesting System
Published: September 21, 2024
Learn how to upgrade your home's exterior with a DIY rainwater harvesting system. Save water, reduce bills, and create a sustainable garden.
(Many of the links in this article redirect to a specific reviewed product. Your purchase of these products through affiliate links helps to generate commission for Storables.com, at no extra cost. Learn more)
Introduction
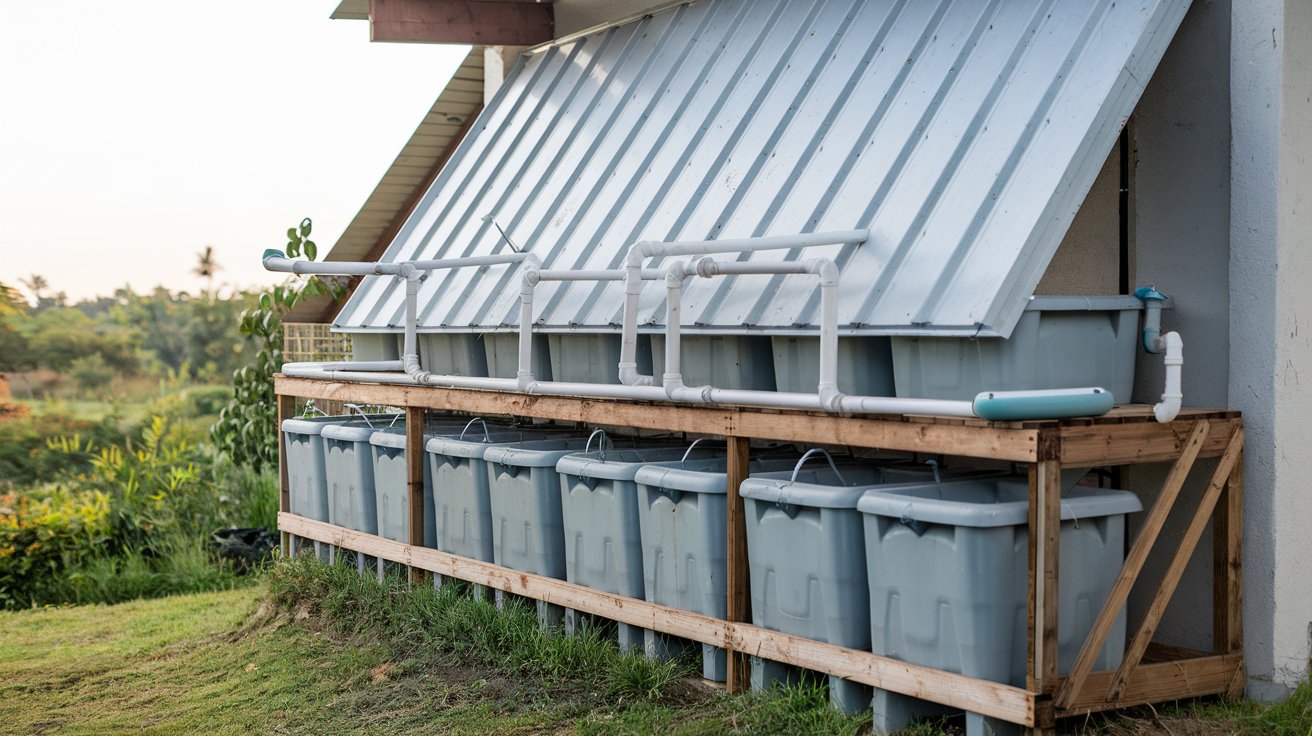
As homeowners, we are constantly looking for ways to improve our living spaces, reduce our environmental footprint, and save on utility bills. One of the most effective and sustainable methods to achieve these goals is by implementing a DIY rainwater harvesting system. This practice, which has been around for thousands of years, involves collecting and storing rainwater from your roof for later use in gardening, irrigation, and even household chores. In this article, we will delve into the world of rainwater harvesting, exploring its benefits, the materials needed, and step-by-step instructions on how to set up a DIY system.
Benefits of Rainwater Harvesting
Rainwater harvesting offers numerous advantages that make it an attractive option for homeowners:
-
Water Conservation: By collecting rainwater, you reduce your reliance on municipal water supplies. This not only saves you money on your water utility bills but also helps conserve this precious resource for future generations.
-
Efficient Landscaping: Plants prefer rainwater to treated tap water. Using rainwater for irrigation can lead to healthier plants and a more vibrant garden.
-
Reduced Stormwater Runoff: By capturing rainwater, you reduce the amount of stormwater that enters the drainage system. This helps prevent flooding and minimizes the amount of pollutants that enter local waterways.
-
Lower Carbon Footprint: The energy required to treat and distribute tap water is significant. By using rainwater, you reduce the demand on municipal water treatment plants, thereby lowering your carbon footprint.
-
Cost-Effective: While the initial setup may require some investment, rainwater harvesting systems can pay for themselves over time by reducing your water bills.
Materials Needed
To build a DIY rainwater harvesting system, you will need the following materials:
-
Food-Grade Plastic Drums or IBC Totes:
- These containers are essential for storing the collected rainwater. You can use either 55-gallon food-grade plastic drums or intermediate bulk containers (IBCs) that hold 275 gallons each.
-
Gutters and Downspouts:
- Ensure your gutters are clean and functioning properly to direct rainwater towards the collection system.
-
PVC Pipes and Fittings:
- These are used to connect the gutters to the collection containers and to create a network for distributing the collected water.
-
Filters and Screens:
- To keep debris out of the collected water, you will need filters and screens. These can be simple mesh screens or more advanced filtration systems.
-
Spigots and Valves:
- Install spigots at the base of each container for easy access to the collected water. Valves can be used to control the flow of water from one container to another.
-
Drill and Drill Bits:
- A drill is necessary for making holes in the containers for spigots and valves.
-
PVC Cleaner and Cement:
- These are used to ensure a watertight seal when connecting PVC pipes.
-
Decorative Materials (Optional):
- If you want to add some personality to your rain barrels, you can use spray paint, acrylic paint, or cover them with materials like wood or bamboo.
Step-by-Step Instructions
Step 1: Choose Your Collection Containers
You can use either 55-gallon food-grade plastic drums or IBCs that hold 275 gallons each. If you opt for IBCs, ensure they are food-grade and free from any contaminants.
Example Using IBCs:
- Purchase: You can find IBCs on Facebook Marketplace, local farming stores, or online.
- Cleaning: Rinse out any previous contents from the IBCs. For example, if they previously held vitamin C or bentonite clay, rinse them thoroughly before use.
- Placement: Position the IBCs in a convenient location where they can be easily accessed.
Step 2: Connect Gutters to Collection Containers
- Identify Downspouts: Locate the downspouts from your gutters.
- Cut PVC Pipes: Cut PVC pipes to connect the downspouts to the collection containers.
- Use Flex-Elbow: Use a flex-elbow to connect the PVC pipes to the downspouts for easier installation.
- Secure Connections: Use PVC cleaner and cement to ensure watertight seals.
Example Using PVC Piping:
- Connect Downspouts: Connect the downspouts directly to the IBCs using PVC pipes.
- Add Filters: Install filters and screens at the inlet of each IBC to prevent debris from entering.
Step 3: Install Spigots and Valves
- Drill Holes: Drill holes in each IBC for spigots.
- Install Spigots: Attach spigots to these holes for easy access to the collected water.
- Add Valves: Install valves between containers if you plan to connect multiple IBCs together.
Example Using Spigots:
- Drill Pilot Bit: Use a small pilot bit to drill pilot holes before installing larger drill bits for spigots.
- Attach Spigots: Attach brass faucets with threaded washers to provide access points for collected rainwater.
Step 4: Decorate Your Rain Barrels (Optional)
If you want to add some personality to your rain barrels, now is the time You can use spray paint or acrylic paint to add designs like images of plants and pollinators.
Example Decorating:
- Painting: Use spray paint or acrylic paint to decorate your rain barrels.
- Covering: Cover your barrels with materials like wood for an old-fashioned look or bamboo for something more natural.
Additional Tips and Considerations
Maintenance
Regular maintenance is crucial for keeping your rainwater harvesting system clean and functional:
- Check Gutters Regularly: Ensure your gutters are clean and functioning properly.
- Inspect Filters: Regularly inspect filters and replace them if necessary.
- Drain Containers: Drain containers periodically to prevent stagnation.
Legal Considerations
While rainwater harvesting is legal in all 50 states, there may be local regulations or homeowners association (HOA) rules that need to be considered:
- Check Local Laws: Research local laws regarding rainwater harvesting.
- Consult HOA: If you live in an area with an HOA, consult their rules regarding rain barrels.
Real-Life Examples
Example 1: Using IBCs
Phil from Earth Nails and Tails created a DIY rainwater collection system using three IBCs that hold over 800 gallons of water. He designed this system to capture and store a week and a half's worth of water for his garden, ensuring that his plants receive enough water even during dry weeks.
Example 2: Building a Rain Barrel
The Tarrant County Master Gardeners built a simple rain barrel using a 55-gallon food-grade plastic drum. They provided step-by-step instructions on how to build, paint, and set up the barrel for efficient rainwater harvesting.
Example 3: Advanced Setup
A Reddit user shared an advanced setup using two 1000-liter IBC containers connected to gutters and a pump. This system not only provides water for gardening but also serves as a backup during emergency situations.
Conclusion
Implementing a DIY rainwater harvesting system is an excellent way to upgrade your home's exterior while contributing to environmental sustainability. By following these steps and considering additional tips, you can create a functional and efficient system that benefits both your garden and your wallet. Whether you choose to use IBCs or traditional rain barrels, the process is rewarding and can be tailored to fit your specific needs. So why not start saving rainwater today?
By implementing a DIY rainwater harvesting system, you are not only improving your home's exterior but also contributing to a more sustainable future. With the right materials and a bit of creativity, you can create a system that meets all your needs while reducing your reliance on municipal water supplies. Whether you're a seasoned gardener or just starting out, this practice offers numerous benefits that make it an attractive option for any homeowner looking to make a positive impact on the environment.
Was this page helpful?
At Storables.com, we guarantee accurate and reliable information. Our content, validated by Expert Board Contributors, is crafted following stringent Editorial Policies. We're committed to providing you with well-researched, expert-backed insights for all your informational needs.


0 thoughts on “Upgrading Your Home’s Exterior With DIY Rainwater Harvesting System”