Home>Ideas and Tips>Upgrading Your Home’s Garage With DIY Hydronic Heating System
Ideas and Tips
Upgrading Your Home’s Garage With DIY Hydronic Heating System
Modified: October 20, 2024
Upgrade your garage with a DIY hydronic heating system for efficient, cost-effective warmth. Learn the benefits, installation steps, and tips for success.
(Many of the links in this article redirect to a specific reviewed product. Your purchase of these products through affiliate links helps to generate commission for Storables.com, at no extra cost. Learn more)
Introduction
As the seasons change, many homeowners find themselves facing the challenge of keeping their garages warm and comfortable. Traditional heating methods like electric space heaters or forced-air systems can be inefficient and costly. One alternative solution that has gained popularity in recent years is the DIY hydronic heating system. This method involves circulating warm water through pipes to heat the garage floor, providing a more efficient and cost-effective way to maintain a warm environment.
In this article, we will delve into the world of DIY hydronic heating systems, exploring their benefits, installation process, and potential challenges. Whether you're a seasoned DIY enthusiast or a homeowner looking to upgrade your garage, this guide will provide you with the necessary information to make an informed decision.
Benefits of Hydronic Heating Systems
Hydronic heating systems offer several advantages over traditional heating methods:
-
Efficiency: Hydronic systems use circulating warm water to heat the garage floor, which is generally more efficient than electric space heaters. The water temperature can be set between 55°F to 70°F (13°C to 21°C), providing consistent warmth without overheating the space.
-
Cost-Effectiveness: While the initial installation cost of a hydronic system can be higher, it is often more cost-effective in the long run. The operating costs are typically lower compared to electric systems, especially for larger spaces like garages.
-
Comfort: Hydronic systems provide a more even distribution of heat across the floor, ensuring that the entire garage remains warm and comfortable. This is particularly beneficial for garages used for working or storing vehicles during the winter months.
-
Aesthetics: Unlike traditional baseboard heaters or forced-air systems, hydronic heating systems can be installed under the floor, leaving the space clutter-free and visually appealing.
-
Durability: The tubing used in hydronic systems is typically made from PEX (cross-linked polyethylene), which is durable and resistant to leaks. The lifespan of the tubing can range from 20 to 30 years, making it a long-term solution for garage heating.
Components of a Hydronic Heating System
To install a DIY hydronic heating system in your garage, you'll need several key components:
-
Pipes and Tubing: The most common type of tubing used is PEX (cross-linked polyethylene). It comes in long rolls, reducing the number of joints and making it more reliable and durable.
-
Manifold: A manifold is used to distribute the hot water from the boiler or water heater to the various zones of the garage. It typically includes supply and return lines.
-
Boiler or Water Heater: You can use either a boiler or an electric water heater for your hydronic system. Boilers are more common but may require additional components like expansion tanks and pressure gauges.
-
Circulation Pump: A circulation pump is necessary to circulate the warm water through the pipes. It should be compatible with your chosen boiler or water heater.
-
Thermostat: A thermostat controls the temperature of the water circulating through the system, ensuring that it stays within a comfortable range.
-
Insulation and Vapor Barrier: Proper insulation and a vapor barrier are crucial to prevent heat loss and ensure that the system operates efficiently.
Step-by-Step Installation Guide
Step 1: Measure and Plan Your Garage
Before starting the installation process, measure your garage floor space accurately. This will help you determine how much material you need to purchase.
Step 2: Prepare the Floor
Ensure that your garage floor is clean and dry. If necessary, apply a vapor barrier between the ground and concrete to prevent moisture from entering the system.
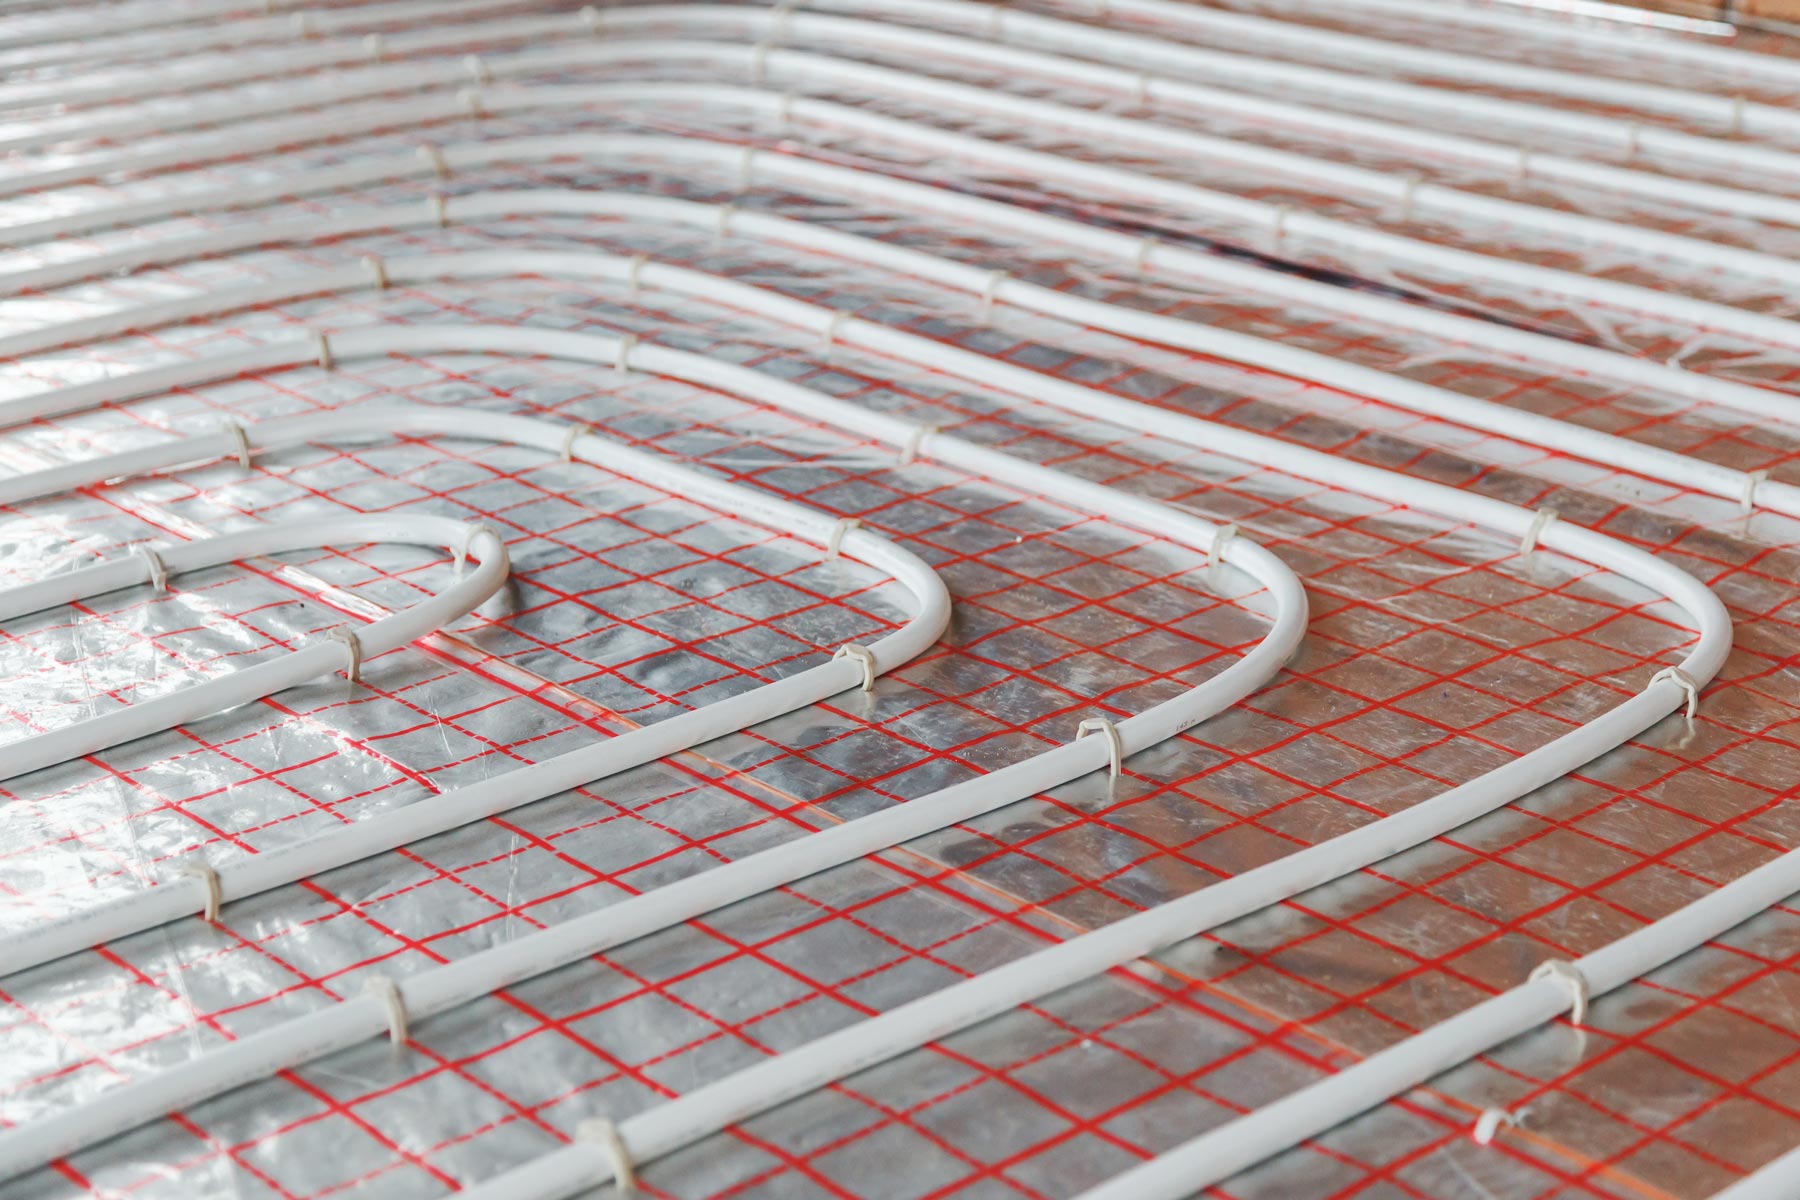
Step 3: Lay Down Insulation Panels
Hydronic systems often require insulation panels specifically designed for this purpose. These panels provide mechanical connections to the tubing and have built-in vapor barriers, making installation easier and more efficient.
- Starting at the Corner: Begin by laying down a full panel at one corner of the garage where connections to electricity and water will be located.
- Interlocking Panels: Snap another panel to it in any direction, creating an interlocking pattern similar to toy bricks.
- Cutting Panels: When reaching the opposite wall, cut the next panel in half to prevent two panels from sharing a joint, which can retard future cracking of the concrete.
- Covering Entire Area: Continue until the entire area is covered with insulation panels.
Step 4: Install PEX Tubing
Once you have laid down the insulation panels, you can start installing PEX tubing.
- Laying Down Tubing: Begin by laying down PEX tubing along the floor, ensuring that it is securely attached to the insulation panels.
- Avoiding Obstacles: Avoid running tubing under cabinets or other obstacles as heat trapped under these areas can be problematic. Leave at least 4 inches of space around these areas.
Step 5: Connect Tubing to Manifold
Connect the PEX tubing to a manifold which will distribute hot water from the boiler or water heater to different zones of the garage.
Step 6: Install Boiler or Water Heater
Choose either a boiler or an electric water heater for your system. Boilers are more common but may require additional components like expansion tanks and pressure gauges.
Step 7: Install Circulation Pump
Install a circulation pump compatible with your chosen boiler or water heater. This pump will circulate warm water through the pipes ensuring consistent heat distribution.
Step 8: Add Thermostat Control
Install a thermostat that controls temperature settings for optimal comfort without overheating or wasting energy.
Step 9: Test and Inspect
After completing all installations, test your system thoroughly to ensure it is functioning correctly. Inspect for any leaks or issues that may arise during operation.
Read more: Upgrading Your Garage Door For Curb Appeal
Common Challenges and Solutions
While installing a DIY hydronic heating system can be rewarding, it also comes with its own set of challenges:
-
Complexity: Hydronic systems can become complex due to multiple components involved. However, manufacturers have improved installation processes by combining components and reducing complexity.
-
Leaks: Leaks are common in plumbing systems but can be minimized by using PEX tubing which has fewer joints compared to standard plumbing pipes.
-
Insulation Issues: Proper insulation is crucial to prevent heat loss but can be challenging especially when dealing with uneven floors or obstacles like cabinets.
-
Pressure Issues: Ensure that your system operates within safe pressure limits by installing appropriate pressure gauges and expansion tanks if necessary.
-
Maintenance: Regular maintenance is essential for extending the lifespan of your system components like pumps and boilers.
Case Studies and Real-Life Examples
Example 1: Garage Floor Radiant Heating
Installing hydronic radiant heating in garages is usually done when a new pad is being poured but can also be installed over old concrete with new concrete added on top. The cost for a garage floor heating system varies from region to region but expect to pay between $8-$20 USD per square foot. Hydronic systems are efficient and do not usually operate 24 hours a day, making them cost-effective in terms of operating costs.
Example 2: DIY Hydronic Heat in Garage
A homeowner successfully installed a DIY hydronic heat system in their 30×60 garage using PEX tubing in six loops. They calculated BTU requirements using LoopCAD software and chose a Taco 0014 pump along with an RL94IN tankless water heater for efficient circulation. This example highlights how homeowners can take charge of their garage heating needs with proper planning and execution.
Example 3: Retrofitting Existing Systems
Retrofitting existing homes with hydronic radiant floor heating systems can be challenging but rewarding. One homeowner described ripping out all floors and subfloors to install warmboard costing around $15 per square foot. This example underscores the significant undertaking involved in retrofitting but also highlights potential aesthetic benefits like reclaiming floor space and improving room flexibility.
Conclusion
Upgrading your home's garage with a DIY hydronic heating system offers numerous benefits including efficiency, cost-effectiveness, comfort, aesthetics, and durability. By following the step-by-step guide outlined above and being aware of common challenges along with their solutions, homeowners can successfully install these systems ensuring their garages remain warm and comfortable throughout the year. Whether you're looking to melt snow off your minivan or keep tools from freezing during winter months, investing in a hydronic heating system is an excellent choice for any homeowner seeking reliable garage heating solutions.
Additional Tips and Considerations
-
Consult Professionals: While DIY projects are rewarding, consulting professionals especially when dealing with complex systems like hydronics can provide valuable insights and avoid costly mistakes.
-
Manufacturer Support: Manufacturers often have design experts available specifically to reduce costly mistakes during installation.
-
Regular Maintenance: Regular maintenance is essential for extending the lifespan of your system components like pumps and boilers.
-
Energy Efficiency: Ensure that your system operates efficiently by setting appropriate temperature settings on your thermostat and avoiding unnecessary heat distribution under obstacles like cabinets.
-
Local Regulations: Check local regulations regarding electrical connections and ensure compliance with safety standards when installing any heating system in your garage.
By following these guidelines and considering real-life examples from case studies, homeowners can confidently embark on their journey towards upgrading their garages with efficient DIY hydronic heating systems.
Was this page helpful?
At Storables.com, we guarantee accurate and reliable information. Our content, validated by Expert Board Contributors, is crafted following stringent Editorial Policies. We're committed to providing you with well-researched, expert-backed insights for all your informational needs.

0 thoughts on “Upgrading Your Home’s Garage With DIY Hydronic Heating System”