Articles
How To Clean Hamilton Beach Juicer
Modified: October 20, 2024
Looking for articles on how to clean your Hamilton Beach juicer? Check out our comprehensive guide to keep your juicer in top shape and ensure long-lasting performance.
(Many of the links in this article redirect to a specific reviewed product. Your purchase of these products through affiliate links helps to generate commission for Storables.com, at no extra cost. Learn more)
Introduction
Welcome to the ultimate guide on how to clean your Hamilton Beach Juicer. Whether you are a health enthusiast who loves fresh juices or simply someone who enjoys the convenience and taste of homemade juice, it is important to properly clean your juicer to maintain its optimal performance and ensure the longevity of the machine. Cleaning your juicer on a regular basis not only helps remove any buildup or residue, but it also ensures that your juices remain fresh and free from any contaminants.
In this article, we will take you through a step-by-step process on how to clean your Hamilton Beach Juicer effectively. We will also share some important safety precautions to keep in mind, as well as provide tips for regular maintenance to keep your juicer in top-notch condition.
Before we dive into the cleaning techniques, it is crucial to emphasize the importance of following the manufacturer’s instructions. Different juicer models may have specific cleaning instructions, so always refer to the user manual for guidance. With that said, let’s get started with the cleaning process!
Key Takeaways:
- Keep your Hamilton Beach Juicer in top-notch condition by following safety precautions, disassembling, and cleaning each part with care. Utilize natural cleaners to remove stains and residue for a pristine juicing experience.
- Regular maintenance, such as trimming fibrous produce and checking for wear and tear, ensures your juicer’s longevity. Store it in a dry place and clean the motor vent for optimal performance.
Read also: 15 Best Juicer Hamilton Beach for 2025
Safety Precautions
Before you begin the cleaning process, it is essential to prioritize safety. Here are some important safety precautions to follow when cleaning your Hamilton Beach Juicer:
- Unplug the Juicer: Always make sure to unplug the juicer from the power source before starting any cleaning. This will prevent any accidental starting of the machine during the cleaning process.
- Allow the Juicer to Cool Down: If you have recently used the juicer, allow it to cool down before disassembling and cleaning. Hot parts can cause burns or damage to the juicer.
- Handle Sharp Parts with Care: Some parts of the juicer, such as the cutting blades or mesh filters, may have sharp edges. Use caution when handling these parts to avoid any injuries.
- Use Non-Abrasive Cleaning Materials: When choosing cleaning materials, opt for non-abrasive sponges or brushes to prevent scratching the juicer’s surfaces.
- Do Not Submerge the Motor Base: The motor base of the juicer contains electrical components and should never be submerged in water. Only the removable parts should be cleaned with water.
- Do Not Use Harsh Chemicals: Avoid using harsh chemicals or abrasive cleaners to clean your juicer, as these can damage the plastic parts or leave a residue that may affect the taste of your juices.
- Follow All Manufacturer’s Instructions: Each Hamilton Beach Juicer model may have specific cleaning instructions provided by the manufacturer. It is important to read and follow these instructions to ensure proper cleaning and maintenance of your juicer.
By following these safety precautions, you will not only protect yourself from potential harm but also safeguard the integrity and functionality of your Hamilton Beach Juicer. Now that we have covered the safety aspects, let us move on to the process of disassembling the juicer for cleaning.
Disassembling the Juicer
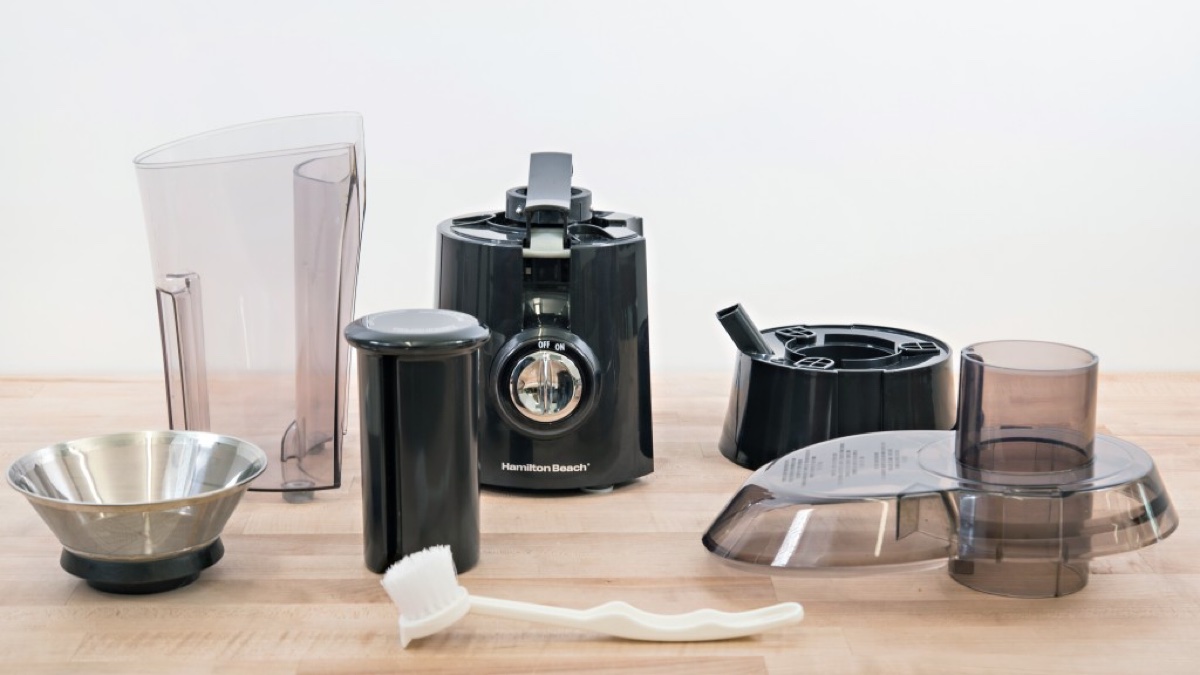
Before you can start cleaning your Hamilton Beach Juicer, you need to disassemble it into its individual parts. Follow these steps to properly disassemble the juicer:
- Turn off and unplug the juicer: Ensure that the juicer is turned off and unplugged from the power source before starting the disassembly process.
- Remove the pulp container and juice pitcher: Lift off the pulp container from the top of the juicer and remove the juice pitcher from the spout.
- Unlock and remove the locking bar: Locate the locking bar on the juicer’s lid and rotate it counterclockwise to unlock. Lift the bar out of the notches and set it aside.
- Lift off the lid: Grab the juicer’s lid and lift it off the juicer’s body, exposing the cutter assembly and filter basket.
- Remove the cutter assembly: Hold the cutter assembly by the handle and gently lift it out of the machine. Be cautious as the cutter may still have some juice residues.
- Remove the filter basket: Grasp the filter basket, located underneath the cutter assembly, and lift it out of the juicer.
- Detach the food pusher: If your juicer model has a food pusher, remove it by pulling it out from the feed chute.
Now that you have successfully disassembled your Hamilton Beach Juicer, you are ready to proceed with cleaning the individual parts. Each part requires proper attention and care to ensure thorough cleaning and efficient operation. In the next section, we will guide you through the cleaning process for each of the juicer’s removable parts.
Cleaning the Removable Parts
Now that you have disassembled your Hamilton Beach Juicer, it’s time to focus on cleaning the individual removable parts. Here is a step-by-step guide on how to clean each part:
- Pulp Container and Juice Pitcher: Rinse the pulp container and juice pitcher with warm soapy water. Use a non-abrasive sponge or brush to remove any pulp or juice residue. Rinse thoroughly and allow them to air dry.
- Lid, Cutter Assembly, and Filter Basket: Place the lid, cutter assembly, and filter basket under running water to remove any large debris. Gently scrub with a sponge or brush using warm soapy water to remove any remaining residue. Pay close attention to the mesh filter, as it can accumulate pulp and fiber. Rinse thoroughly to ensure all soap is removed.
- Food Pusher: If your juicer came with a food pusher, wash it with warm soapy water and remove any food particles or residue. Rinse well and let it air dry.
- Brush for Cutter Assembly: Some juicers come with a brush specifically designed to clean the cutter assembly. Use the brush to remove any stubborn pulp or fiber stuck in the blade area. Rinse the brush after each use and let it air dry.
It is important to note that all removable parts, except for the motor base, can be washed with warm soapy water. Avoid using abrasive cleaners or scrubbing too vigorously as this can cause damage to the parts.
If you encounter any stubborn stains or residue, the next section will provide you with effective techniques to remove them. Continue reading to learn how to restore your juicer’s parts to their pristine condition.
Removing Stains and Residue
Over time, your Hamilton Beach Juicer may develop stains or stuck-on residue, especially on the cutter assembly and filter basket. Here are some effective techniques to help you remove these stains and restore your juicer’s parts:
- Vinegar and Baking Soda Solution: Create a cleaning solution by mixing equal parts of white vinegar and baking soda. Place the stained parts, such as the cutter assembly and filter basket, in a sink or large bowl. Pour the solution over the parts and let them soak for about 30 minutes. Use a sponge or brush to scrub away any stains or residue. Rinse well with water and dry thoroughly.
- Lemon Juice: Cut a lemon in half and squeeze the juice onto the stained parts. Rub the lemon halves on the stains, allowing the natural acidity of the lemon juice to break down the residue. Afterward, rinse the parts with water and dry them thoroughly.
- Baking Soda Paste: Create a paste by mixing baking soda with water until it forms a thick consistency. Apply the paste onto the stained parts and let it sit for about 15 minutes. Scrub the parts using a sponge or brush, paying close attention to the stained areas. Rinse well with water and dry thoroughly.
- Denture Cleaning Tablets: Fill a sink or large bowl with warm water and drop in a few denture cleaning tablets. Place the stained parts into the water, ensuring they are fully submerged. Let them soak for the recommended time specified on the denture cleaning tablet package. Remove the parts, rinse thoroughly with water, and dry them completely.
Remember to rinse all cleaning solutions off the parts thoroughly after cleaning. Residue from cleaning products can affect the taste and quality of your juice if not completely removed. Ensure that all parts are dry before reassembling the juicer to prevent any moisture-related issues.
Now that you have successfully removed stains and residue from your juicer’s parts, let’s move on to the next step of cleaning: the motor base.
To clean a Hamilton Beach juicer, disassemble the parts and rinse them with warm, soapy water. Use a brush to remove any pulp or residue, then dry thoroughly before reassembling.
Cleaning the Motor Base
While the removable parts of your Hamilton Beach Juicer are cleaned with water and mild detergent, the motor base requires a slightly different approach to ensure its longevity:
- Unplug the Juicer: Always make sure your juicer is unplugged from the power source before cleaning the motor base.
- Damp Cloth or Sponge: Use a damp cloth or sponge to gently wipe the motor base. Avoid using excessive water or submerging the base in water, as it contains electrical components and should not come into contact with moisture.
- Avoid Harsh Chemicals: Refrain from using harsh chemicals or abrasive cleaners on the motor base. These can damage the surface or affect the electrical components.
- Dry Thoroughly: After wiping the motor base, ensure it is completely dry before reassembling the juicer. Moisture can cause electrical shorts or damage to the machine.
By following these simple steps, you can keep the motor base of your Hamilton Beach Juicer clean and free from dirt and dust. Now it’s time to move on to the next and final steps: drying the juicer parts and reassembling the juicer.
Drying and Reassembling the Juicer
After cleaning all the individual parts of your Hamilton Beach Juicer, it’s important to ensure they are thoroughly dry before reassembling the juicer. Here are the steps to follow:
- Drying the Parts: Use a clean towel or allow the parts to air dry completely. Pay special attention to areas that may have collected water, such as the mesh filter, cutter assembly, and juicer lid.
- Inspect for Residue: After drying, examine all the parts to ensure there is no leftover residue or moisture. Any remaining residue can affect the taste and quality of your juices, so it’s important to make sure everything is clean and dry.
- Reassembling the Juicer: Once all the parts are dry and clean, start reassembling the juicer. Follow the reverse order of the disassembly process, starting with placing the filter basket into the juicer’s body, followed by the cutter assembly, lid, locking bar, and finally, the pulp container and juice pitcher.
- Locking the Lid: Ensure that the juicer’s lid is properly aligned and locked in place using the locking bar. This will prevent any accidents during juicing.
Once the juicer is reassembled, plug it in and conduct a quick test to ensure everything is functioning correctly before using it for juicing. If any issues arise, refer to the manufacturer’s manual or contact Hamilton Beach customer support for assistance.
Now that your Hamilton Beach Juicer is clean, dry, and ready to use, let’s move on to some important tips for regular maintenance to keep your juicer in optimal condition.
Regular Maintenance Tips
In addition to cleaning your Hamilton Beach Juicer after each use, there are a few key tips for regular maintenance that can help keep your juicer performing at its best:
- Trim Fibrous Fruits and Vegetables: Before juicing fibrous fruits or vegetables, such as celery or kale, it’s recommended to trim them into smaller pieces. This will help prevent clogging and minimize strain on the juicer’s motor.
- Alternate Between Soft and Hard Produce: To maximize juicing efficiency, alternate between juicing soft fruits and hard vegetables. This will help the juicer extract the juice more effectively, extending its lifespan.
- Remove Seeds and Pits: Remove any seeds, pits, or large seeds before juicing. Hard seeds can damage the cutting blade and filter, and may even cause the juicer to become jammed.
- Regularly Check for Wear and Tear: Regularly inspect the cutter assembly, filter basket, and other parts for signs of wear and tear. Replace any damaged or worn-out parts to maintain optimal juicer performance.
- Store in a Dry and Clean Place: After cleaning and drying the juicer, store it in a dry and clean place. Avoid storing it near water sources or in a damp environment to prevent mold or mildew growth.
- Follow Recommended Usage Guidelines: Refer to the user manual for recommended usage guidelines, including maximum juicing time and quantities. Overusing the juicer or exceeding its capacity may strain the motor and reduce its lifespan.
- Regularly Clean the Motor Vent: The motor vent is located on the bottom or back of the juicer. Use a soft brush or cloth to remove any dust or debris from the vent to maintain good airflow and prevent overheating.
By following these regular maintenance tips, you can prolong the life of your Hamilton Beach Juicer and ensure it continues to produce delicious and nutritious juices for years to come. Now that you have all the necessary information for cleaning and maintaining your juicer, let’s conclude this guide.
Conclusion
Congratulations, you have now learned how to effectively clean and maintain your Hamilton Beach Juicer! By following the step-by-step cleaning process, prioritizing safety precautions, and incorporating regular maintenance tips, you can ensure that your juicer remains in optimal condition, providing you with delicious and nutritious juices for years to come.
Remember to always unplug the juicer and follow the manufacturer’s instructions when cleaning. Disassemble the juicer carefully, cleaning each removable part with warm soapy water. For stubborn stains and residue, utilize natural cleaners like vinegar, lemon juice, or baking soda. Take extra care when cleaning the motor base, using a damp cloth or sponge to wipe away any dirt or dust.
In addition to cleaning, regular maintenance practices such as trimming fibrous produce, alternating between soft and hard ingredients, and checking for wear and tear will help keep your juicer running smoothly and efficiently. Storing the juicer in a dry and clean place and regularly cleaning the motor vent are also important steps to maintain its longevity.
By following these guidelines, you can ensure the longevity and optimal performance of your Hamilton Beach Juicer. So go ahead, enjoy the convenience of homemade juices while knowing that your juicer is clean and well-maintained.
Remember, a clean juicer not only means better-tasting juices but also promotes your health and well-being. Cheers to a refreshing and vibrant juicing experience!
Frequently Asked Questions about How To Clean Hamilton Beach Juicer
Was this page helpful?
At Storables.com, we guarantee accurate and reliable information. Our content, validated by Expert Board Contributors, is crafted following stringent Editorial Policies. We're committed to providing you with well-researched, expert-backed insights for all your informational needs.

0 thoughts on “How To Clean Hamilton Beach Juicer”