
Articles
How To Cook Chickpeas In Air Fryer
Modified: December 6, 2023
Learn how to cook chickpeas in an air fryer and discover new ways to enjoy this healthy legume. Find expert tips and delicious recipes in our informative articles.
(Many of the links in this article redirect to a specific reviewed product. Your purchase of these products through affiliate links helps to generate commission for Storables.com, at no extra cost. Learn more)
Introduction
Welcome to the world of air frying, where we can transform simple ingredients into delicious and healthy dishes. In this article, we will explore how to cook chickpeas in an air fryer, unlocking a whole new level of flavor and texture.
Chickpeas, also known as garbanzo beans, are not only a staple in many cuisines but also packed with nutrients. They are a great source of protein, fiber, and essential minerals, making them a fantastic addition to any diet. Traditionally, chickpeas are cooked by boiling or soaking overnight. However, cooking them in an air fryer offers a convenient and alternative method that doesn’t compromise on taste or nutrition.
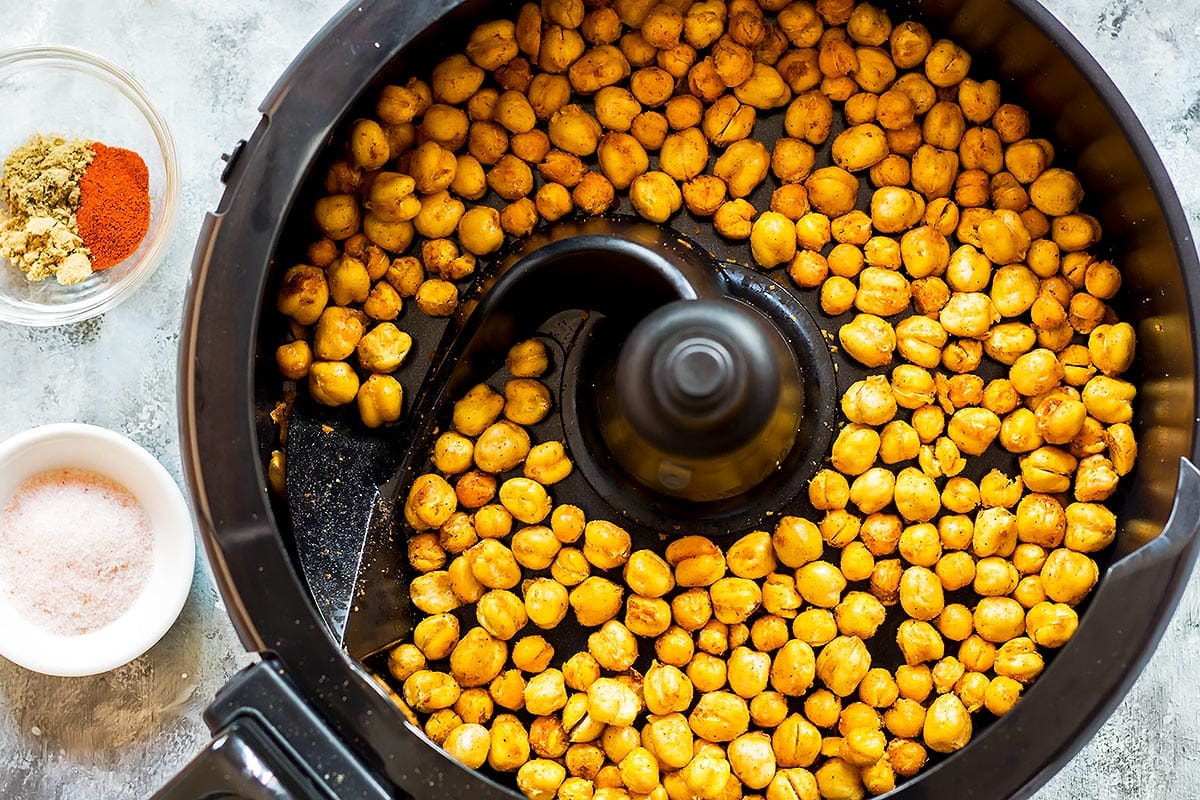
One of the greatest advantages of cooking chickpeas in an air fryer is the crispy texture that can be achieved. The air fryer uses hot air circulation to cook food, resulting in a crunchy exterior and a tender interior. This makes it perfect for recreating the satisfying crunch of fried chickpeas without the excessive oil.
Moreover, air frying chickpeas allows for a variety of seasoning and flavoring options. Whether you prefer a classic savory taste, a spicy kick, or a hint of sweetness, the air fryer can help you achieve the perfect flavor profile. From simple salt and pepper to bold spices and herbs, the possibilities are endless.
So, let’s dive into the world of air frying chickpeas and discover how to achieve that perfect crispy texture and mouthwatering flavors. Get ready to tantalize your taste buds and impress your friends and family with this simple yet impressive snack or meal option.
Key Takeaways:
- Air frying chickpeas offers a healthier, crispy, and flavorful alternative to traditional cooking methods. With endless seasoning options, it’s a versatile snack or meal addition that’s quick and convenient to prepare.
- From classic salt and pepper to spicy buffalo and sweet cinnamon sugar, air-fried chickpeas cater to diverse flavor preferences. Enjoy them as a snack, salad topping, or in creative recipes for a satisfying crunch and burst of taste.
Read more: How To Store Chickpeas
Benefits of Cooking Chickpeas in an Air Fryer
Cooking chickpeas in an air fryer offers several benefits that make it an attractive cooking method for this versatile legume. Let’s explore some of the advantages:
1. Crispy Texture:
One of the main benefits of air frying chickpeas is the ability to achieve a crispy texture. The hot air circulation in the air fryer helps to evenly cook and crisp up the chickpeas, providing a satisfying crunch without the need for excessive oil. This makes them a healthier alternative to traditional deep-fried snacks.
2. Healthier Option:
Air frying significantly reduces the amount of oil needed to cook chickpeas. By using just a small amount of oil or even opting for oil-free recipes, you can enjoy the same flavorful results with fewer calories and less saturated fat. This makes air-fried chickpeas a healthier alternative to their fried counterparts.
3. Time-Saving:
Cooking chickpeas in an air fryer can save you time compared to traditional stovetop or oven methods. The air fryer preheats quickly and cooks food faster due to the intense heat and circulation. This means you can enjoy crispy chickpeas in a fraction of the time it would take using other cooking methods.
Read more: How To Grill Chicken In Air Fryer
4. Versatile Seasoning Options:
Air frying allows you to experiment with various seasonings and flavors to customize your chickpeas. Whether you prefer a classic combination of salt and pepper, a spicy buffalo kick, or a sweet and savory mix, the air fryer can help you achieve your desired flavor profile. The seasoning options are only limited by your creativity and taste preferences.
5. Multiple Uses:
Air-fried chickpeas are not only a delicious snack but also a versatile ingredient that can be used in a variety of dishes. You can toss them in salads, sprinkle them over soups and stews, or even use them as a flavorful topping for roasted vegetables. The crispy texture and nutty flavor of air-fried chickpeas add depth and excitement to any meal.
With these benefits in mind, it’s no wonder that air frying chickpeas has gained popularity among health-conscious individuals and food enthusiasts. It offers a healthier and quicker cooking method while delivering a satisfying crunch and a range of delicious flavors. So, let’s move on to the next section and learn how to prepare chickpeas for air frying.
Preparing Chickpeas for Air Frying
Before you can start air frying chickpeas, it’s essential to properly prepare them. Here’s a step-by-step guide to get your chickpeas ready:
1. Soaking and Cooking:
If you’re using dried chickpeas, start by soaking them in water overnight or for at least 8 hours. Soaking helps to soften the chickpeas and reduce their cooking time. After soaking, rinse the chickpeas and transfer them to a pot. Cover with fresh water and bring to a boil. Reduce the heat and simmer for about 1-2 hours, or until the chickpeas are tender. Alternatively, you can use canned chickpeas, which are already cooked and require no pre-soaking.
Read more: How To Reheat Shrimp In Air Fryer
2. Draining and Drying:
Once the chickpeas are cooked, drain them and rinse with cold water to cool them down. To achieve crispy results in the air fryer, it’s crucial to remove as much moisture as possible. Pat the chickpeas dry with a clean kitchen towel or paper towels to help eliminate excess water.
3. Removing Skins (Optional):
If desired, you can remove the skins from the chickpeas to further enhance the crispy texture. This step is optional but can make a difference. Simply place the cooked chickpeas in a clean kitchen towel and gently rub them to loosen the skins. Remove the skins and discard them.
4. Seasoning:
Now it’s time to give your chickpeas a burst of flavor. Transfer the drained and dried chickpeas to a bowl and add your preferred seasonings. You can keep it simple with salt and pepper, or get creative with spices like paprika, cumin, garlic powder, or chili powder. Toss the chickpeas well to ensure they are evenly coated with the seasonings.
5. Preheating the Air Fryer:
Preheat your air fryer to around 400°F (200°C) for a few minutes. Preheating is important to ensure even cooking and crispy results.
With your chickpeas prepared and seasoned, you’re now ready to move on to the next step: air frying. In the next section, we’ll guide you through the process of air frying chickpeas to perfection!
Read more: How To Dehydrate Fruit In Air Fryer
Seasoning and Flavoring Options
When it comes to seasoning and flavoring air-fried chickpeas, the possibilities are endless. Whether you prefer savory, spicy, or sweet flavors, there’s a seasoning combination to suit every taste. Here are some popular options to inspire your culinary creativity:
1. Classic Salt and Pepper:
Keep it simple yet delicious with a generous sprinkle of sea salt and freshly ground black pepper. This classic combination enhances the natural nutty flavor of chickpeas while adding just the right amount of seasoning.
2. Smoky Paprika:
Add a smoky and slightly sweet flavor to your chickpeas with smoked paprika. This seasoning pairs well with the nuttiness of chickpeas and creates a rich, complex taste.
3. Spicy Buffalo:
For those who enjoy a little heat, try tossing your chickpeas in a mixture of hot sauce, garlic powder, and a pinch of cayenne pepper. This gives your chickpeas a tangy and spicy flavor reminiscent of classic buffalo wings.
Read more: How To Cook Squash In Air Fryer
4. Mediterranean Herb Blend:
Transport your taste buds to the Mediterranean with a blend of herbs such as dried oregano, thyme, and rosemary. This combination adds a fragrant and savory element to your chickpeas.
5. Curry Powder:
Add an aromatic and slightly spicy kick to your chickpeas with curry powder. This versatile spice mix brings depth of flavor and pairs well with the earthiness of chickpeas.
6. Sweet Cinnamon Sugar:
If you prefer a sweet treat, try sprinkling your chickpeas with a mixture of cinnamon and sugar. This creates a delightful sweet and crunchy snack that can satisfy your dessert cravings.
Remember, these are just a few seasoning ideas to get you started. Don’t be afraid to experiment with different combinations of spices, herbs, or even sauces to find your favorite flavor profile. The air fryer’s intense heat will help to seal in the flavors and create a deliciously crispy coating on your chickpeas.
With your chickpeas seasoned to perfection, it’s time to dive into the air frying process. In the next section, we’ll guide you through step-by-step instructions on how to achieve crispy and flavorful chickpeas in the air fryer. Get ready to satisfy your crunch cravings!
Air Frying Chickpeas Step-by-Step
Now that your chickpeas are seasoned and ready to go, it’s time to air fry them to achieve that perfect combination of crispiness and flavor. Follow these step-by-step instructions for delicious results:
Read more: How To Cook Zucchini In Air Fryer
Step 1: Preheat the Air Fryer
Preheat your air fryer to around 400°F (200°C) for a few minutes. Preheating ensures that the chickpeas cook evenly and become crispy.
Step 2: Transfer Chickpeas to the Air Fryer Basket
Transfer the seasoned chickpeas to the air fryer basket in a single layer, making sure they are evenly spread out. This allows hot air to circulate and ensures that all chickpeas cook and become crispy.
Step 3: Air Fry for the Initial Time
Start air frying the chickpeas for about 15 minutes. During this initial cooking time, the chickpeas will begin to crisp up and develop a golden color.
Step 4: Shake the Basket
After 15 minutes, carefully remove the air fryer basket and give it a gentle shake to toss and redistribute the chickpeas. This helps to ensure even cooking and prevents any sticking or clumping together.
Read more: How To Turn On Air Fryer
Step 5: Continue Air Frying
Place the basket back into the air fryer and continue cooking for an additional 10-15 minutes. Keep an eye on the chickpeas to prevent them from burning. The cooking time may vary depending on your air fryer and desired level of crispiness.
Step 6: Check for Crispiness
To determine if the chickpeas are done, carefully remove one or two chickpeas and let them cool slightly. Test their crispness and adjust the cooking time accordingly. If they are not crispy enough, put them back in the air fryer for a few more minutes.
Step 7: Cool and Enjoy
Once the chickpeas are cooked to your desired level of crispiness, remove them from the air fryer and let them cool for a few minutes. This allows them to become even crispier. Serve them as a snack or use them in your favorite recipes.
With these simple steps, you can achieve perfectly crispy and flavorful chickpeas in your air fryer. The next section will provide you with some helpful tips to ensure your chickpeas turn out crispy and delicious every time.
Tips for Crispy and Flavorful Chickpeas
To ensure your air-fried chickpeas turn out irresistibly crispy and bursting with flavor, consider these helpful tips:
1. Dry the Chickpeas Thoroughly:
After cooking and draining the chickpeas, make sure to pat them dry with a clean kitchen towel or paper towels. Removing excess moisture is crucial for achieving maximum crispiness in the air fryer.
2. Use a Single Layer:
When placing the seasoned chickpeas in the air fryer basket, be sure to arrange them in a single layer. This allows hot air to circulate around each chickpea evenly, resulting in crispiness throughout.
3. Shake the Basket:
During the cooking process, carefully shake the air fryer basket every 10-15 minutes. This helps to toss and redistribute the chickpeas, ensuring that they cook and crisp up evenly on all sides.
4. Adjust Seasoning and Spices:
If you feel that the seasoning or spices on your chickpeas are not strong enough, you can add more after the initial cooking time. Once you shake the basket, you can sprinkle additional seasoning, such as salt, pepper, or spices, to enhance the flavor to your liking.
Read more: How To Make A Baked Potato In Air Fryer
5. Monitor Cooking Time:
The cooking time may vary from one air fryer to another, as well as depending on the size and type of chickpeas. Keep a close eye on the chickpeas during the cooking process to ensure they become crispy without getting burnt. Adjust the cooking time as needed to achieve your desired level of crunchiness.
6. Cool Completely Before Storing:
Allow the air-fried chickpeas to cool completely before storing them. This ensures that they remain crispy and don’t become soft or soggy. Store them in an airtight container at room temperature for up to a week. However, they are best enjoyed fresh and crispy.
7. Experiment with Different Seasonings:
Don’t be afraid to get creative with your seasoning choices. Explore various spices, herbs, and even different sauces to create unique flavor profiles. The air fryer provides a perfect platform for experimentation and discovering your favorite combination.
By following these tips, you can achieve perfectly crispy and flavorful chickpeas in your air fryer. Whether you’re enjoying them as a healthy snack or incorporating them into your favorite recipes, these crunchy little gems are sure to delight your taste buds.
In the next section, we’ll explore some exciting serving ideas and recipes that will take your air-fried chickpeas to the next level of deliciousness!
Serving Ideas and Recipes
Air-fried chickpeas are incredibly versatile and can be enjoyed in various ways. Here are some serving ideas and recipes to inspire you:
Read more: How Long To Cook Shrimp In The Air Fryer
1. Snack on Their Own:
Serve the crispy chickpeas as a healthy and satisfying snack on their own. Pour them into a bowl and enjoy them as a crunchy alternative to chips or nuts. You can even create a snack mix by combining them with your favorite nuts, seeds, or dried fruits.
2. Salad Topping:
Sprinkle air-fried chickpeas on top of your favorite salads for added crunch and protein. They make a fantastic topping for leafy green salads, grain-based salads, or even pasta salads. The crispy texture and nutty flavor complement a range of salad ingredients, adding depth and excitement to your dish.
3. Buddha Bowl Ingredient:
Incorporate air-fried chickpeas into a nourishing Buddha bowl. Combine them with cooked grains, roasted vegetables, fresh greens, and a flavorful dressing for a well-rounded and satisfying meal. The chickpeas provide a protein-packed element to the bowl, making it even more filling and nutritious.
4. Soup or Stew Garnish:
Sprinkle crispy chickpeas on top of your favorite soup or stew just before serving. They add a delightful crunch and texture while enhancing the overall flavor of the dish. Whether it’s a hearty vegetable soup or a comforting lentil stew, the addition of air-fried chickpeas takes it to another level.
Read more: How To Make Popcorn In Air Fryer
5. Sandwich or Wrap Filling:
Use air-fried chickpeas as a filling in your sandwiches or wraps. They can be mashed slightly to create a chunky spread, or you can leave them whole for added texture. Combined with fresh veggies, greens, and a flavorful sauce, chickpeas make for a satisfying and nutritious sandwich filling.
6. Pasta Topping:
Upgrade your pasta dishes by sprinkling air-fried chickpeas on top. They provide a crispy element that contrasts well with the softness of the pasta. Whether it’s a creamy Alfredo, a zesty tomato sauce, or a savory pesto, the addition of chickpeas adds a unique twist to your pasta creations.
7. Recipe: Spicy Garlic Chickpea Snack
Ingredients:
- 2 cups cooked chickpeas
- 2 tablespoons olive oil
- 1 teaspoon garlic powder
- 1/2 teaspoon paprika
- 1/2 teaspoon chili powder
- 1/2 teaspoon salt
- 1/4 teaspoon cayenne pepper (optional)
Instructions:
- Preheat the air fryer to 400°F (200°C).
- In a bowl, combine the chickpeas, olive oil, garlic powder, paprika, chili powder, salt, and cayenne pepper (if desired). Toss until the chickpeas are evenly coated.
- Transfer the seasoned chickpeas to the air fryer basket in a single layer.
- Air fry for 15 minutes, then shake the basket to toss the chickpeas.
- Continue air frying for another 10-15 minutes, or until the chickpeas are crispy and golden brown.
- Remove the basket from the air fryer and let the chickpeas cool slightly before serving.
These spicy garlic chickpeas make a delicious snack on their own or can be used as a topping for salads, soups, or wraps.
With these serving ideas and recipe inspiration, you can enjoy air-fried chickpeas in a variety of delicious and creative ways. Get creative in the kitchen and discover your own favorite ways to savor the crispy goodness of these versatile legumes.
Now that you’re armed with knowledge on how to air fry chickpeas, from preparation to cooking and serving, it’s time to embrace this flavorful and nutritious snack. Enjoy the crispy, flavorful goodness of air-fried chickpeas and let your taste buds rejoice!
Conclusion
Air frying chickpeas is a game-changer when it comes to enjoying this nutritious legume in a crispy and flavorful form. With the help of an air fryer, you can achieve the perfect balance of crunchiness and taste without the excessive use of oil.
Cooking chickpeas in an air fryer offers several benefits, including a crispy texture, healthier preparation, and time-saving convenience. The hot air circulation in the air fryer ensures that the chickpeas cook evenly, resulting in a satisfying crunch on the outside and a tender center.
Preparing chickpeas for air frying involves soaking and cooking them, draining and drying them thoroughly, and seasoning them to your liking. Experiment with a variety of seasonings and flavors to discover your favorite combination.
When air frying chickpeas, it’s important to preheat the air fryer, arrange the chickpeas in a single layer, shake the basket to promote even cooking, and monitor the cooking time to achieve desired crispiness. With these simple steps, you can enjoy perfectly crispy and flavorful chickpeas every time.
There are countless ways to enjoy air-fried chickpeas. Snack on them as a healthy alternative to chips, incorporate them into salads, top soups and stews, use them as filling for sandwiches, add them to pasta dishes, or experiment with your own creative recipes.
Whether you’re a fan of savory, spicy, or sweet flavors, air-fried chickpeas can cater to your taste preference. The versatility of chickpeas allows you to explore a wide range of seasoning options and get imaginative in the kitchen.
In conclusion, air frying chickpeas opens up a world of possibilities for creating crispy, flavorful, and nutritious snacks and meal additions. It’s time to embrace the wonders of the air fryer and transform simple chickpeas into crunchy delights that will leave your taste buds wanting more.
So, grab your air fryer, get those chickpeas seasoned, and let the magic of air frying take your culinary creations to new heights. Enjoy the delight of crispy and flavorful chickpeas, knowing that you’re indulging in a healthy and satisfying treat.
Happy air frying!
Frequently Asked Questions about How To Cook Chickpeas In Air Fryer
Was this page helpful?
At Storables.com, we guarantee accurate and reliable information. Our content, validated by Expert Board Contributors, is crafted following stringent Editorial Policies. We're committed to providing you with well-researched, expert-backed insights for all your informational needs.


0 thoughts on “How To Cook Chickpeas In Air Fryer”