Home>Articles>How To Make Chickpeas In An Electric Pressure Cooker
Articles
How To Make Chickpeas In An Electric Pressure Cooker
Modified: October 30, 2024
Learn how to make delicious chickpeas in an electric pressure cooker with this informative article. Discover the benefits and step-by-step instructions for a quick and healthy meal.
(Many of the links in this article redirect to a specific reviewed product. Your purchase of these products through affiliate links helps to generate commission for Storables.com, at no extra cost. Learn more)
Introduction
Welcome to the world of electric pressure cooking! If you love chickpeas as much as I do, you’re in for a treat. In this article, we will explore the art and science behind cooking chickpeas in an electric pressure cooker.
Gone are the days of soaking chickpeas overnight and spending hours simmering them on the stove. With an electric pressure cooker, you can achieve perfectly cooked chickpeas in a fraction of the time. Not only does this save you time and energy, but it also ensures that your chickpeas are tender, flavorful, and packed with nutrients.
Before we dive into the cooking process, let’s first discuss how to choose the right electric pressure cooker for your needs. There are many different models and brands available, each with its own unique features. Look for a cooker that has a large enough capacity to accommodate the amount of chickpeas you plan to cook. Additionally, consider features such as programmable settings, safety mechanisms, and ease of cleaning.
Once you have your electric pressure cooker, it’s time to start cooking those delicious chickpeas. There are several methods you can use, depending on your time constraints and personal preferences. Let’s explore each method in detail.
Key Takeaways:
- Say goodbye to long soaking and simmering times! An electric pressure cooker makes cooking chickpeas a breeze, offering three methods to achieve tender, flavorful results in a fraction of the time.
- From Mediterranean-inspired flavors to Indian spices, the versatility of chickpeas shines through. Whether in salads, curries, or hummus, the options for incorporating chickpeas into your meals are endless.
Choosing the Right Electric Pressure Cooker
When it comes to cooking chickpeas in an electric pressure cooker, having the right appliance is key. With so many options available in the market, it’s important to consider a few factors before making your purchase.
First and foremost, determine the capacity that suits your needs. Electric pressure cookers come in various sizes, typically ranging from 4 to 8 quarts. If you plan on cooking large batches of chickpeas or frequently prepare meals for a large family, a larger capacity cooker might be the best option for you. However, if you have limited kitchen space or usually cook smaller portions, a smaller capacity cooker would suffice.
Next, consider the features offered by different models. Look for cookers with programmable settings, as this allows you to easily adjust cooking times and pressure levels for optimal results. Some cookers also incorporate pre-set cooking functions specifically designed for beans, which can be a convenient feature when cooking chickpeas.
Another important factor to consider is safety. Look for cookers with built-in safety mechanisms, such as pressure release valves and locking lids, to ensure safe operation. Additionally, some cookers may have additional features like automatic pressure release or lid-open detection.
One often overlooked aspect is ease of cleaning. Opt for a cooker with a removable inner pot that is dishwasher safe for hassle-free cleanup. Non-stick coatings also make cleaning easier, but be sure to choose cookers with PFOA-free coatings for health and safety reasons.
Lastly, consider your budget. Electric pressure cookers come in a range of prices, so it’s important to find one that fits within your budget while still meeting your needs. While more expensive models may offer advanced features and enhanced durability, there are plenty of affordable options that can deliver excellent results.
By carefully considering these factors, you can choose an electric pressure cooker that is perfect for cooking chickpeas and other meals with ease. Once you have your cooker, it’s time to move on to the next step: soaking and cooking the chickpeas.
Soaking and Cooking Chickpeas in an Electric Pressure Cooker
Before cooking chickpeas in an electric pressure cooker, it’s important to soak them. Soaking helps to soften the chickpeas, reduce cooking time, and improve digestibility. There are two common methods for soaking chickpeas: the overnight soak and the quick-soak method.
The overnight soak method involves placing the chickpeas in a bowl and covering them with plenty of water. Let them soak overnight, or for a minimum of 8 hours. This method ensures that the chickpeas are fully hydrated and ready for cooking.
If you’re short on time, you can use the quick-soak method. Start by rinsing the chickpeas under running water. Then, place them in a saucepan, cover with water, and bring to a boil. Boil for 2-3 minutes, then remove from heat and let them sit covered for about an hour. Drain and rinse the chickpeas once again before cooking.
Once your chickpeas are soaked, it’s time to cook them in the electric pressure cooker. There are three methods you can choose from: the basic pressure cooking method, the quick-soaking method, and the pre-soaking method.
Method 1: Basic Pressure Cooking:
- Drain and rinse the soaked chickpeas.
- Add the chickpeas to the electric pressure cooker along with water or broth. The general ratio is 3 cups of liquid for every 1 cup of soaked chickpeas.
- Securely lock the lid of the pressure cooker, ensuring that the pressure release valve is closed.
- Select the “Pressure Cook” or “Manual” setting and adjust the cooking time. Start with 8-10 minutes for soaked chickpeas.
- Once the cooking time is complete, allow for a natural pressure release for about 10-15 minutes before carefully opening the vent to release any remaining pressure.
- Drain the cooked chickpeas and they are ready to be used in your favorite recipes.
Method 2: Quick-Soaking Method:
- Drain and rinse the soaked chickpeas.
- Add the chickpeas to the electric pressure cooker along with water or broth. The general ratio is 3 cups of liquid for every 1 cup of soaked chickpeas.
- Securely lock the lid of the pressure cooker, ensuring that the pressure release valve is closed.
- Select the “Pressure Cook” or “Manual” setting and adjust the cooking time. Start with 5 minutes for quick-soaked chickpeas.
- Once the cooking time is complete, perform a quick pressure release by carefully opening the vent to release the pressure.
- Drain the cooked chickpeas and they are ready to be used in your favorite recipes.
Method 3: Pre-Soaking Method:
- Drain and rinse the soaked chickpeas.
- Add the chickpeas to the electric pressure cooker along with water or broth. The general ratio is 3 cups of liquid for every 1 cup of soaked chickpeas.
- Securely lock the lid of the pressure cooker, ensuring that the pressure release valve is closed.
- Select the “Pressure Cook” or “Manual” setting and adjust the cooking time. Start with 6-8 minutes for pre-soaked chickpeas.
- Once the cooking time is complete, allow for a natural pressure release for about 10-15 minutes before carefully opening the vent to release any remaining pressure.
- Drain the cooked chickpeas and they are ready to be used in your favorite recipes.
No matter which method you choose, the electric pressure cooker will provide you with tender and perfectly cooked chickpeas in a fraction of the time it takes with traditional cooking methods.
Now that you know how to soak and cook chickpeas in an electric pressure cooker, let’s move on to some tips and tricks to ensure you achieve the best results.
Method 1: Basic Pressure Cooking
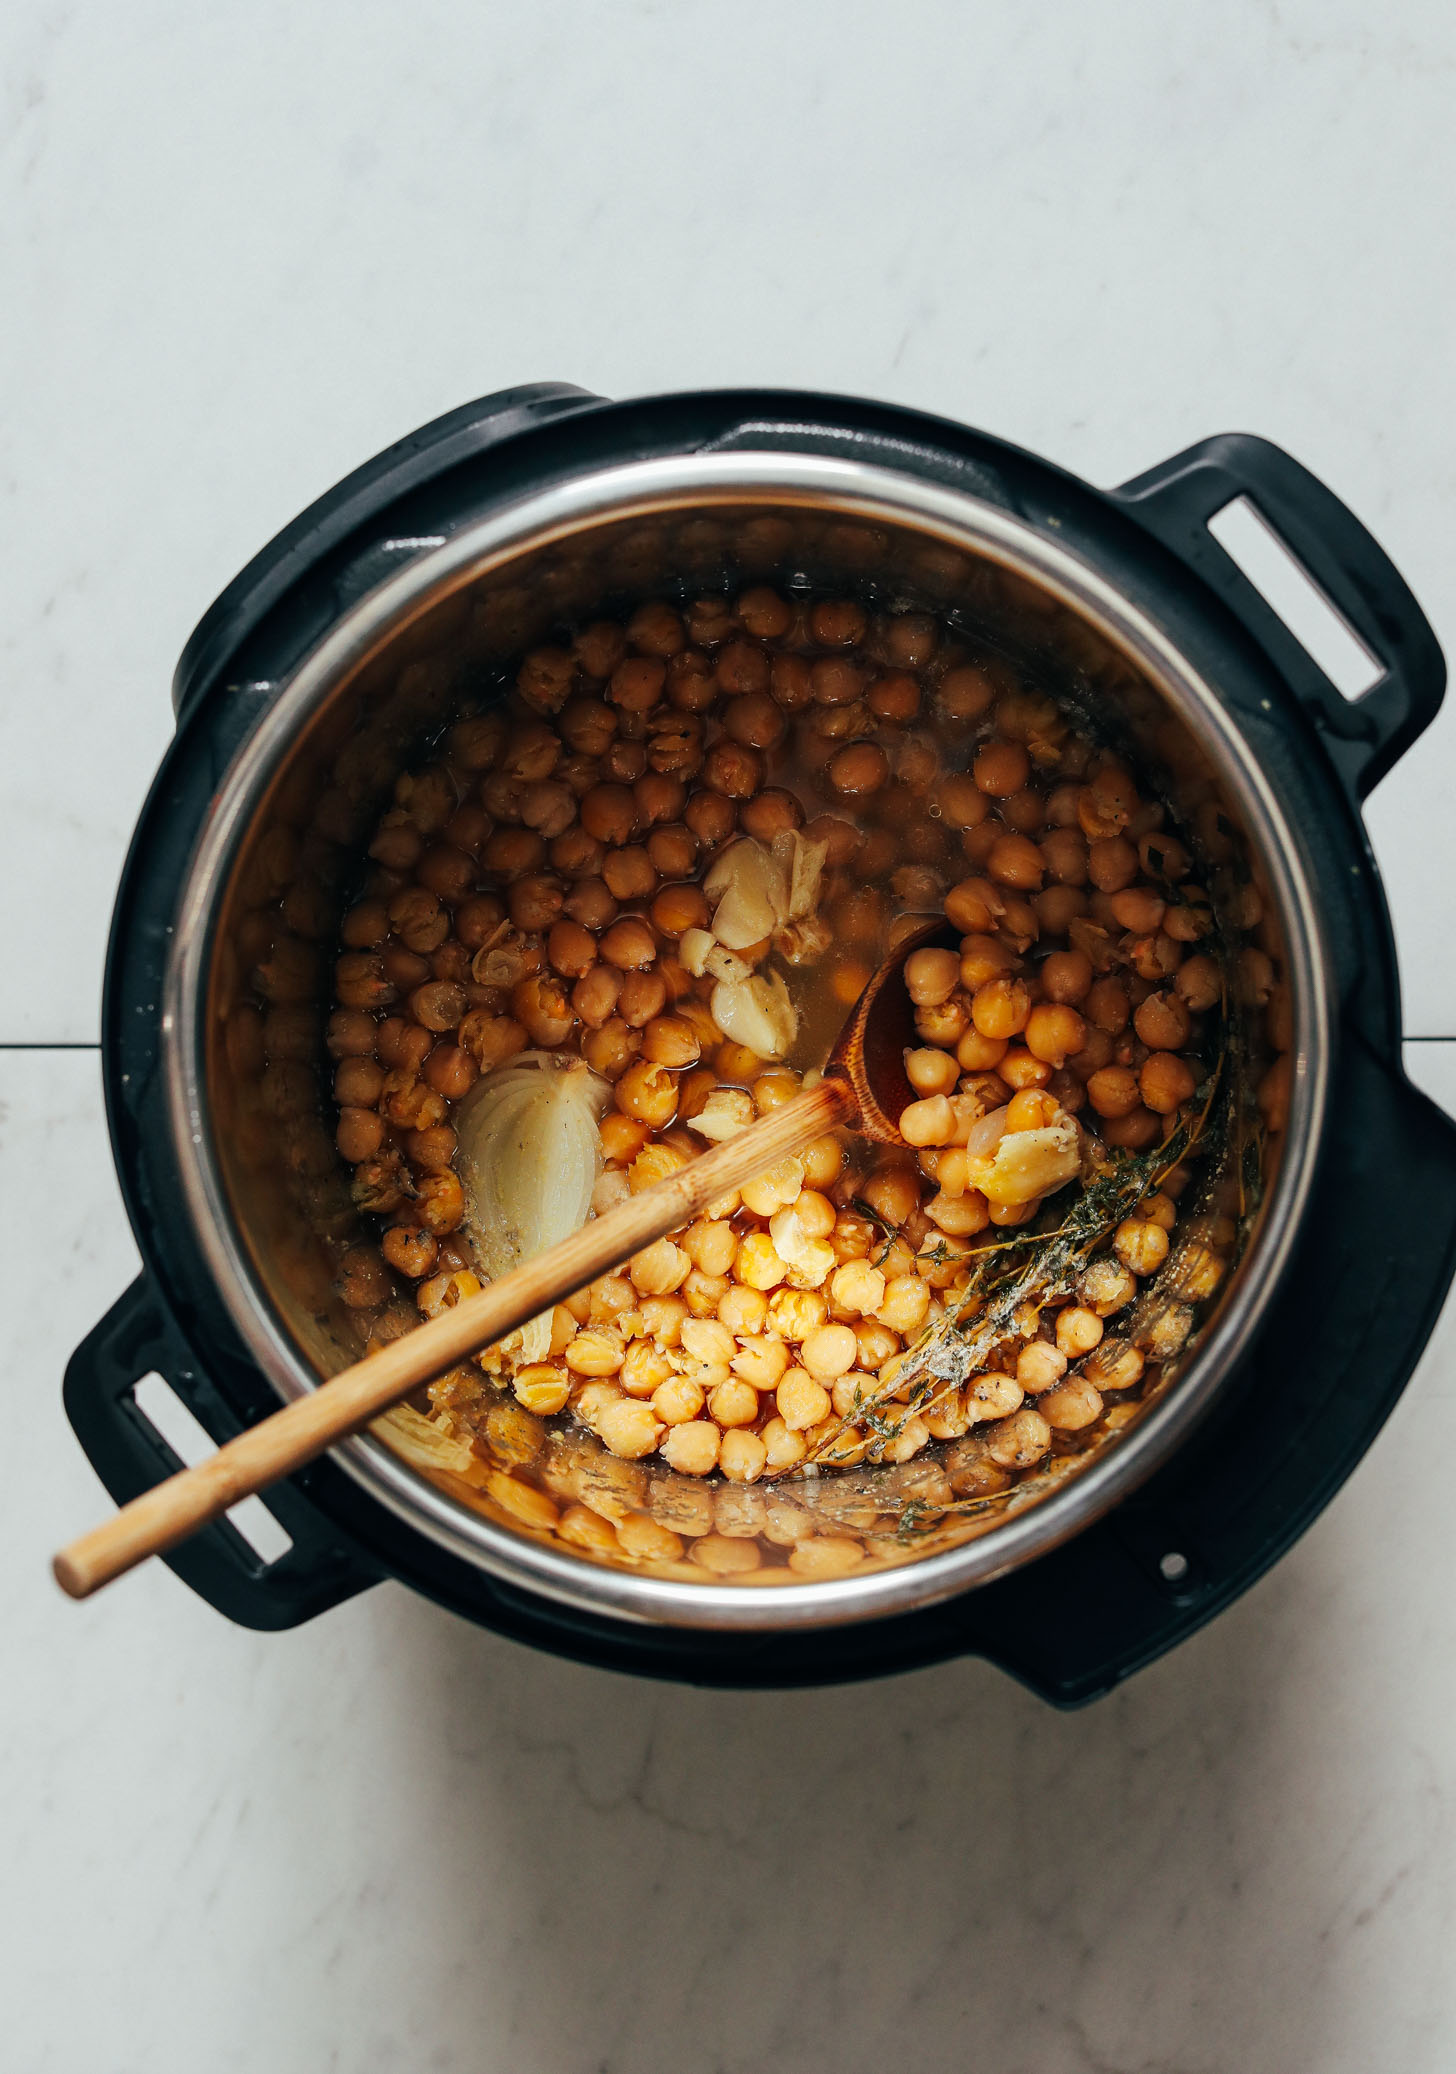
Pressure cooking is an efficient and convenient way to cook chickpeas in an electric pressure cooker. This method yields perfectly tender chickpeas with minimal effort. Here’s how to do it:
- Drain and rinse the soaked chickpeas. Make sure to remove any dirt or debris.
- Add the chickpeas to the electric pressure cooker along with water or broth. The general ratio is 3 cups of liquid for every 1 cup of soaked chickpeas. You can adjust the amount of liquid based on your desired consistency.
- Securely lock the lid of the pressure cooker, ensuring that the pressure release valve is closed. This is important to trap the steam and build up pressure inside the cooker.
- Select the “Pressure Cook” or “Manual” setting on your pressure cooker and adjust the cooking time. Start with 8-10 minutes, as this is usually sufficient for soaked chickpeas. If you prefer a softer texture, you can increase the cooking time by a couple of minutes.
- Once the cooking time is set, the pressure cooker will start building up pressure. You will see the pressure indicator rise, indicating that the pressure has been reached inside the cooker. The cooking process will begin once the pressure is achieved.
- After the cooking time is complete, allow for a natural pressure release for about 10-15 minutes. This means letting the pressure reduce naturally without manually releasing it. This helps the chickpeas to continue cooking and absorb more flavors.
- After the natural pressure release, you can carefully open the vent to release any remaining pressure. Be cautious as the steam may still be hot.
- Once the pressure has been fully released, you can open the lid of the pressure cooker. Drain the cooked chickpeas using a colander or strainer.
- The cooked chickpeas are now ready to be used in your favorite recipes. They can be added to salads, soups, stews, curries, or even mashed into hummus.
With the basic pressure cooking method, you can achieve tender, flavorful chickpeas in no time. The electric pressure cooker does all the work for you, resulting in perfectly cooked chickpeas that are versatile and ready to be enjoyed in a variety of dishes.
Now that you’ve mastered the basic pressure cooking method, let’s explore two other methods: the quick-soaking method and the pre-soaking method, which can be handy when you have less time for soaking the chickpeas.
Method 2: Quick-Soaking Method
If you’re short on time and didn’t have the chance to soak the chickpeas overnight, don’t worry! The quick-soaking method allows you to prepare chickpeas for cooking in a fraction of the time. Here’s how to use the quick-soaking method in an electric pressure cooker:
- Start by rinsing the chickpeas under running water. This helps remove any impurities and dirt.
- Add the rinsed chickpeas to the electric pressure cooker.
- Add water or broth to the pressure cooker. The general ratio is 3 cups of liquid for every 1 cup of chickpeas. Adjust the amount of liquid based on the desired consistency of the final dish.
- Securely lock the lid of the pressure cooker, making sure the pressure release valve is closed.
- Select the “Pressure Cook” or “Manual” setting on your pressure cooker and adjust the cooking time. For quick-soaked chickpeas, start with 5 minutes of pressure cooking. This shorter cooking time compensates for the lack of overnight soaking and helps soften the chickpeas.
- Once the cooking time is set, the pressure cooker will start building up pressure. You’ll notice the pressure indicator rise as the pressure builds inside the cooker. The cooking process will begin once the pressure is reached.
- After the cooking time is complete, perform a quick pressure release by carefully opening the vent to release the pressure. Be cautious, as the steam may still be hot.
- Once the pressure has been fully released, you can open the lid of the pressure cooker. Drain the cooked chickpeas using a colander or strainer.
- The quick-soaked chickpeas are now ready to be used in your favorite recipes. They can be used in salads, soups, stews, curries, or any other dish that calls for tender and flavorful chickpeas.
The quick-soaking method allows you to save time while still achieving tender and delicious chickpeas. The electric pressure cooker speeds up the cooking process, ensuring that the chickpeas are beautifully cooked and ready to be enjoyed.
Now that you know how to use the quick-soaking method, let’s explore another alternative: the pre-soaking method, which provides even more flavor and texture to your chickpeas.
To reduce cooking time, soak chickpeas in water for at least 8 hours before using an electric pressure cooker. This will help them cook faster and more evenly.
Method 3: Pre-Soaking Method
If you have some extra time and want to enhance the flavor and texture of your chickpeas, the pre-soaking method is a great option. Pre-soaking allows the chickpeas to absorb water, reducing cooking time and promoting even cooking. Here’s how to use the pre-soaking method in an electric pressure cooker:
- Start by soaking the chickpeas in water overnight or for at least 8 hours. This step helps to soften the chickpeas and improve their digestibility.
- After the soaking period, drain and rinse the chickpeas to remove any residual water and dirt.
- Add the pre-soaked chickpeas to the electric pressure cooker.
- Add water or broth to the pressure cooker. The general ratio is 3 cups of liquid for every 1 cup of chickpeas. Adjust the amount of liquid based on the desired consistency of the final dish.
- Securely lock the lid of the pressure cooker, ensuring that the pressure release valve is closed.
- Select the “Pressure Cook” or “Manual” setting on your pressure cooker and adjust the cooking time. For pre-soaked chickpeas, start with 6-8 minutes of pressure cooking. This cooking time may be shorter compared to basic pressure cooking, as the pre-soaked chickpeas have already absorbed some water during the soaking process.
- Once the cooking time is set, the pressure cooker will start building up pressure. You will see the pressure indicator rise, indicating that the pressure has been reached inside the cooker. The cooking process will begin once the desired pressure is achieved.
- After the cooking time is complete, allow for a natural pressure release for about 10-15 minutes. This natural release helps the chickpeas continue to cook and absorb flavors.
- After the natural pressure release, you can carefully open the vent to release any remaining pressure. Be cautious as the steam may still be hot.
- Once the pressure has been fully released, you can open the lid of the pressure cooker. Drain the cooked chickpeas using a colander or strainer.
- The pre-soaked chickpeas are now ready to be used in your favorite recipes. Their texture will be tender, and they will have a more pronounced nutty flavor.
The pre-soaking method allows the chickpeas to fully absorb water, resulting in evenly cooked and flavorful chickpeas. The electric pressure cooker helps expedite the cooking process, making it easy to prepare pre-soaked chickpeas in no time.
Now that you know three different methods for cooking chickpeas in an electric pressure cooker, it’s time to explore some tips and tricks for achieving perfect results every time.
Tips for Perfect Chickpeas in an Electric Pressure Cooker
While cooking chickpeas in an electric pressure cooker is a straightforward process, there are a few tips and tricks that can help you achieve perfect results consistently. Here are some tips to keep in mind:
- Soak the chickpeas: Soaking the chickpeas overnight or using the quick-soaking method helps to soften them and reduce cooking time. This step also improves their digestibility.
- Rinse the chickpeas: Before cooking, be sure to rinse the soaked or pre-soaked chickpeas under running water. This helps remove any dirt, impurities, and enzyme inhibitors.
- Use the right liquid ratio: The general ratio for cooking chickpeas in an electric pressure cooker is 3 cups of liquid for every 1 cup of chickpeas. Adjust the amount of liquid based on your preferred consistency, whether you want a thicker or thinner cooking liquid.
- Don’t overfill the pressure cooker: Avoid filling the pressure cooker more than two-thirds full, as the chickpeas will expand during cooking. This prevents any potential issues with liquid overflow or clogging the pressure release valve.
- Select the correct cooking time: The cooking time for chickpeas in an electric pressure cooker can vary depending on the method used and personal preferences. Start with the recommended cooking times provided in the methods above and adjust as needed. It’s better to slightly undercook the chickpeas than overcook them, as they can become mushy.
- Allow for natural pressure release: After the cooking time is complete, allow the pressure cooker to naturally release pressure for about 10-15 minutes. This additional time helps the chickpeas continue cooking and absorb flavors.
- Experiment with spices and seasonings: Chickpeas have a mild flavor on their own, so feel free to experiment with different spices, herbs, and seasonings to enhance their taste. Adding ingredients like garlic, cumin, paprika, or turmeric can add depth and complexity to your dish.
- Use the cooking liquid: The cooking liquid left in the pressure cooker after cooking the chickpeas is full of flavor. Instead of discarding it, you can reserve it and use it as a base for soups, stews, or sauces.
- Store cooked chickpeas properly: If you have cooked more chickpeas than you need for your immediate use, store the leftovers in an airtight container in the refrigerator. They can last up to 4-5 days. Alternatively, you can freeze them for up to 3 months.
By following these tips, you can achieve perfectly cooked chickpeas in your electric pressure cooker every time. Feel free to adjust the methods and seasonings based on your personal preferences and the specific recipe you’re preparing.
Now, let’s explore some flavor variations and ideas for incorporating chickpeas into your meals.
Flavor Variations and Adding Spices
Chickpeas are incredibly versatile and can be transformed into a variety of dishes with the addition of different flavors and spices. Here are some flavorful variations and spice ideas to enhance your chickpea dishes:
- Mediterranean Chickpeas: Give your chickpeas a Mediterranean twist by adding flavors like lemon juice, olive oil, garlic, and fresh herbs such as parsley and oregano. This combination is perfect for salads, wraps, or as a delicious side dish.
- Indian Masala Chickpeas: Create a vibrant and aromatic dish by incorporating Indian spices like cumin, coriander, turmeric, and garam masala into your chickpeas. Serve them with rice, flatbread, or as a filling for samosas or wraps.
- Moroccan Spiced Chickpeas: Transport your taste buds to Morocco with a blend of spices like cumin, paprika, cinnamon, and ginger. Add some raisins or apricots for a touch of sweetness and serve over couscous or with roasted vegetables.
- Spicy Roasted Chickpeas: Toss cooked chickpeas with olive oil, chili powder, cayenne pepper, and a sprinkle of salt. Roast them in the oven until crispy for a nutritious and addictive snack.
- Curried Chickpeas: Create a warming and comforting dish by adding curry powder or curry paste to your chickpeas. You can also add coconut milk for a creamy and rich flavor. Serve over rice or with naan bread.
- Hummus Variations: Use your cooked chickpeas to prepare different variations of hummus. Add roasted red peppers, sun-dried tomatoes, spinach, or roasted garlic to create unique and flavorful dips.
- Herbed Chickpea Salad: Toss cooked chickpeas with a variety of fresh herbs such as basil, cilantro, mint, and dill. Add some diced tomatoes, cucumbers, red onion, and a simple vinaigrette for a refreshing and healthy salad.
- Smoky Chipotle Chickpeas: Add a smoky and spicy twist to your chickpeas by incorporating chipotle peppers in adobo sauce or smoked paprika. Serve them as a filling for tacos, quesadillas, or as a topping for loaded nachos.
These are just a few examples of the many flavor variations and spice combinations you can use to elevate your chickpea dishes. Don’t be afraid to get creative and experiment with different ingredients to suit your taste preferences.
Now that you have a variety of flavor ideas, let’s explore some serving suggestions and recipe ideas for incorporating chickpeas into your meals.
Serving Suggestions and Recipe Ideas
Chickpeas are incredibly versatile and can be enjoyed in a wide range of dishes. Here are some serving suggestions and recipe ideas to inspire you in incorporating chickpeas into your meals:
- Chickpea Salad: Combine cooked chickpeas with diced veggies like cucumbers, tomatoes, bell peppers, and red onions. Toss with a refreshing dressing of lemon juice, olive oil, and herbs for a light and nutritious salad.
- Curries and Stews: Add cooked chickpeas to your favorite curries and stews for added texture and protein. Whether it’s a spicy Indian curry or a comforting Moroccan tagine, chickpeas can bring heartiness to the dish.
- Hummus: Transform chickpeas into a creamy and flavorful dip by blending them with tahini, garlic, lemon juice, and olive oil. Serve with pita bread, fresh vegetables, or as a spread on sandwiches and wraps.
- Chickpea Wraps and Sandwiches: Stuff a tortilla or pita pocket with cooked chickpeas, fresh veggies, and a drizzle of yogurt or tahini sauce for a quick and satisfying lunch option.
- Chickpea Burgers: Mash cooked chickpeas with breadcrumbs, herbs, and spices to create delicious vegetarian patties. Serve them on a bun with your favorite toppings for a tasty and nutritious veggie burger.
- Roasted Chickpeas: Toss cooked chickpeas with olive oil, spices, and a pinch of salt, then roast them in the oven until crispy. Enjoy them as a crunchy snack or sprinkle them on top of salads and soups for added texture.
- Chickpea Soups: Add cooked chickpeas to your favorite soup recipes. They can add creaminess and protein to dishes like vegetable soups, lentil soups, or even a hearty minestrone.
- Chickpea Curry Pasta: Combine cooked chickpeas with your favorite pasta, simmered in a flavorful curry sauce. This fusion dish brings together the goodness of chickpeas and the comfort of pasta.
These are just a few ideas to get you started, but the possibilities are endless. Feel free to experiment with different ingredients and flavors to create unique chickpea dishes that suit your preferences.
Chickpeas are not only delicious but also packed with nutrients and a great source of plant-based protein. Whether you’re a vegetarian, vegan, or simply looking to incorporate more plant-based meals into your diet, chickpeas are a fantastic addition to your culinary repertoire.
Now that you have a variety of serving suggestions and recipe ideas, it’s time to put your electric pressure cooker to use and enjoy the deliciousness of chickpeas in your favorite dishes.
Happy cooking!
Conclusion
Cooking chickpeas in an electric pressure cooker is a game-changer when it comes to saving time and achieving perfectly cooked results. With the ability to quickly soak and cook chickpeas in a matter of minutes, you can enjoy their delicious flavor and nutritional benefits without the long preparation and cooking times required by traditional methods.
We explored three different methods for cooking chickpeas in an electric pressure cooker: the basic pressure cooking method, the quick-soaking method, and the pre-soaking method. Each method offers its own benefits depending on your time constraints and desired texture. Whether you’re starting with soaked chickpeas or need to expedite the soaking process, the electric pressure cooker allows you to achieve tender and flavorful chickpeas in a fraction of the time.
Beyond the cooking methods, we also delved into tips for perfect chickpeas, such as soaking them overnight, rinsing them thoroughly, and adjusting cooking times based on your preferences. We discussed flavor variations and adding spices to elevate your chickpea dishes, from Mediterranean-inspired flavors to Indian spices and beyond. Additionally, we provided serving suggestions and recipe ideas to showcase the versatility of chickpeas, from salads and wraps to soups and curries.
In conclusion, an electric pressure cooker is a fantastic tool for cooking chickpeas and incorporating them into a wide range of delicious meals. It streamlines the cooking process, saving you time and effort while delivering perfectly cooked chickpeas with enhanced flavor and texture. So, go ahead and explore the wonderful world of chickpeas in your electric pressure cooker, and let your creativity soar as you create mouthwatering dishes that will impress your family and friends.
Enjoy the journey of cooking with chickpeas and savor the delightful flavors and textures they bring to your table!
Frequently Asked Questions about How To Make Chickpeas In An Electric Pressure Cooker
Was this page helpful?
At Storables.com, we guarantee accurate and reliable information. Our content, validated by Expert Board Contributors, is crafted following stringent Editorial Policies. We're committed to providing you with well-researched, expert-backed insights for all your informational needs.

0 thoughts on “How To Make Chickpeas In An Electric Pressure Cooker”