
Articles
How To Make A Blooming Onion In An Air Fryer
Modified: February 26, 2024
Learn how to make a delicious blooming onion in an air fryer with this step-by-step guide. Perfect for appetizers and parties. Read more articles on our website.
(Many of the links in this article redirect to a specific reviewed product. Your purchase of these products through affiliate links helps to generate commission for Storables.com, at no extra cost. Learn more)
Introduction
Do you crave the delicious and crispy taste of a blooming onion? Traditionally, this mouthwatering appetizer is deep-fried, but what if we told you that you can achieve the same amazing taste with a healthier twist? That’s right! In this article, we will guide you step-by-step on how to make a blooming onion in an air fryer.
Air fryers have gained popularity in recent years for their ability to create crispy and flavorful dishes without the need for excessive oil. By using hot air circulation, these kitchen appliances can mimic the results of deep-frying while significantly reducing the amount of oil used.
So, whether you’re looking to indulge in a guilt-free snack or impress your friends and family with a restaurant-quality appetizer, making a blooming onion in an air fryer is the way to go. With a few simple ingredients and our easy-to-follow instructions, you’ll be able to create a golden brown, crispy exterior with a tender and flavorful onion center.
All you need is a large onion, a few basic pantry staples, and an air fryer to achieve that perfect blooming onion texture and taste. And don’t worry if you’re a beginner in the kitchen. This recipe is beginner-friendly, so you can confidently embark on your culinary journey.
In the following sections, we will walk you through the step-by-step process of preparing, cutting, battering, and air frying your blooming onion. We’ll also provide some tips and tricks to ensure your creation turns out picture-perfect and delicious.
So, get ready to tantalize your taste buds with a healthier version of the classic blooming onion. Let’s dive into the world of air frying and discover how to make this delectable appetizer right in the comfort of your own kitchen. Get your air fryer and ingredients ready, because it’s time to create magic with a blooming onion!
Key Takeaways:
- Indulge in the crispy and flavorful delight of a blooming onion made in an air fryer, offering a healthier twist without sacrificing the delicious taste and visual appeal of this classic appetizer.
- Elevate your culinary skills and impress your guests by creating a guilt-free, restaurant-quality blooming onion right in the comfort of your own kitchen using an air fryer.
Read more: How To Make Frozen Onion Rings In Air Fryer
Required Ingredients
Before we begin, let’s gather all the necessary ingredients to make a blooming onion in an air fryer. Here’s what you’ll need:
1. 1 large onion: Choose a large onion, such as a Vidalia or a sweet onion. The size of the onion will determine the final size of your blooming onion.
2. 1 cup all-purpose flour: This will be used to make the batter for coating the onion.
3. 1 teaspoon paprika: Paprika adds a touch of smokiness and enhances the flavor of the batter.
4. 1 teaspoon garlic powder: Garlic powder provides a delicious savory flavor to the coating.
5. 1 teaspoon salt: Salt is essential for seasoning the batter and bringing out the flavors.
6. 1/2 teaspoon black pepper: Black pepper adds a hint of spiciness to the batter.
7. 1/2 teaspoon cayenne pepper (optional): If you like a bit of heat, you can add cayenne pepper to the batter to give your blooming onion a kick.
8. 1 cup buttermilk: Buttermilk helps tenderize the onion and provides moisture for the batter to adhere to.
9. Cooking spray: Cooking spray will be used to coat the onion and the air fryer basket to prevent sticking.
10. Dipping sauce of your choice: Prepare a delicious dipping sauce to complement the flavors of the blooming onion. Popular choices include a tangy aioli, spicy chipotle sauce, or a classic ranch dressing.
These are the basic ingredients needed to make a blooming onion in an air fryer. Feel free to adjust the seasonings according to your taste preferences. Now that we have all the ingredients ready, it’s time to dive into the step-by-step process of making this delicious appetizer.
Step 1: Preparation
Before we start preparing the onion for our blooming masterpiece, let’s make sure we have everything set up. Here’s what you need to do:
1. Preheat the air fryer: Preheat your air fryer to 400°F (200°C). This will ensure that you get a nice crispy texture on the outside while the onion becomes tender inside.
2. Gather your tools: Make sure you have all the necessary tools within reach. You’ll need a sharp knife, a cutting board, a large bowl for the batter, and a pair of tongs.
3. Remove the outer skin: Start by peeling off the outer skin of the onion. Cut off the root end, but be careful not to remove too much, as it will help hold the layers together.
4. Rinse the onion: Give the onion a quick rinse under running water to remove any dirt or debris.
5. Pat dry: Use a clean kitchen towel or paper towel to pat the onion dry. This will help the batter adhere better to the onion.
6. Set up your work station: Place the cutting board and the large bowl for the batter on your work surface. Make sure you have enough space to comfortably work with the onion.
Now that you’ve prepped your air fryer, gathered your tools, and prepared the onion, it’s time to move on to the next step: cutting the onion. Get ready to unleash your inner chef as we create the signature blooming shape that makes this appetizer so visually impressive and enticing.
Step 2: Cutting the Onion
Now that we have our onion prepped and ready, it’s time to create that beautiful blooming shape. Follow these steps to cut the onion:
1. Stand the onion upright: Place the onion on your cutting board with the root end facing downward. This will create a stable base for cutting.
2. Make vertical cuts: Using a sharp knife, make 4 evenly-spaced vertical cuts into the onion, starting about half an inch from the root end and stopping before reaching the top. Be careful not to cut all the way through the onion. These cuts will create the “petals” of the blooming onion.
3. Turn the onion and repeat: Turn the onion 90 degrees and make another set of 4 vertical cuts, again stopping before reaching the top. Make sure the cuts are evenly spaced to create a symmetrical appearance.
4. Separate the layers: Gently spread the layers apart, starting from the center and working your way outwards. Be careful not to pull too hard, as you don’t want the layers to detach completely.
5. Shape the onion: Once you’ve spread the layers apart, use your hands to gently push down on the center of the onion. This will help create a more pronounced blooming shape.
Now that you’ve successfully cut the onion, you’ll see the beautiful layers opening up, ready to be coated in a flavorful batter. It’s time to move on to the next step: preparing the batter. Get ready for the delicious transformation of your blooming onion in the air fryer.
Step 3: Preparing the Batter
The batter is what gives the blooming onion its signature crispy coating. Let’s get started on making the delicious batter for your blooming onion:
1. In a large bowl, combine the all-purpose flour, paprika, garlic powder, salt, black pepper, and cayenne pepper (if using). Mix everything together until well combined. This blend of spices will add a savory and slightly spicy kick to the batter.
2. Pour the buttermilk into a separate bowl. The acidity in the buttermilk helps to tenderize the onion and creates a tangy flavor in the batter.
3. Take one of the largest onion rings from the center of the onion and dip it into the buttermilk. Make sure it is fully coated with the buttermilk.
4. Transfer the onion ring into the bowl with the flour mixture. Use your hands or a spoon to gently coat the onion ring with the flour mixture, making sure it is well coated on all sides. Press the flour mixture onto the onion ring to ensure it adheres properly.
5. Repeat the process with the remaining onion rings. Take each ring, dip it in the buttermilk, and then coat it with the flour mixture. Continue this process until all the onion rings are coated and ready to be air-fried.
It’s important to note that the batter should be thick enough to stick to the onion rings but not so thick that it becomes clumpy. If the batter seems too thin, you can add a little more flour. If it’s too thick, you can add a splash of buttermilk to thin it out slightly.
Now that we have our perfectly coated onion rings, it’s time to give them the crispy texture and delicious flavor that we all crave. In the next step, we’ll guide you on how to coat the onion rings and get them ready for the air fryer. Get ready to elevate your blooming onion to the next level of deliciousness!
Before breading the onion, make sure to cut it into a blooming shape by making vertical cuts around the onion. This will help the onion cook evenly in the air fryer.
Read more: How To Cook Onion Rings In Air Fryer
Step 4: Coating the Onion
Now that our onion rings are coated in the flavorful batter, it’s time to make sure every nook and cranny of the onion is evenly coated. Follow these steps to ensure a perfectly coated blooming onion:
1. Take one of the batter-coated onion rings and carefully shake off any excess flour. This will help prevent clumping and promote even cooking.
2. Place the onion ring back on the cutting board and gently re-spread the layers to ensure the batter reaches every crevice. This will ensure that each bite of your blooming onion is bursting with flavor.
3. Repeat this process with the remaining onion rings, giving each one a final check for any areas that may need some extra batter. Taking the time to coat each ring thoroughly will ensure a consistent and crisp texture.
4. As you coat each onion ring, arrange them on a plate or a wire rack. This will allow any excess batter to drip off and give your blooming onion a more even coating.
5. Once all the onion rings are coated and arranged, let them sit for a few minutes. This will allow the batter to set slightly, which will promote a better texture when air-frying.
By ensuring that each onion ring is properly coated, you’ll achieve a crispy and flavorful exterior that perfectly complements the tender and savory onion inside. Now that your onion rings are ready to go, it’s time to move on to the next step: air frying them to perfection. Get ready to experience the delicious transformation as your blooming onion takes shape in the air fryer!
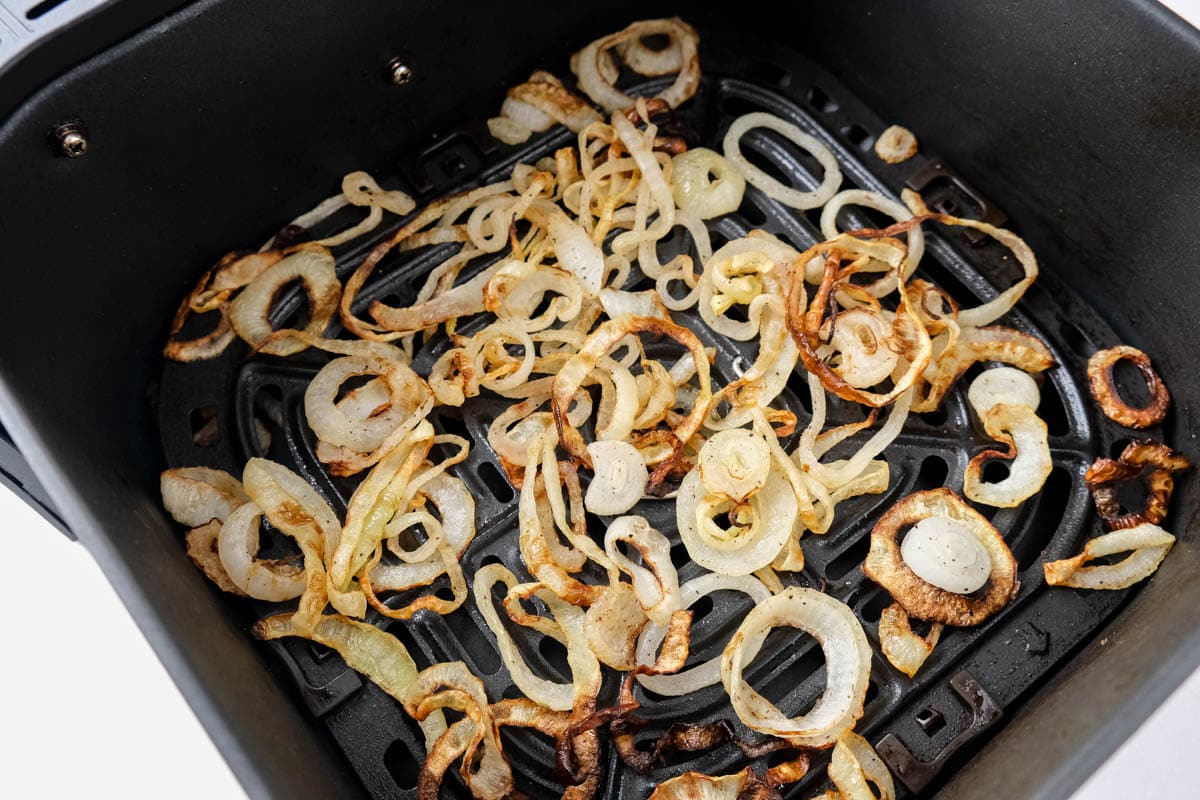
Step 5: Air Frying the Onion
Now comes the exciting part – air frying your blooming onion to crispy perfection. Follow these steps to achieve that irresistible golden brown exterior:
1. Preheat your air fryer to 400°F (200°C) if you haven’t done so already. This will ensure that the air fryer is hot and ready to cook the onion rings evenly.
2. Lightly spray the air fryer basket with cooking spray. This will help prevent the onion rings from sticking to the basket.
3. Place the coated onion rings into the air fryer basket in a single layer, making sure they are not overlapping. It’s best to work in batches if your air fryer is not large enough to accommodate all the onion rings at once.
4. Close the air fryer and set the timer for 8-10 minutes. Cooking times may vary depending on the size of your onion rings and the specific model of your air fryer. Keep a close eye on the onion rings as they cook to prevent them from burning.
5. After the initial cooking time, carefully flip the onion rings using tongs to ensure even browning. Cook for an additional 8-10 minutes or until the onion rings are golden brown and crispy.
6. Once the onion rings are cooked to perfection, remove them from the air fryer basket and transfer them to a serving plate or platter. Be gentle when handling the onion rings to prevent them from falling apart.
7. Repeat the process with any remaining batches of onion rings until all are cooked.
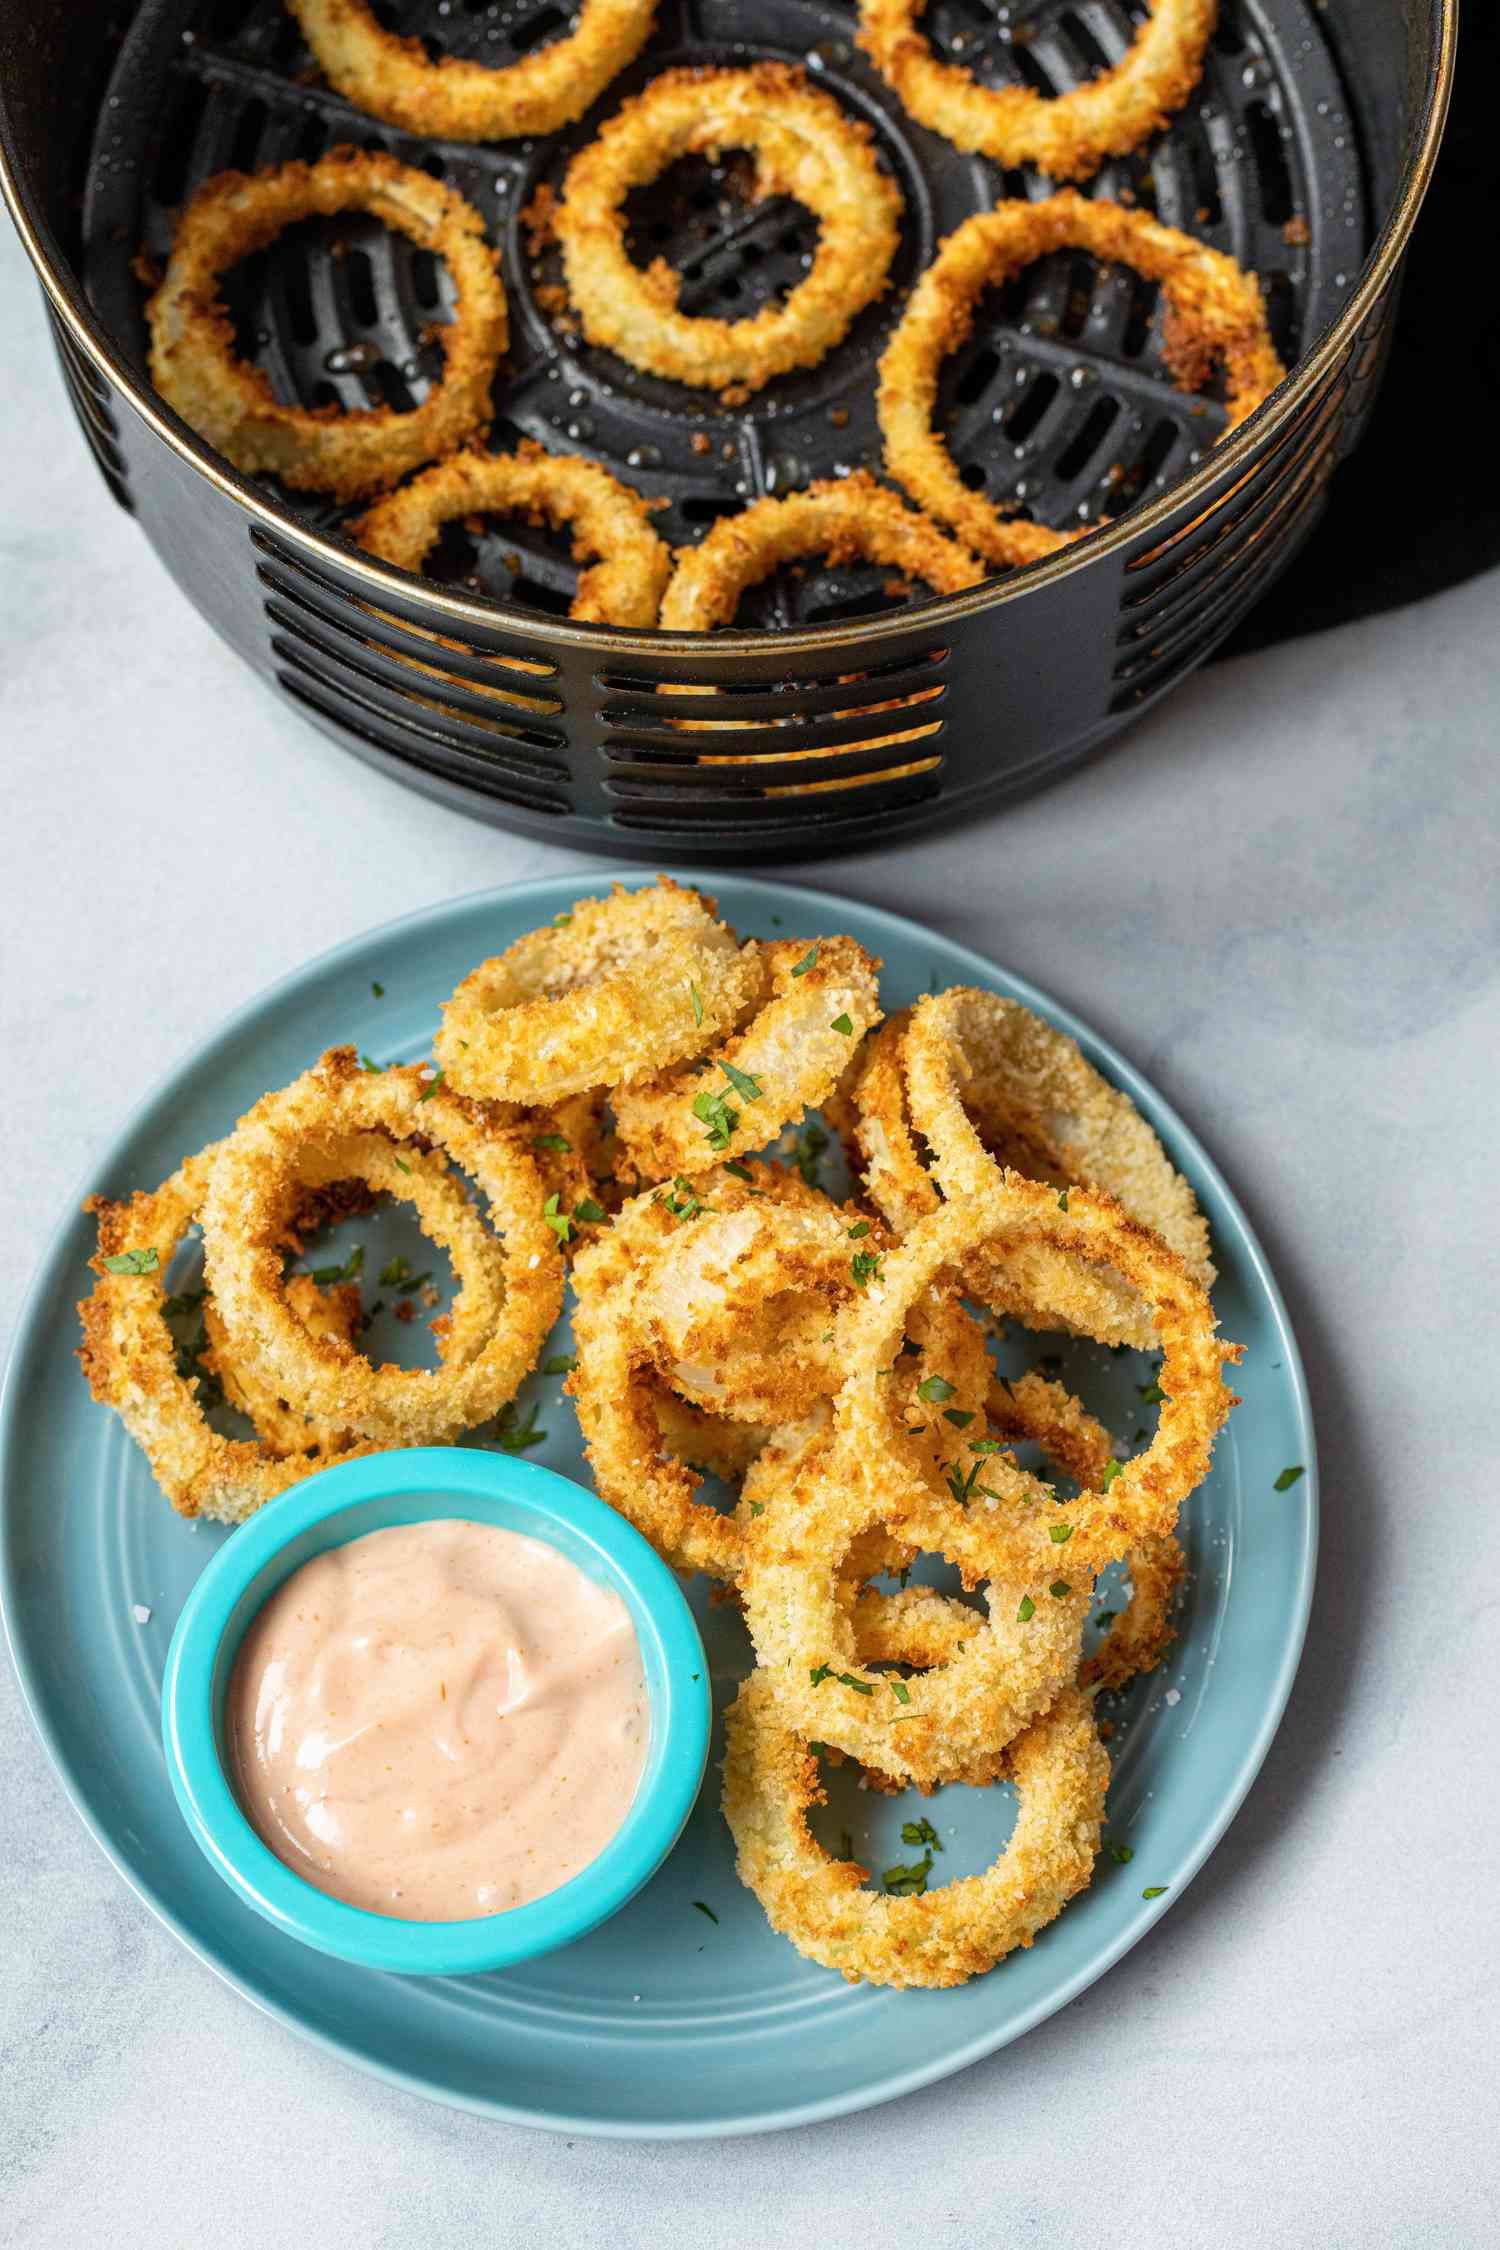
Now that your blooming onion has gone through the magic of air frying, it is transformed into a crispy and flavorful appetizer. All that’s left to do is serve it up and enjoy! But before we dive into savoring this culinary delight, let’s talk about some delicious serving ideas and dipping sauces that will take your blooming onion to the next level of taste sensation.
Step 6: Serving and Enjoying
Congratulations! You’ve successfully made a blooming onion in an air fryer. Now it’s time to serve it up and enjoy the enticing combination of crispy texture and savory flavors. Follow these steps to ensure a delightful dining experience:
1. Transfer the cooked blooming onion to a serving platter. Arrange it carefully to showcase its stunning blooming shape.
2. Garnish the blooming onion with some fresh parsley or chives for an added touch of color and freshness.
3. Serve the blooming onion while it’s still warm to fully enjoy its crispy exterior and tender onion interior. It’s best to enjoy it immediately after cooking to preserve its optimal texture.
4. Pair your blooming onion with a delicious dipping sauce of your choice. Some popular options include tangy aioli, zesty chipotle sauce, or classic ranch dressing. The creamy and flavorful dip will complement the crispy onion rings perfectly.
5. Invite your family and friends to gather around the table and indulge in this delectable appetizer. The visually stunning presentation and mouthwatering taste will surely impress your guests.
6. Take a moment to appreciate the crunchy texture, the burst of flavors, and the satisfaction that comes with creating a restaurant-quality dish right at home.
Remember, the blooming onion is not just a feast for the palate, but also an eye-catching centerpiece for your table. Snap a photo of your masterpiece before it disappears, and feel free to share your culinary creation with friends or on social media to inspire others to try making a blooming onion in an air fryer.
So, grab a slice of the blooming onion, dip it in your favorite sauce, and savor each crispy and savory bite. Enjoy the fruits of your labor and revel in the fact that you’ve mastered the art of making a blooming onion in an air fryer. Cheers to your culinary success!
Conclusion
Making a blooming onion in an air fryer is a delicious and healthier alternative to the traditional deep-fried version. With the right ingredients and a few simple steps, you can enjoy a crispy and flavorful appetizer right in the comfort of your own home.
By prepping the onion, cutting it into beautiful layers, and coating it with a seasoned batter, you create a masterpiece that is visually stunning and bursting with flavor. And with the magic of air frying, you achieve that desirable golden brown texture without the excessive use of oil.
The air fryer not only saves you from the mess and hassle of deep-frying, but it also reduces the calories and fat content, making this blooming onion a guilt-free indulgence. With the help of this incredible kitchen appliance, you can enjoy the same great taste and mouthfeel of a restaurant-quality blooming onion while making a healthier choice.
So, the next time you’re craving a blooming onion, don’t hesitate to bring out your air fryer and give this recipe a try. Impress your family and friends with your culinary skills and let them savor the satisfying crunch and delicious flavors of your homemade creation.
Remember to play around with different spices and dipping sauces to customize the flavor to your liking. Whether you prefer a milder taste or crave a bit of heat, you can adjust the seasonings to suit your palate. The beauty of making your own blooming onion is that you have control over the ingredients and flavors, allowing you to tailor it exactly to your preferences.
So why wait? Gather your ingredients, preheat your air fryer, and get ready to embark on a flavor-filled journey. Whether you’re hosting a gathering or simply treating yourself to a special snack, the blooming onion in an air fryer is sure to be a crowd-pleaser.
Go ahead and elevate your culinary skills by creating a blooming onion that will have everyone coming back for more. Enjoy the crispy exterior, the tender onion center, and the satisfaction of mastering this delectable appetizer. Happy air frying!
Frequently Asked Questions about How To Make A Blooming Onion In An Air Fryer
Was this page helpful?
At Storables.com, we guarantee accurate and reliable information. Our content, validated by Expert Board Contributors, is crafted following stringent Editorial Policies. We're committed to providing you with well-researched, expert-backed insights for all your informational needs.


0 thoughts on “How To Make A Blooming Onion In An Air Fryer”