
Articles
How To Store Breast Pump
Modified: October 20, 2024
Learn the best methods and tips for storing your breast pump properly with our informative articles. Ensure your breast pump remains clean and ready for use.
(Many of the links in this article redirect to a specific reviewed product. Your purchase of these products through affiliate links helps to generate commission for Storables.com, at no extra cost. Learn more)
Introduction
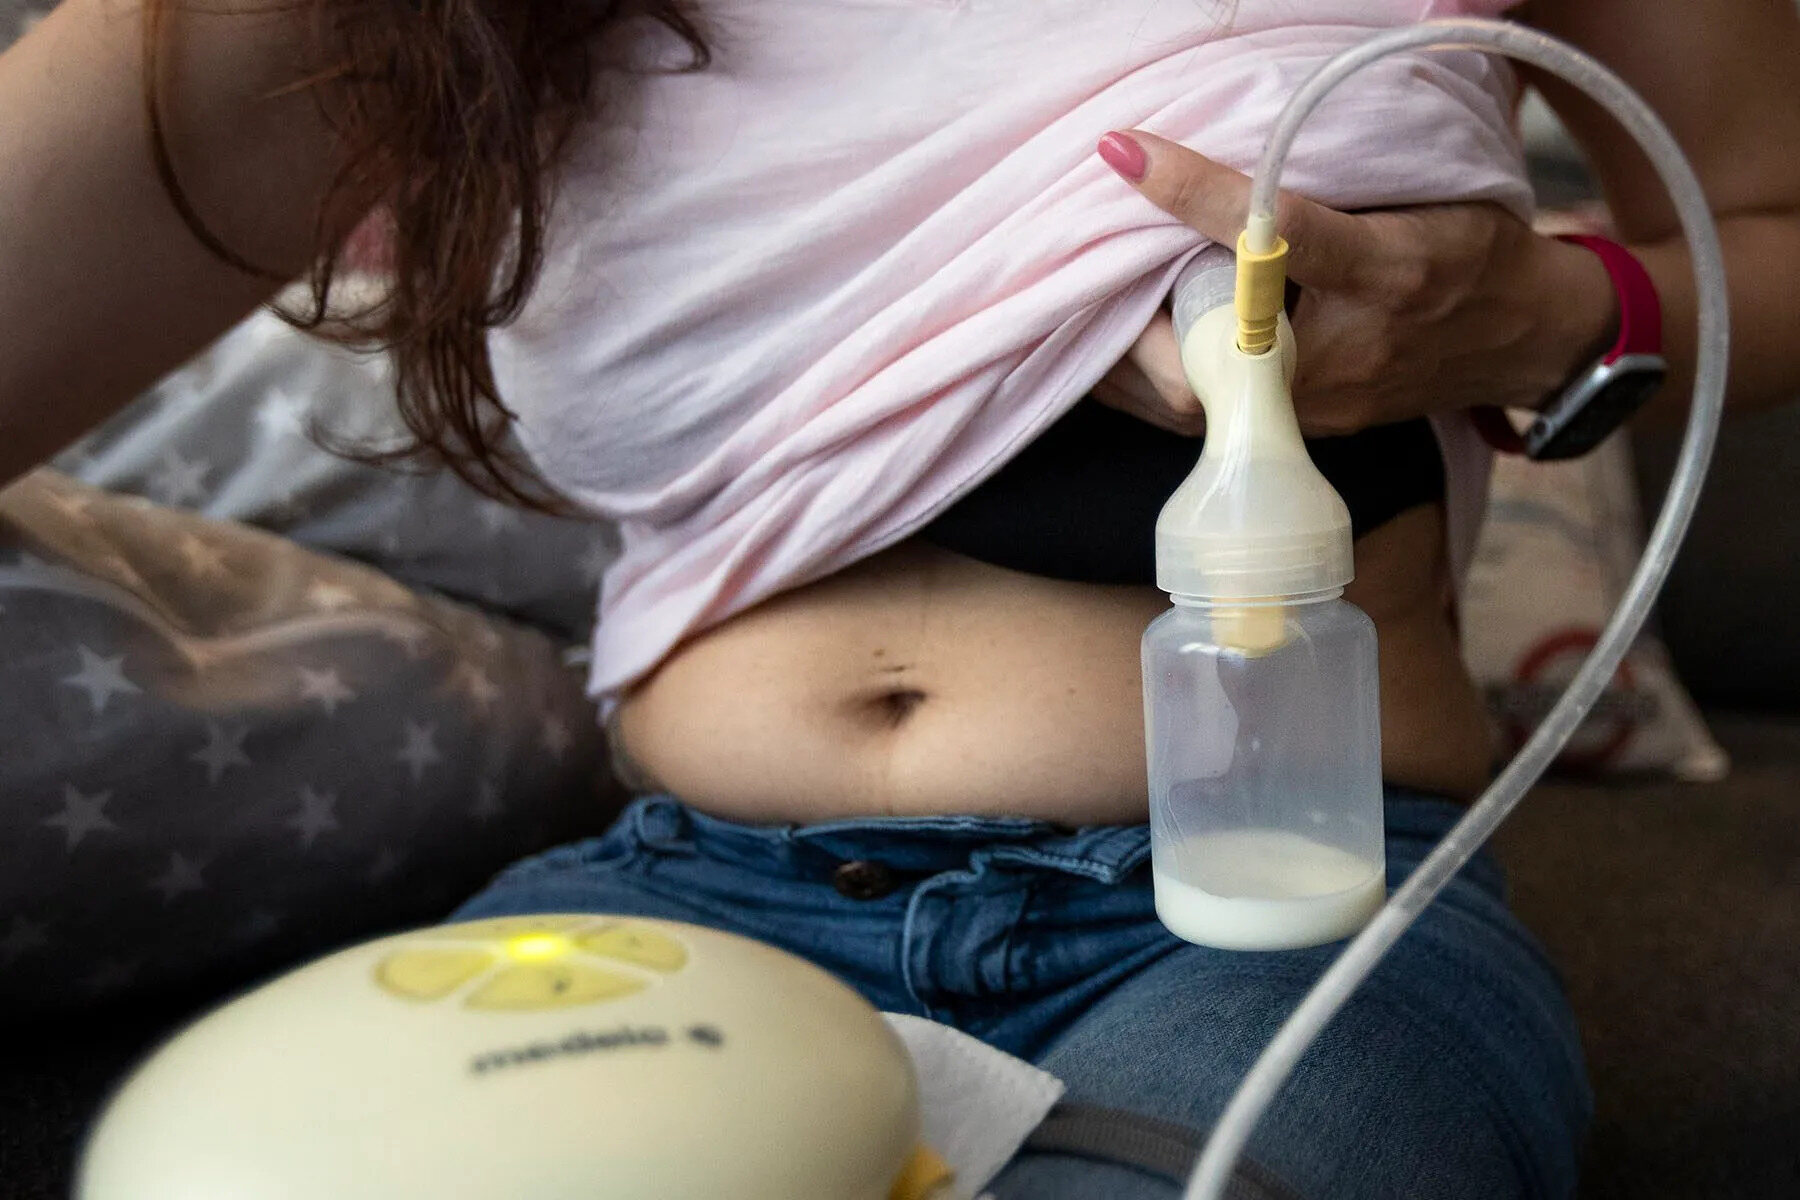
Welcome to our guide on how to store breast pump properly. When you’re a breastfeeding mom, having a breast pump can be a game-changer. It allows you to provide breast milk to your baby even when you are not physically present. But storing breast milk correctly is crucial to maintain its quality and safety. In this article, we will walk you through the step-by-step process of storing breast pump milk, from cleaning to thawing, ensuring that your baby gets the best nutrition even when you are apart.
Proper storage of breast milk is essential to preserve its nutritional value and prevent the growth of bacteria. Whether you are pumping to build a stash for future use or preparing to return to work, following the recommended guidelines will help keep your baby healthy and well-nourished.
By adhering to the steps and tips laid out in this guide, you can ensure that your breast milk remains safe, free from contamination, and retains its essential nutrients. So, let’s get started and learn how to store breast pump properly.
If you are using a breast pump for the first time, you may need to experiment to find the right routine and storage method that works for you. Remember, breast milk is precious, and providing it to your baby is an act of love and care. With that in mind, let’s dive into the details of storing breast pump milk!
Key Takeaways:
- Properly storing breast milk is crucial for maintaining its quality, safety, and nutritional value. Following the steps outlined in this guide ensures that your breast milk remains fresh and safe for your baby to consume, even when you’re not able to breastfeed directly.
- Cleaning and sterilizing your breast pump and storage equipment before each use is essential to prevent contamination and maintain hygiene. Disassembling the breast pump, choosing the right storage containers, and keeping track of dates are key steps in ensuring the optimal nutrition of your baby.
Read more: How To Store Cooked Chicken Breast
Step 1: Cleaning and Sterilizing
Before you begin pumping and storing breast milk, it is crucial to ensure that your breast pump and all its parts are clean and sterilized. Cleanliness is important to maintain the quality and safety of the milk. Here’s how you can clean and sterilize your breast pump:
- Wash your hands: Before handling the breast pump and its parts, wash your hands thoroughly with soap and warm water. This step helps to prevent any contamination.
- Disassemble the pump: Take apart all the detachable parts of your breast pump, such as the breast shields, valves, membranes, and bottles. This allows for a thorough cleaning of each individual component.
- Rinse with cool water: Rinse all the pump parts that come in contact with breast milk with cool water as soon as possible after each use. This step helps to remove any remaining milk residue and prevents it from drying and becoming difficult to clean later on.
- Wash with hot, soapy water: Fill a clean basin or sink with hot water and add a small amount of dish soap specifically formulated for baby bottles or breast pump parts. Use a bottle brush or a soft-bristled brush to scrub the pump parts thoroughly. Pay extra attention to any crevices or hard-to-reach areas.
- Rinse with hot water: Rinse all the pump parts with hot water to remove any soap residue. Ensure that there is no soap or cleanser left on the surface of the parts, as it could contaminate the breast milk.
- Sterilize the parts: After washing, you have the option to sterilize the pump parts. There are several methods to sterilize, including using a steam sterilizer, boiling them in water for at least five minutes, or using microwave steam bags designed for sterilization. Follow the manufacturer’s instructions for your specific breast pump model.
- Air dry: After cleaning and sterilizing, place the pump parts on a clean, dry towel or on a drying rack in a well-ventilated area. Allow the parts to air dry completely before storing or using them again.
By following these steps to clean and sterilize your breast pump, you can ensure that it remains hygienic and safe for both you and your baby. This process eliminates any harmful bacteria and ensures that the expressed breast milk can be stored without any contamination.
Step 2: Disassembling the Breast Pump
Once you have properly cleaned and sterilized your breast pump, it’s time to disassemble it before storing the parts. Disassembling the pump ensures that each component is separate and ready for storage. Here’s how you can disassemble the breast pump:
- Refer to the user manual: If you’re unsure about how to disassemble your specific breast pump model, refer to the user manual that came with it. The manual will provide detailed instructions on how to properly disassemble the pump.
- Remove the breast shields: Carefully detach the breast shields from the pump motor. Usually, they can be twisted or pulled off, depending on the design of the pump. Set the breast shields aside for cleaning or storage.
- Detach the valves and membranes: The valves and membranes are integral parts of the pump mechanism. Separate them from the breast shields and keep them together. These parts need to be clean and in good condition for effective pumping.
- Take off the collection bottles: Remove the collection bottles or containers from the pump. These are the containers where the expressed milk is collected. Make sure to handle them with clean hands and store them separately if needed.
- Disassemble any additional parts: Some breast pumps may have additional accessories or parts that need to be disassembled. This could include backflow protectors, tubing, or connectors. Follow the specific instructions for your pump’s accessories, if applicable.
Disassembling the breast pump allows for proper cleaning of each individual part and ensures that the pump remains sanitary. It also makes storage more convenient, as the parts are separated and ready for use when needed.
Remember, keep all the disassembled parts together in a clean, dry place until you are ready to use them again. Properly maintaining and organizing the components of your breast pump will help prolong its lifespan and ensure its optimal performance.
Step 3: Proper Storage Containers
Choosing the right storage containers is essential when it comes to storing breast milk. The containers should be safe, clean, and designed specifically for storing breast milk. Here are some factors to consider when selecting containers for breast milk storage:
- BPA-free: Ensure that the storage containers you use are BPA-free. Bisphenol A (BPA) is a chemical that can leach into the milk and may pose health risks. Opt for containers made from glass or BPA-free plastic to ensure the safety of your breast milk.
- Sealable: Look for containers with secure and leak-proof lids. This is important to prevent any spills or contamination during storage and transportation.
- Easy to clean: Choose containers that are easy to clean and dishwasher-safe. This will make the cleaning process more convenient and efficient.
- Measurement markings: Containers with clear measurement markings are helpful for accurately measuring and tracking the amount of breast milk you have stored. This is particularly useful if you are pumping and storing milk for a specific purpose, such as for daycare or feeding while you’re away.
- Size and shape: Consider the size and shape of the containers based on your intended use. If you plan to freeze breast milk in batches, select containers with a volume that can accommodate your desired portion size. If you will be using the stored milk for immediate use, smaller containers may be more practical.
There are various options available for breast milk storage containers, including breast milk storage bags, glass containers, and plastic bottles specifically designed for storing breast milk. Choose the option that aligns with your preferences and needs.
Remember to label each storage container with the date of expression using a marker or adhesive labels. This will help you keep track of the freshness and ensure that you prioritize using the oldest milk first.
By selecting appropriate and safe storage containers, you can ensure that your breast milk remains fresh, free from contaminants, and easy to manage. Properly storing your breast milk is essential to maintaining its quality and providing your baby with the best nutritional benefits.
Step 4: Choosing the Right Storage Location
Once you have properly prepared your breast milk and stored it in suitable containers, it’s important to choose the right location for storing the milk. The storage location should be cool, clean, and away from direct sunlight. Here are some factors to consider when choosing the right storage location:
- Refrigerator: If you plan to use the expressed breast milk within a few days, storing it in the refrigerator is a suitable option. Choose a spot in the refrigerator that maintains a consistent temperature, ideally between 32°F (0°C) and 39°F (4°C). Avoid placing the milk in the refrigerator door as it is often subject to temperature fluctuations.
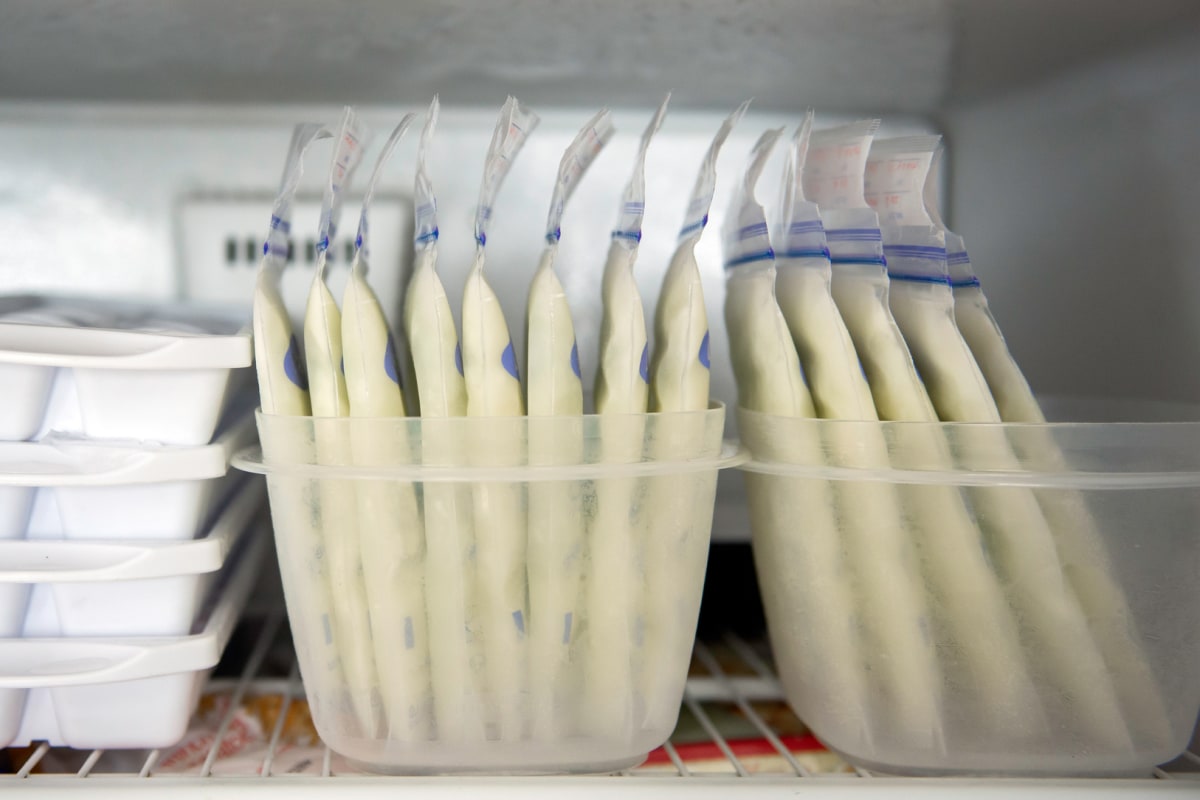
- Freezer: If you want to store breast milk for a longer period, freezing it is the most effective method. The freezer temperature should be set at or below 0°F (-18°C) to maintain the quality and safety of the milk. Note that breast milk expands when frozen, so ensure that you leave enough space in the storage container to accommodate the expansion.
- Freezer compartment of the refrigerator: If you have a separate freezer compartment within your refrigerator, you can use it to freeze breast milk. However, keep in mind that the freezer in the refrigerator compartment may not maintain a consistent temperature as compared to a standalone freezer.
- Deep freezer: A deep freezer is an ideal storage option if you plan to store breast milk for an extended period, such as for several months. Deep freezers are designed to maintain a very cold temperature, which helps to preserve the quality and freshness of the breast milk for a longer period.
It’s important to note that breast milk storage guidelines may vary depending on the specific recommendations from healthcare professionals or organizations. Always consult with your healthcare provider for specific instructions and guidelines based on your individual circumstances.
Remember to place the stored breast milk in the back of the refrigerator or freezer, as this area maintains a more consistent temperature. Avoid storing the milk near raw meats, strong-smelling foods, or cleaning products to prevent any odors or contamination.
Choosing the right storage location ensures that the breast milk remains safe, maintains its nutritional value, and reduces the risk of bacterial growth. Following these guidelines will help you provide your baby with safe and nourishing breast milk even when you are not able to breastfeed directly.
Read more: How To Store Expired Breast Milk
Step 5: Keeping Track of Dates
When it comes to storing breast milk, it is crucial to keep track of the dates to ensure that you use the oldest milk first and maintain the freshness and safety of the milk. Here are some tips for effectively tracking the dates of your stored breast milk:
- Label each storage container: Before storing the breast milk, label each container with the date of expression. You can use a marker directly on the container or attach adhesive labels. This will help you easily identify the oldest milk and prioritize its use.
- First in, first out: When it’s time to use the expressed breast milk, always reach for the container with the earliest date of expression. This practice ensures that the milk is consumed before it reaches its expiration date.
- Rotate storage containers: As you continue to pump and store breast milk, periodically rotate the containers in your storage area. Bring the containers with the oldest dates to the front, and place the newly expressed milk towards the back. This helps to maintain a consistent rotation and prevents any milk from being overlooked or forgotten.
- Use a breast milk storage chart: You may find it helpful to create a breast milk storage chart or use an app that allows you to track and record the dates and quantities of the stored breast milk. This can provide you with an overview of your supply and help you plan accordingly.
By keeping track of the dates, you can ensure that your baby consumes the oldest breast milk first, reducing the risk of spoiling or wasting any milk. It also helps you maintain a well-organized storage system, ensuring that you utilize the stored breast milk efficiently.
Remember, breast milk can be stored in the refrigerator for a certain number of days and in the freezer for a longer period. Be sure to adhere to the recommended storage guidelines provided by healthcare professionals or organizations to ensure the safety and quality of the breast milk.
Keeping track of dates is a simple yet effective way to manage your breast milk supply and ensure that your baby receives the freshest and most nutritious milk possible. By implementing this step in your breast milk storage process, you can feel confident in providing your baby with optimal nutrition.
After each use, disassemble the breast pump and wash all parts that come into contact with breast milk in hot, soapy water. Allow them to air dry completely before storing in a clean, dry place.
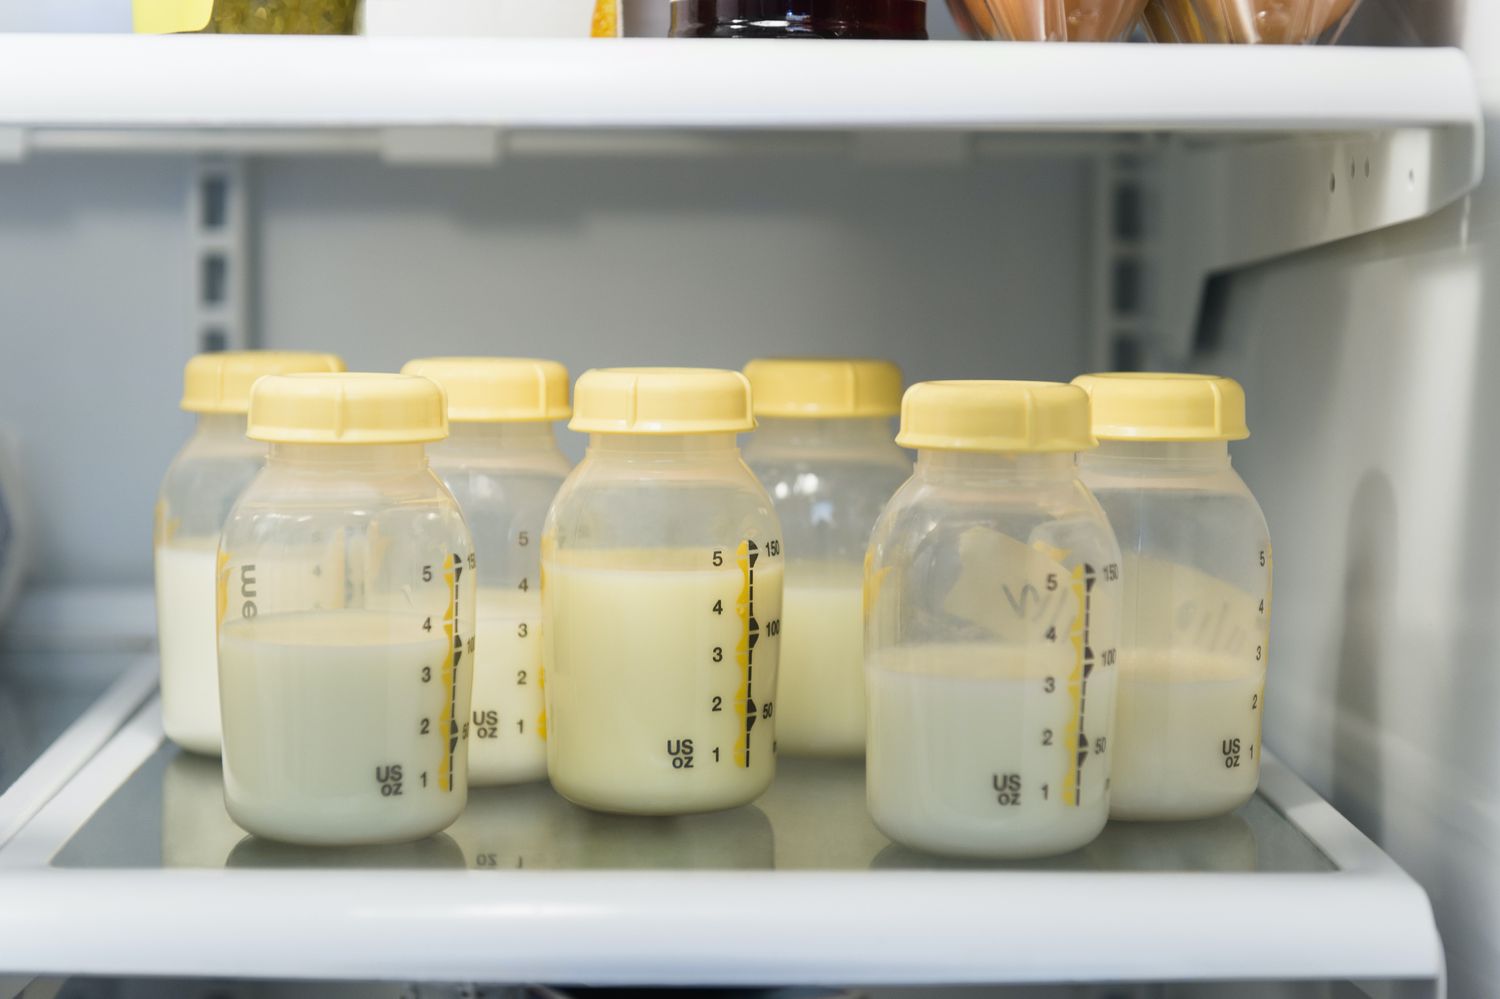
Step 6: Storing in the Refrigerator
The refrigerator is a convenient storage option for breast milk that will be used within a few days. Proper storage in the refrigerator helps to maintain the quality and safety of the breast milk. Here are the steps to store breast milk in the refrigerator:
- Ensure clean hands: Before handling the breast milk and storage containers, wash your hands thoroughly with soap and warm water. This helps to prevent any contamination.
- Transfer the breast milk: Pour the freshly expressed breast milk into clean, sterilized storage containers. Leave some space at the top of each container to allow for expansion when the milk freezes, if you plan to freeze it later on.
- Attach the secure lids: Seal the storage containers with the appropriate lids, ensuring they are tightly secured to prevent any leaks or spills.
- Label the containers: Use a marker or adhesive labels to label each container with the date of expression. This will help you keep track of the freshness and prioritize the use of the oldest milk first.
- Place in the refrigerator: Find a suitable spot in the refrigerator to store the breast milk. It is ideal to keep the milk towards the back of the refrigerator, away from the door, as the temperature in this area tends to be more consistent.
- Store for the recommended duration: Breast milk can be safely stored in the refrigerator for up to 4 days. It is important to note that the longer the milk is stored, the more its nutritional value may diminish. Therefore, it is best to use the refrigerated breast milk within a few days for optimal nutrition.
Remember to avoid storing breast milk in the refrigerator door, as the temperature in that area can fluctuate due to frequent opening and closing of the door. Additionally, do not store breast milk near raw meats, strong-smelling foods, or cleaning products to prevent any odors from transferring to the milk.
Following these guidelines for storing breast milk in the refrigerator will help maintain its freshness, nutritional properties, and safety. Always check the milk for any signs of spoilage before using, such as an off smell or unusual consistency. If you notice any abnormalities, it is best to discard the milk.
Storing breast milk in the refrigerator provides a convenient option for short-term use, ensuring that your baby receives the benefits of your breast milk even when you are not available to breastfeed directly.
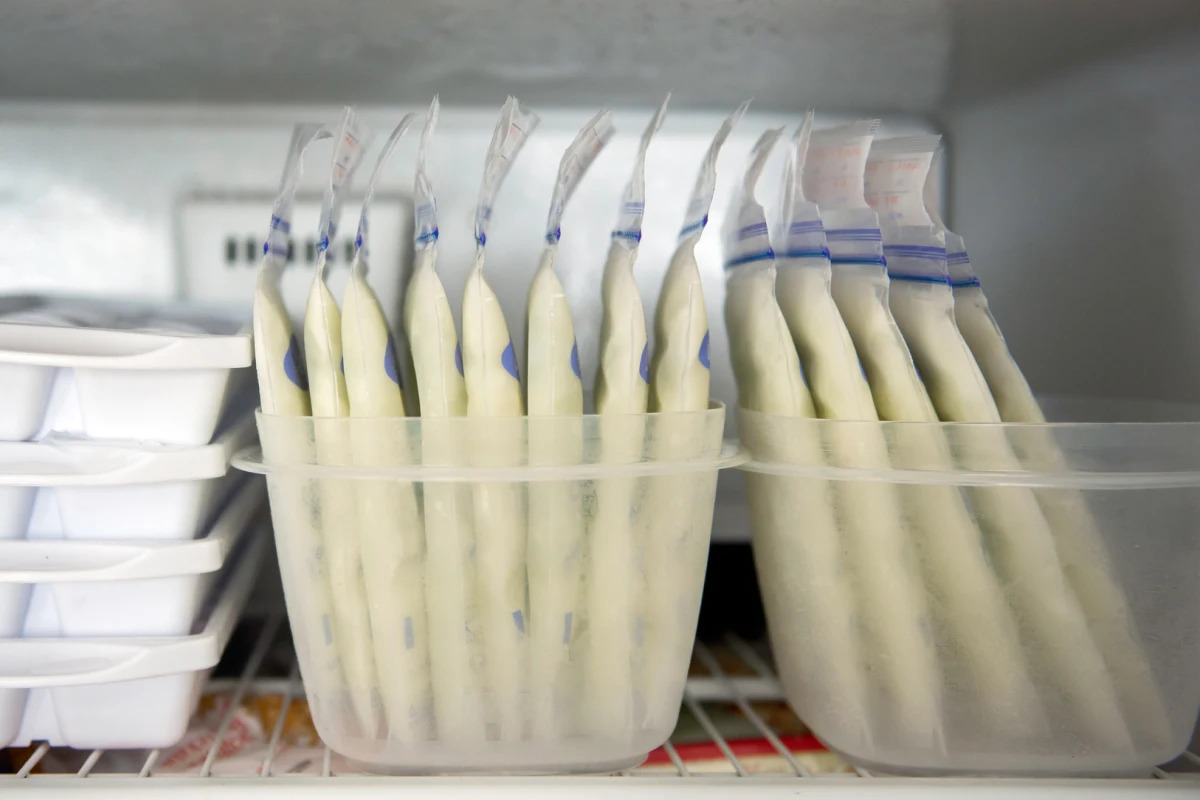
Step 7: Freezing Breast Milk
Freezing breast milk is a great way to extend its shelf life and ensure a steady supply for future use. Freezing helps to preserve the nutrients and quality of the milk. Follow these steps to properly freeze breast milk:
- Prepare the storage containers: Ensure that the storage containers you are using are clean, sterilized, and specifically designed for freezing breast milk. Leave some space at the top of each container to allow for the milk to expand when it freezes.
- Pour the breast milk: Pour the expressed breast milk into the storage containers. It is recommended to freeze breast milk in smaller portions, such as 2 to 4 ounces, to minimize waste and allow for flexible serving sizes later on.
- Seal the containers: Securely attach the lids to the storage containers, ensuring they are tightly sealed. This prevents any potential leaks or spills during the freezing process.
- Label the containers: Use a marker or adhesive labels to clearly label each container with the date of expression. This will help you keep track of the storage duration and prioritize using the oldest milk first.
- Store in the freezer: Find a suitable spot in the freezer to store the breast milk containers. Place them in an area where the temperature remains consistent, such as towards the back of the freezer.
- Organize and stack: Arrange the frozen breast milk containers in an organized manner to maximize space in the freezer. You may consider stacking them in a systematic way to access the oldest milk first, similar to a “first in, first out” approach.
- Freeze for the recommended duration: Breast milk can be safely stored in the freezer for up to 6 months. However, it is best to use the milk within 3 to 4 months for optimal quality and nutrition.
- Keep an inventory: Maintain an inventory of the frozen breast milk, noting the dates and quantities. This will help you keep track of your supply and plan accordingly.
Properly freezing breast milk is crucial to maintaining its quality and safety. By following these steps, you can ensure that your breast milk remains fresh and nutritious, ready to provide your baby with optimal nutrition whenever needed.
Remember to always thaw and use the oldest frozen breast milk first. Thawing breast milk properly is essential to preserve its nutrients and quality, which we will discuss in the next step.
Freezing breast milk gives you the flexibility to build a stockpile and have a convenient supply of breast milk available for future use, whether it is for returning to work, overnight feeds, or other situations where direct breastfeeding may not be possible.
Step 8: Thawing and Preparing for Use
Thawing breast milk correctly is important to preserve its nutrients and maintain its quality. Here are the steps to thaw and prepare frozen breast milk for use:
- Choose the thawing method: There are a few methods you can use to thaw frozen breast milk. The recommended methods include:
- Refrigerator: Transfer the frozen breast milk container from the freezer to the refrigerator. Allow it to thaw slowly overnight or for a few hours until it reaches a liquid state.
- Warm water bath: Place the frozen breast milk container in a container or basin filled with warm water. Ensure that the water level remains below the lid of the container to prevent any water from entering it. Swirl the container occasionally to help distribute the heat evenly. Check the temperature of the breast milk and continue thawing until it reaches the desired temperature.
- Bottle warmer: If you have a bottle warmer that is specifically designed for breast milk, follow the manufacturer’s instructions to thaw the frozen breast milk safely.
- Avoid using microwaves or boiling water: Never thaw or heat breast milk in a microwave or using boiling water. These methods can cause hot spots, which may destroy the valuable nutrients and proteins in the milk.
- Gently swirl, do not shake: Once the breast milk is fully thawed, gently swirl the container to mix the layers of milk. Avoid shaking vigorously, as this can potentially damage the milk’s proteins and decrease its nutritional value.
- Check the temperature: Before feeding the thawed breast milk to your baby, check the temperature by placing a few drops on the inside of your wrist. It should feel lukewarm or at a comfortable temperature, similar to body temperature.
- Use within 24 hours: Once thawed, the breast milk should be used within 24 hours. Discard any remaining milk that was not consumed within this time frame.
- Do not refreeze: It is important to note that once breast milk has been thawed, it should not be refrozen. Once thawed, the milk’s nutritional and protective properties may become diminished, and it is best to use it within the recommended time frame.
Following these steps will help ensure the safe and proper thawing of frozen breast milk. By using the correct thawing methods and maintaining the milk’s quality, you can provide your baby with the nutrition they need while preserving the benefits of breastfeeding.
Remember to practice proper hygiene by washing your hands before handling the thawed breast milk and using clean bottle and nipple equipment for feeding. This helps to minimize the risk of contamination and ensure a safe feeding experience for your baby.
Thawing breast milk provides a convenient way to utilize your frozen supply and ensures that your baby continues to receive the benefits of your breast milk, even when freshly expressed milk may not be available.
Read more: How To Store Breast Milk Soap
Step 9: Cleaning and Disinfecting After Storage
After using stored breast milk, it is important to properly clean and disinfect the storage containers and any other equipment that came into contact with the milk. Here are the steps to ensure proper cleaning and disinfection:
- Pour out any remaining milk: Before you begin cleaning, pour out any remaining breast milk from the storage containers into the sink or a suitable disposal container.
- Take apart and rinse: Disassemble the storage containers and any other equipment such as bottle nipples, caps, or breast pump parts that came into contact with the breast milk. Rinse off any visible residue with cool water to prevent the milk from drying and becoming difficult to clean later on.
- Wash with hot, soapy water: Fill a basin or sink with hot water and add a small amount of dish soap specifically formulated for baby bottles or breast pump parts. Use a bottle brush or a soft-bristled brush to thoroughly wash all the parts, including the storage containers, caps, nipples, and any other equipment. Pay attention to hard-to-reach areas and crevices where milk residue may be present.
- Rinse with hot water: Rinse all the cleaned parts with hot water to remove any soap residue. Ensure that there is no soap or cleanser left on the surface of the parts, as it could impact the taste and safety of the breast milk.
- Sanitize as necessary: Depending on your preference and the recommendations from healthcare professionals or organizations, you may choose to sanitize the cleaned parts to ensure maximum hygiene. Sanitizing can be done by boiling the parts for at least five minutes, using a steam sterilizer, or using microwave steam bags designed for sterilization.
- Air dry or use a clean towel: After cleaning and sanitizing, allow the parts to air dry on a clean, dry towel or on a drying rack. Alternatively, you can use a clean towel to gently pat them dry. Avoid using cloth towels or tissues that may leave behind lint or fibers.
- Store in a clean, dry place: Place the dried storage containers and equipment in a clean, dry area until they are ready for use again. Ensure that they are stored in a way that prevents any potential contamination, such as in a covered container or a closed cabinet.
By following these steps, you can ensure that the storage containers and equipment are properly cleaned and ready for future use. Regular and thorough cleaning after each use of stored breast milk helps to maintain hygienic conditions and prevent the growth of bacteria.
Remember to consult the manufacturer’s instructions for your specific breast pump and storage containers to ensure that you are following the recommended cleaning and sanitizing methods. Additionally, it is important to replace any cracked or damaged storage containers or equipment that may compromise the safety of the breast milk.
By practicing proper cleaning and disinfection processes, you can maintain the quality and safety of your breast milk and provide your baby with the best possible feeding experience.
Conclusion
Properly storing breast milk is crucial for maintaining its quality, safety, and nutritional value. By following the steps outlined in this guide, you can ensure that your breast milk remains fresh and safe for your baby to consume, even when you’re not able to breastfeed directly.
Cleaning and sterilizing your breast pump and storage equipment before each use is essential to prevent contamination and maintain hygiene. Disassembling the breast pump allows for thorough cleaning, while choosing the right storage containers ensures that the breast milk remains safe and free from harmful chemicals.
When storing breast milk, it’s important to select a suitable location, such as a refrigerator or freezer, and keep track of the dates to prioritize using the oldest milk first. Thawing frozen breast milk correctly helps preserve its nutrients and quality, while proper cleaning and disinfection after each use maintain cleanliness and safety.
Remember, every drop of breast milk is valuable, offering numerous health benefits to your baby. By following the steps in this guide, you can ensure that your breast milk is stored, thawed, and prepared properly, providing your baby with the optimal nutrition they deserve.
Lastly, it’s important to consult with healthcare professionals or organizations for specific guidelines and recommendations on breast milk storage. Every situation is unique, and it’s crucial to adapt these guidelines to your individual needs and circumstances.
With the information provided in this guide, you can confidently store and handle your breast milk, ensuring that your baby receives the nourishment they need throughout their developmental journey.
Frequently Asked Questions about How To Store Breast Pump
Was this page helpful?
At Storables.com, we guarantee accurate and reliable information. Our content, validated by Expert Board Contributors, is crafted following stringent Editorial Policies. We're committed to providing you with well-researched, expert-backed insights for all your informational needs.


0 thoughts on “How To Store Breast Pump”