Articles
How To Store DIY Vinyl Rolls
Modified: February 26, 2024
Learn how to store vinyl rolls and keep them organized with this DIY guide. Get tips and ideas for storing vinyl articles to preserve their quality and prevent damage.
(Many of the links in this article redirect to a specific reviewed product. Your purchase of these products through affiliate links helps to generate commission for Storables.com, at no extra cost. Learn more)
Introduction
As a vinyl enthusiast, it’s essential to store your precious vinyl rolls in a way that keeps them safe and preserves their quality. Whether you’re a professional crafter or a DIY hobbyist, having a well-organized and accessible storage system for your vinyl rolls is crucial for an efficient and enjoyable creative process.
In this article, we will guide you through the steps to create your own DIY vinyl roll storage solution. We will explore various materials and techniques that will help you organize, protect, and easily access your vinyl rolls. By following these steps, you can ensure that your inventory stays in pristine condition and that you never have to waste time searching for the perfect roll again.
So, grab your tools and let’s dive into the world of DIY vinyl roll storage!
Key Takeaways:
- Create a DIY vinyl roll storage system by choosing an appropriate location, organizing by size or color, and utilizing protective measures. Maintain and update your system for efficient access to your vinyl rolls.
- Utilize storage solutions such as bins, shelves, and protective sleeves to keep your vinyl rolls organized and protected from dust and sunlight. Regularly assess and update your storage system for optimal efficiency.
Read also: 12 Best Vinyl Roll Storage For 2025
Materials Needed
Before you begin organizing your vinyl roll storage, gather the following materials:
- Storage containers: Choose containers that are durable, stackable, and preferably clear so you can easily see the contents.
- Shelving units: Invest in sturdy shelves that can accommodate the weight of your vinyl rolls and fit well in your storage space.
- Labels: Use adhesive labels or label makers to clearly mark each container with important details, such as the color or type of vinyl inside.
- Protective sleeves: To prevent scratches and damage, consider using plastic sleeves or individual protective covers for each roll.
- Dust covers: Keep your vinyl rolls dust-free by using dust covers or plastic wrap.
- UV-resistant materials: Protect your vinyl from harmful sunlight by using UV-resistant sleeves or storing your rolls in a dark or shaded area.
- Scissors or cutting tools: These are essential for trimming or cutting vinyl rolls as needed.
- Miscellaneous: You might also need a ladder, measuring tape, and cleaning supplies to prepare your storage area.
With these materials in hand, you’ll be ready to start organizing and storing your vinyl rolls in a way that maximizes their lifespan and ease of use.
Step 1: Choose an appropriate storage location
The first step in creating a DIY vinyl roll storage system is to select a suitable location for your collection. Consider the following factors when choosing a storage spot:
- Space availability: Ensure that the area has enough space to accommodate your current collection as well as potential future additions.
- Temperature and humidity: Vinyl rolls are sensitive to extreme temperature and humidity fluctuations. Choose a location with stable conditions to preserve the quality of your rolls.
- Sunlight exposure: Direct sunlight can cause fading and damage to your vinyl rolls over time. Find a spot that is away from windows or use UV-resistant sleeves for added protection.
- Accessibility: Consider how often you access your vinyl rolls. Ideally, choose a location that is easily accessible, allowing you to quickly find and retrieve the rolls you need.
Popular storage locations include spare rooms, closets, basements, or dedicated craft areas. Depending on the size of your collection, you may also consider utilizing wall space and vertical storage solutions to maximize efficiency.
Once you’ve chosen the appropriate storage location, move on to the next step to prepare the area for your vinyl rolls.
Step 2: Prepare the storage area
Now that you have identified the ideal storage location for your vinyl rolls, it’s time to prepare the area. Follow these steps to ensure an organized and conducive storage environment:
- Clean the space: Remove any debris, dust, or clutter from the area. Wipe down surfaces to create a clean and dust-free environment for your vinyl rolls.
- Measure and plan: Take accurate measurements of the storage space, including height, width, and depth. Use these measurements to plan the arrangement of your shelving units or storage containers.
- Consider climate control: If the storage area is subject to extreme temperature or humidity fluctuations, consider installing a dehumidifier or ensuring proper ventilation to maintain ideal conditions for your vinyl rolls.
- Optimize lighting: Adequate lighting is essential for easy browsing and retrieval of your vinyl rolls. Install bright, energy-efficient lights or utilize portable lamps to ensure sufficient illumination.
- Clear pathways: Make sure there is enough space to move around comfortably and that your storage area doesn’t obstruct any walkways or access points.
By taking the time to prepare and organize your storage area, you’ll create an efficient and visually appealing space for your vinyl rolls. With a clean and well-planned storage area, you’ll be ready to move on to the next step: organizing your vinyl rolls.
Step 3: Organize your vinyl rolls by size or color
Now that your storage area is prepped and ready, it’s time to focus on the organization of your vinyl rolls. Organizing your rolls will not only make finding and accessing them easier but also ensure that your collection remains in good condition. Here are some tips for effective organization:
- Sort by size: One way to organize your vinyl rolls is by size. If you have rolls of different widths, group them together to create designated sections for each size. This way, you’ll be able to quickly locate the desired width when working on a project.
- Group by color: Sorting your vinyl rolls by color is another popular organizational method. It allows you to easily find the perfect shade for your projects. You can create separate sections for different colors or use color-coded labels to identify each roll.
- Combination approach: If you have a large collection, you can combine both size and color organization. Group rolls by size and further categorize them within each size group by color. This provides a more detailed and efficient organization system.
- Consider frequency of use: If you have specific rolls that you use more frequently, keep them easily accessible in a separate section or within arm’s reach. This way, you won’t have to dig through the entire collection for your most frequently used rolls.
Remember to label each section or container accordingly to avoid confusion. Use clear and descriptive labels that indicate the size, color, or any other relevant details about the vinyl rolls contained within.
By organizing your vinyl rolls in a logical and systematic way, you’ll save time and effort when searching for the perfect roll for your next project.
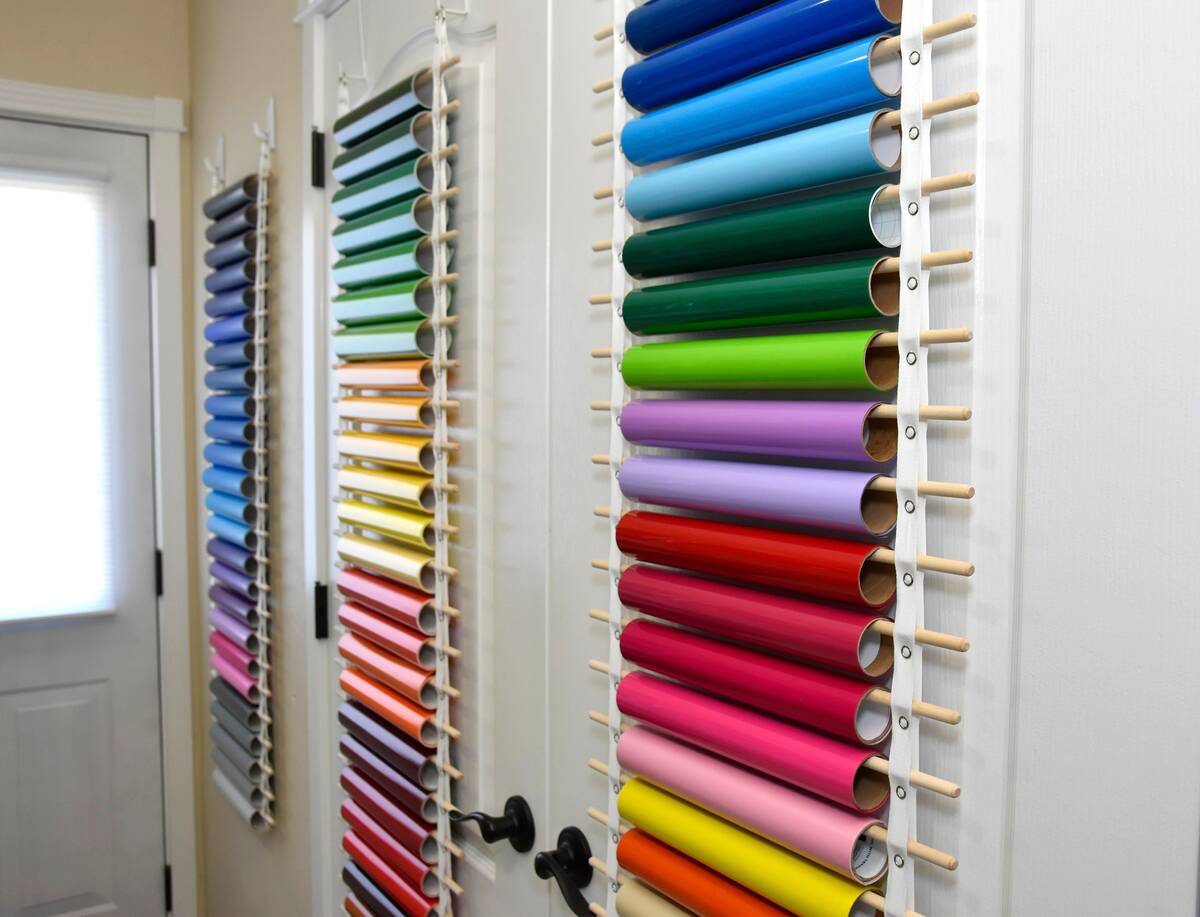
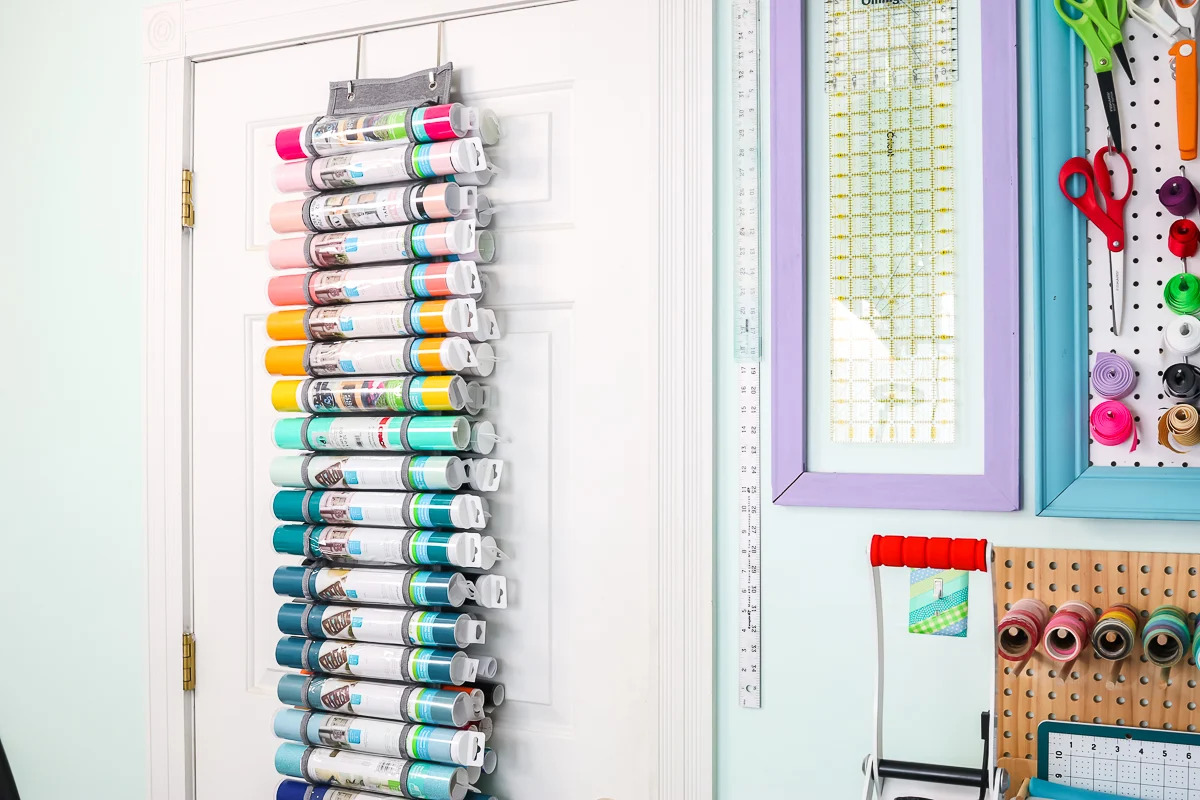
Store vinyl rolls vertically to prevent warping and damage. Use a sturdy rack or holder to keep them organized and easily accessible.
Read more: How To Store Vinyls
Step 4: Utilize storage solutions such as bins or shelves
When it comes to storing your vinyl rolls, having the right storage solutions is essential. Bins, shelves, and other storage options can help maximize space, keep your rolls organized, and protect them from damage. Here are some storage solutions to consider:
- Storage bins: Clear plastic storage bins are a popular choice for storing vinyl rolls. They come in various sizes, allowing you to separate and categorize your rolls. Opt for stackable bins to make the most of your storage space.
- Shelving units: Invest in sturdy shelves to create a designated area for your vinyl rolls. Adjustable shelves are especially beneficial as they allow you to customize the space according to the height of your rolls. Consider installing wall-mounted shelves or freestanding units depending on your storage area.
- Drawer systems: If you prefer a more compact storage option, consider utilizing drawer systems. These can be particularly useful for storing smaller rolls or organizing your rolls by color.
- Hanging storage: Utilize wall space by hanging vinyl roll storage solutions. Wall-mounted racks or specially designed storage pouches can effectively store and display your rolls while keeping them easily accessible.
When using storage solutions, ensure that the containers or shelves are sturdy enough to support the weight of your vinyl rolls. Additionally, consider the accessibility of the storage system – you want to be able to reach your rolls without any hassle.
As you arrange your storage solutions, keep in mind the organization methods discussed in the previous step. Group your rolls together based on size or color and keep them in the appropriate storage containers or on designated shelves.
By utilizing these storage solutions, you’ll not only keep your vinyl rolls neatly organized but also protect them from damage and make efficient use of your storage space.
Step 5: Protect your vinyl rolls from dust and sunlight
Properly protecting your vinyl rolls is crucial for maintaining their quality and preventing damage. Here are some measures you can take to shield them from dust and sunlight:
- Use protective sleeves: Slip each vinyl roll into a protective sleeve to safeguard them from dust, moisture, and scratches. Opt for sleeves made of acid-free and archival-quality materials to ensure the long-term preservation of your rolls.
- Store in dust-free containers: Place your vinyl rolls in dust-free storage containers, such as bins or drawers with lids. This extra layer of protection will help prevent dust particles from settling on the rolls.
- Utilize dust covers: If your storage area is exposed to dust, consider using dust covers or plastic wrap to shield your containers or shelves. These covers provide an additional barrier against dust accumulation.
- Avoid direct sunlight: Sunlight can cause vinyl rolls to fade or warp over time. Keep your storage area away from direct sunlight or install UV-resistant curtains or blinds to block out harmful rays.
- Consider UV-resistant sleeves: If your storage area features windows or is prone to sunlight exposure, use UV-resistant sleeves for enhanced protection. These sleeves are designed to block harmful UV rays and maintain the integrity of your vinyl rolls.
- Keep the storage area clean: Regularly dust and clean your storage area to minimize the presence of dust particles. A clean environment will go a long way in preserving the quality of your vinyl rolls.
By taking these protective measures, you can prolong the lifespan of your vinyl rolls and ensure that they remain in excellent condition for years to come.
Step 6: Label and categorize your vinyl rolls for easy access
Labeling and categorizing your vinyl rolls is a crucial step in creating an organized storage system. Clear and descriptive labels will help you quickly identify and locate the rolls you need for your projects. Here’s how to label and categorize your vinyl rolls effectively:
- Create a labeling system: Decide on a consistent labeling system that works best for you. You can label your rolls based on size, color, material, or any other categorization that suits your needs. Choose labels that are easy to read and affix them to each protective sleeve or container.
- Include necessary information: Make sure your labels include essential information about the rolls, such as color name, type of vinyl, or any other relevant details. This will save you time when searching for specific rolls.
- Color-code your labels: If you have a large collection, consider color-coding your labels. Assign a specific color to each category or type of vinyl roll. This visual cue will make it even easier to locate the desired rolls at a glance.
- Create an inventory list: Keep track of your vinyl rolls by creating an inventory list. Include details such as roll number, color, size, or any other relevant information. This list will serve as a reference and help you stay organized.
- Arrange rolls in a logical order: Organize your vinyl rolls in a way that makes sense to you. You can arrange them alphabetically, by category, or based on your most frequently used rolls. The goal is to create a system that allows for easy access and efficient browsing.
Consistently maintaining your labeling system and updating your inventory list as needed will ensure that you always know what you have and where to find it. With a well-labeled and categorized collection, you’ll save time and frustration when searching for the perfect vinyl rolls for your projects.
Step 7: Maintain and regularly update your storage system
Creating an efficient and organized storage system for your vinyl rolls is not a one-time task. It’s important to maintain and regularly update your system to ensure its effectiveness over time. Here are some tips for maintaining and updating your storage system:
- Regularly assess your collection: Periodically go through your vinyl rolls and assess their condition, usage, and relevance to your current projects. Remove any rolls that you no longer need or that have been damaged beyond repair.
- Reorganize as needed: As your collection grows or changes, reorganize your storage system accordingly. Adjust the arrangement of your rolls, update labels, and make any necessary modifications to ensure optimal organization and ease of access.
- Consider expansion: If you find that your storage space is becoming limited, explore options for expanding your storage capacity. This could involve investing in additional shelving units, utilizing vertical space, or reevaluating your storage containers to maximize efficiency.
- Maintain cleanliness: Regularly clean your storage area to prevent dust buildup and keep your vinyl rolls in pristine condition. Wipe down surfaces, dust shelves, and regularly replace protective sleeves or covers as needed.
- Update your inventory list: Keep your inventory list up to date by adding new rolls and removing any that are no longer in your collection. This will help you stay organized and have an accurate record of your vinyl rolls.
- Review and optimize: Periodically review your storage system to identify any areas for improvement. Look for ways to optimize space usage, streamline organization, and enhance accessibility. This ongoing process will ensure that your storage system is always tailored to your needs.
By maintaining and regularly updating your storage system, you’ll be able to enjoy a well-organized and efficient storage solution for your vinyl rolls. It will save you time and frustration, allowing you to focus on your projects and creative endeavors.
Read more: How To Store Vinyl Records
Conclusion
Congratulations! You have successfully created your own DIY vinyl roll storage system. By following the steps outlined in this article, you have learned how to organize, protect, and maintain your valuable vinyl rolls. Your creativity will now flow smoothly as you can easily access the perfect rolls for your projects without the frustration of searching through disorganized piles.
Remember that choosing an appropriate storage location, preparing the area, and utilizing storage solutions are crucial steps in creating an efficient storage system. Organizing your vinyl rolls by size or color and labeling them accurately will save you time and effort. Protecting your rolls from dust and sunlight ensures their longevity, and maintaining and updating your storage system will keep it efficient and effective in the long run.
As you continue your creative journey, keep in mind the importance of maintaining and updating your storage system regularly. As your vinyl roll collection grows and changes, make necessary adjustments to ensure optimal organization and accessibility.
Now that you have a well-organized storage system, you can focus on what you love most – creating beautiful projects with your vinyl rolls. With easy access to your collection, you can let your imagination run wild and bring your artistic ideas to life.
Enjoy the convenience and satisfaction that comes with having a carefully curated and organized storage system for your vinyl rolls. Happy crafting!
Frequently Asked Questions about How To Store DIY Vinyl Rolls
Was this page helpful?
At Storables.com, we guarantee accurate and reliable information. Our content, validated by Expert Board Contributors, is crafted following stringent Editorial Policies. We're committed to providing you with well-researched, expert-backed insights for all your informational needs.


0 thoughts on “How To Store DIY Vinyl Rolls”