Articles
How To Store Fig Cuttings
Modified: January 5, 2024
Learn how to store fig cuttings with these helpful articles. Start growing your own fig trees today!
(Many of the links in this article redirect to a specific reviewed product. Your purchase of these products through affiliate links helps to generate commission for Storables.com, at no extra cost. Learn more)
Introduction
Welcome to the world of fig trees! Fig trees are not only beautiful additions to your garden or landscape, but they also provide delicious and nutritious fruits. One of the common methods of propagating fig trees is through cuttings. This article will guide you on how to store fig cuttings and successfully grow them into healthy plants.
Fig trees are unique because they can be grown from cuttings rather than seeds. By taking a small part of an existing fig tree and nurturing it, you can create an entirely new tree that shares the same characteristics as its parent. It’s a fantastic way to propagate your favorite fig varieties or share them with friends and family.
Storing fig cuttings is an important step in the propagation process. Cuttings are typically taken during the dormant season when the trees have shed their leaves and are in a resting state. By properly storing these cuttings, you can ensure that they remain viable until it’s time to plant them.
In this article, we will walk you through the step-by-step process of storing fig cuttings. We will discuss the materials needed, how to prepare the cuttings, and the proper techniques for storing them. By following these guidelines, you will be one step closer to growing your own fig trees from cuttings.
So, let’s get started!
Key Takeaways:
- Propagating fig trees from cuttings is a rewarding and sustainable way to grow your favorite varieties. By following the proper storage and planting techniques, you can nurture healthy fig trees and enjoy their delicious fruits.
- Providing the right care, from proper watering and lighting to monitoring for pests and diseases, is essential for the successful growth of fig cuttings. With patience and attention to detail, you can watch your cuttings flourish into thriving fig trees.
Read more: How To Store Ripe Figs
Materials Needed
Before you begin storing fig cuttings, it’s important to gather all the necessary materials. Having everything prepared in advance will make the process smoother and ensure the cuttings are properly stored. Here are the materials you will need:
- A sharp, clean pruning shears or hand pruners: These will be used to take the cuttings from the fig tree. Make sure the blades are sharp to ensure clean cuts and reduce the risk of damaging the plant.
- Fig tree branches or shoots: Look for healthy branches that are around 1/4 to 1/2 inch in diameter and 8-12 inches in length. These should be taken from the previous year’s growth.
- Plastic bags or containers: You will need plastic bags or containers to store the cuttings. Choose ones that are large enough to accommodate the length of the cuttings without bending or damaging them.
- Moistened paper towels or sphagnum moss: This will be used to keep the cuttings hydrated during storage. Moisten the paper towels or moss with water, ensuring they are damp but not soaking wet.
- Rooting hormone (optional): While not necessary, rooting hormone can help increase the success rate of rooting the cuttings. It encourages the growth of roots and improves the chances of the cuttings developing into healthy plants.
- Labels and markers: It’s important to label each bag or container with the variety of the cutting and the date it was taken. This will help you keep track of the different varieties and their progress.
- Cool, dark storage area: Find a cool and dark place to store the cuttings. A basement or garage with a temperature between 35-45°F (1-7°C) is generally ideal. This will help maintain the dormancy of the cuttings.
By gathering these materials ahead of time, you will be well-prepared to store the fig cuttings properly. This will increase their chances of survival and ensure they are ready to be planted when the time comes.
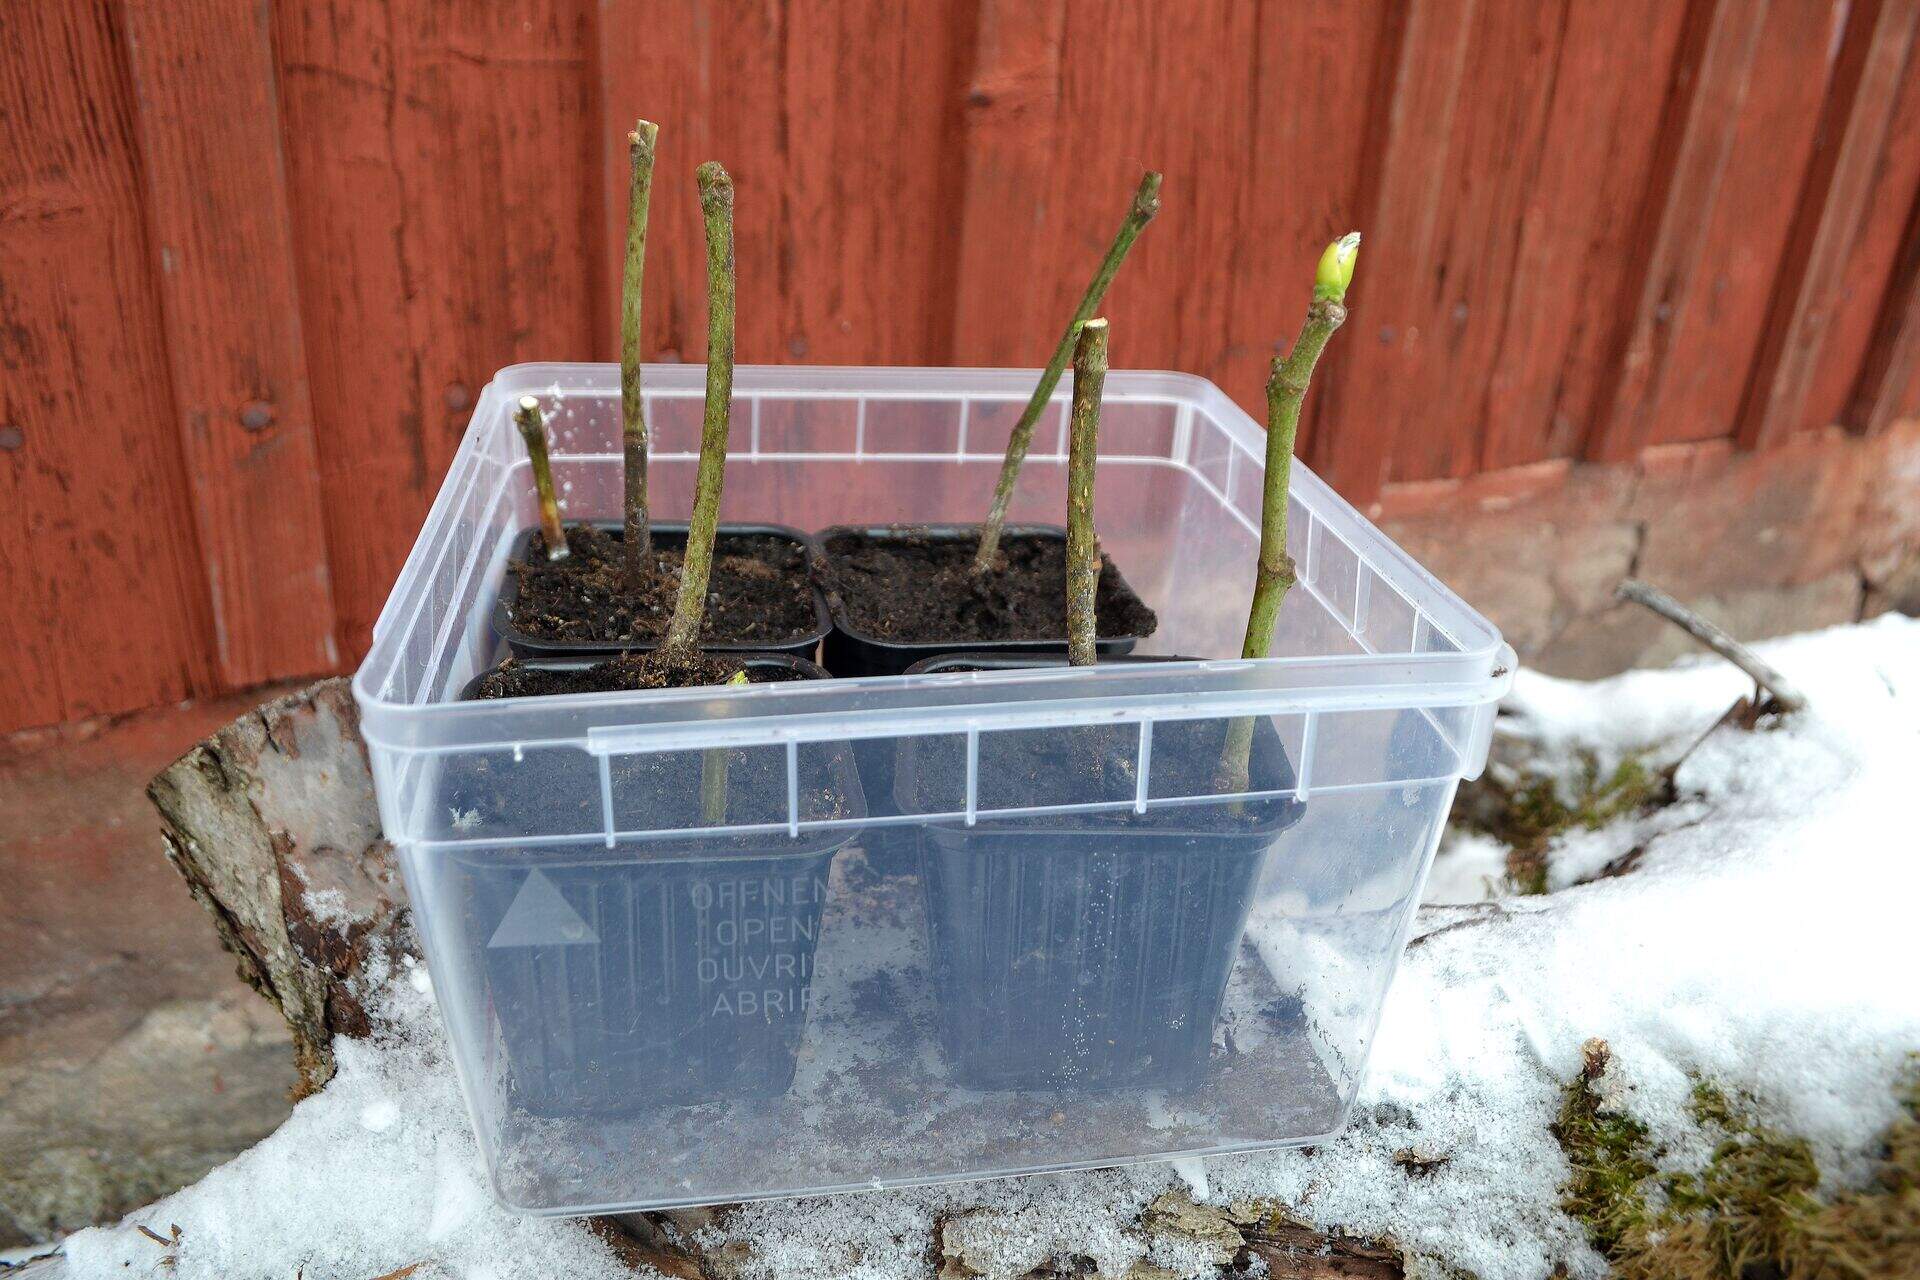
Step 1: Gather Healthy Fig Cuttings
The first step in storing fig cuttings is to gather healthy cuttings from a mature and well-established fig tree. It’s important to select branches that are disease-free and have shown vigorous growth. Here’s how to do it:
- Choose the right time: The best time to take fig cuttings is during the dormant season, which is typically in late winter or early spring. The tree should have shed its leaves, signaling that it is in its resting phase.
- Identify suitable branches: Look for branches that are around 1/4 to 1/2 inch in diameter and 8-12 inches in length. These should be taken from the previous year’s growth. Avoid using branches that are too young or too old, as they may have a lower success rate in rooting.
- Make clean cuts: Use sharp and clean pruning shears or hand pruners to make clean cuts. This will minimize damage to both the mother tree and the cutting itself. Cut the branch at a 45-degree angle just below a node or bud.
- Take multiple cuttings: It’s a good idea to take several cuttings to increase your chances of success. At least 3-4 cuttings per variety should be sufficient.
- Remove any unwanted leaves: Trim off any leaves from the lower half of the cutting. This will help reduce moisture loss during storage and prevent the growth of mold or fungus.
It’s important to note that not all varieties of fig trees are suitable for propagation through cuttings. Some varieties may have a lower success rate, while others may not root at all. It’s best to stick with varieties that are known to be conducive to propagation through cuttings.
Once you have gathered the cuttings, it’s important to proceed with the storage process as soon as possible. This will help maintain their freshness and increase their chances of successful rooting. Follow the next steps to properly store the fig cuttings until it’s time to plant them.
Step 2: Prepare the Potting Medium
After gathering healthy fig cuttings, the next step in storing them is to prepare the potting medium. The potting medium provides the necessary support and nutrients for the cuttings to remain viable during storage. Here’s how to prepare the potting medium:
- Choose the right potting mix: Use a well-draining potting mix that is suitable for rooting cuttings. You can purchase a commercial potting mix or make your own by combining peat moss, perlite, and vermiculite. This will provide the right balance of moisture retention and aeration.
- Sterilize the potting medium: Before using the potting mix, it’s essential to sterilize it to eliminate any potential pathogens or pests. You can do this by heating the potting mix in an oven at 180°F (82°C) for about 30 minutes. Allow it to cool completely before using.
- Moisten the potting mix: Dampen the potting mix with clean, filtered water. It should be moist but not soggy. Avoid using tap water, as it may contain chlorine or other chemicals that can harm the cuttings.
- Add rooting hormone (optional): If desired, you can dip the cuttings in rooting hormone before planting them in the potting mix. Rooting hormone contains hormones and nutrients that stimulate root growth and increase the chances of successful rooting.
Once you have prepared the potting medium, you are ready to move on to the next step: preparing the cuttings for storage. Proper preparation and handling of the cuttings are crucial to their survival and rooting success. Follow the upcoming steps to ensure the cuttings are stored correctly.
Step 3: Prepare the Cuttings
Preparing the fig cuttings for storage is a critical step in ensuring their viability and successful rooting. Proper handling and treatment of the cuttings will help prevent dehydration and increase their chances of developing roots. Here’s how to prepare the cuttings:
- Trim the cuttings: Inspect the cuttings and trim any damaged or diseased parts. Make clean cuts just below a node or bud using sharp, clean pruning shears. This will encourage new growth and increase the chances of successful rooting.
- Dip in water or rooting hormone: To prevent dehydration, dip the bottom ends of the cuttings in clean water or a rooting hormone solution. This will provide moisture and nutrients to the base of the cuttings, promoting root development.
- Wrap with moistened paper towels or sphagnum moss: Moisten some paper towels or sphagnum moss with clean water. Wrap the damp material around the bottom ends of the cuttings to keep them moist during storage. This will help prevent drying out and maintain their vitality.
- Place in plastic bags or containers: Put the wrapped cuttings into plastic bags or containers, making sure not to overcrowd them. Leave enough space between the cuttings to allow for air circulation and prevent mold or fungus growth.
- Label the bags or containers: Use labels or markers to note the variety of the cuttings and the date they were taken. This will help you keep track of the different varieties and their storage duration.
Handling the cuttings with care and attention to detail will ensure their optimal condition during storage. With the cuttings prepared, it’s time to move on to the next step: storing the fig cuttings in a suitable environment. Follow the upcoming steps to learn the best practices for storing the cuttings until they are ready to be planted.
Read more: How To Store Figs In Fridge
Step 4: Plant the Fig Cuttings
Once you have stored the fig cuttings and they have developed roots, it’s time to plant them and provide them with the opportunity to grow into healthy fig trees. Here’s how to plant the fig cuttings:
- Prepare the planting site: Choose a suitable location in your garden or landscape for planting the fig cuttings. Ensure that the soil is well-draining and receives plenty of sunlight, as fig trees thrive in full sun.
- Prepare the planting holes: Dig planting holes that are deep enough to accommodate the root system of the cuttings. The hole should be about 6 inches deep and wide enough to allow for easy insertion of the roots.
- Remove the cuttings from storage: Gently remove the cuttings from the plastic bags or containers, being careful not to damage the delicate roots. Remove any wrapping material or moss around the base of the cuttings.
- Place the cuttings in the planting holes: Insert the cuttings into the prepared planting holes, ensuring that the roots are spread out evenly. The base of the cutting, where the roots meet the stem, should be level with the soil surface.
- Backfill the holes: Gradually backfill the holes with the soil, firming it gently around the roots to provide stability. Avoid compacting the soil too much, as it may hinder root growth.
- Water the newly planted cuttings: After planting, thoroughly water the cuttings to settle the soil and provide moisture to the roots. Use a gentle stream of water to avoid displacing the soil around the cuttings.
- Apply mulch: Add a layer of organic mulch around the base of the cuttings to conserve moisture and suppress weed growth. Keep the mulch a few inches away from the stem to prevent rotting.
- Provide ongoing care: Regularly water the newly planted cuttings to keep the soil consistently moist but not waterlogged. Monitor for signs of growth and protect the young plants from extreme weather conditions or pests.
By following these steps and providing proper care, your fig cuttings have the potential to develop into strong and productive fig trees. Keep in mind that it may take time for the cuttings to establish and grow, so be patient and maintain a consistent care routine.
Congratulations! You have successfully planted your fig cuttings and are on your way to enjoying the beauty and bounty of fresh figs in your own garden.
When storing fig cuttings, make sure to keep them in a cool, dark place with good air circulation to prevent mold and rot. Check them regularly for any signs of decay and remove any affected cuttings immediately.
Step 5: Watering the Cuttings
Proper watering is essential for the growth and establishment of fig cuttings. Adequate moisture will help the roots develop and prevent dehydration, while excessive watering can lead to root rot and other issues. Here’s how to properly water your fig cuttings:
- Monitor the soil moisture: Check the moisture level of the soil regularly by inserting your finger about an inch or two into the soil. If it feels dry at this depth, it’s time to water the cuttings.
- Water deeply: When watering, ensure that the water reaches the root zone of the fig cuttings. Use a gentle stream of water and apply it directly to the soil around the base of the cuttings. Avoid wetting the leaves excessively, as this can cause fungal diseases.
- Water gradually: Water the cuttings gradually to allow the soil to absorb the moisture without causing runoff. Slow and steady watering is more effective in promoting root growth than quick and heavy watering.
- Provide consistent moisture: Aim for consistent moisture in the soil, but avoid overwatering. The soil should be slightly moist but not overly saturated. Avoid allowing the soil to dry out completely between waterings.
- Use mulch: Applying a layer of organic mulch around the base of the cuttings can help retain soil moisture and reduce weed growth. Mulch also acts as an insulator, protecting the roots from extreme temperature fluctuations.
- Adjust watering based on environmental conditions: Be mindful of environmental factors such as temperature, humidity, and rainfall. During hot and dry periods, you may need to increase the frequency of watering. Conversely, during cooler and rainy periods, reduce watering to prevent waterlogged soil.
- Observe plant response: Pay attention to the growth and appearance of the cuttings, as they can provide clues about their water needs. Wilting or yellowing leaves may indicate underwatering, while yellowing or drooping leaves may indicate overwatering.
- Consider the stage of growth: As the cuttings develop into young plants, their water requirements may change. Adjust the watering regimen accordingly, providing more water as the plants establish and grow.
Remember, maintaining proper soil moisture is crucial for the success of your fig cuttings. By providing them with adequate and consistent moisture, you’ll encourage healthy root development and overall growth.
Continue to monitor and adjust your watering practices as the fig cuttings progress, taking into account the specific needs of your particular variety and environmental conditions. With proper watering, your fig cuttings will have the best opportunity to flourish into thriving fig trees.
Step 6: Provide Proper Lighting
Proper lighting is crucial for the growth and development of your fig cuttings. Fig trees thrive in full sun, so providing adequate light is essential for their success. Here’s how to ensure your cuttings receive the proper lighting:
- Choose a sunny location: Select a planting site that receives at least 6-8 hours of direct sunlight every day. Fig trees require ample sunlight to photosynthesize and produce energy for growth.
- Consider light intensity: In addition to the duration of sunlight, consider the intensity of the light. Figs prefer bright, direct sunlight rather than weak or filtered light. Placing the cuttings in a spot with unobstructed sunlight will provide the best lighting conditions.
- Monitor for sunburn: While fig trees enjoy sun, excessive heat and intense, direct sunlight can cause sunburn on the leaves. If you notice leaf burn or discoloration, consider providing a bit of shade during the hottest part of the day, especially in hot climate regions.
- Rotate the cuttings: If growing your fig cuttings indoors under artificial light, rotate the pots regularly to ensure all sides of the plant receive adequate light. This will help prevent the cuttings from leaning or growing in one direction in search of light.
- Supplement with grow lights: If you are unable to provide sufficient natural sunlight, you can supplement with artificial grow lights. LED grow lights or fluorescent lights with a spectrum similar to natural sunlight can be used to provide the necessary light energy for the cuttings. Position the lights at an appropriate distance from the plants to avoid burning the foliage.
- Observe the plant’s response: Monitor the growth and appearance of the cuttings. If they are not receiving enough light, they may become leggy, with elongated stems and sparse foliage. On the other hand, if they are receiving too much light, they may become stressed and exhibit leaf scorch or discoloration.
- Make adjustments as needed: Based on the plant’s response and the available light conditions, make any necessary adjustments. This may include repositioning the plants, providing shade during extreme heat, or adjusting the duration and intensity of artificial grow lights.
By providing the right amount and quality of light, you will optimize the growth and health of your fig cuttings. Remember to strike a balance between sunlight and shade, ensuring that the cuttings receive enough light without being subjected to excessive heat or direct sunlight. With proper lighting, you can encourage strong and vigorous growth in your fig trees.
Step 7: Maintain a Suitable Temperature
Maintaining a suitable temperature is essential for the health and development of your fig cuttings. Fig trees are typically hardy and can tolerate a range of temperatures, but providing optimal conditions will increase their chances of successful growth. Here’s how to maintain a suitable temperature for your fig cuttings:
- Understanding Temperature Requirements: Fig trees thrive in temperatures between 60°F (16°C) and 85°F (29°C). During the growing season, they can tolerate warmer temperatures, but extreme heat can stress the cuttings. In the dormant season, the cuttings need cooler temperatures to promote dormancy and root development.
- Provide Adequate Ventilation: Proper air circulation is important for preventing heat buildup and reducing the risk of fungal diseases. If growing your fig cuttings indoors, place them in a well-ventilated area to ensure a fresh supply of air.
- Protect from Extreme Cold: While fig trees are generally hardy, prolonged exposure to freezing temperatures can damage or kill the cuttings. If frost or freezing temperatures are expected, take measures to protect the cuttings, such as moving them to a sheltered location or covering them with a breathable fabric or frost blanket.
- Monitor Indoor Temperatures: If growing your fig cuttings indoors, ensure that the temperature remains within the suitable range. Avoid placing the cuttings near heat sources or in drafty areas that may cause temperature fluctuations.
- Utilize Heat Mats (Optional): For faster rooting, you can use heat mats underneath the containers to provide gentle bottom heat to the cuttings. This can help stimulate root growth, especially in cooler conditions. Use a thermostat to maintain the desired temperature range.
- Observe Plant Response: Monitor the growth and overall health of the fig cuttings. Look for signs of stress or discomfort such as wilting, leaf discoloration, or slow growth. These may indicate temperature-related issues, and adjustments should be made accordingly.
- Adjust as Needed: Based on your observation and the specific requirements of your fig variety, make adjustments to the temperature conditions. Aim to provide a stable and consistent temperature, avoiding extreme fluctuations.
By maintaining a suitable temperature, you provide the optimal growing conditions for your fig cuttings. Balancing the temperature range throughout the seasons and ensuring adequate ventilation will help your cuttings thrive and establish healthy root systems.
Remember, fig trees are adaptable to a range of temperatures, but providing them with the best conditions will promote optimal growth and increase their chances of developing into strong and productive plants.
Read more: How To Store Dried Figs
Step 8: Monitor and Protect the Cuttings
Monitoring and protecting your fig cuttings is crucial for their successful growth and development. By keeping a close eye on their progress, you can address any issues promptly and provide the necessary care to ensure their well-being. Here’s how to monitor and protect your fig cuttings:
- Regularly check moisture levels: Monitor the moisture level of the potting medium to ensure it remains consistently moist but not waterlogged. Use your finger to check the soil’s moisture level, and adjust your watering schedule accordingly.
- Inspect for pests and diseases: Regularly inspect the cuttings for signs of pests, such as aphids or mites, and diseases like powdery mildew or root rot. Early detection allows for prompt treatment and minimizes potential damage to the cuttings.
- Address any issues promptly: If you notice any signs of pests, diseases, or nutrient deficiencies, take immediate action. Remove any affected leaves or sections, and apply appropriate treatments or remedies to prevent further spread.
- Provide support as needed: As the cuttings start to grow and develop shoots, they may require support to prevent bending or breaking. Use stakes or gentle tying techniques to provide support and maintain the desired shape and structure of the plants.
- Protect from extreme weather conditions: Shield the cuttings from prolonged exposure to harsh weather elements such as heavy rain, strong winds, or extreme heat. Move the pots or provide temporary covers to minimize stress and damage.
- Monitor for signs of root development: Gently check the base of the cuttings for signs of root growth. You can do this by carefully lifting one or two cuttings to check if they have developed healthy white roots. This indicates that the cuttings are ready for transplantation.
- Record and track progress: Keep a record of the growth milestones, including the date the cuttings were taken, the appearance of roots, and any notable changes. This will help you assess their progress and make adjustments if needed.
- Provide appropriate space: As the fig cuttings grow and develop, ensure they have enough space in their containers or planting area. Overcrowding can lead to competition for resources and stunted growth.
By actively monitoring and protecting your fig cuttings, you can address any issues promptly and provide the necessary care to promote their optimal growth and development. With attentive and diligent care, your fig cuttings will have the best chance of growing into healthy and productive fig trees.
Step 9: Transplanting the Rooted Cuttings
Once your fig cuttings have developed a healthy root system, it’s time to transplant them into their permanent growing location. Transplanting allows the fig trees to continue their growth and establish themselves in a more suitable environment. Here’s how to transplant the rooted cuttings:
- Choose a suitable location: Select a planting site in your garden or landscape that meets the sun and soil requirements of fig trees. Ensure the soil is well-draining and provides enough space for the mature size of the fig tree.
- Prepare the planting hole: Dig a hole that is wider and deeper than the root ball of the rooted cutting. The hole should be large enough to accommodate the roots without crowding or bending them.
- Remove the rooted cutting from the container: Gently tap the sides and bottom of the container to loosen the root ball. Carefully remove the rooted cutting from the container, holding it by the base of the stem to avoid damaging the roots.
- Place the rooted cutting in the planting hole: Lower the rooted cutting into the prepared hole, ensuring that it is planted at the same depth it was in the container. The base of the stem should be level with the ground or slightly above it.
- Backfill and firm the soil: Gradually backfill the hole with soil, making sure to eliminate any air pockets. Compact the soil gently around the roots to provide stability and support to the plant.
- Water thoroughly: Give the transplanted fig cutting a generous watering to settle the soil and ensure good contact between the roots and the surrounding soil. This will help the plant establish itself in its new location.
- Apply mulch: Apply a layer of organic mulch around the base of the plant, leaving a few inches of space around the stem to prevent rot. Mulch will help conserve moisture, regulate temperature, and suppress weed growth.
- Provide ongoing care: After transplanting, continue to care for the fig tree by watering regularly, providing adequate sunlight, and monitoring for any signs of pests, diseases, or nutrient deficiencies.
Transplanting the rooted cuttings is an exciting step as it marks the beginning of your fig tree’s journey in its permanent home. With proper care and attention, your fig trees will continue to grow, thrive, and eventually reward you with delicious fig fruits.
Remember to be gentle when handling the rooted cuttings and provide the necessary support and care to help them adjust to their new environment. With time and proper care, your newly transplanted fig trees will establish themselves and become a valuable addition to your garden or landscape.
Conclusion
Congratulations on completing the process of storing fig cuttings and taking the first steps towards growing your own fig trees! By following the steps outlined in this guide, you have learned how to gather healthy cuttings, prepare the potting medium, and store the cuttings until they develop roots. Additionally, you’ve discovered how to plant the rooted cuttings, provide them with proper lighting, maintain suitable temperatures, and monitor their progress.
Growing fig trees from cuttings is a rewarding journey that allows you to propagate your favorite fig varieties or share them with others. It requires patience, care, and attention to detail, but the end result is well worth the effort. As your fig trees continue to grow, don’t forget to provide them with ongoing care, such as regular watering, protection from pests and diseases, and monitoring their overall health and growth.
Remember that each variety of fig tree may have its own unique requirements and characteristics, so it’s essential to research and understand the specific needs of the variety you are growing. Additionally, gardening practices may vary depending on your climate, so adapt the recommendations to suit your local conditions.
Now that you have the knowledge and skills to store and grow fig cuttings, you can enjoy the process of nurturing these beautiful trees and harvesting flavorful fig fruits. Whether you’re growing them for their ornamental value or for their sweet and juicy fruits, fig trees will bring beauty, shade, and a touch of nature to your garden or landscape.
So, get started on your fig-growing adventure, and watch as your cuttings transform into thriving fig trees, ready to provide you with years of enjoyment and a bountiful harvest. Happy fig growing!
Frequently Asked Questions about How To Store Fig Cuttings
Was this page helpful?
At Storables.com, we guarantee accurate and reliable information. Our content, validated by Expert Board Contributors, is crafted following stringent Editorial Policies. We're committed to providing you with well-researched, expert-backed insights for all your informational needs.


0 thoughts on “How To Store Fig Cuttings”