Articles
Why Does My Freezer Have Frost
Modified: October 20, 2024
Discover the reasons behind frost buildup in your freezer with our informative articles. Learn how to prevent and troubleshoot freezer frost issues.
(Many of the links in this article redirect to a specific reviewed product. Your purchase of these products through affiliate links helps to generate commission for Storables.com, at no extra cost. Learn more)
Introduction
Having a freezer is a convenient way to store and preserve food for an extended period. However, if you’ve noticed a layer of frost accumulating inside your freezer, you might be wondering why this is happening and if it’s something to be concerned about. Frost build-up in freezers is a common occurrence that can affect the performance and efficiency of your appliance. In this article, we will explore the causes of frost in freezers and provide you with practical tips on how to prevent it.
Understanding the reasons behind frost formation is crucial in maintaining the optimal functioning of your freezer. When frost develops, it can create an insulating layer that reduces the efficiency of your freezer, causing it to consume more energy and potentially impact the quality of stored food.
Additionally, excessive frost can lead to a decrease in available storage space since it takes up valuable room that could be used for other items. By understanding the causes and taking preventive measures, you can keep your freezer frost-free and functioning effectively for years to come.
Now, let’s dive into the various factors that contribute to the development of frost in freezers and explore solutions to prevent them.
Key Takeaways:
- Prevent frost build-up in your freezer by maintaining proper door sealing, limiting door openings, controlling humidity levels, and addressing defrost system issues. These measures ensure efficient freezing and food preservation.
- Regularly inspect and maintain your freezer to prevent frost build-up. Replace damaged door gaskets, seal air leaks, and set the right temperature to maintain optimal freezing conditions. A well-maintained freezer ensures long-lasting freshness of your food items.
Read more: Why Does My Dryer Have Water In It
Understanding Frost in Freezers
Before we delve into the causes and prevention of frost build-up in freezers, let’s first understand what frost is and how it forms. Frost is simply condensed water vapor that freezes on surfaces, such as the walls and shelves of your freezer. When warm moisture-laden air enters the freezer, it comes into contact with cold surfaces and condenses, leading to frost formation.
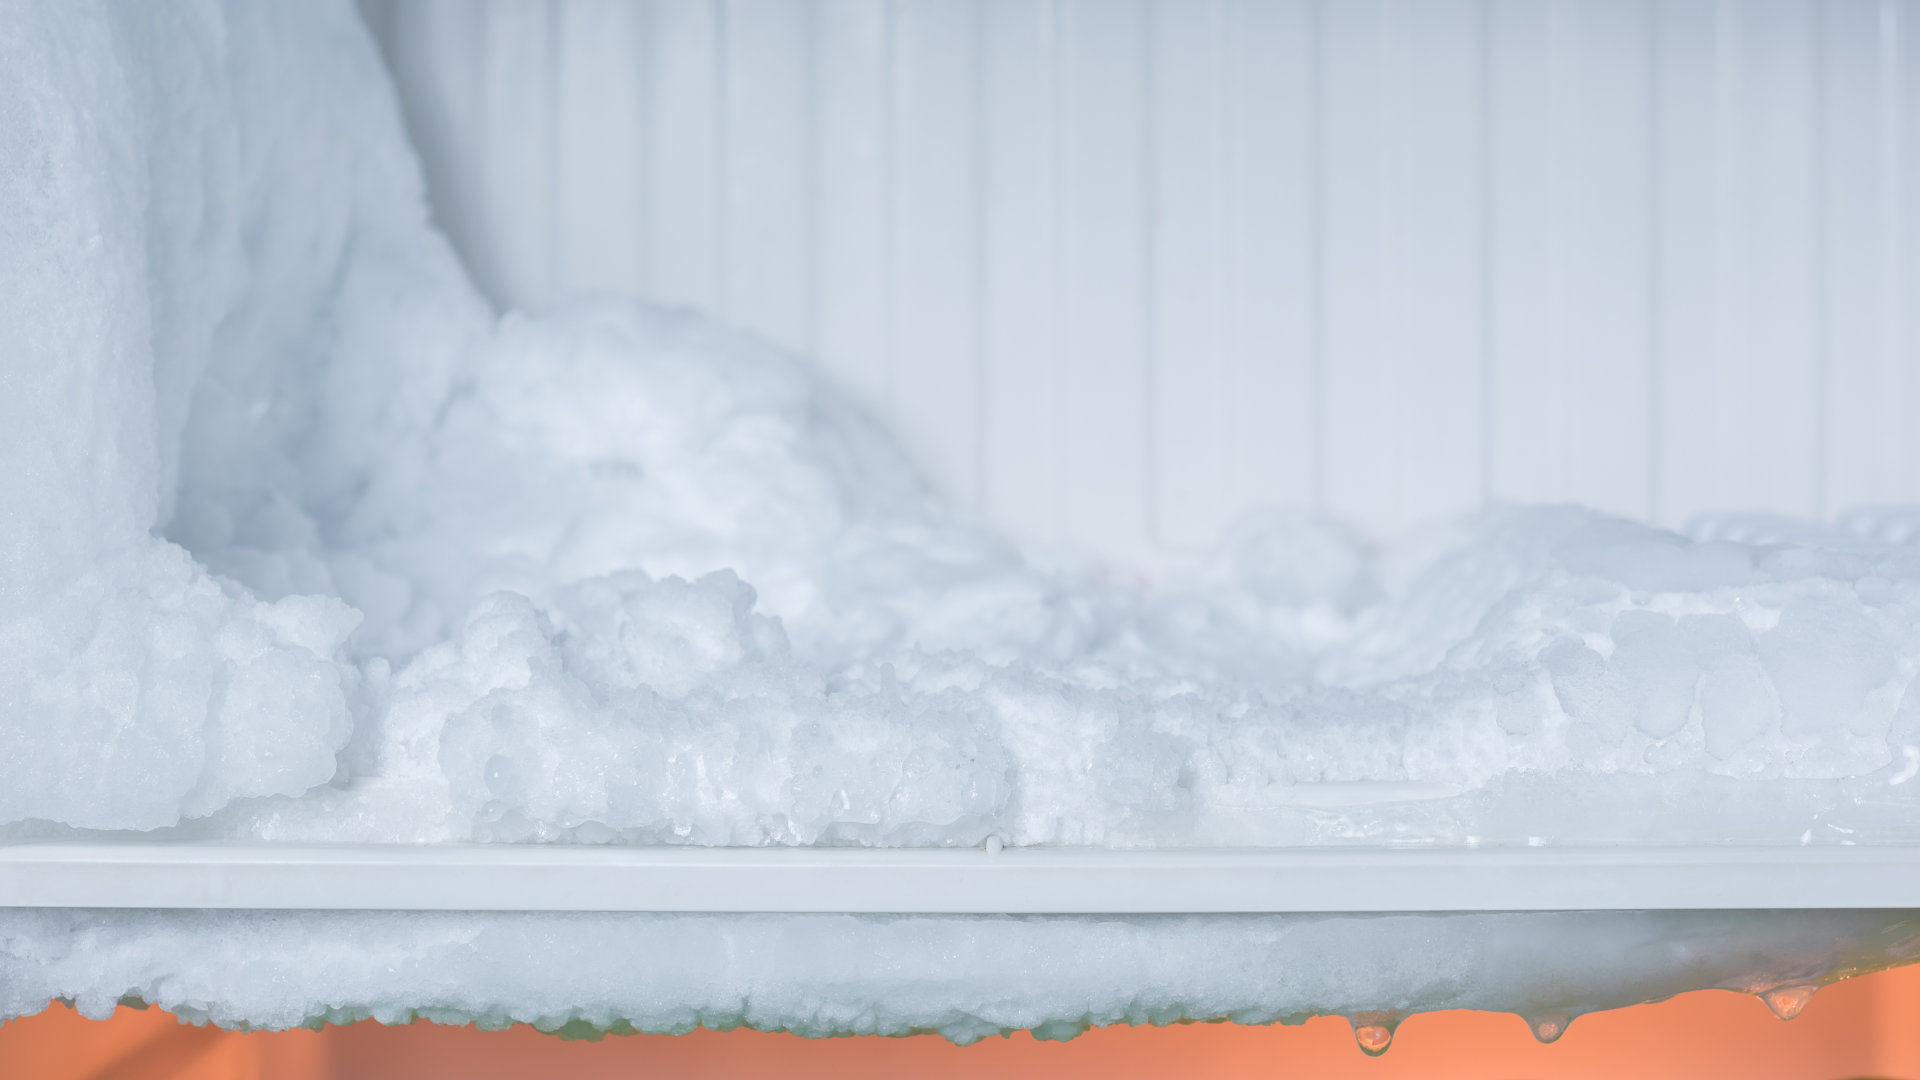
As the temperature inside the freezer drops, the moisture in the air freezes and turns into frost. Over time, if left unchecked, this frost can accumulate and result in a thick layer that can affect the freezer’s cooling efficiency and storage capacity.
It is important to distinguish between frost build-up and ice buildup. While frost is a thin layer of ice crystals, ice buildup is more significant and usually occurs due to a malfunctioning freezer or a consistently low temperature setting. Ice buildup requires defrosting to remove, whereas frost can be prevented through proper maintenance and adjustments to the freezer’s settings.
Now that we have a basic understanding of frost formation in freezers, let’s explore the common causes of frost build-up and learn how to address them effectively.
Causes of Frost Build-up in Freezers
Several factors contribute to the formation of frost in freezers. Understanding these causes can help you identify the underlying issue and take appropriate measures to prevent frost build-up. Here are some common reasons why frost may accumulate in your freezer:
- Inadequate Door Sealing: If the freezer door does not seal properly, warm air from the surrounding environment can enter, causing moisture to condense and freeze.
- Frequent Opening and Closing of the Door: Every time you open the freezer door, cold air escapes and warm air enters. This continuous exchange of air can lead to condensation and frost formation.
- Humidity in the Air: High humidity levels in the area where the freezer is located can contribute to excessive moisture in the freezer, leading to frost build-up.
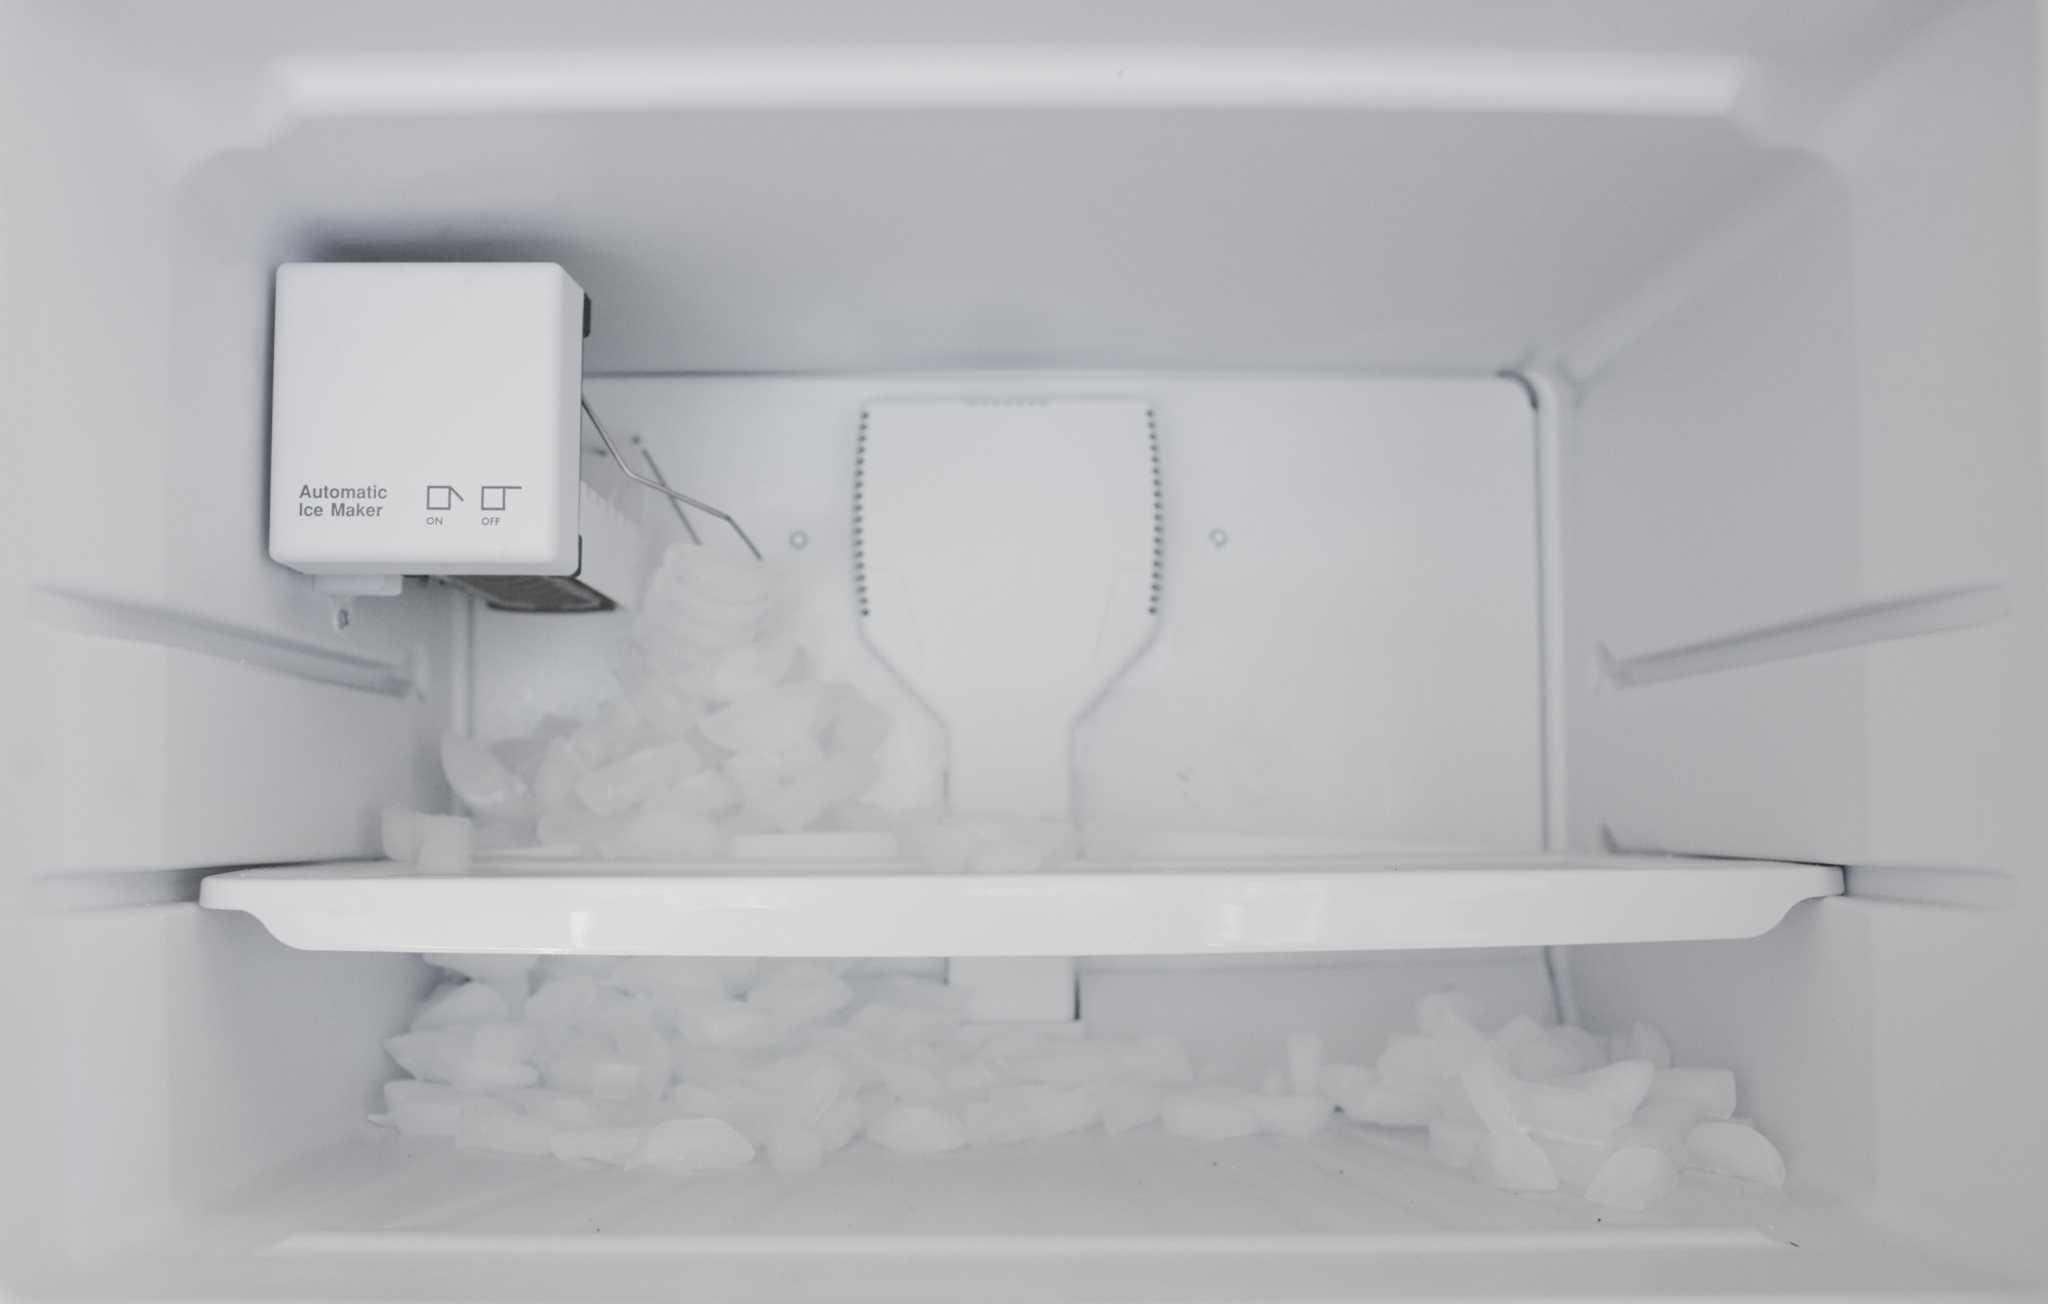
- Faulty Defrost System: If the automatic defrost system in your freezer malfunctions or is not functioning optimally, it can result in frost accumulation.
- Improper Temperature Settings: Setting the freezer temperature too low can cause excess moisture to freeze and form frost. Similarly, setting the temperature too high can create fluctuating temperatures and promote condensation and frost build-up.
- Overloading the Freezer: Overloading the freezer with too many items can obstruct proper airflow, leading to temperature fluctuations and the formation of frost.
- Damaged or Worn-out Door Gasket: A damaged or worn-out door gasket can compromise the seal between the door and the freezer, allowing warm air to seep in and contribute to frost development.
- Air Leaks in the Freezer: Any gaps or cracks in the freezer’s walls, vents, or insulation can enable warm air to enter and cause frost to form.
By identifying the specific cause of frost build-up in your freezer, you can take appropriate actions to prevent or minimize its occurrence. In the next section, we will discuss practical strategies to prevent frost build-up and keep your freezer functioning optimally.
Inadequate Door Sealing
One of the most common causes of frost build-up in freezers is inadequate door sealing. If the freezer door does not form a tight seal when closed, warm air from the surrounding environment can enter, leading to condensation and the formation of frost.
To determine if your freezer’s door sealing is inadequate, perform a simple test. Close the door and place a thin sheet of paper between the door gasket and the body of the freezer. Gently pull the paper out. If it slides out easily without any resistance, it indicates that the door seal is not tight enough and needs to be adjusted or replaced.
To improve door sealing and prevent frost build-up, follow these steps:
- Clean the Door Gasket: Over time, dirt, debris, and food particles can accumulate on the door gasket, affecting its ability to form a secure seal. Use a mild detergent and warm water to clean the gasket thoroughly. Avoid using harsh cleaning agents that can damage the gasket.
- Inspect the Door Gasket for Damage: Check the door gasket for any visible signs of damage, such as cracks, tears, or wear. If you notice any damage, it is crucial to replace the gasket to ensure proper sealing.
- Adjust the Door Seal: If the door gasket appears to be intact but not sealing tightly, you can try adjusting it to improve the seal. Use a hairdryer to warm the gasket gently, which will make it more pliable. Then, carefully stretch and mold the gasket to fit snugly against the freezer door.
- Replace the Door Gasket: If cleaning and adjusting the gasket do not resolve the inadequate sealing issue, it is recommended to replace the gasket entirely. Contact the manufacturer or a professional appliance repair service to obtain a compatible replacement gasket and follow the installation instructions.
By ensuring a proper and tight seal between the freezer door and the body, you can significantly reduce the amount of warm air entering the freezer, thereby preventing excessive condensation and frost formation.
Frequent Opening and Closing of the Door
Frequent opening and closing of the freezer door can contribute to the build-up of frost. Every time you open the door, cold air escapes, and warm air from the surrounding environment enters the freezer. This influx of warm air can lead to condensation and ultimately result in frost formation.
To minimize the frequency of door openings and reduce the potential for frost build-up, consider the following tips:
- Organize Your Freezer: Arrange the items in your freezer in an organized and easily accessible manner. This way, you can quickly find what you need without spending too much time with the freezer door open.
- Create a System: Establish a system for categorizing and labeling items in the freezer. By doing so, you can easily locate specific items without having to search or shuffle things around for an extended period.
- Plan Ahead: Think ahead about the items you will need from the freezer and take them out in one go, rather than repeatedly opening the door throughout the day.
- Use Transparent Containers: Store food in transparent containers or use transparent freezer bags. This way, you can quickly identify the contents without having to open the containers or bags.
- Check Expiry Dates: Regularly check the expiry dates of the items stored in the freezer. Discard any expired or spoiled items promptly to free up space and minimize the need to search through the freezer.
- Keep a List or Inventory: Maintain a list or inventory of the items in your freezer. This can help you keep track of what you have and avoid unnecessary and prolonged door openings when trying to remember the contents.
- Plan Meals in Advance: Plan your meals in advance and defrost only the necessary items for each meal. This reduces the need to open the freezer multiple times to find what you need.
- Share the Knowledge: If you have other household members, educate them about the importance of minimizing door openings and inform them of the organization system you have in place.
By minimizing the frequency of door openings and being mindful of how you use your freezer, you can significantly reduce the amount of warm air entering the appliance and prevent frost build-up.
Read more: Why Does My Blanket Have Static
Humidity in the Air
High humidity levels in the air can contribute to excessive moisture inside the freezer, leading to frost build-up. When the humidity is high, the air contains more moisture, and when this moisture comes into contact with the cold surfaces of the freezer, it condenses and forms frost.
To address humidity-related issues and prevent frost build-up, consider the following tips:
- Keep the Freezer Location in Mind: Avoid placing your freezer in areas with high humidity, such as near the dishwasher or in a damp basement. Choose a well-ventilated area with relatively low humidity to reduce the amount of moisture entering the freezer.
- Use a Dehumidifier: If the overall humidity in your home or the designated location of the freezer is consistently high, consider using a dehumidifier to remove excess moisture from the air. This can help create a more suitable environment for your freezer.
- Avoid Opening the Freezer in Humid Conditions: On particularly humid days, try to avoid opening the freezer door unnecessarily. This reduces the amount of moisture-laden air entering the freezer and helps prevent frost formation.
- Seal Food Properly: Ensure that all food items stored in the freezer are properly sealed to prevent them from releasing excess moisture into the air. Use airtight containers or freezer bags to maintain the quality of the food and minimize moisture content.
- Don’t Store Hot or Warm Food: Avoid placing hot or warm food directly into the freezer. Allow it to cool down to room temperature before putting it in to prevent the release of excess moisture into the freezer.
- Monitor Temperature and Humidity Levels: Use a thermometer to regularly monitor the temperature and humidity levels inside the freezer. Follow the manufacturer’s recommendations for the ideal settings and make adjustments as necessary.
- Open the Freezer Door Carefully: When you do need to open the freezer, do so gently and avoid prolonged door openings. This minimizes the exchange of humid air with the freezer’s interior.
By managing the humidity levels in your freezer’s surroundings and taking precautions to minimize the entry of moist air, you can effectively reduce the formation of frost and keep your freezer operating efficiently.
Faulty Defrost System
A faulty defrost system can contribute to frost build-up in your freezer. The defrost system is responsible for periodically melting any ice or frost that forms on the freezer’s coils and preventing the accumulation of excessive frost. When the defrost system malfunctions or fails to operate properly, frost can continue to accumulate, leading to inefficient cooling and potential damage to the freezer’s components.
If you suspect a faulty defrost system as the cause of frost build-up, here are some steps to address the issue:
- Manual Defrosting: If you notice excessive frost, manually defrost your freezer by unplugging it and allowing the frost to melt completely. This can help temporarily resolve the issue, but it is important to investigate and fix the underlying problem.
- Clean the Drain Tube: Check the drain tube, which is responsible for draining melted water from the defrost process. Ensure that it is free from blockages and debris that can prevent proper drainage. Use a thin, long brush or pipe cleaner to clean the tube if necessary.
- Test the Defrost Timer: The defrost system is controlled by a timer that initiates the defrost cycle at regular intervals. Test the defrost timer to ensure it is functioning correctly. Consult the freezer’s manual or seek professional assistance to locate and test the timer.
- Inspect the Defrost Heater and Thermostat: The defrost system also includes a heater and thermostat that regulate the melting of frost. Check these components for any signs of damage or malfunction. If they are faulty, they may need to be repaired or replaced by a qualified technician.
- Consult a Professional: If you are unable to diagnose or fix the defrost system issue on your own, it is recommended to consult a professional appliance repair service. They have the expertise and tools to accurately identify and resolve any problems in the defrost system.
Repairing or replacing a faulty defrost system is crucial to prevent frost accumulation and maintain the optimal performance of your freezer. Regular maintenance and timely addressing of any defrost system issues can help prolong the lifespan of your appliance and save you from the inconvenience of frost build-up.
Improper Temperature Settings
Setting the temperature of your freezer too low or too high can contribute to the formation of frost. Improper temperature settings can cause excess moisture in the air to freeze and accumulate as frost on the surfaces and shelves of the freezer. It’s essential to set the temperature at the appropriate level for optimal freezing and to prevent frost build-up.
To address improper temperature settings and prevent frost accumulation, consider the following guidelines:
- Refer to the Manufacturer’s Recommendations: Consult the user manual or contact the manufacturer to determine the recommended temperature settings for your specific freezer model. Different freezers may have different temperature requirements.
- Set the Freezer Temperature Correctly: Adjust the temperature settings on your freezer to the recommended level. Typically, it is recommended to set the temperature between -18°C (-0.4°F) to -23°C (-9.4°F) for optimal freezing and prevention of frost build-up.
- Avoid Frequent Temperature Changes: Try to avoid constant fluctuations in temperature settings. Unnecessary adjustments can disrupt the freezing process and promote the formation of frost. Set the temperature to the desired level and leave it there unless there is a specific need to change it.
- Use a Freezer Thermometer: Consider using a freezer thermometer to monitor the actual temperature inside the freezer. This will allow you to ensure that the set temperature matches the actual temperature and make adjustments if necessary.
- Keep the Freezer Well Stocked: A well-stocked freezer helps maintain a more consistent temperature. The frozen items act as insulation and help stabilize the internal temperature, reducing the risk of temperature fluctuations and frost formation.
- Regularly Check the Temperature: Periodically check the temperature readings on the freezer’s control panel or thermometer to ensure that it remains within the desired range. If you notice significant deviations, there may be an issue with the freezer’s cooling system that requires professional attention.
- Keep the Freezer Clean: Regularly clean the inside of the freezer, removing any spills or food debris that could affect the freezer’s temperature regulation. A clean and well-maintained freezer is more likely to maintain the desired temperature and prevent frost accumulation.
By setting the freezer temperature correctly and being mindful of temperature fluctuations, you can help prevent frost build-up and ensure optimal freezing and storage conditions in your freezer.
Overloading the Freezer
Overloading your freezer with too many items can contribute to the formation of frost. When the freezer is overloaded, proper airflow is restricted, which can lead to uneven cooling and temperature fluctuations. These conditions create an environment conducive to frost build-up on the walls and surfaces of the freezer.
To prevent frost caused by overloading the freezer, consider the following tips:
- Organize and Prioritize: Properly organize the items in your freezer, placing frequently used items in accessible locations. This will reduce the need to shuffle things around and spend excessive time with the freezer door open.
- Create Space: Periodically review the contents of your freezer and remove any items that are no longer needed or have expired. By creating space, you allow for better airflow, which helps maintain consistent and efficient cooling.
- Do Not Overfill: Avoid overstuffing your freezer, as it can prevent the cold air from circulating freely. Leave enough space between items for air to flow and ensure that nothing is blocking the vents.
- Use Proper Storage Containers: Opt for space-saving storage containers that maximize the use of available space. Consider using stackable containers or freezer bags that allow for efficient organization without excessive bulk.
- Freeze Items Before Storing: When adding new items to the freezer, ensure that they are fully frozen before placing them inside. This prevents the release of additional moisture into the freezer, reducing the risk of frost formation.
- Rotate and Use Older Items First: Practice a “first in, first out” approach when it comes to using your freezer’s contents. Use older items before newer ones to prevent food items from languishing and taking up unnecessary space.
- Consider a Separate Freezer: If you consistently find yourself running out of space, consider investing in an additional freezer to accommodate your storage needs. Having an extra freezer can help distribute the items more evenly, reducing the strain on a single overloaded unit.
By avoiding overloading and maintaining proper organization in your freezer, you can ensure better airflow, improve cooling efficiency, and minimize the risk of frost build-up.
Read more: Why Does My Attic Have Condensation
Damaged or Worn-out Door Gasket
A damaged or worn-out door gasket can significantly contribute to frost build-up in your freezer. The door gasket is the rubber seal that lines the edges of the freezer door and creates a tight seal when closed. If the gasket is damaged, cracked, or worn-out, it can allow warm air from the surrounding environment to enter the freezer, causing condensation and eventual frost formation.
To address the issue of a damaged or worn-out door gasket and prevent frost build-up, consider the following steps:
- Inspect the Door Gasket: Carefully examine the door gasket for any visible signs of damage, including cracks, tears, or deformities. Pay close attention to the areas where the gasket makes contact with the freezer body.
- Clean the Gasket: Gently clean the door gasket with a mild detergent and warm water solution. Use a soft cloth or sponge to remove any dirt, debris, or food particles that may be affecting the gasket’s ability to seal properly.
- Test the Door Seal: Close the freezer door and check the firmness of the seal. Place a small piece of paper between the door and the gasket, then try to pull it out. If the paper slides out easily, it indicates that the gasket is not creating a proper seal and needs to be adjusted or replaced.
- Adjust the Gasket: If the door gasket appears to be misaligned or not sealing tightly, you can try adjusting it. Use a hairdryer to warm the gasket slightly, making it more pliable. Then, carefully stretch and mold the gasket back into shape, ensuring a snug fit against the freezer door.
- Replace the Gasket: If the door gasket is severely damaged, warped, or cannot be adjusted to create a proper seal, it is recommended to replace it. Contact the freezer manufacturer or a professional appliance repair service to obtain a compatible replacement gasket and follow the installation instructions precisely.
- Regularly Inspect and Maintain: Periodically check the condition of the door gasket and clean it as necessary. Regular maintenance and care can help prolong the life of the gasket and ensure an effective seal to prevent frost formation.
By keeping the door gasket in good condition and ensuring a tight seal, you can minimize the entry of warm air and prevent frost build-up in your freezer.
Air Leaks in the Freezer
Air leaks in your freezer can contribute to frost build-up. Any gaps, cracks, or openings in the freezer’s walls, vents, or insulation can allow warm air from the surrounding environment to enter, leading to condensation and the formation of frost. It is essential to identify and seal these air leaks to maintain the proper temperature and prevent frost accumulation.
To address air leaks and prevent frost build-up, follow these steps:
- Inspect the Freezer: Carefully examine the exterior of the freezer, including the walls, vents, and insulation, for any visible signs of damage, such as cracks, gaps, or loose parts. Look for any areas where warm air might be entering the freezer.
- Seal Small Gaps: For small gaps or cracks, you can use silicone caulk or weather-stripping to seal them. Apply the caulk or weather-stripping material to the affected areas following the manufacturer’s instructions. Ensure a tight seal to prevent any air leakage.
- Repair Damaged Parts: If you notice any damaged or deteriorated parts, such as cracked vents or insulation, they may need to be repaired or replaced. Consult the freezer’s manufacturer or a professional appliance repair service to obtain the necessary parts and perform the repairs.
- Check the Door Alignment: Ensure that the freezer door is properly aligned and closes securely. If the door is misaligned, it may not create a tight seal, resulting in air leaks. Adjust the door hinges or latch to improve the door’s alignment and seal.
- Test the Door Seal: Perform a seal test by closing the freezer door and checking for any gaps or resistance. Place a thin piece of paper between the door and the frame, then try to pull it out. If the paper slides out easily, it indicates that the door seal is not tight enough and needs to be adjusted or replaced.
- Replace Damaged Door Seal: If the door seal is damaged or worn-out, it is crucial to replace it. Contact the manufacturer or a professional appliance repair service to obtain a compatible replacement seal and follow the installation instructions carefully.
- Regularly Inspect and Maintain: Periodically inspect the freezer for any new air leaks that may develop over time. Additionally, keep the freezer clean and free from any debris that may obstruct proper sealing.
By identifying and sealing any air leaks in your freezer, you can prevent warm air from entering and reduce the formation of frost. This helps maintain optimal cooling conditions and efficiency in your freezer.
Make sure the freezer door is sealing properly to prevent warm air from entering. Also, avoid opening the door frequently and check the temperature settings.
How to Prevent Frost Build-up
Frost build-up in freezers can be a hassle, affecting the performance and efficiency of your appliance. Fortunately, there are several preventive measures you can take to minimize frost accumulation and maintain optimal freezing conditions. Here are some effective tips to prevent frost build-up:
- Check and Improve Door Sealing: Ensure that the freezer door seals tightly by cleaning the door gasket, adjusting it if necessary, and replacing it if it is damaged or worn-out. A properly sealed door prevents warm air from entering the freezer, reducing condensation and frost formation.
- Limit Opening and Closing of the Door: Avoid frequent and unnecessary door openings to minimize the exchange of warm and cold air. Plan ahead, organize your freezer, and take out all necessary items in a single visit to reduce the need for repeated door openings.
- Control Humidity Levels: Keep the humidity levels in the area where the freezer is located as low as possible. Use a dehumidifier if needed, avoid opening the freezer in humid conditions, and ensure proper ventilation in the surrounding space.
- Check and Fix the Defrost System: Regularly inspect your freezer’s defrost system, including the timer, heater, and thermostat components. If any of these are faulty, repair or replace them to ensure proper functioning and avoid frost accumulation.
- Set the Right Temperature: Adjust the freezer temperature to the recommended range specified by the manufacturer. Setting the temperature too low can lead to excess moisture and frost formation, while setting it too high may result in inadequate freezing and temperature fluctuations. Use a freezer thermometer to verify the actual temperature inside the freezer.
- Avoid Overloading the Freezer: Properly organize your freezer, leaving enough space between items for proper airflow. Overloading the freezer obstructs circulation and can lead to uneven cooling and frost build-up. Consider investing in an additional freezer if you consistently run out of space.
- Replace Damaged or Worn-out Door Gaskets: Damaged or worn-out door gaskets compromise the seal and allow warm air to enter. Regularly inspect the gasket for any signs of damage or wear, and promptly replace it if needed to maintain a tight seal and prevent frost formation.
- Seal Air Leaks in the Freezer: Identify and seal any gaps, cracks, or openings in the freezer’s walls, vents, or insulation using caulk or weather-stripping. Proper insulation helps maintain the desired temperature and prevents warm air from entering and causing frost.
By implementing these preventive measures, you can significantly reduce frost build-up, improve the efficiency of your freezer, and ensure the long-lasting freshness of your stored food items.
Check and Improve Door Sealing
The first step in preventing frost build-up in your freezer is to check and improve the door sealing. The door seal, also known as the door gasket, plays a crucial role in maintaining a tight seal between the freezer door and the cabinet. If the door seal is loose, damaged, or worn out, warm air from the surrounding environment can enter the freezer, leading to condensation and frost formation.
Here are some steps you can take to check and improve door sealing:
- Clean the Door Gasket: Over time, the door gasket can accumulate dirt, debris, and food particles, which can affect its ability to form a secure seal. Use a mild detergent and warm water to clean the gasket thoroughly. Gently scrub the gasket with a soft cloth or sponge, ensuring that all residue is removed. Avoid using harsh cleaning agents that could damage the gasket.
- Inspect for Damage: Carefully examine the door gasket for any visible signs of damage, such as cracks, tears, or deformities. Inspect the entire length of the gasket, paying close attention to the areas where the gasket makes contact with the freezer cabinet.
- Perform the Dollar Bill Test: To check the effectiveness of the door sealing, perform the “dollar bill test.” Close the freezer door on a dollar bill or a piece of paper, leaving half of it inside the freezer and the other half outside. Gently tug on the bill. If you encounter resistance and feel some degree of friction when pulling, it indicates a good seal. However, if the bill easily slides out, it suggests an inadequate seal that needs improvement.
- Adjust the Door Gasket: If the door gasket appears to be misaligned or not sealing tightly, you may be able to improve the seal by adjusting it. Use a hairdryer on a low heat setting to warm the gasket slightly, making it more pliable. Then, gently stretch and mold the gasket back into shape. Ensure that it fits snugly against both the door and the cabinet to create a tight seal.
- Replace the Door Gasket: If the door gasket is damaged, cracked, or cannot be adjusted to form a proper seal, it is crucial to replace it. Contact the freezer manufacturer or a professional appliance repair service to obtain a compatible replacement gasket. Carefully follow the manufacturer’s instructions for installation to ensure a proper fit and optimal sealing.
Improving the door sealing is essential to prevent warm air from entering the freezer, which can lead to frost formation. By regularly checking and maintaining the door gasket, you can ensure an airtight seal, enhance energy efficiency, and minimize frost build-up in your freezer.
Limit Opening and Closing of the Door
One effective way to prevent frost build-up in your freezer is to limit the frequency of opening and closing the door. Every time you open the door, warm air from the surrounding environment enters the freezer, causing condensation that can lead to frost formation. By reducing the number of door openings, you can minimize the introduction of warm air and prevent frost accumulation.
Here are some strategies to help you limit the opening and closing of the freezer door:
- Organize Your Freezer: Properly organize the contents of your freezer to maximize accessibility and minimize the time spent searching for items. Keep frequently used items within easy reach and group similar items together. This organization will help you quickly locate what you need, reducing the time the freezer door remains open.
- Create a Meal Plan: Plan your meals in advance and take out all the necessary ingredients from the freezer at once. By doing this, you can minimize the need to open the freezer multiple times throughout the day, reducing the exposure of warm air to the freezer’s interior.
- Use Lists or Labels: Create a list or label the items in your freezer to keep track of what you have and where it is located. This will help you find what you need more efficiently and prevent you from rummaging through the freezer, keeping the door open for extended periods.
- Check Expiry Dates Regularly: Regularly check the expiry dates of the items in your freezer and discard anything that is past its prime. This practice not only helps you maintain a clutter-free freezer but also prevents the need to open the door to search for expired items.
- Consolidate Items: Store smaller items in designated containers or use freezer-safe bags to prevent them from getting lost or buried in the freezer. Keeping items properly organized and consolidated reduces the chances of having to dig through the freezer, minimizing door-opening time.
- Coordinate with Household Members: Communicate with other household members about the importance of limiting the opening and closing of the freezer door. By sharing this knowledge, everyone can work together to reduce unnecessary door openings, ensuring the freezer remains closed as much as possible.
- Consider a Freezer Alarm: Invest in a freezer alarm that alerts you when the door has been left open for an extended period. This can help you quickly address any accidental door openings and prevent prolonged exposure to warm air.
- Be Mindful and Efficient: When you do need to open the freezer, be mindful of minimizing the time the door remains open. Take out what you need promptly, then close the door tightly. Avoid leaving it open while you search for other items or get distracted.
By implementing these strategies, you can reduce the frequency of opening and closing the freezer door, minimizing warm air entry, and mitigating the risk of frost build-up. This not only helps maintain the optimal temperature inside the freezer but also improves energy efficiency and prolongs the life of your appliance.
Control Humidity Levels
Controlling humidity levels is essential for preventing frost build-up in your freezer. High humidity increases the potential for moisture in the air, which can condense and freeze on the surfaces of the freezer, leading to frost formation. By managing the humidity levels in and around your freezer, you can minimize the likelihood of frost accumulation and maintain an optimal environment for food storage.
Here are some effective strategies to control humidity levels and prevent frost build-up in your freezer:
- Choose the Right Location: Place your freezer in an area with low humidity. Avoid positioning it near sources of moisture, such as a dishwasher or washing machine, as these can increase humidity levels in the surrounding air.
- Use a Dehumidifier: Consider using a dehumidifier in the room where the freezer is located. A dehumidifier helps remove excess moisture from the air, reducing humidity levels and preventing condensation inside the freezer.
- Avoid Opening the Freezer in Humid Conditions: Be mindful of the humidity levels in your home when accessing the freezer. Try to avoid opening the freezer door when humidity levels are high, such as during rainy or humid weather conditions. This minimizes the amount of moist air that enters the freezer.
- Properly Store and Seal Food: Ensure that all food items stored in the freezer are properly sealed to prevent them from releasing excess moisture into the air. Use airtight containers or freezer bags to maintain the quality of the food and minimize moisture content.
- Allow Hot or Warm Food to Cool: Avoid placing hot or warm food directly into the freezer. Allow it to cool down to room temperature before storing it to prevent the release of additional moisture into the freezer.
- Ventilate the Area: Ensure proper ventilation around the freezer by allowing air to circulate freely. Avoid blocking vents or obstructing the airflow around the freezer, as this can contribute to increased humidity levels.
- Monitor Temperature and Humidity: Use a thermometer and hygrometer to regularly monitor the temperature and humidity levels inside and around the freezer. The ideal range for freezer humidity is typically below 50% relative humidity. If the humidity exceeds this range, take steps to reduce it, such as using a dehumidifier or improving ventilation.
- Address Plumbing Leaks: Check for any plumbing leaks near the area where the freezer is located, as these can contribute to increased humidity levels in the surrounding air. Address any leaks promptly to prevent excess moisture from affecting the freezer environment.
By implementing these strategies to control humidity levels, you can create a more suitable environment for your freezer and reduce the risk of frost build-up. This not only helps preserve the quality of your frozen food but also improves the efficiency and lifespan of your freezer.
Check and Fix the Defrost System
A well-functioning defrost system is essential in preventing frost build-up in your freezer. The defrost system is responsible for melting any accumulated ice or frost on the freezer’s coils, ensuring efficient cooling and preventing excessive frost formation. If the defrost system malfunctions or fails to operate correctly, frost can continue to accumulate, affecting the freezer’s performance and storage capacity.
To prevent frost build-up caused by a faulty defrost system, follow these steps to check and fix it:
- Understand the Defrost System: Familiarize yourself with the defrost system in your freezer. Consult the user manual or research online to learn about its components, such as the defrost timer, defrost heater, and defrost thermostat.
- Manually Defrost the Freezer: If you notice excessive frost build-up, start by manually defrosting the freezer. Unplug the freezer and remove all the items. Allow the frost to melt completely, either by leaving the freezer door open or using a gentle heat source, such as a hairdryer. Use towels or a container to collect the melting water.
- Clean the Drain Tube: Locate the drain tube at the back of the freezer, which is responsible for draining the melted water during the defrost cycle. Ensure that the drain tube is clear and free from any blockages or debris that could prevent proper drainage. Use a thin, long brush or pipe cleaner to clean the tube if necessary.
- Test the Defrost Timer: The defrost system operates according to a cycle controlled by the defrost timer. Locate the defrost timer, usually found either at the back of the freezer or inside the control panel. Use a screwdriver to manually advance the timer until you hear a click. Wait for about 30 minutes to see if the defrost heater turns on. If it does, the timer is likely functioning correctly. If not, the timer may need to be replaced.
- Inspect the Defrost Heater and Thermostat: Check the defrost heater and defrost thermostat for any signs of damage or malfunction. The defrost heater helps melt the ice or frost on the freezer coils, while the defrost thermostat ensures that the heater operates at the proper temperature. If either of these components is faulty, it may need to be repaired or replaced by a professional technician.
- Consult a Professional: If you are unable to diagnose or fix the issue with the defrost system on your own, it is recommended to consult a professional appliance repair service. They have the expertise and tools to accurately identify the problem and perform the necessary repairs or replacements.
- Maintain Regular Defrosting: Regularly defrost your freezer as part of your maintenance routine. This can help prevent excessive frost accumulation and strain on the defrost system. Follow the manufacturer’s guidelines on the recommended frequency of defrosting.
By regularly checking and fixing the defrost system, you can ensure that it operates optimally, preventing excessive frost build-up in your freezer. Proper maintenance of the defrost system enhances your freezer’s performance, extends its lifespan, and keeps your frozen food in optimal condition.
Set the Right Temperature
Setting the right temperature for your freezer is crucial in preventing frost build-up. Improper temperature settings can contribute to excess moisture in the air, which can condense and freeze on the surfaces of the freezer, leading to frost formation. By maintaining the correct temperature, you can create an environment that discourages frost and promotes efficient freezing and food preservation.
Here are some steps to set the right temperature and prevent frost build-up in your freezer:
- Refer to the Manufacturer’s Recommendations: Consult the user manual or contact the manufacturer to determine the recommended temperature range for your specific freezer model. Different freezers may vary in their temperature requirements.
- Adjust the Temperature Setting: Use the control panel or temperature dial on your freezer to adjust the temperature to the recommended range. Typically, the ideal temperature for a freezer is set between -18°C (-0.4°F) to -23°C (-9.4°F). This range ensures proper freezing while minimizing the risk of frost formation.
- Be Mindful of Extremes: Avoid setting the temperature too low or too high. Setting the temperature too low below the recommended range can result in excess moisture, leading to frost build-up. On the other hand, if the temperature is set too high, it may cause temperature fluctuations, promoting condensation and frost formation.
- Use a Thermometer: Invest in a freezer thermometer to monitor the actual temperature inside your freezer. Place the thermometer inside the freezer and check it regularly to ensure that it matches the set temperature. Adjust the temperature setting if necessary to maintain the desired temperature range.
- Consider External Factors: Take into account any external factors that may affect the temperature in and around your freezer. For example, if your freezer is placed near a heat source or exposed to direct sunlight, you may need to adjust the temperature setting accordingly to compensate for the additional warmth.
- Allow for Temperature Stabilization: Once you have adjusted the temperature setting, allow the freezer sufficient time to reach and stabilize at the desired temperature. This may take a few hours, so be patient and avoid making frequent temperature adjustments during this time.
- Monitor and Adjust as Needed: Regularly monitor the temperature inside your freezer using the built-in thermometer or an external thermometer. Check for any significant deviations from the set temperature and make adjustments as needed to ensure consistent and proper freezing conditions.
By setting the right temperature and monitoring it regularly, you can create an optimal freezing environment in your freezer and minimize the risk of frost accumulation. Proper temperature control not only prevents frost build-up but also helps maintain the quality and longevity of your frozen food items.
Read more: Why Does My Furnace Have Two Breakers
Avoid Overloading the Freezer
Preventing frost build-up in your freezer includes avoiding overloading it with too many items. When the freezer is overloaded, proper airflow is obstructed, leading to uneven cooling and temperature fluctuations. These conditions create an environment conducive to frost formation on the walls and surfaces of the freezer. By avoiding overloading, you can help maintain consistent temperatures and prevent frost accumulation.
Here are some effective strategies to avoid overloading your freezer and prevent frost build-up:
- Organize and Prioritize Items: Properly organize the items in your freezer to optimize the available space. Arrange items in a way that maximizes accessibility and visibility. Also, consider prioritizing frequently used items so they are easily accessible without the need to dig through the freezer.
- Create Space: Periodically review the contents of your freezer and remove any items that are no longer needed or have expired. This creates space and allows for better airflow, helping to maintain consistent temperatures and reducing the risk of frost formation.
- Avoid Overstuffing: Resist the temptation to cram too many items into your freezer. Overstuffing obstructs proper airflow, limiting the freezer’s ability to maintain uniform temperatures. Leave enough room around the items to allow cold air to circulate freely.
- Use Appropriate Storage Containers: Opt for space-saving storage containers that maximize the use of available space. Utilize freezer-safe bags or containers that enable efficient organization. Ensure that containers are properly sealed to avoid the release of excess moisture into the freezer.
- Freeze Items Before Storing: Prior to storing items in the freezer, make sure they are fully frozen. Placing warm or partially frozen items in the freezer increases the likelihood of moisture release, which can contribute to frost build-up.
- Rotate and Use Older Items First: Practice a “first in, first out” approach when using the items in your freezer. Consume older items before newer ones to prevent food from languishing and taking up unnecessary space. This helps prevent overcrowding and ensures efficient utilization of freezer space.
- Consider Additional Freezer Space: If you consistently find yourself running out of space, consider investing in an additional freezer. Having extra freezer capacity allows for better organization and prevents the need to overload a single unit. This can also help distribute the items more evenly, reducing strain on a single freezer.
By implementing these strategies, you can prevent overloading your freezer, maintain proper airflow, and prevent frost build-up. An uncluttered and well-organized freezer ensures that adequate cold air circulates, providing efficient freezing and helping to preserve the quality of your frozen food items.
Replace Damaged or Worn-out Door Gaskets
Damaged or worn-out door gaskets can significantly contribute to frost build-up in your freezer. The door gasket, also known as the door seal, creates an airtight seal between the freezer door and the cabinet. If the gasket is damaged, cracked, or worn out, warm air from the surroundings can enter the freezer, leading to condensation and frost formation. To prevent frost build-up, it is crucial to promptly replace damaged or worn-out door gaskets.
Follow these steps to replace the damaged or worn-out door gaskets:
- Identify the Correct Replacement Gasket: Look for the model number and manufacturer of your freezer, usually found on a sticker inside the door or on the back of the appliance. Use this information to find the correct replacement door gasket. You can order the gasket online, contact the manufacturer, or visit an appliance parts store.
- Prepare the Freezer: Before starting the replacement process, unplug the freezer to ensure your safety. Empty the contents of the freezer and place them in a cooler or another freezer to keep them frozen during the replacement process. It is also a good opportunity to clean the interior of the freezer.
- Remove the Old Gasket: Start by lifting one corner of the old gasket away from the freezer door. Use a flathead screwdriver or a putty knife to gently pry it away from the door, continuing along the perimeter until the entire gasket is detached. Take note of how the gasket is installed to aid in the installation of the new one.
- Clean the Door Surface: Once the old gasket is removed, clean the door surface thoroughly to ensure proper adhesion of the new gasket. Use a mild detergent and warm water to clean the area, and dry it completely before proceeding to the next step.
- Install the New Gasket: Begin by inserting one corner of the new gasket into the corresponding corner of the freezer door. From there, press the gasket firmly along the entire perimeter of the door, making sure it fits snugly against the cabinet. Take care to align the gasket properly and ensure that it is seated securely.
- Check the Seal: Close the freezer door and check for any gaps or resistance along the seal. The gasket should create a tight seal when the door is closed. If there are any areas where the seal is not secure, adjust and press the gasket more firmly until it forms a complete seal.
- Test the New Gasket: Perform the dollar bill test mentioned earlier in the “Check and Improve Door Sealing” section. Close the door on a dollar bill and try to pull it out. If you encounter resistance and feel some degree of friction when pulling, it indicates that the new gasket is effectively sealing the freezer.
- Restore Power and Return Contents: Once you are satisfied with the new gasket’s installation and seal, plug the freezer back in. Return the frozen items to the freezer, ensuring they are properly organized and do not obstruct the door’s seal.
By replacing damaged or worn-out door gaskets, you can ensure a proper seal, minimize the entry of warm air, and prevent frost build-up in your freezer. This contributes to efficient cooling, energy savings, and the preservation of your frozen food items.
Seal Air Leaks in the Freezer
Air leaks in your freezer can lead to frost build-up by allowing warm air to enter and create condensation. Gaps, cracks, or openings in the freezer’s walls, vents, or insulation can all contribute to air leaks. It is important to identify and seal these leaks to maintain the desired temperature and prevent frost formation in your freezer.
Here are some steps to seal air leaks in your freezer:
- Inspect the Freezer: Take a close look at the exterior of your freezer, examining every surface, including the walls, vents, and insulation. Look for any visible signs of damage such as cracks, gaps, or loose parts that could be contributing to air leaks.
- Seal Small Gaps and Cracks: For small gaps or cracks, use a silicone-based sealant or weather-stripping tape to seal them. Carefully apply the sealant or tape to cover the gaps, ensuring a tight seal. Follow the manufacturer’s instructions for proper application and drying time.
- Repair Damaged Parts: If you identify any damaged parts, such as cracked vents or insulation, they may need to be repaired or replaced. Consult the freezer’s manufacturer or contact an appliance repair professional to obtain the necessary replacement parts and perform the repairs.
- Check the Door Alignment: Ensure that the freezer door is properly aligned and closes tightly. If the door alignment is off, warm air can enter through gaps. Adjust the door hinges or latch to improve alignment and ensure a snug fit when closed.
- Test the Door Seal: Conduct the dollar bill test mentioned earlier to check the quality of the door seal. Close the door on a dollar bill or a piece of paper, then try to pull it out. If you feel resistance and the bill doesn’t slide out easily, it indicates a good seal. If there is no resistance and the bill easily slides out, the door seal may need adjustment or replacement.
- Replace Damaged Door Seal: If the door seal is damaged, worn-out, or fails the dollar bill test, it is recommended to replace it. Contact the freezer manufacturer or an appliance repair professional to obtain a compatible replacement seal. Follow the provided installation instructions carefully to ensure a proper fit and effective sealing.
- Regularly Inspect and Maintain: Periodically inspect your freezer for any new air leaks that may develop over time. Regularly clean the exterior of the freezer, removing any debris or dirt that could affect the sealing. By staying vigilant and addressing air leaks promptly, you can prevent frost build-up and maintain optimal freezer performance.
By sealing air leaks in your freezer, you can minimize the entry of warm air and prevent frost build-up. This will help maintain consistent temperatures, improve energy efficiency, and prolong the life of your freezer.
Conclusion
Frost build-up in freezers can be a frustrating issue, but with the right preventive measures, you can minimize its occurrence and keep your freezer running efficiently. By understanding the causes of frost build-up, you can take proactive steps to prevent it and maintain optimal freezing conditions.
We have explored various factors that contribute to frost formation, including inadequate door sealing, frequent door openings, high humidity, faulty defrost systems, improper temperature settings, overloading, damaged door gaskets, and air leaks. Each of these factors can be addressed with specific strategies to prevent frost build-up.
To prevent frost build-up in your freezer, make sure to regularly check and improve door sealing, limit the opening and closing of the door, control humidity levels in the surrounding environment, regularly check and fix the defrost system, set the right temperature, avoid overloading the freezer, replace damaged or worn-out door gaskets, and seal any air leaks in the freezer.
By implementing these measures, you can not only prevent frost build-up but also ensure optimal freezing and storage conditions for your food items. Additionally, a frost-free freezer reduces energy consumption and prolongs the lifespan of your appliance.
Remember to regularly maintain and clean your freezer to ensure its efficiency and proper functioning. By following these preventive measures and practicing good freezer habits, you can enjoy a frost-free freezer that keeps your food fresh and extends the lifespan of your appliance.
Now that you have the knowledge and tools to prevent frost build-up in your freezer, put them into action and enjoy the benefits of a well-functioning and frost-free appliance!
Frequently Asked Questions about Why Does My Freezer Have Frost
Was this page helpful?
At Storables.com, we guarantee accurate and reliable information. Our content, validated by Expert Board Contributors, is crafted following stringent Editorial Policies. We're committed to providing you with well-researched, expert-backed insights for all your informational needs.


0 thoughts on “Why Does My Freezer Have Frost”