Home>Furniture & Design>Bathroom Accessories>How To Make Baby Socks Non-Slip
Bathroom Accessories
How To Make Baby Socks Non-Slip
Modified: February 18, 2024
Discover how to make baby socks non-slip with our easy bathroom accessories. Keep your little one safe and stylish with this simple DIY solution.
(Many of the links in this article redirect to a specific reviewed product. Your purchase of these products through affiliate links helps to generate commission for Storables.com, at no extra cost. Learn more)
Introduction
When it comes to caring for our little ones, safety is always a top priority. As babies start to explore the world around them, it's essential to ensure that their environment is as secure as possible. One area that often requires attention is their clothing and accessories, including their adorable little socks. While baby socks are undeniably cute, they can sometimes pose a slipping hazard, especially on smooth surfaces. Fortunately, there's a simple and effective solution to this common concern: making baby socks non-slip.
In this comprehensive guide, we will walk you through the process of transforming ordinary baby socks into non-slip wonders. By following a few straightforward steps and using readily available materials, you can provide your little one with added stability and confidence as they navigate their surroundings. Whether your baby is just learning to crawl or has already taken their first steps, non-slip socks can offer peace of mind and minimize the risk of accidental slips and falls.
By taking the time to make baby socks non-slip, you're not only enhancing your child's safety but also adding a personal touch to their wardrobe. This DIY approach allows you to customize the level of traction on the socks, ensuring that they are tailored to your baby's specific needs. Additionally, this process can be a fun and rewarding activity, allowing you to unleash your creativity while crafting practical and stylish non-slip socks for your little one.
So, gather your materials and get ready to embark on this enjoyable and beneficial project. With a few simple steps, you can transform ordinary baby socks into non-slip marvels that combine functionality with charm. Let's dive into the details and learn how to make baby socks non-slip, providing your little explorer with an extra layer of safety and comfort.
Key Takeaways:
- Keep your baby safe and stylish by making their socks non-slip. It’s a fun DIY project that adds a personal touch to their wardrobe while preventing slips and falls on smooth surfaces.
- With just a few materials and simple steps, you can transform ordinary baby socks into personalized non-slip wonders. Infuse creativity and care into this project to provide your little one with added stability and confidence.
Read more: How To Make Socks Non-Slip
Materials Needed
To embark on the journey of making baby socks non-slip, you'll need a few essential materials that are readily available and easy to work with. Here's a comprehensive list of what you'll need to get started:
-
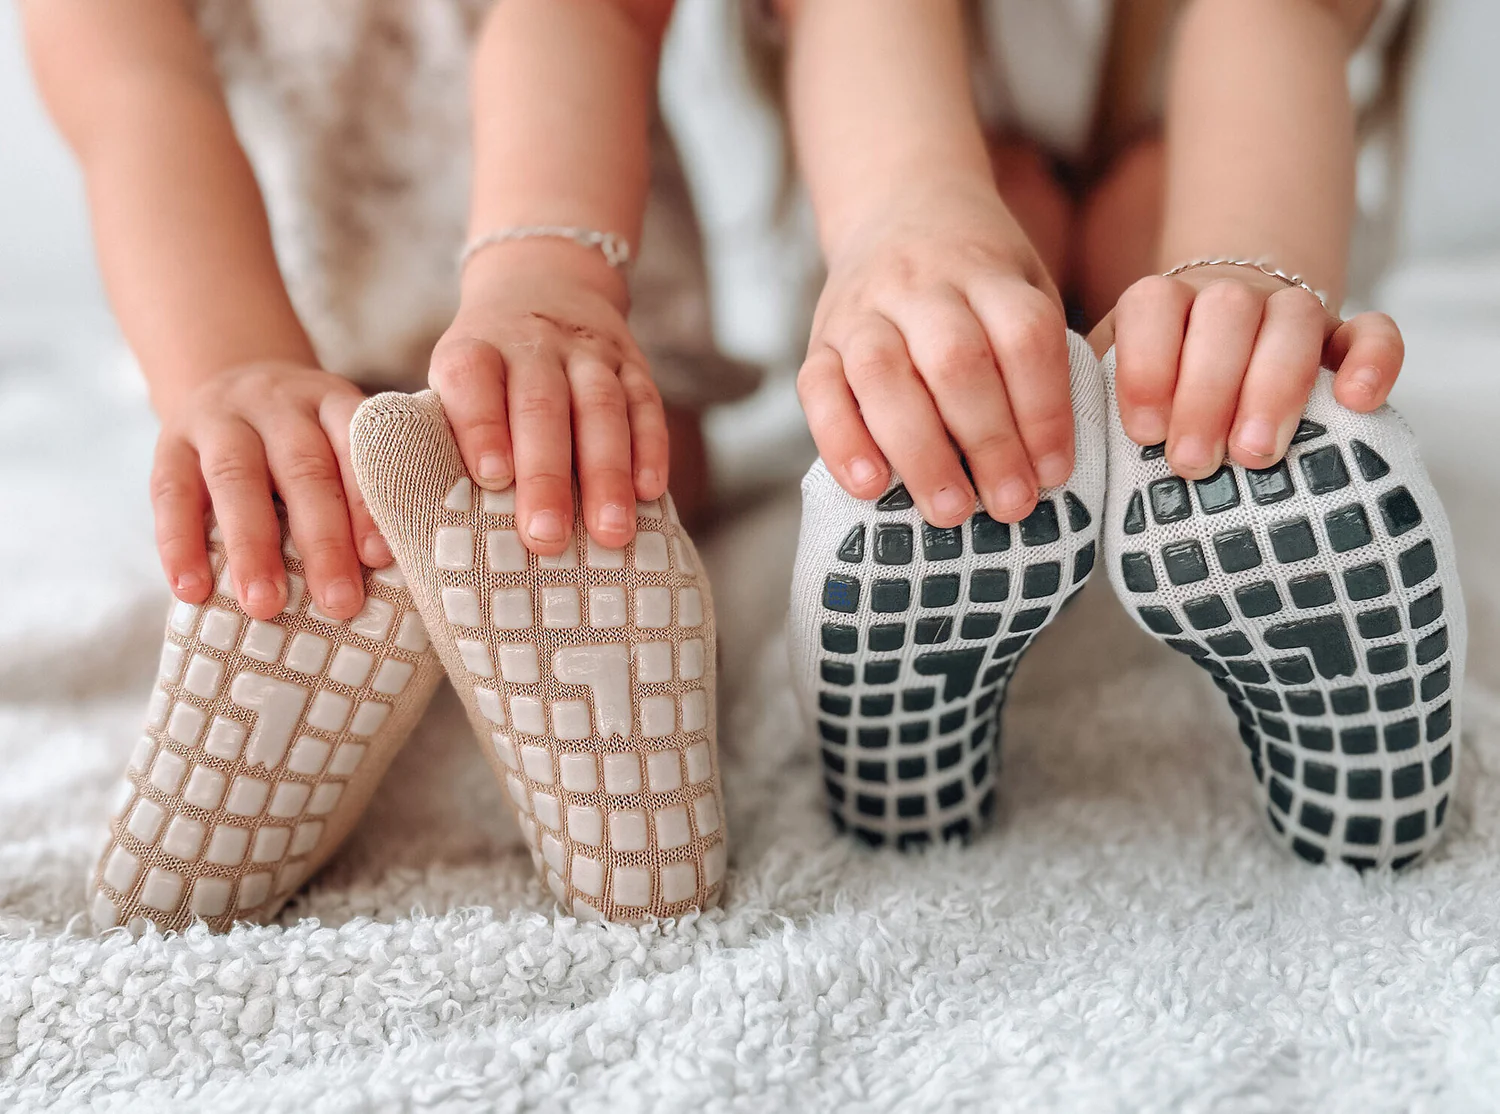
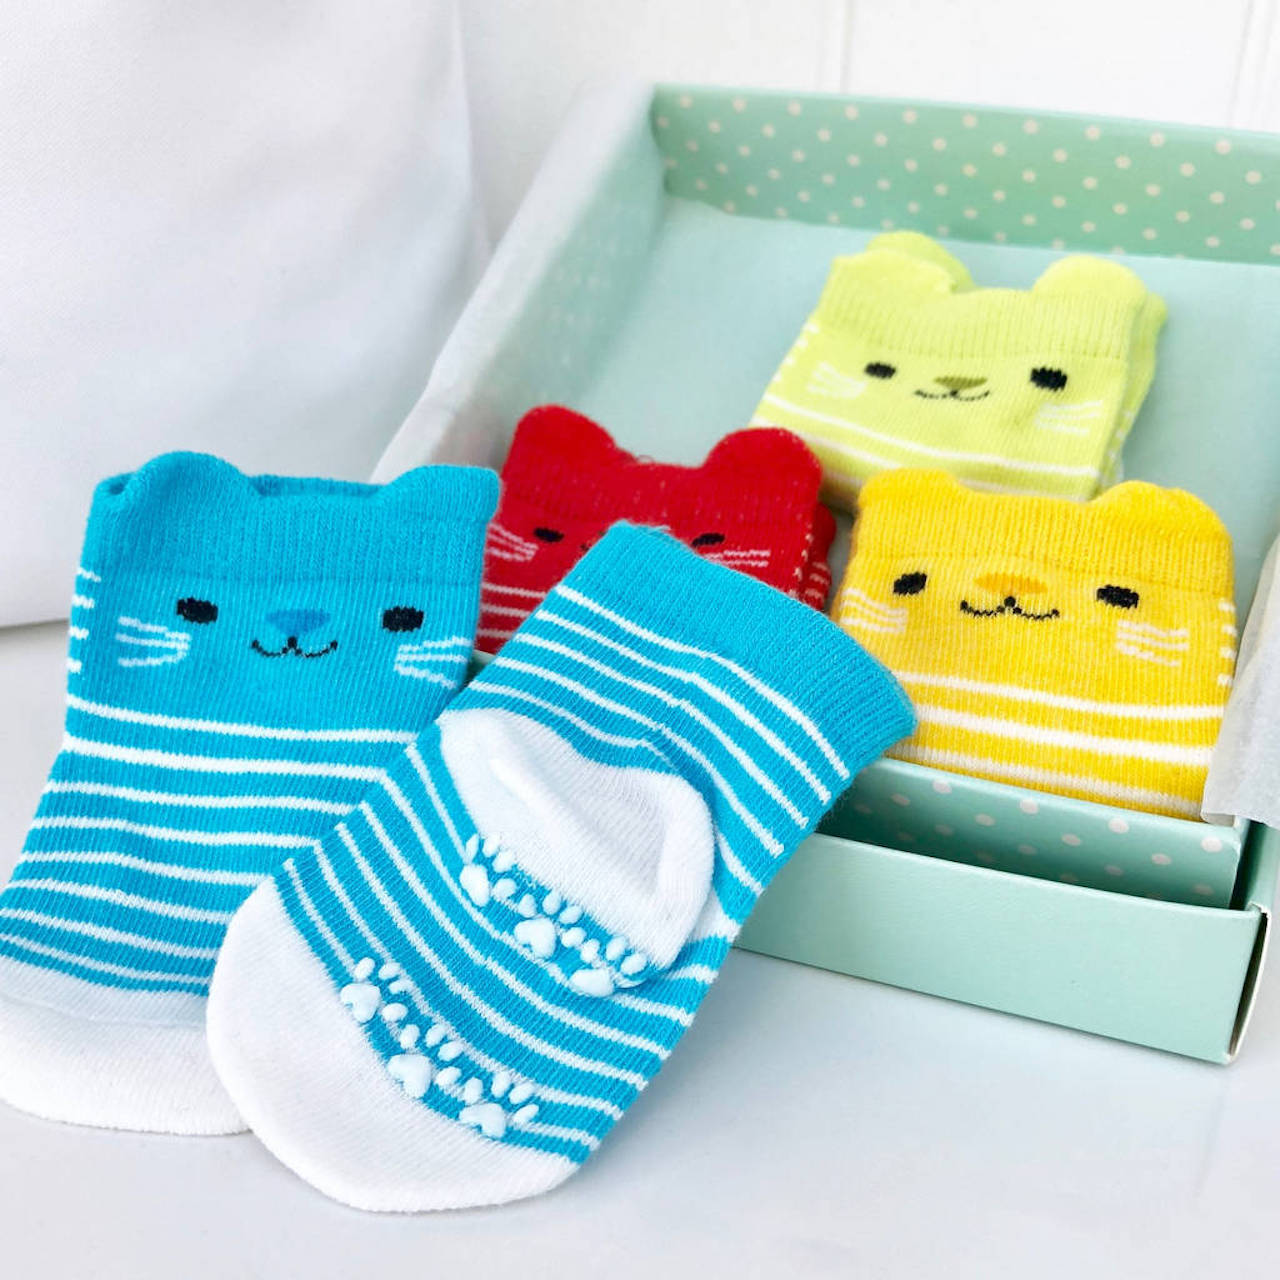
Baby Socks: Select a few pairs of your baby's favorite socks to transform into non-slip wonders. Opt for socks with a smooth sole, as this will provide an ideal surface for applying the non-slip material.
-
Non-Slip Fabric Paint or Silicone Grips: There are various non-slip options available, including non-slip fabric paint and silicone grips. These materials are designed to enhance traction and prevent slipping, making them perfect for this DIY project.
-
Cardboard or Newspaper: To create a stable work surface and prevent any accidental spills or stains, it's helpful to have some cardboard or newspaper on hand. This will protect your work area and make the cleanup process a breeze.
-
Paintbrush or Applicator: If you're using non-slip fabric paint, a small paintbrush or applicator will be essential for applying the paint evenly onto the socks. This will allow you to control the application and create precise patterns or designs if desired.
-
Flat Surface for Drying: Once you've applied the non-slip material to the socks, you'll need a flat surface where the socks can dry undisturbed. This could be a clean countertop, a drying rack, or any other suitable flat area where the socks can lay flat until the non-slip material has fully set.
-
Optional: Fabric Markers or Iron-On Patches: If you want to add a personal touch to the non-slip socks, consider having fabric markers or iron-on patches on hand. These additional materials can be used to embellish the socks with fun designs, patterns, or your baby's name, adding a delightful custom touch to the finished product.
By gathering these materials, you'll be fully equipped to embark on the process of making baby socks non-slip. With these simple yet essential items at your disposal, you can proceed with confidence, knowing that you have everything you need to create safe, stylish, and personalized non-slip socks for your little one.
Step 1: Prepare the Socks
Before diving into the process of making baby socks non-slip, it's crucial to prepare the socks properly to ensure optimal results. This initial step sets the foundation for the subsequent application of the non-slip material, laying the groundwork for a successful and durable transformation.
To begin, gather the selected baby socks that you intend to convert into non-slip wonders. Ensure that the socks are clean and free from any dust, lint, or debris that could interfere with the adherence of the non-slip material. If necessary, gently brush or shake the socks to remove any surface particles, preparing them for the next phase of the process.
Next, lay out a stable work surface using cardboard or newspaper to protect the area where you'll be working. This simple precaution will safeguard your surroundings from any potential spills or smudges, allowing you to focus on the task at hand without worrying about accidental messes.
Once your work area is prepared, carefully turn the socks inside out to expose the soles, which will be the primary focus of the non-slip application. Smooth out the fabric to create an even surface, ensuring that the socks are ready to receive the non-slip material in a uniform and consistent manner.
By taking the time to prepare the socks meticulously, you're setting the stage for a seamless and effective application of the non-slip solution. This thoughtful approach will contribute to the overall durability and functionality of the non-slip socks, ensuring that the traction-enhancing material adheres securely to the fabric, providing reliable grip for your little one as they explore and play.
With the socks prepared and the groundwork laid, you're now ready to move on to the next step in the process: applying the non-slip material. This exciting phase will bring your vision of non-slip baby socks to life, combining practicality with creativity to craft personalized and secure footwear for your precious little explorer.
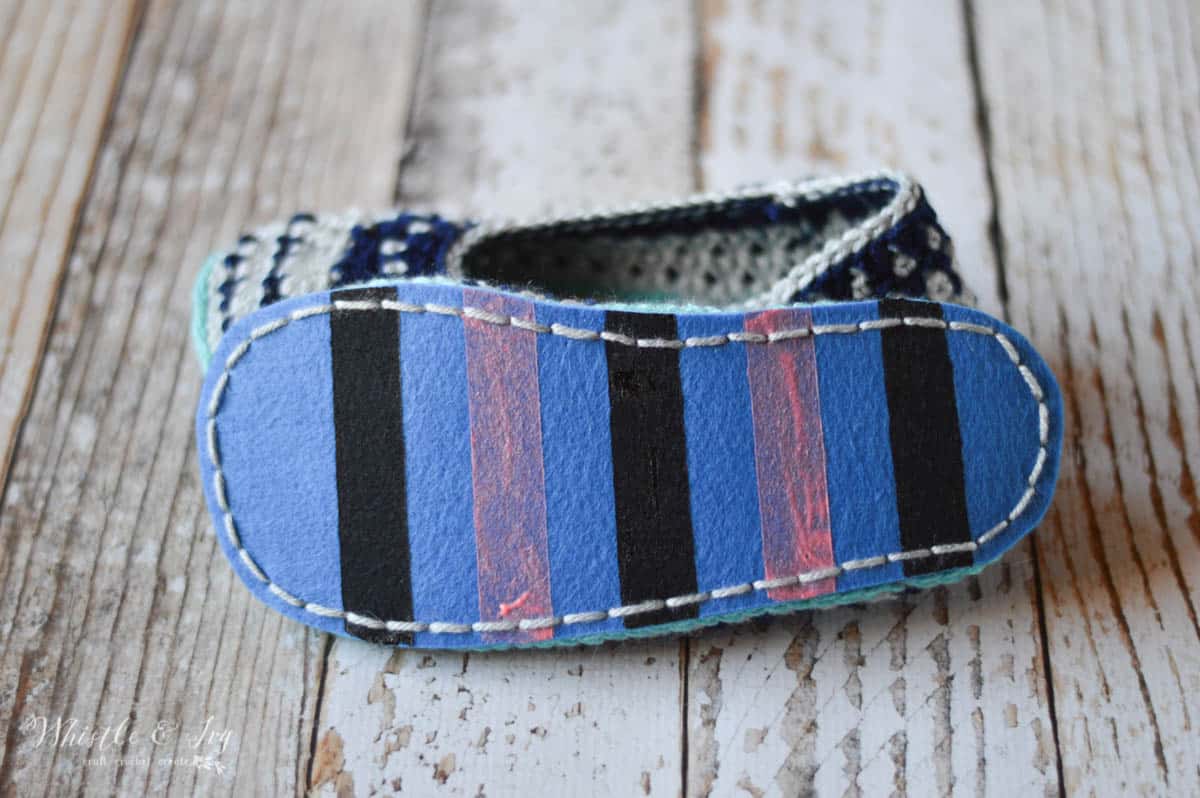
Apply a thin layer of fabric paint or silicone adhesive to the bottom of the baby socks to create a non-slip surface. Allow it to dry completely before use.
Step 2: Apply the Non-Slip Material
With the socks prepared and the stage set, it's time to embark on the transformative process of applying the non-slip material. This pivotal step will infuse the socks with enhanced traction, providing your little one with stability and confidence as they move about. Whether you've opted for non-slip fabric paint or silicone grips, the application process remains straightforward and rewarding.
If you've chosen non-slip fabric paint, begin by gently shaking the bottle to ensure the paint is thoroughly mixed. Then, using a small paintbrush or applicator, carefully apply the non-slip fabric paint to the soles of the socks. You have the creative freedom to apply the paint in various patterns or designs, such as dots, lines, or playful shapes, tailored to your baby's unique style. This customization adds a delightful touch to the socks while serving the essential function of preventing slips and falls.
On the other hand, if you've opted for silicone grips, carefully peel the grips from their backing and strategically place them on the soles of the socks. Ensure that the grips are securely adhered to the fabric, creating a reliable non-slip surface that will withstand your baby's adventures. The flexibility of silicone grips allows you to explore different placement options, from simple lines for maximum coverage to fun and whimsical designs that add a personalized flair to the socks.
Regardless of the non-slip material you choose, take care to apply it evenly and consistently, covering the targeted areas with precision. This meticulous approach will ensure that the non-slip solution provides reliable traction across the entire sole of the sock, offering comprehensive support and stability for your little one's every step.
As you apply the non-slip material, consider incorporating fun and engaging elements that resonate with your baby's personality. Whether it's vibrant colors, adorable patterns, or their favorite shapes, infusing the non-slip material with a touch of creativity can make the socks even more appealing to your little explorer.
Once the non-slip material has been applied, take a moment to admire your handiwork. The socks have now been transformed into personalized, non-slip wonders, ready to accompany your baby on their daily adventures. With the non-slip material in place, the socks are primed to offer enhanced stability and security, allowing your little one to explore their world with confidence and joy.
With the non-slip material expertly applied, the final step awaits: allowing the socks to dry thoroughly. This crucial phase will ensure that the non-slip material sets securely, creating a durable and long-lasting grip that will accompany your baby on countless adventures. Let's proceed to the next step and complete the journey of making baby socks non-slip.
Step 3: Let the Socks Dry
After the non-slip material has been expertly applied to the baby socks, the final step in this transformative process is to allow the socks to dry thoroughly. This crucial phase is essential for ensuring that the non-slip material sets securely, creating a durable and long-lasting grip that will accompany your baby on countless adventures.
To facilitate the drying process, carefully transfer the non-slip socks to a flat surface where they can rest undisturbed. Whether it's a clean countertop, a dedicated drying rack, or any other suitable flat area, providing a stable and level surface is key to allowing the non-slip material to set evenly and effectively.
As the socks begin to dry, it's important to exercise patience and allow an adequate amount of time for the non-slip material to fully adhere to the fabric. The specific drying time may vary depending on the type of non-slip material used, as well as environmental factors such as temperature and humidity. It's advisable to refer to the manufacturer's recommendations for the particular non-slip product to ensure optimal drying conditions.
During the drying period, resist the temptation to handle or manipulate the socks, as this could disrupt the setting process of the non-slip material. Instead, allow the socks to rest undisturbed, giving the non-slip solution ample time to bond securely with the fabric, creating a reliable and resilient grip that will withstand your baby's active explorations.
As the socks gradually dry, take a moment to envision the countless adventures that lie ahead for your little one. Whether they're mastering the art of crawling, taking their first wobbly steps, or embarking on playful expeditions, the non-slip socks you've crafted will be there every step of the way, providing essential stability and support.
Once the socks have thoroughly dried and the non-slip material has set, gently turn them right side out to reveal the delightful transformation. Take a moment to admire the personalized and secure non-slip socks that you've created, knowing that they will serve as a reliable companion for your baby's daily discoveries and adventures.
With the socks now fully dried and the non-slip material firmly in place, your DIY journey of making baby socks non-slip is complete. You've combined practicality with creativity, crafting personalized and secure footwear that reflects your care and dedication to your little one's safety and comfort. As your baby dons their newly transformed non-slip socks, they're ready to embrace the world with confidence and joy, supported by your thoughtful and loving creation.
Read more: What Makes Non-Slip Shoes Non-Slip
Conclusion
In conclusion, the process of making baby socks non-slip is a rewarding and practical endeavor that combines functionality with creativity. By following the simple yet impactful steps outlined in this guide, you can transform ordinary baby socks into personalized and secure footwear that enhances your little one's safety and comfort.
Through careful preparation, thoughtful application of non-slip material, and patient drying, you have the opportunity to craft non-slip socks that cater to your baby's unique style and needs. Whether you opt for non-slip fabric paint or silicone grips, the result is the same: a reliable and durable grip that provides essential stability as your baby explores their world.
As you embark on this DIY journey, consider infusing the non-slip material with a touch of creativity, adding delightful patterns, designs, or even your baby's name to the socks. This personalization not only enhances the visual appeal of the socks but also reflects the care and dedication you put into ensuring your little one's safety.
Once the non-slip material has been expertly applied and the socks have thoroughly dried, you'll have the satisfaction of witnessing the delightful transformation. The non-slip socks you've created are now ready to accompany your baby on their daily adventures, offering peace of mind and support as they navigate their surroundings.
By making baby socks non-slip, you're not only addressing a common safety concern but also adding a personal touch to your baby's wardrobe. These customized non-slip socks serve as a testament to your commitment to providing a secure and nurturing environment for your little one.
As your baby dons their newly transformed non-slip socks, they're equipped to embrace each moment with confidence and joy, supported by your thoughtful and loving creation. With each step they take, you can take pride in knowing that you've played a part in enhancing their safety and comfort, allowing them to explore and thrive with added stability and security.
In the end, the process of making baby socks non-slip is more than a DIY project – it's a meaningful expression of care and creativity that resonates with every step your little one takes. So, celebrate this accomplishment and cherish the moments ahead, knowing that you've taken a proactive and loving approach to safeguarding your baby's adventures.
Frequently Asked Questions about How To Make Baby Socks Non-Slip
Was this page helpful?
At Storables.com, we guarantee accurate and reliable information. Our content, validated by Expert Board Contributors, is crafted following stringent Editorial Policies. We're committed to providing you with well-researched, expert-backed insights for all your informational needs.
0 thoughts on “How To Make Baby Socks Non-Slip”