Home>Furniture & Design>Bathroom Accessories>How To Replace The Battery In An Oral-B Toothbrush
Bathroom Accessories
How To Replace The Battery In An Oral-B Toothbrush
Modified: April 22, 2024
Learn how to easily replace the battery in your Oral-B toothbrush with our step-by-step guide. Keep your bathroom accessories working like new!
(Many of the links in this article redirect to a specific reviewed product. Your purchase of these products through affiliate links helps to generate commission for Storables.com, at no extra cost. Learn more)
Introduction
Replacing the battery in an Oral-B toothbrush is a simple yet essential task that can extend the life of your beloved oral care device. Over time, the battery in your electric toothbrush may lose its ability to hold a charge, leading to diminished performance and ultimately rendering the toothbrush unusable. However, with the right tools and a bit of know-how, you can easily replace the battery and breathe new life into your trusty Oral-B toothbrush.
In this comprehensive guide, we will walk you through the step-by-step process of replacing the battery in your Oral-B toothbrush. Whether you're a seasoned DIY enthusiast or a novice looking to save on costly replacements, this guide will equip you with the knowledge and confidence to tackle this maintenance task with ease.
By following the instructions outlined in this guide, you'll not only save money on purchasing a new toothbrush but also contribute to reducing electronic waste by extending the lifespan of your current device. Additionally, by taking the initiative to replace the battery yourself, you'll gain a deeper understanding of the inner workings of your toothbrush, empowering you to take better care of it in the long run.
So, without further ado, let's dive into the process of replacing the battery in your Oral-B toothbrush and ensure that your oral hygiene routine remains efficient and effective for years to come.
Key Takeaways:
- Revive your Oral-B toothbrush by replacing the battery, saving money and reducing electronic waste. Gain confidence in maintaining your oral care device for long-term reliability and sustainability.
- Replacing the battery in your Oral-B toothbrush is a rewarding DIY task that extends its lifespan, reduces waste, and empowers you to take better care of your oral hygiene tools.
Step 1: Gather the necessary tools
Before embarking on the task of replacing the battery in your Oral-B toothbrush, it's crucial to gather the essential tools and materials to ensure a smooth and efficient process. Here's a comprehensive list of items you'll need:
-
Replacement Battery: The first and most crucial item you'll need is a compatible replacement battery for your specific Oral-B toothbrush model. It's essential to ensure that the replacement battery matches the voltage and size requirements of your toothbrush to guarantee optimal performance.
-
Screwdriver Set: A precision screwdriver set with interchangeable heads is indispensable for opening the casing of your toothbrush. Look for a set that includes small Phillips and flathead screwdriver heads to accommodate various screw sizes.
-
Safety Glasses: While this may seem like an unusual addition, wearing safety glasses can protect your eyes from any accidental debris or small components that may dislodge during the battery replacement process.
-
Work Surface: Prepare a clean and well-lit work surface with ample space to lay out the toothbrush components and tools. A flat, stable surface such as a table or countertop will provide the ideal workspace for this task.
-
Small Container or Tray: Having a small container or tray on hand to hold the tiny screws and components removed from the toothbrush will prevent them from getting lost during the disassembly process.
-
Tweezers or Needle-nose Pliers: These tools can be incredibly useful for handling small components and extracting the old battery from its housing.
-
Protective Gloves (Optional): If you prefer added protection for your hands, especially if you'll be handling sharp or delicate components, wearing a pair of protective gloves can provide an extra layer of safety.
By ensuring that you have all the necessary tools and materials at your disposal, you'll be well-prepared to proceed with the battery replacement process without any interruptions. With these items in hand, you're ready to move on to the next step and begin the journey of revitalizing your Oral-B toothbrush with a new, reliable battery.
Step 2: Open the toothbrush
Opening the casing of your Oral-B toothbrush is the crucial first step in the battery replacement process. To begin, ensure that you are working on a clean and clutter-free surface to prevent any small components from getting misplaced. Additionally, it's advisable to put on your safety glasses to shield your eyes from any potential debris that may dislodge during the disassembly.
Using the appropriate screwdriver from your set, carefully locate and remove the screws that secure the outer casing of the toothbrush. These screws are typically situated at the base or underneath the rubberized grip of the toothbrush. It's important to exercise caution and precision when unscrewing, as the screws are often small and delicate.
Once the screws have been removed, gently pry open the casing using a flathead screwdriver or a plastic opening tool, taking care not to force or damage the casing. As you separate the two halves of the casing, be mindful of any internal components or wiring that may be connected between them. Slow and steady movements will help prevent accidental damage to these delicate parts.
As the casing is opened, you may notice the internal arrangement of components, including the battery, circuit board, and motor. Take note of the positioning of these elements as it will aid in the reassembly process later on. If there are any additional screws or fasteners securing the internal components, carefully remove them and keep them in a designated container to prevent misplacement.
With the toothbrush casing now open and the internal components accessible, you've successfully completed the second step in the battery replacement process. This careful and methodical approach to opening the toothbrush sets the stage for the subsequent steps, allowing you to proceed with confidence and precision as you continue the journey of revitalizing your Oral-B toothbrush.
Step 3: Remove the old battery
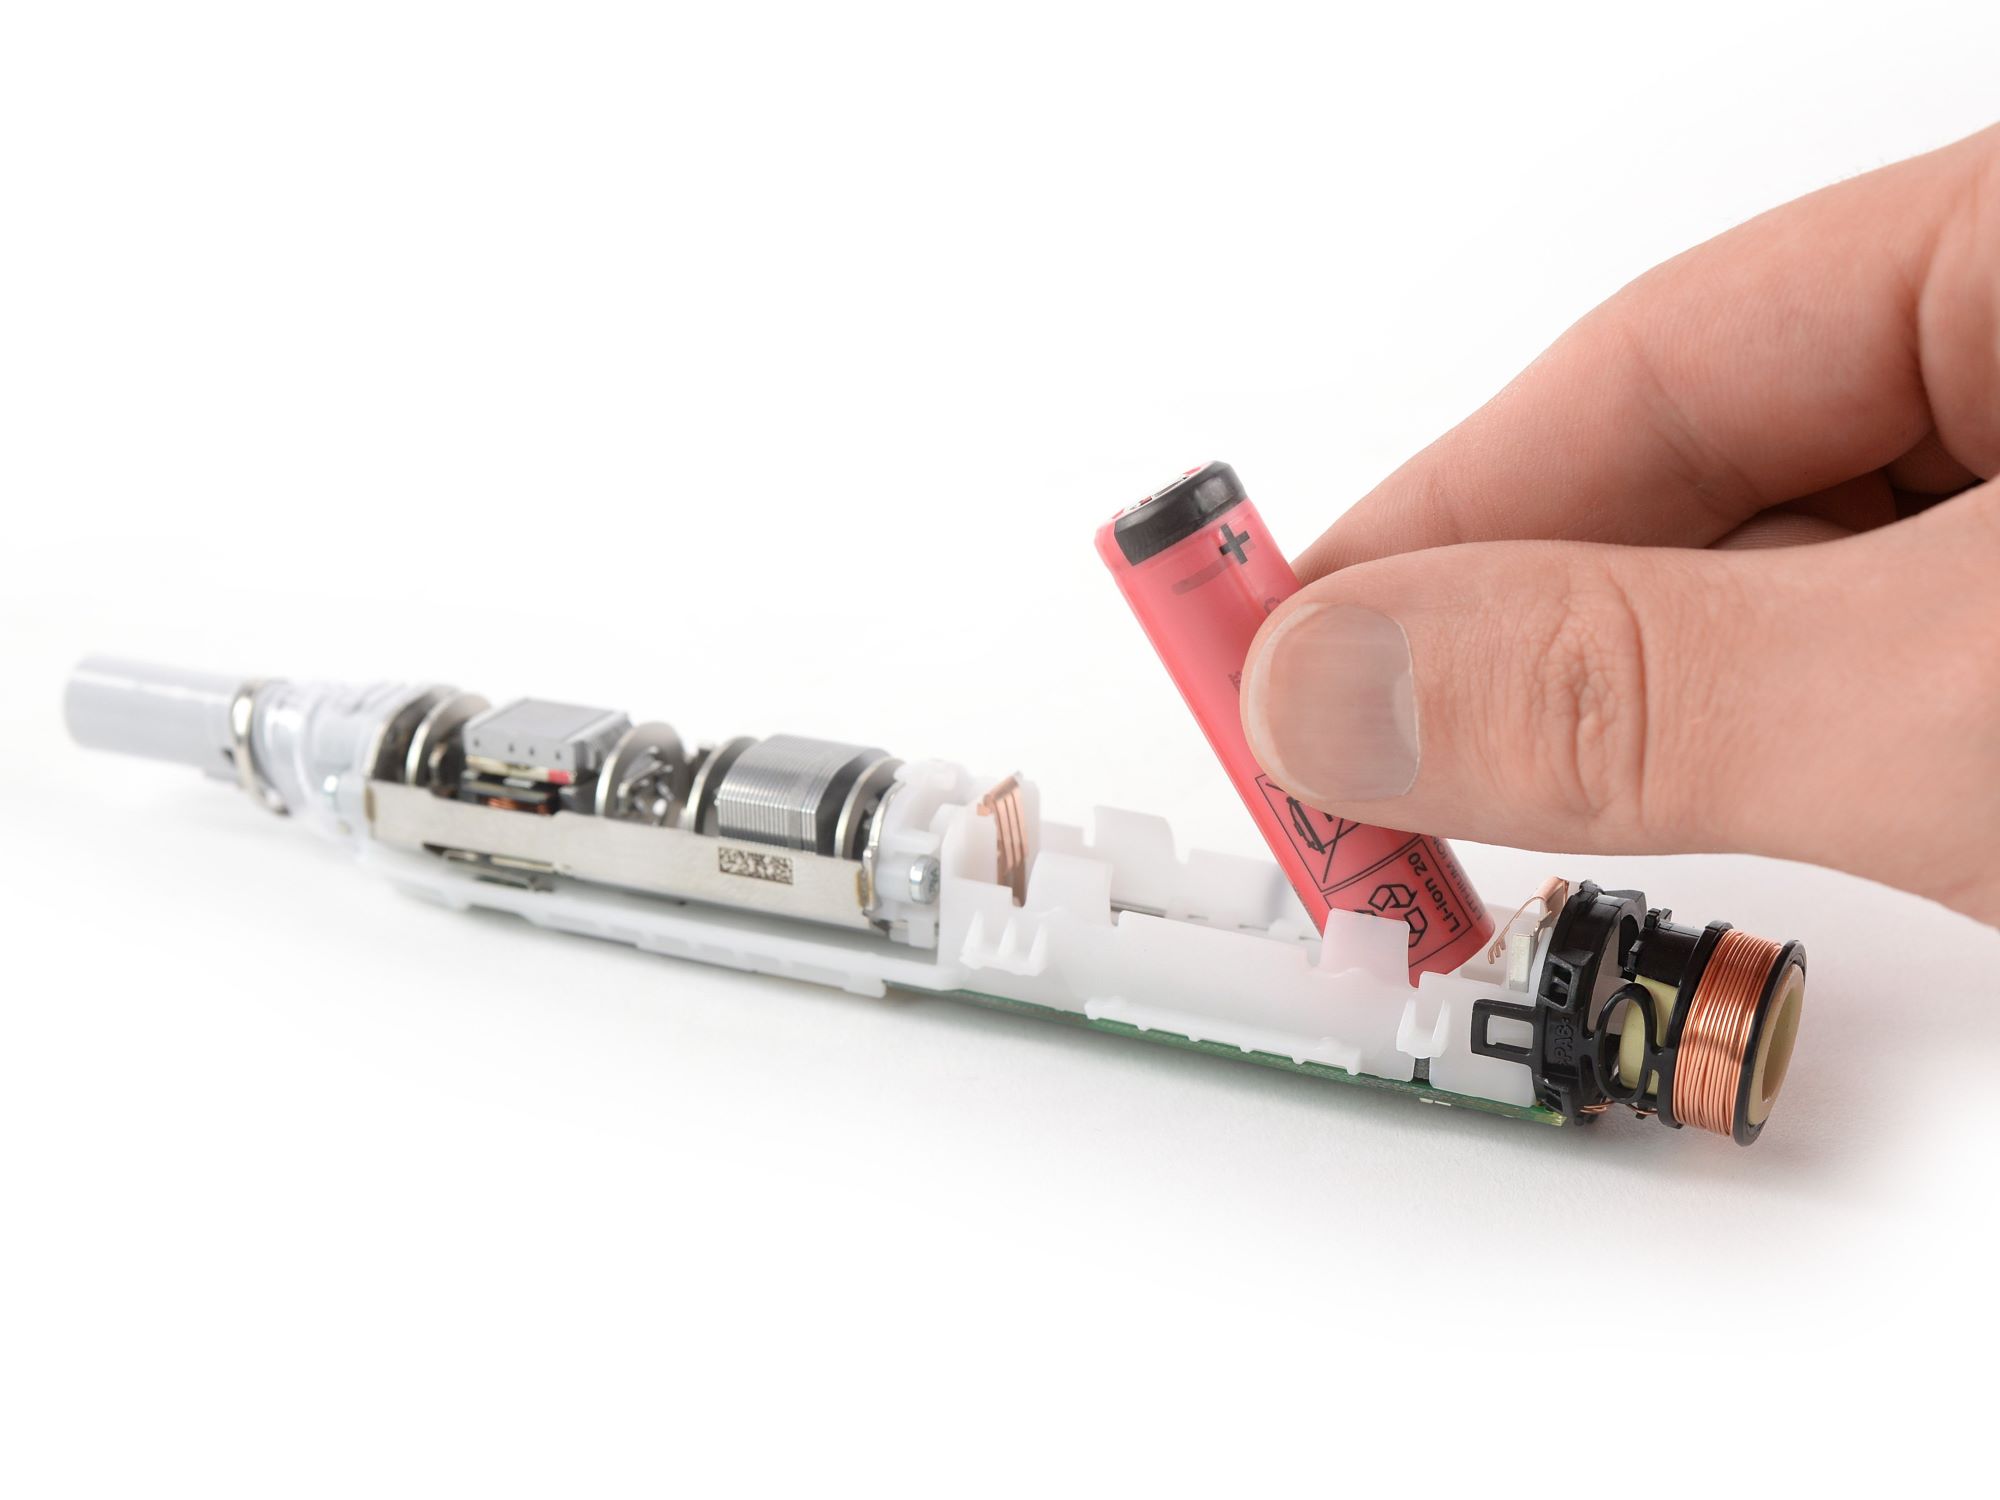
With the casing of your Oral-B toothbrush opened and the internal components exposed, the next critical step is to carefully remove the old battery. Before proceeding, it's essential to approach this task with precision and patience to avoid damaging any surrounding components.
The old battery is typically secured in place within a compartment or holder, often connected to the toothbrush's circuitry. To access the battery, carefully inspect the internal layout to identify its positioning and any securing mechanisms. In some models, the battery may be soldered to the circuit board, requiring additional care during removal.
Using a pair of tweezers or needle-nose pliers, gently disconnect any wiring or connectors attached to the old battery. Take note of the orientation of the battery and its connections to ensure proper reinstallation of the new battery later in the process.
Once any electrical connections have been safely detached, proceed to extract the old battery from its housing. Depending on the design of the toothbrush, the battery may be held in place by clips, adhesive, or additional fasteners. Exercise caution and delicacy during this step to avoid causing any damage to the surrounding components or the battery itself.
If the old battery is secured with adhesive, carefully loosen it by applying gentle pressure and leveraging the edge of a flathead screwdriver or plastic opening tool. Take care to avoid bending or puncturing the battery, as this can pose safety risks and damage the battery cells.
Once the old battery has been successfully removed from its housing, place it aside in a safe and designated area. Properly disposing of the old battery in accordance with local regulations is crucial to minimize environmental impact and ensure responsible waste management.
By methodically and attentively removing the old battery from your Oral-B toothbrush, you've completed a pivotal stage in the battery replacement process. With the old battery safely extracted, you're now ready to proceed to the next step of inserting the new battery and revitalizing your toothbrush for continued reliable performance.
This careful and meticulous approach to removing the old battery sets the stage for a seamless transition to the subsequent steps, allowing you to progress with confidence and precision as you embark on the journey of enhancing the longevity of your Oral-B toothbrush.
To replace the battery in an Oral-B toothbrush, carefully remove the bottom cap and old battery. Insert a new AA battery, making sure the positive and negative ends are aligned correctly. Then, replace the bottom cap and you’re good to go!
Step 4: Insert the new battery
With the old battery safely removed from your Oral-B toothbrush, the next pivotal step in the battery replacement process is to insert the new battery. This phase marks a significant milestone in revitalizing your toothbrush, as the new battery will restore its power and functionality, ensuring continued reliable performance in your oral care routine.
Before proceeding with the insertion of the new battery, carefully inspect the battery compartment and the positioning of the electrical connections within the toothbrush. Ensure that the compartment is clean and free from any debris or residue that may impede the installation of the new battery. Additionally, take note of the orientation and polarity of the new battery, aligning it with the markings or indicators within the compartment to guarantee proper installation.
Carefully place the new battery into the designated compartment, ensuring a secure and snug fit without applying excessive force. If the battery is equipped with leads or connectors, re-establish the electrical connections according to the markings or documentation provided with the replacement battery. Exercise caution and precision during this step to prevent any accidental damage to the new battery or the toothbrush's internal components.
If the new battery is secured with adhesive, gently press it into place, ensuring that it adheres firmly to the designated area within the compartment. Take care to avoid bending or stressing the battery during this process, as maintaining its structural integrity is crucial for optimal performance and safety.
Once the new battery is securely in place and any electrical connections have been re-established, carefully inspect the compartment to confirm that the battery is properly seated and aligned. Double-check the polarity and orientation of the battery to ensure that it corresponds with the toothbrush's electrical configuration.
With the new battery successfully inserted and secured within the toothbrush, you've reached a significant milestone in the battery replacement process. This meticulous and attentive approach to installing the new battery sets the stage for the subsequent steps, allowing you to proceed with confidence and precision as you continue the journey of enhancing the longevity and performance of your Oral-B toothbrush.
By methodically and thoughtfully inserting the new battery, you're one step closer to revitalizing your toothbrush and ensuring that it remains a reliable companion in your daily oral care routine. With the new battery in place, you're ready to progress to the next step and bring your revitalized Oral-B toothbrush one step closer to completion.
Step 5: Close the toothbrush
After successfully inserting the new battery into your Oral-B toothbrush, the next crucial step in the battery replacement process is to carefully close the toothbrush casing. This phase marks the culmination of the intricate maintenance journey, bringing your revitalized toothbrush one step closer to resuming its essential role in your oral care routine.
Begin by carefully aligning the two halves of the toothbrush casing, ensuring that any internal components, wiring, and the new battery are positioned securely within the housing. Take note of any guiding tabs or alignment features that facilitate the proper closure of the casing, as these elements play a key role in ensuring a seamless and secure fit.
As you bring the two halves of the casing together, apply gentle and even pressure to encourage the interlocking of the components. Take care to avoid forcing or misaligning the casing, as this can lead to potential damage to the internal components or compromise the integrity of the toothbrush's housing.
Once the casing is aligned and the components are securely nested within, begin reinserting the screws that secure the casing. Using the appropriate screwdriver from your set, carefully tighten the screws in a diagonal pattern to ensure uniform pressure and a balanced closure of the casing. Exercise caution and precision during this step to prevent overtightening, which can potentially damage the casing or strip the screw threads.
As you secure the final screws, take a moment to inspect the toothbrush casing, ensuring that it is uniformly closed and that there are no gaps or misalignments. A snug and seamless closure of the casing is essential for maintaining the structural integrity of the toothbrush and safeguarding its internal components from external elements.
With the toothbrush casing securely closed, you've reached a pivotal milestone in the battery replacement process, bringing your revitalized Oral-B toothbrush one step closer to resuming its essential role in your daily oral care routine. This careful and methodical approach to closing the toothbrush sets the stage for the final step, allowing you to proceed with confidence and anticipation as you prepare to test the functionality of your newly revitalized toothbrush.
By thoughtfully and attentively closing the toothbrush casing, you've ensured that your Oral-B toothbrush is poised for reliable and efficient performance, ready to accompany you in maintaining optimal oral hygiene for the days and months ahead. With the toothbrush securely closed, you're now prepared to embark on the final step and test the functionality of your revitalized oral care companion.
Step 6: Test the toothbrush
With the battery successfully replaced and the toothbrush securely reassembled, the final and pivotal step in the battery replacement process is to test the functionality of your revitalized Oral-B toothbrush. This critical phase serves as the ultimate validation of your meticulous efforts, ensuring that the toothbrush is ready to resume its essential role in your daily oral care routine.
To begin the testing process, ensure that the toothbrush is disconnected from any charging sources and that the casing is securely closed. Once these prerequisites are met, proceed to power on the toothbrush by pressing the designated power button or activating the switch, depending on the model of your Oral-B toothbrush.
As the toothbrush powers on, pay close attention to the indicators of functionality, including the activation of the motor and the vibrational movement of the brush head. Observe the performance of the toothbrush, noting any unusual sounds, vibrations, or irregularities that may indicate potential issues with the battery replacement or reassembly process.
If the toothbrush powers on and operates as expected, including the smooth and consistent movement of the brush head, this signifies a successful battery replacement and reassembly. Congratulations, your Oral-B toothbrush has been revitalized and is ready to resume its essential role in maintaining optimal oral hygiene.
However, if you encounter any unexpected behavior or issues during the testing phase, such as erratic motor operation or a lack of power, it may indicate potential complications with the battery replacement or reassembly. In such cases, it's advisable to power off the toothbrush and revisit the reassembly process, ensuring that all components are securely in place and that the new battery is properly installed and connected.
In the event of persistent issues or concerns regarding the functionality of the toothbrush after the battery replacement, it may be prudent to seek assistance from a qualified technician or the manufacturer's support services. Professional guidance can help address any underlying issues and ensure the optimal performance and safety of your Oral-B toothbrush.
By diligently testing the functionality of your revitalized toothbrush, you've completed the final step in the battery replacement process, affirming that your efforts have successfully extended the lifespan of your trusted oral care companion. With the toothbrush tested and ready for use, you can confidently incorporate it back into your daily oral hygiene routine, knowing that it has been rejuvenated and primed for continued reliable performance.
This careful and methodical approach to testing the toothbrush ensures that your revitalized Oral-B toothbrush is poised to accompany you in maintaining optimal oral hygiene for the days and months ahead. With the testing phase successfully completed, your revitalized toothbrush stands as a testament to your dedication to sustainable maintenance and responsible care for your oral care devices.
Conclusion
In conclusion, the process of replacing the battery in an Oral-B toothbrush is a rewarding endeavor that empowers individuals to extend the lifespan of their trusted oral care companion. By following the comprehensive steps outlined in this guide, you have gained valuable insights into the intricate maintenance process, allowing you to revitalize your toothbrush with a new battery and ensure its continued reliable performance.
Through the meticulous disassembly, removal of the old battery, and insertion of the new battery, you have demonstrated a commitment to sustainable maintenance practices, contributing to the reduction of electronic waste and the responsible management of resources. Your dedication to preserving and rejuvenating your Oral-B toothbrush reflects a proactive approach to extending the longevity of essential personal care devices, aligning with principles of environmental consciousness and resource efficiency.
As you carefully closed the toothbrush casing and tested the functionality of your revitalized toothbrush, you have affirmed your capability to undertake maintenance tasks with precision and confidence. The successful completion of each step in the battery replacement process serves as a testament to your dedication to preserving the functionality and reliability of your oral care devices, ensuring that they continue to serve you effectively in your daily oral hygiene routine.
Furthermore, by embracing the process of replacing the battery in your Oral-B toothbrush, you have deepened your understanding of the inner workings of this essential personal care device. This knowledge empowers you to take proactive measures in maintaining and caring for your toothbrush, fostering a sense of ownership and responsibility for its long-term performance and functionality.
In essence, the journey of replacing the battery in your Oral-B toothbrush transcends a mere maintenance task; it embodies a commitment to sustainability, resourcefulness, and proactive care for essential personal care devices. By revitalizing your toothbrush with a new battery, you have not only extended its lifespan but also reaffirmed your dedication to responsible maintenance practices and environmental stewardship.
With your revitalized Oral-B toothbrush ready to accompany you in maintaining optimal oral hygiene, you can take pride in the knowledge that your efforts have contributed to the sustainable use and preservation of essential personal care devices. As you continue to integrate your revitalized toothbrush into your daily routine, may it serve as a reminder of the impact of proactive maintenance and responsible care in enhancing the longevity and reliability of essential personal care devices.
Frequently Asked Questions about How To Replace The Battery In An Oral-B Toothbrush
Was this page helpful?
At Storables.com, we guarantee accurate and reliable information. Our content, validated by Expert Board Contributors, is crafted following stringent Editorial Policies. We're committed to providing you with well-researched, expert-backed insights for all your informational needs.


0 thoughts on “How To Replace The Battery In An Oral-B Toothbrush”