Home>Furniture & Design>Interior Design Trends>How To Age Glass
Interior Design Trends
How To Age Glass
Published: February 8, 2024
Discover the latest interior design trends with our guide on how to age glass. Transform your space with this timeless technique.
(Many of the links in this article redirect to a specific reviewed product. Your purchase of these products through affiliate links helps to generate commission for Storables.com, at no extra cost. Learn more)
Introduction
Aging glass is a captivating technique that adds character and depth to any space. Whether you're a vintage enthusiast or simply seeking a unique way to elevate your interior design, aging glass can impart a sense of history and charm to your living environment. This process involves creating a weathered, time-worn appearance on glass surfaces, evoking a nostalgic ambiance reminiscent of centuries past.
By embracing the art of aging glass, you can infuse your home with a touch of antiquity, transforming ordinary glass into a conversation piece that exudes timeless elegance. This DIY method allows you to achieve the look of aged glass without the expense of purchasing authentic antique pieces, making it an accessible and rewarding project for design enthusiasts of all levels.
In this comprehensive guide, we will explore the step-by-step process of aging glass, from cleaning the surface to applying the aging solution and sealing the final result. By following these instructions and utilizing simple materials, you can embark on a creative journey to impart a vintage allure to mirrors, windows, picture frames, and other glass elements in your home.
Embrace the allure of the past and unlock the transformative power of aging glass as we delve into the materials needed and the meticulous steps required to achieve a beautifully weathered aesthetic. Let's embark on this enchanting endeavor to infuse your living space with the timeless allure of aged glass.
Key Takeaways:
- Transform ordinary glass into a timeless treasure by aging it with a DIY solution. Embrace history and character with a weathered, nostalgic aesthetic that adds charm to your living space.
- Infuse your home with the allure of aged glass using simple materials and meticulous steps. Create captivating, vintage surfaces that evoke the timeless elegance of bygone eras.
Read more: How To Make Brick Look Aged
Materials Needed
To embark on the captivating journey of aging glass, you will need a few essential materials to achieve the desired weathered effect. These items are readily available and can be easily sourced, making the process of aging glass accessible and enjoyable for DIY enthusiasts. Here's a comprehensive list of the materials required to commence your glass aging project:
-
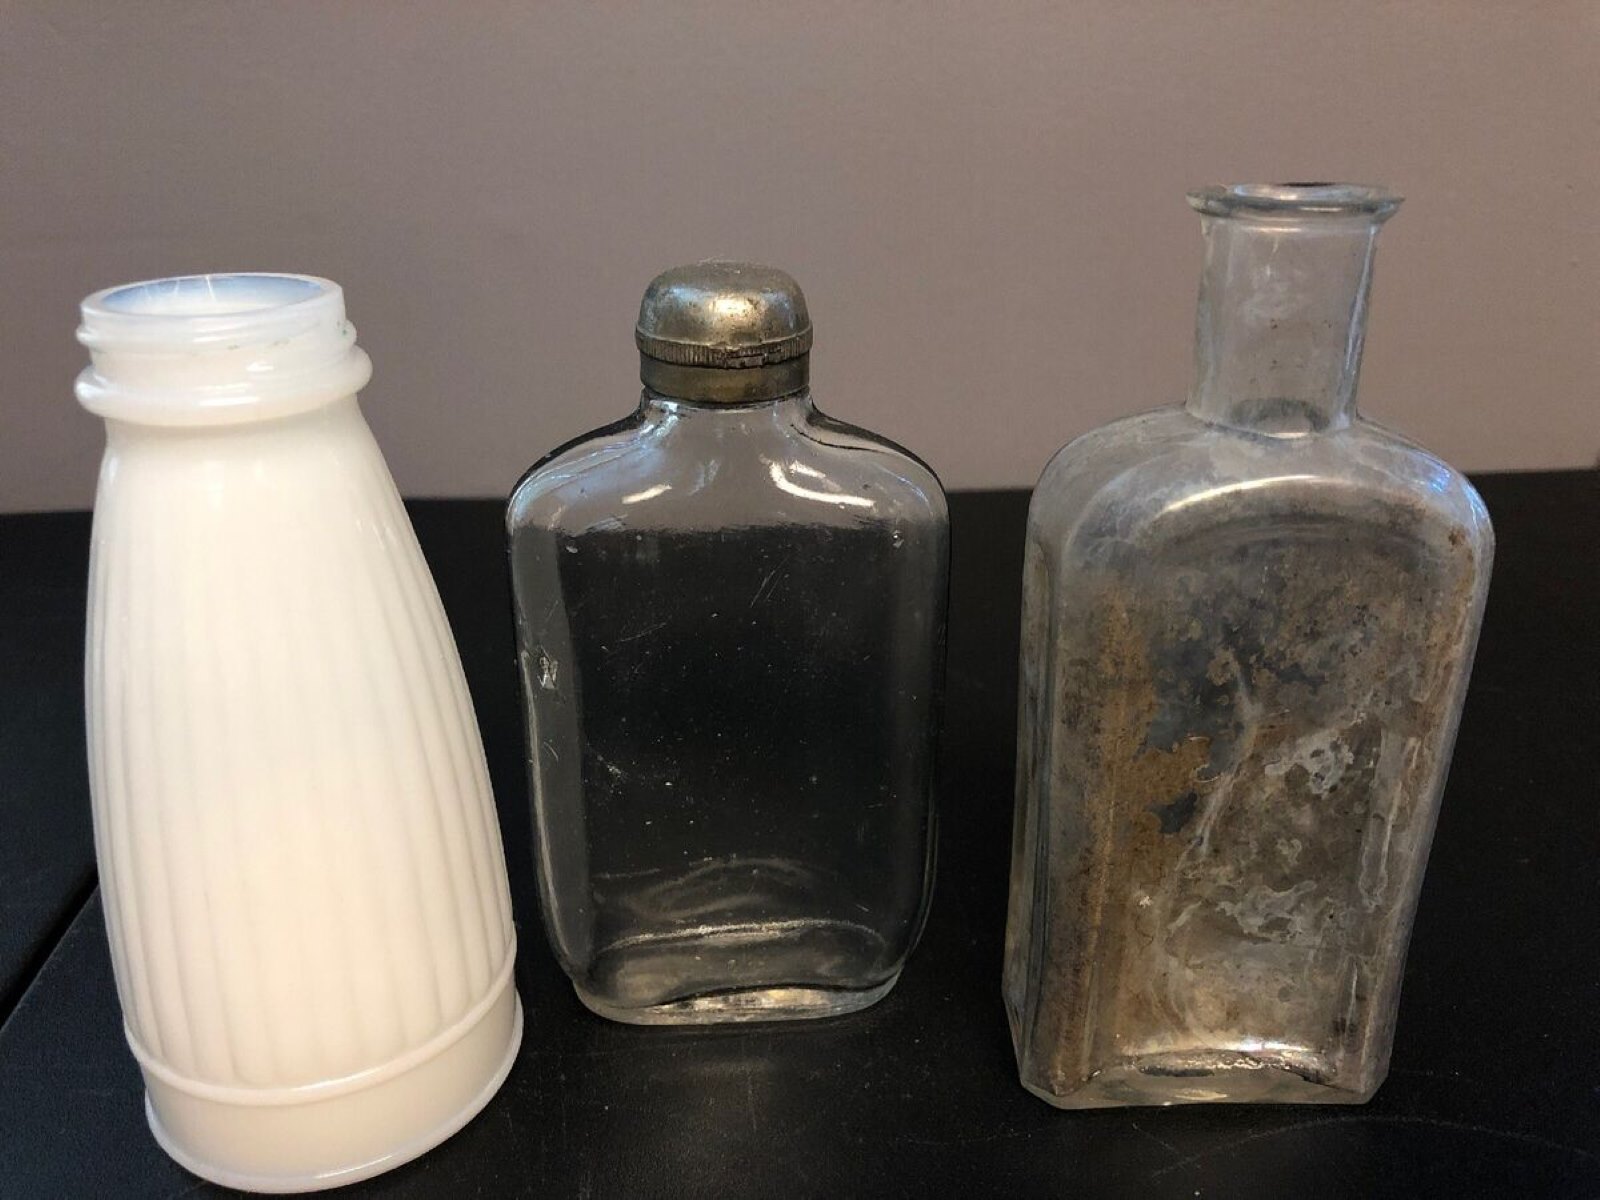
Glass Surfaces: Select the glass surfaces you wish to age, such as mirrors, windows, picture frames, or glass decor items. Ensure that the surfaces are clean and free from any existing coatings or residues.
-
Rubbing Alcohol: This is an essential cleaning agent that effectively removes dirt, grime, and any residual substances from the glass surfaces. It prepares the glass for the aging solution, ensuring optimal adherence and a uniform weathered appearance.
-
Spray Bottle: A spray bottle will be used to apply the aging solution evenly onto the glass surfaces. Opt for a high-quality spray bottle with a fine mist setting to facilitate precise application.
-
Distilled White Vinegar: Vinegar serves as a key component in the aging solution, contributing to the chemical reaction that creates the weathered effect on the glass. Ensure that the vinegar is distilled and free from impurities for optimal results.
-
Flat Black Spray Paint: This type of spray paint will be combined with the vinegar to create the aging solution. The flat black finish will interact with the vinegar to produce the desired antiqued appearance on the glass.
-
Water: Distilled water is recommended for creating the aging solution, as it is free from minerals and impurities that could affect the chemical reaction with the vinegar and spray paint.
-
Paper Towels or Soft Cloth: These materials will be used for cleaning the glass surfaces and applying the aging solution. Opt for lint-free paper towels or soft, clean cloths to prevent lint or debris from marring the aged finish.
-
Protective Gloves: When handling the aging solution and applying it to the glass surfaces, protective gloves are recommended to shield your skin from direct contact with the chemicals.
-
Protective Eyewear: As an additional safety measure, protective eyewear can safeguard your eyes from any accidental splashes or fumes during the glass aging process.
By gathering these materials, you will be fully equipped to initiate the glass aging process and embark on a creative endeavor to infuse your living space with the timeless allure of aged glass.
Step 1: Cleaning the Glass
Before commencing the glass aging process, it is crucial to ensure that the glass surfaces are impeccably clean to facilitate optimal adhesion and a uniform weathered effect. Cleaning the glass effectively removes any dirt, grime, or residual substances that could interfere with the aging solution, allowing for a flawless transformation. Follow these meticulous steps to prepare the glass surfaces for the aging process:
-
Gather the Necessary Materials: Assemble the rubbing alcohol, paper towels or soft cloth, and protective gloves. Ensure that the glass surfaces are accessible and free from any obstructions to facilitate thorough cleaning.
-
Prepare the Cleaning Solution: Pour a small amount of rubbing alcohol onto a clean paper towel or soft cloth. The alcohol serves as a potent cleaning agent that effectively dissolves and lifts away dirt and grime from the glass surfaces.
-
Clean the Glass Surfaces: Gently wipe the glass surfaces with the rubbing alcohol-soaked paper towel or cloth, ensuring comprehensive coverage. Use circular motions to remove any stubborn residues or smudges, paying particular attention to the edges and corners of the glass.
-
Inspect for Residual Substances: After cleaning the glass, inspect the surfaces for any remaining residues or streaks. If necessary, repeat the cleaning process with fresh rubbing alcohol and a clean paper towel to achieve a pristine, residue-free finish.
-
Allow the Glass to Dry: Once the glass surfaces have been thoroughly cleaned, allow them to air dry completely. This ensures that the glass is free from moisture or cleaning solution residues before proceeding to the next step of the glass aging process.
By meticulously cleaning the glass surfaces with rubbing alcohol, you prepare the foundation for the aging solution, setting the stage for a seamless and captivating transformation. This essential step ensures that the glass is primed for the application of the aging solution, paving the way for a beautifully weathered appearance that evokes the allure of aged glass with timeless charm.
Step 2: Creating the Aging Solution
The creation of the aging solution is a pivotal stage in the glass aging process, as it sets the foundation for imparting a weathered, antiqued appearance to the glass surfaces. This carefully crafted solution initiates a chemical reaction that interacts with the glass, resulting in a beautifully aged patina that exudes timeless allure. By combining specific ingredients in precise proportions, you can orchestrate a transformative alchemy that imbues ordinary glass with the captivating charm of aged antiquity.
To create the aging solution, you will need to gather the essential components: distilled white vinegar, flat black spray paint, water, a spray bottle, and protective gloves. These materials converge to form a potent elixir that will bestow a weathered aesthetic upon the glass, infusing it with the allure of a bygone era.
Follow these meticulous steps to craft the aging solution:
-
Prepare the Spray Bottle: Begin by ensuring that the spray bottle is clean and free from any residual substances. This will prevent contamination and ensure the purity of the aging solution.
-
Combine the Ingredients: In a well-ventilated area, pour a precise ratio of distilled white vinegar and water into the spray bottle. A common ratio is one part vinegar to three parts water, but you can adjust the proportions based on the intensity of aging desired. Next, add a small amount of flat black spray paint to the mixture. The paint should be added gradually, allowing for careful observation of the solution's color transformation. As the paint disperses, it will contribute to the creation of the aged effect, imparting depth and character to the solution.
-
Shake and Mix: Secure the spray bottle's cap and shake the solution vigorously to ensure thorough mixing. The agitation facilitates the integration of the ingredients, resulting in a homogeneous aging solution ready for application.
-
Test and Adjust: Before applying the aging solution to the glass surfaces, conduct a small test on a discreet area to gauge the intensity of the weathered effect. This allows for adjustments to the solution's composition, ensuring that the desired level of antiquing is achieved.
By meticulously crafting the aging solution, you set the stage for a captivating metamorphosis of the glass surfaces. This meticulously concocted elixir holds the power to bestow a sense of history and character upon the glass, transforming it into a cherished relic that evokes the timeless allure of aged antiquity.
To age glass, expose it to natural elements like sunlight and moisture. Over time, this will create a weathered and aged appearance on the surface of the glass.
Step 3: Applying the Aging Solution
With the meticulously crafted aging solution at the ready, it's time to embark on the transformative process of applying this elixir to the glass surfaces. This pivotal step is where the magic unfolds, as the carefully concocted solution interacts with the glass, bestowing it with a beautifully weathered appearance that exudes timeless allure.
To apply the aging solution, follow these meticulous steps:
-
Prepare the Work Area: Ensure that the glass surfaces are accessible and free from any obstructions. Lay down protective coverings or drop cloths to safeguard surrounding areas from potential overspray or drips.
-
Shake the Aging Solution: Prior to application, shake the spray bottle containing the aging solution vigorously. This ensures that the components are thoroughly mixed, ready to impart the desired weathered effect onto the glass.
-
Even Application: Hold the spray bottle at a consistent distance from the glass surface to facilitate an even application of the aging solution. Utilize smooth, sweeping motions to coat the glass, ensuring comprehensive coverage without oversaturating the surface.
-
Observe and Adjust: As you apply the aging solution, observe the glass surfaces closely to gauge the evolving antiqued effect. Adjust the application technique or solution concentration as needed to achieve the desired level of weathering, ensuring a harmonious and authentic appearance.
-
Allow for Drying Time: Once the aging solution has been applied, allow the glass surfaces to dry undisturbed. This period of drying is crucial for the chemical reaction to unfold, culminating in the manifestation of the aged patina that will adorn the glass.
By meticulously applying the aging solution, you orchestrate a captivating metamorphosis that imbues the glass with the allure of aged antiquity. This transformative process breathes new life into ordinary glass, endowing it with a sense of history and character that evokes the timeless charm of bygone eras. As the aging solution interacts with the glass, a beautifully weathered patina emerges, infusing the surfaces with a captivating allure that transcends the boundaries of time.
The application of the aging solution marks a pivotal stage in the glass aging process, heralding the emergence of a beautifully weathered aesthetic that will adorn your living space with the timeless allure of aged glass.
Read more: How To Tell Age Of Electrical Cord
Step 4: Drying and Sealing the Glass
After the meticulous application of the aging solution, the glass surfaces must undergo a crucial phase of drying and sealing to preserve the captivating weathered effect and ensure its longevity. This pivotal step not only finalizes the transformation but also safeguards the aged patina, allowing it to endure as a timeless testament to the art of glass aging.
To effectively dry and seal the glass, follow these meticulous steps:
-
Allow Sufficient Drying Time: After the application of the aging solution, it is imperative to allow the glass surfaces to dry thoroughly. This period of undisturbed drying enables the chemical reaction initiated by the aging solution to culminate, resulting in the manifestation of the aged patina. Depending on environmental conditions, such as humidity and airflow, the drying process may take several hours to complete.
-
Inspect for Desired Effect: Once the glass surfaces have dried, carefully inspect them to ensure that the desired level of weathering has been achieved. The aged patina should exude a sense of history and character, evoking the timeless allure of aged glass. If adjustments are necessary, additional layers of the aging solution can be applied to enhance the weathered effect.
-
Seal the Aged Glass: To preserve the captivating antiqued appearance and protect it from environmental factors, it is essential to seal the aged glass surfaces. Utilize a high-quality glass sealant or clear coat specifically designed for use on glass. Apply the sealant evenly across the aged surfaces, following the manufacturer's instructions for optimal results. The sealant acts as a protective barrier, safeguarding the aged patina and enhancing its durability.
-
Allow for Curing Time: Once the sealant has been applied, allow the aged glass surfaces to cure according to the manufacturer's recommendations. This curing period ensures that the sealant forms a resilient bond with the glass, fortifying the aged patina and enhancing its resistance to wear and environmental influences.
By meticulously drying and sealing the glass, you solidify the captivating transformation initiated by the aging solution, ensuring that the weathered effect endures as a timeless testament to the art of glass aging. The carefully orchestrated process of drying and sealing culminates in the preservation of the aged patina, allowing it to grace your living space with the enduring allure of aged glass.
Conclusion
In conclusion, the art of aging glass presents a captivating opportunity to infuse your living space with the timeless allure of aged antiquity. By meticulously following the steps outlined in this comprehensive guide, you have embarked on a transformative journey that transcends the boundaries of time, imparting a sense of history and character to ordinary glass surfaces. Through the meticulous cleaning of the glass, the creation and application of the aging solution, and the essential steps of drying and sealing, you have orchestrated a captivating metamorphosis that breathes new life into glass, endowing it with a beautifully weathered patina that exudes timeless charm.
The allure of aged glass lies in its ability to evoke a sense of nostalgia and antiquity, transforming ordinary surfaces into cherished relics that bear the marks of time. As the aging solution interacts with the glass, a beautifully weathered aesthetic emerges, infusing the surfaces with a captivating allure that transcends the constraints of contemporary design. The resulting aged patina serves as a testament to the art of glass aging, embodying the beauty of imperfection and the allure of bygone eras.
By embracing the art of aging glass, you have unlocked the transformative power to bestow a sense of history and character upon your living environment. Whether adorning mirrors, windows, picture frames, or glass decor items, the weathered patina imbues these surfaces with a captivating allure that captivates the eye and sparks conversations. Each aged glass surface becomes a cherished focal point, inviting admiration and evoking a sense of timeless elegance within your home.
As you gaze upon the beautifully weathered glass surfaces, adorned with the allure of aged antiquity, you are reminded of the enduring charm of bygone eras. The art of aging glass transcends mere design; it is a testament to the enduring allure of history and the captivating beauty of imperfection. Through this transformative process, you have bestowed your living space with a touch of timeless elegance, infusing it with the captivating allure of aged glass.
In embracing the art of aging glass, you have not only embarked on a creative endeavor but also woven a narrative of timeless charm and enduring allure within your living space. The weathered patina that adorns the glass surfaces stands as a testament to the art of glass aging, evoking the beauty of imperfection and the allure of aged antiquity. As you bask in the captivating ambiance of your aged glass, you are reminded of the enduring allure of history and the timeless charm of bygone eras.
Frequently Asked Questions about How To Age Glass
Was this page helpful?
At Storables.com, we guarantee accurate and reliable information. Our content, validated by Expert Board Contributors, is crafted following stringent Editorial Policies. We're committed to providing you with well-researched, expert-backed insights for all your informational needs.


0 thoughts on “How To Age Glass”