Home>Furniture & Design>Interior Design Trends>How To Prep Driftwood For Home Decor
Interior Design Trends
How To Prep Driftwood For Home Decor
Published: December 22, 2023
Discover how to properly prepare driftwood for your home decor in line with the latest interior design trends. Get expert tips and ideas for incorporating driftwood into your interior design.
(Many of the links in this article redirect to a specific reviewed product. Your purchase of these products through affiliate links helps to generate commission for Storables.com, at no extra cost. Learn more)
Introduction
Decorating your home with natural elements can bring a sense of tranquility and organic beauty to your living space. Driftwood, in particular, has become a popular choice for adding a touch of coastal charm and rustic elegance to interior design. Its weathered appearance and unique shapes make it a versatile and captivating decor element that can complement a variety of styles, from bohemian and coastal to modern and minimalist.
In this comprehensive guide, we will explore the process of prepping driftwood for home decor, from selecting the perfect pieces to cleaning, sanding, and treating them to ensure they are ready to be showcased in your home. Whether you're a seasoned DIY enthusiast or a novice decorator, understanding how to prepare driftwood for home decor will allow you to unleash your creativity and infuse your living space with a touch of natural beauty.
So, let's dive into the fascinating world of driftwood decor and discover the transformative potential of this humble yet enchanting natural material. Whether you've stumbled upon a captivating piece of driftwood during a beachcombing adventure or you're considering incorporating this organic element into your home decor for the first time, this guide will equip you with the knowledge and techniques to prepare driftwood for a variety of creative projects.
Key Takeaways:
- Embrace the beauty of driftwood by selecting pieces that match your design vision, cleaning them thoroughly, and enhancing their natural allure through gentle sanding and thoughtful treatment.
- Transform raw driftwood into captivating decor elements by carefully selecting, cleaning, and refining the wood, then treating it to protect and enhance its visual appeal.
Read more: How To Minimize Home Decor
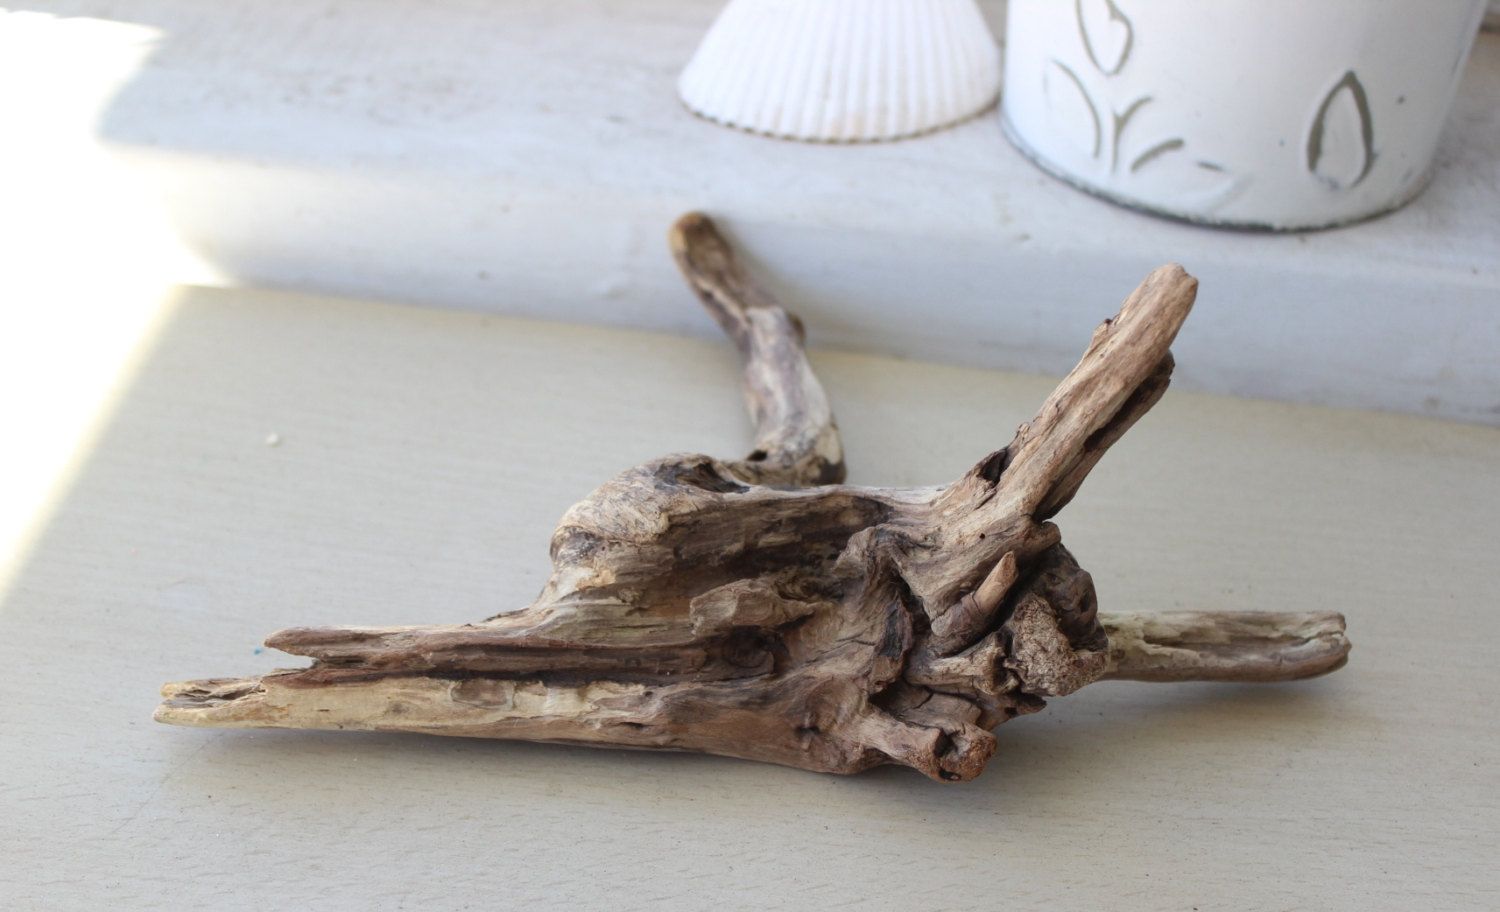
Selecting Driftwood
When it comes to selecting driftwood for your home decor projects, there are several factors to consider to ensure that you choose the most suitable pieces for your specific design vision. Here are some essential tips for selecting driftwood:
- Size and Shape: Look for pieces of driftwood that align with the scale of your intended decor project. Whether you aim to create a striking centerpiece, a wall-mounted art installation, or smaller decorative accents, consider the dimensions and shapes that will best complement your design scheme.
- Texture and Character: Embrace the unique textures and character of each piece of driftwood. Whether it boasts intricate gnarls, smooth surfaces, or interesting twists and turns, the individuality of each piece can add depth and visual interest to your decor.
- Condition: Inspect the condition of the driftwood to ensure it is sturdy and free from signs of decay or damage. While weathered and worn surfaces can add charm, it's important to avoid pieces that are excessively brittle or compromised.
- Authenticity: If possible, source driftwood from reputable suppliers or gather it from beaches where collecting driftwood is permitted. This ensures that you are working with authentic driftwood and contributing to sustainable practices.
- Legal Considerations: Be mindful of local regulations and environmental guidelines when collecting driftwood from natural settings. Some areas have restrictions on removing natural materials, so it's crucial to respect these regulations and seek permission when necessary.
By carefully considering these aspects, you can select driftwood that not only aligns with your design objectives but also embodies the inherent beauty and charm of this natural material. Whether you opt for a single statement piece or an assortment of driftwood accents, the selection process sets the stage for a captivating and personalized decor endeavor.
Cleaning Driftwood
Before incorporating driftwood into your home decor, it’s essential to clean it thoroughly to remove any dirt, salt, or impurities accumulated during its time in the water. This process ensures that your driftwood is not only visually appealing but also free from potential contaminants. Here’s a step-by-step guide to cleaning driftwood:
- Rinse: Start by giving the driftwood a thorough rinse with clean water to remove any surface debris, sand, or salt. A gentle spray from a hose or a soak in a tub of water can help dislodge loose particles.
- Soak: For more stubborn dirt or salt deposits, consider soaking the driftwood in a large container of water for a few hours or overnight. This soaking process can help soften and loosen the buildup, making it easier to remove during the cleaning phase.
- Scrub: Using a soft-bristled brush, such as a toothbrush or a scrubbing brush, gently scrub the surfaces of the driftwood to dislodge any remaining debris. Take care not to scrub too vigorously, especially if the driftwood features delicate textures or intricate details.
- Rinse Again: Once you’ve scrubbed the driftwood, give it another thorough rinse to wash away the loosened dirt and impurities. Ensure that all surfaces are free from residue and that the water runs clear during the rinsing process.
- Dry: After cleaning, allow the driftwood to air-dry completely in a well-ventilated area. This step is crucial to prevent mold or mildew from developing and to ensure that the driftwood is ready for the next stages of preparation.
By following these cleaning steps, you can prepare your driftwood for further treatment and transformation without compromising its natural beauty. Clean driftwood not only enhances the visual appeal of your decor projects but also provides a pristine foundation for any additional techniques, such as sanding or sealing, that you may choose to apply.
Removing Bark and Debris
Once your driftwood is clean and dry, the next step in the preparation process involves removing any remaining bark and debris to reveal the natural beauty of the wood beneath the weathered exterior. This process not only enhances the aesthetic appeal of the driftwood but also prepares it for further treatments, such as sanding or sealing. Here’s how to effectively remove bark and debris from driftwood:
- Assess the Bark: Examine the driftwood to determine the condition of the bark. In some cases, the bark may be loose or partially detached, while in other instances, it may adhere firmly to the wood. Understanding the bark’s condition will guide your approach to removal.
- Peel or Pry: For loose or partially detached bark, gently peel it away from the wood using your fingers or a blunt tool, such as a butter knife or a flathead screwdriver. Take care to avoid causing damage to the underlying wood as you work to remove the bark.
- Scrape Debris: Use a small, handheld scraper or a piece of fine-grit sandpaper to scrape away any remaining debris or stubborn patches of bark. This process can help smooth the surface and reveal the natural textures and contours of the driftwood.
- Inspect and Refine: After removing the bark and debris, inspect the driftwood to ensure that the surface is free from rough patches and protrusions. If necessary, use sandpaper to gently refine the wood’s surface, creating a smooth and touchable finish while preserving its organic character.
- Final Cleaning: Once the bark and debris have been removed, give the driftwood a final gentle cleaning to eliminate any residual particles or dust. A soft brush or a cloth can be used to wipe down the wood and prepare it for the next phase of the preparation process.
By taking the time to delicately remove bark and debris from your driftwood, you can unveil its natural allure and prepare it for the subsequent steps that will elevate it into a stunning decor element. This process allows you to showcase the raw beauty of the wood while setting the stage for further enhancements that will bring your creative vision to life.
To prep driftwood for home decor, scrub it with a brush and soapy water to remove dirt and debris. Then, soak it in a solution of bleach and water to kill any bacteria or pests. Finally, let it dry completely before using it in your decor.
Sanding Driftwood
After cleaning and removing bark and debris from the driftwood, the next critical step in the preparation process involves sanding the wood to refine its surfaces and enhance its tactile appeal. Sanding not only smooths rough areas and edges but also brings out the natural grain and textures, preparing the driftwood for a variety of decorative applications. Here’s a guide to effectively sanding driftwood:
- Select Sandpaper: Choose fine-grit sandpaper, such as 120 or 150 grit, to gently sand the surfaces of the driftwood. The goal is to smooth the wood without removing its inherent character, so opt for a finer grit to achieve a subtle and natural finish.
- Gentle Sanding: Using a light touch, sand the driftwood surfaces in the direction of the wood grain. This technique helps preserve the organic textures and contours while refining any rough spots or irregularities. Take care to maintain the unique character of the wood during the sanding process.
- Focus on Details: Pay attention to intricate details and hard-to-reach areas, ensuring that the entire surface of the driftwood receives gentle and thorough sanding. This step is essential for creating a cohesive and polished look while retaining the individuality of each piece.
- Smooth Edges: If the driftwood features sharp or jagged edges, use the sandpaper to gently smooth and round these areas. This not only enhances the safety and handling of the driftwood but also adds a tactile appeal to the finished piece.
- Final Inspection: Once the sanding is complete, carefully inspect the driftwood to ensure that the surfaces are smooth and refined. Run your hands over the wood to assess its tactile quality, making any additional adjustments as needed to achieve the desired finish.
By approaching the sanding process with a delicate touch and a focus on preserving the natural beauty of the driftwood, you can prepare the wood for a myriad of decorative uses, from standalone sculptures and centerpieces to wall-mounted art and functional accents. The refined surfaces and enhanced textures resulting from sanding set the stage for the final phase of preparing driftwood for home decor.
Read more: How Important Is Home Decor
Treating Driftwood
Once the cleaning, bark removal, and sanding processes are complete, treating the driftwood is essential to enhance its durability, appearance, and longevity in your home decor projects. Whether you intend to use the driftwood in its natural state or apply additional finishes, treating the wood can protect it from environmental factors and accentuate its inherent beauty. Here are some key considerations for treating driftwood:
- Natural Finish: If you prefer to maintain the organic charm of the driftwood, consider applying a natural finish, such as a clear matte varnish or a wood conditioner. These treatments can protect the wood while preserving its raw aesthetic, creating a subtle sheen and enriching the natural colors and textures.
- Enhanced Protection: For driftwood destined for outdoor or high-traffic indoor use, opt for a protective sealant or outdoor-grade varnish. These treatments provide an additional layer of defense against moisture, UV exposure, and wear, ensuring that the driftwood remains resilient and visually appealing over time.
- Stain or Wash: To impart a touch of color or create a weathered effect, consider using wood stains or whitewashing techniques to subtly alter the appearance of the driftwood. This approach can add depth and character to the wood while complementing your decor palette and design theme.
- Preservation Methods: If you wish to preserve the driftwood in its current state without altering its appearance, explore preservation methods such as using a borax solution or a specialized wood preservative. These treatments can safeguard the wood from decay and pests, ensuring its longevity in your decor projects.
- Application Techniques: Whether you opt for a natural finish, protective sealant, or decorative treatment, follow the manufacturer’s instructions for application. Use a brush, sponge, or cloth to apply the treatment evenly, allowing it to penetrate the wood and achieve the desired effect.
By thoughtfully treating the driftwood, you can not only enhance its visual appeal and resilience but also tailor its characteristics to suit your specific decor vision. Whether you seek to showcase the wood’s natural beauty or introduce artistic touches, the treatment phase adds a layer of versatility and protection, ensuring that your prepared driftwood is ready to take center stage in your home decor endeavors.
Conclusion
As you embark on the journey of incorporating driftwood into your home decor, mastering the art of preparing this natural material is key to unlocking its full potential. From the initial selection process to the final treatment phase, each step plays a crucial role in transforming raw driftwood into captivating decor elements that infuse your living space with coastal charm, rustic elegance, and organic allure.
By carefully selecting driftwood that resonates with your design vision, you lay the foundation for a truly personalized decor endeavor. The unique shapes, textures, and sizes of the driftwood you choose will serve as the building blocks for your creative projects, whether you’re crafting wall art, sculptural accents, or functional decor pieces.
Furthermore, the meticulous cleaning, bark removal, and sanding processes not only prepare the driftwood for its decorative role but also honor its natural beauty. The inherent character and weathered charm of driftwood are brought to the forefront, allowing you to showcase the wood’s organic allure while creating visually captivating and tactilely engaging decor pieces.
Finally, the treatment phase offers a spectrum of possibilities, enabling you to protect, preserve, and embellish the driftwood according to your preferences and practical needs. Whether you opt for natural finishes that accentuate the wood’s raw beauty or protective sealants that ensure its longevity, the treatment phase adds a layer of customization and durability to your prepared driftwood.
As you immerse yourself in the world of driftwood decor, remember that each piece of driftwood has a story to tell, shaped by its journey through the ebb and flow of the ocean. By preparing and transforming this humble material with care and creativity, you breathe new life into its narrative, infusing your home with the timeless allure of the coast and the tranquility of nature.
So, embrace the art of preparing driftwood for home decor, and let your imagination guide you as you embark on a transformative and enriching creative journey. With each carefully prepared piece of driftwood, you bring a touch of coastal enchantment and natural elegance into your home, creating a space that reflects your unique style and appreciation for the beauty of the natural world.
Frequently Asked Questions about How To Prep Driftwood For Home Decor
Was this page helpful?
At Storables.com, we guarantee accurate and reliable information. Our content, validated by Expert Board Contributors, is crafted following stringent Editorial Policies. We're committed to providing you with well-researched, expert-backed insights for all your informational needs.


0 thoughts on “How To Prep Driftwood For Home Decor”