Home>Garden Essentials>How To Install Bark As Ground Cover Mulch
Garden Essentials
How To Install Bark As Ground Cover Mulch
Modified: March 7, 2024
Learn how to install bark as ground cover mulch in your garden for a natural and attractive look. Enhance the health of your plants while reducing maintenance.
(Many of the links in this article redirect to a specific reviewed product. Your purchase of these products through affiliate links helps to generate commission for Storables.com, at no extra cost. Learn more)
Introduction
Welcome to the world of garden landscaping! If you’re looking for an eco-friendly and visually appealing way to cover the bare ground in your garden, bark mulch is an excellent choice. Not only does it provide a protective barrier for your plants, but it also adds an aesthetic touch to your outdoor space.
Bark mulch, made from the shredded bark of various trees, offers several benefits as a ground cover. It helps to retain moisture in the soil, reducing the need for frequent watering. Additionally, it acts as a natural weed suppressor, minimizing the growth of unwanted plants. Furthermore, bark mulch helps regulate soil temperature, keeping it cooler in the summer and warmer in the winter, which promotes healthy root development.
In this article, we will guide you through the process of installing bark as ground cover mulch in your garden. With a few simple steps, you’ll be able to transform your garden into a visually stunning and well-maintained oasis. So, let’s get started!
Key Takeaways:
- Bark mulch helps your garden by retaining moisture, preventing weeds, and regulating soil temperature, creating a healthy and visually appealing outdoor space.
- Before installing bark mulch, prepare the area, calculate the amount needed, and choose the right type of mulch to ensure a successful and eco-friendly garden transformation.
Read more: How To Put Bark As A Ground Cover
Benefits of Using Bark as Ground Cover Mulch
Using bark as ground cover mulch has numerous advantages that go beyond enhancing the visual appeal of your garden. Here are some key benefits:
- Moisture Retention: One of the main benefits of using bark mulch is its ability to retain moisture in the soil. The mulch acts as a protective barrier that helps prevent water evaporation, thus reducing the need for frequent watering. This is especially beneficial in dry or arid climates.
- Weed Suppression: Bark mulch acts as a natural weed suppressant. It forms a physical barrier that prevents sunlight from reaching weed seeds, inhibiting their germination and growth. This reduces the need for manual weeding or the use of herbicides.
- Soil Temperature Regulation: Another advantage of bark mulch is its ability to regulate soil temperature. In the summer, it helps keep the soil cool by reducing heat absorption from the sun. This prevents the roots of plants from overheating and drying out. In the winter, the mulch acts as an insulator, protecting the soil and roots from extreme cold temperatures.
- Soil Enrichment: As bark mulch breaks down over time, it slowly releases essential nutrients into the soil. This helps improve soil fertility and provides a favorable environment for plant growth. Additionally, the decomposition of the mulch promotes the growth of beneficial microorganisms in the soil.
- Prevents Erosion: By covering the bare ground, bark mulch helps prevent soil erosion caused by heavy rainfall or strong winds. It acts as a protective layer, keeping the soil in place and reducing the risk of runoff and loss of topsoil.
In addition to these benefits, bark mulch also adds a decorative touch to your garden. It comes in various colors and textures, allowing you to choose the one that best complements your landscaping design.
Now that you understand the benefits of using bark as ground cover mulch, let’s move on to the step-by-step process of installing it in your garden.
Step 1: Choose the Right Type of Bark Mulch
When it comes to choosing the right type of bark mulch for your garden, there are a few factors to consider. The type of bark you select will depend on your specific needs and preferences:
- Hardwood Bark Mulch: Made from the bark of hardwood trees such as oak or maple, hardwood bark mulch is durable and long-lasting. It breaks down slowly, which means you won’t have to replenish it as frequently. It’s an excellent choice for areas with high foot traffic.
- Softwood Bark Mulch: Softwood bark mulch is made from the bark of softwood trees like pine or spruce. It decomposes more quickly than hardwood bark mulch, providing a valuable source of nutrients to the soil. Softwood bark mulch is generally more affordable and is an excellent option for gardens with a limited budget.
- Decorative Bark Mulch: If you’re looking to add a decorative touch to your garden, you may consider using colored or shredded bark mulch. This type of mulch comes in different colors, such as red, black, or golden brown, and can greatly enhance the visual appeal of your landscape. However, decorative bark mulch typically has a shorter lifespan and may need to be replaced more frequently.
- Fine vs. Coarse Bark Mulch: Bark mulch is available in various textures, ranging from fine to coarse. Fine bark mulch works well in flower beds and small garden areas, as it provides a neat and uniform appearance. Coarse bark mulch, on the other hand, is suitable for larger areas and can create a more rustic look. Consider the overall aesthetic of your garden and choose the appropriate texture accordingly.
When selecting bark mulch, it’s essential to ensure that it comes from a reputable source. Quality mulch should be free from contaminants and pests. You can check for certifications or ask for recommendations from local garden centers or nurseries.
Once you’ve determined the type and texture of bark mulch that suits your needs, you’re ready to move on to the next step: preparing the area for installation.
Step 2: Prepare the Area for Installation
Before you start laying down the bark mulch, it’s important to properly prepare the area to ensure optimal results. Here are the key steps to follow:
- Clean the Area: Remove any debris, weeds, or existing mulch from the ground. This will create a clean and even surface for the new bark mulch.
- Level the Ground: If the area is uneven, use a rake or garden tool to level the ground. This will help prevent water pooling and ensure an even distribution of the mulch.
- Address Drainage Issues: If there are any drainage issues in the area, such as poor soil drainage or low spots where water tends to collect, it’s important to address them before installing the mulch. Consider improving the soil drainage by incorporating organic matter or creating a gentle slope to redirect water flow.
- Edge the Area: To create a clean and defined border, consider edging the area where you will be installing the bark mulch. This can be done using edging materials such as bricks, stones, or metal strips. Edging helps prevent the mulch from spreading into unwanted areas and adds a polished look to your garden.
By taking the time to prepare the area properly, you’ll ensure that your new bark mulch installation is off to a great start. With a clean and leveled surface, your mulch will be more effective in retaining moisture, suppressing weeds, and enhancing the overall appearance of your garden.
Now that the area is prepped, it’s time to move on to the next step: calculating the amount of bark mulch needed.
Step 3: Calculate the Amount of Bark Mulch Needed
Calculating the amount of bark mulch needed is an essential step to ensure you purchase the right quantity for your garden. Here’s how to determine the amount of mulch required:
- Measure the Area: Start by measuring the length and width of the area where you plan to install the bark mulch. If the area is shaped irregularly, break it down into smaller sections and measure each one separately.
- Convert to Square Feet: Once you have the measurements, multiply the length by the width to determine the total square footage of the area. For example, if your garden bed is 10 feet long and 6 feet wide, the total square footage is 10 x 6 = 60 square feet.
- Determine the Desired Depth: Decide on the desired depth of the mulch layer. In general, a depth of 2-4 inches is sufficient for most garden beds. However, if you have plants that prefer a thicker mulch layer or if you’re aiming for a more decorative look, you may opt for a deeper layer.
- Calculate the Mulch Volume: To calculate the volume of mulch needed, multiply the square footage by the desired depth. For example, if you want a 3-inch thick layer of mulch for your 60 square feet garden bed, the volume required is 60 x 0.25 (3 inches is equal to 0.25 feet) = 15 cubic feet of mulch.
It’s important to note that mulch is typically sold by the cubic yard or cubic foot. To convert the volume from cubic feet to cubic yards, divide the total cubic feet by 27 (since there are 27 cubic feet in a cubic yard). In this example, you would divide 15 cubic feet by 27 to get approximately 0.56 cubic yards of mulch.
Keep in mind that it’s always a good idea to purchase slightly more mulch than your calculations indicate to account for any uneven areas or potential settling of the mulch over time.
Now that you have determined the amount of bark mulch needed, it’s time to move on to the next step: purchasing the mulch.
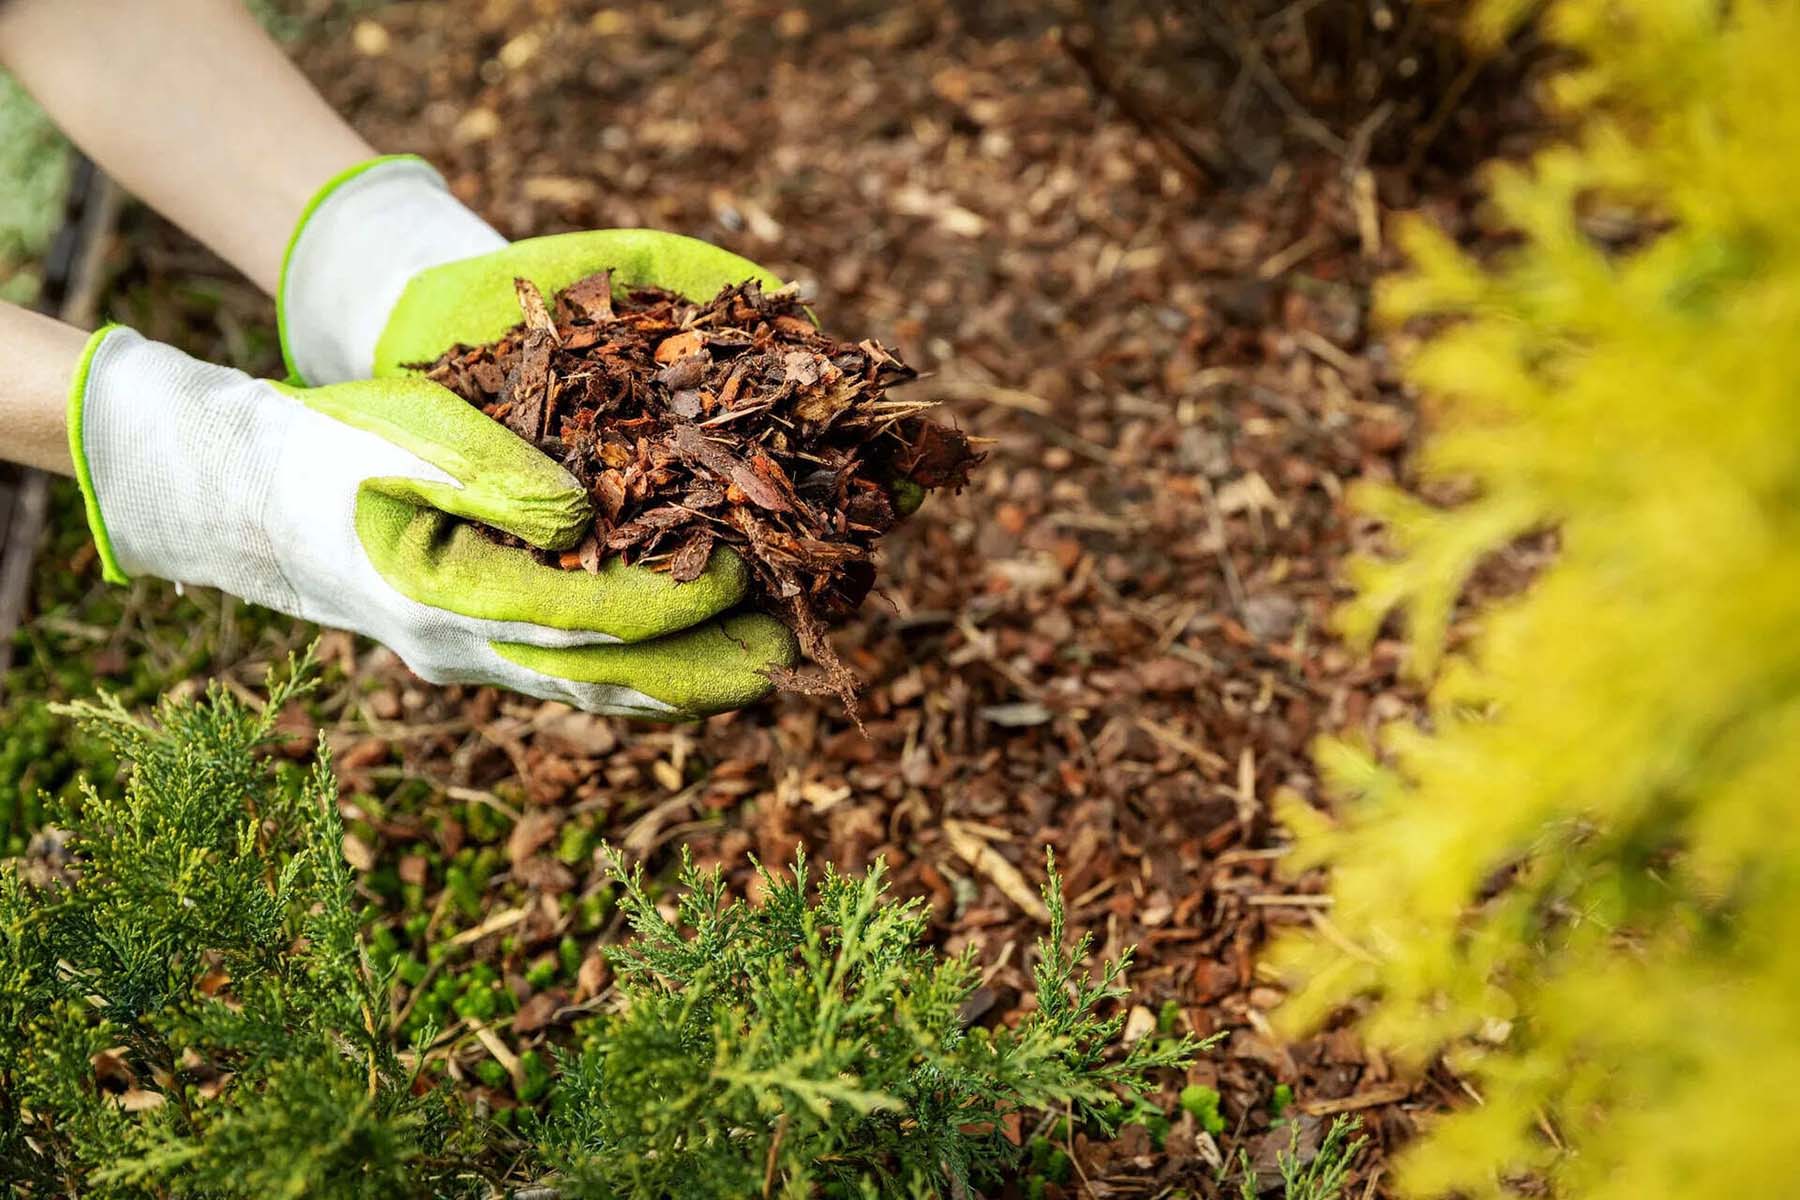
Before installing bark as ground cover mulch, make sure to clear the area of any weeds or debris. Lay down a weed barrier fabric to prevent weed growth, then spread the bark evenly to a depth of 2-4 inches for effective coverage.
Read more: How To Install Rock Ground Cover
Step 4: Purchase the Bark Mulch
With the amount of bark mulch needed calculated, it’s time to purchase the mulch for your garden. Here are a few tips to consider when making your purchase:
- Choose a Reputable Supplier: Look for a reputable garden center, nursery, or landscaping supplier that offers high-quality bark mulch. Read reviews, ask for recommendations, or visit the supplier in person to ensure they provide reliable and trusted products.
- Select the Right Type and Texture: Based on your previous decision in Step 1, choose the type and texture of bark mulch that best suits your garden’s needs and aesthetic preferences. Consider factors such as durability, decomposition rate, and the desired visual impact.
- Consider Bulk vs. Bagged: Bark mulch is available in both bulk and bagged form. Bulk mulch is often more cost-effective for larger areas, while bagged mulch offers convenience and ease of transportation for smaller gardens or tight spaces. Evaluate your needs and choose the option that best fits your project.
- Check for Contaminants: Ensure that the bark mulch you purchase is free from any contaminants, such as invasive weed seeds or pests. Ask the supplier about their sourcing methods and any certifications they have to guarantee the quality and purity of the mulch.
- Consider Delivery: If you’re purchasing a large quantity of bark mulch or if it’s not feasible for you to transport it yourself, inquire about delivery options. Many suppliers offer delivery services, making the process more convenient and saving you time and effort.
When purchasing bark mulch, it’s recommended to buy a bit more than your calculated amount to account for any variations in thickness or potential settling over time. This ensures that you have enough mulch to cover the designated area adequately.
Now that you’ve purchased the bark mulch, it’s time to move on to the next step: preparing the ground for installation.
Step 5: Weed Control
Before laying down the bark mulch, it’s crucial to address weed control to ensure that unwanted plants don’t flourish under the mulch layer. Here are some effective weed control methods:
- Manual Weed Removal: Take the time to manually remove any existing weeds or grass from the area. Use a garden tool or your hands to carefully uproot the weeds, ensuring that you remove them from the root to prevent regrowth. This step is especially important if the area already has a weed problem.
- Landscape Fabric: Consider using a layer of landscape fabric as a weed barrier. Landscape fabric is a permeable material that allows water to pass through but prevents weed growth. Before laying the fabric, ensure that the area is free of any debris or weeds. Cut the fabric to fit the area and secure it in place with landscaping pins.
- Apply Pre-Emergent Herbicide: If you’re dealing with stubborn weeds or want an extra layer of weed control, you can apply a pre-emergent herbicide. These herbicides prevent weed seeds from germinating, effectively reducing weed growth. Follow the instructions on the herbicide label carefully and apply it before laying the mulch.
Implementing effective weed control measures will help create a clean and low-maintenance environment for your plants to thrive. Preventing weed growth is crucial not only for the health and aesthetics of your garden but also for reducing the competition for resources with your desired plants.
Now that you have addressed weed control, it’s time to move on to the next step: spreading the bark mulch.
Step 6: Spread the Bark Mulch
With the ground prepared and weed control measures in place, it’s time to lay down the bark mulch. Here’s how to effectively spread the mulch:
- Start from the Outer Edges: Begin spreading the mulch from the outer edges of the area, working your way towards the center. This ensures a more even distribution and helps prevent mulch from spilling over onto unwanted areas.
- Use a Rake or Shovel: Use a rake or shovel to distribute the mulch evenly across the surface. Spread it to the desired thickness, usually around 2-4 inches. Be mindful not to pile the mulch too high against plant stems or tree trunks, as it can lead to moisture accumulation and potential rotting.
- Smooth and Level the Mulch: After spreading the mulch, use the back of the rake or a garden tool to smooth and level the surface. This creates a polished and finished look. Ensure that the mulch is evenly distributed and covers the entire area.
- Avoid Mulch Volcanoes: As you spread the mulch, be cautious not to create mulch volcanoes around the base of plants or trees. Piling mulch against the stems or trunks can lead to moisture retention and create a favorable environment for pests and diseases.
Take your time to ensure that the mulch is spread evenly and provides adequate coverage for the entire area. A well-distributed layer of mulch will help conserve moisture, regulate soil temperature, and suppress weed growth.
Now that the mulch is spread, it’s time to move on to the final step: maintaining the bark mulch.
Step 7: Maintain the Bark Mulch
Maintaining the bark mulch is essential to ensure its longevity and effectiveness in your garden. Follow these tips to keep your mulch looking fresh and performing its functions:
- Inspect and Refresh: Regularly inspect the mulch for signs of wear, decomposition, or thinning. Depending on the type of mulch and environmental conditions, you may need to refresh the mulch layer every 1-3 years. Add a thin layer of fresh mulch to maintain the desired thickness and appearance.
- Manage Weed Growth: Despite the preventive measures taken, some weeds may still find their way through the mulch layer. Regularly inspect your garden for any weed growth and promptly remove them by hand or using appropriate tools. This will prevent weeds from establishing a foothold and competing with your plants for nutrients and moisture.
- Watering: Bark mulch helps retain moisture in the soil, which reduces the need for frequent watering. However, during dry periods, ensure that your plants receive sufficient water by watering deeply, reaching the root zone. Monitor soil moisture levels to prevent over or under watering.
- Replenish Mulch Thickness: Over time, the bark mulch may break down or settle due to weather elements or natural processes. Periodically check the thickness of the mulch layer and replenish as needed to maintain the recommended depth of 2-4 inches.
- Prevent Mulch Compaction: Avoid heavy foot traffic or the use of heavy equipment on the mulch, as this can compact the material and reduce its effectiveness. Place stepping stones or create paths to direct foot traffic and protect the mulch layer.
By regularly maintaining the bark mulch, you can preserve its appearance, functionality, and benefits in your garden. Not only will this enhance the visual appeal of your landscape, but it will also provide optimal growing conditions for your plants.
Congratulations! You have now completed all the necessary steps to install and maintain bark mulch as a ground cover in your garden. Sit back, relax, and enjoy the beauty and benefits that this eco-friendly mulching option brings!
If you have any other gardening-related questions or need further guidance, feel free to explore our website or consult with local gardening experts.
Conclusion
Congratulations! You have now learned how to install bark as ground cover mulch in your garden. By following the step-by-step process outlined in this article, you can enjoy the many benefits that bark mulch provides, from moisture retention and weed suppression to soil temperature regulation and soil enrichment.
Choosing the right type and texture of bark mulch, preparing the area, calculating the amount needed, and purchasing quality mulch are all crucial steps in ensuring a successful installation. Additionally, implementing effective weed control measures, spreading the mulch evenly, and regularly maintaining it will help maximize its functionality and appearance.
Remember, bark mulch not only serves as a protective layer for your plants and soil but also adds a decorative touch to your garden. The variety of options available, from hardwood to softwood, and even decorative colored mulch, allows you to customize the look to suit your landscaping design.
As you embark on this journey of installing bark mulch, remember to consider the environment and choose sustainable practices. Opt for mulch sourced from reputable suppliers, free from contaminants, and consider using organic options whenever possible.
Installing bark mulch as ground cover is an investment that will pay off in the long run. Your garden will not only look visually appealing but also benefit from improved moisture retention, weed control, and soil health. Sit back, relax, and enjoy the beautiful and functional transformation of your garden.
So why wait? Get started on your bark mulch installation project and create a lush and vibrant garden that will be the envy of your neighbors!
Frequently Asked Questions about How To Install Bark As Ground Cover Mulch
Was this page helpful?
At Storables.com, we guarantee accurate and reliable information. Our content, validated by Expert Board Contributors, is crafted following stringent Editorial Policies. We're committed to providing you with well-researched, expert-backed insights for all your informational needs.

0 thoughts on “How To Install Bark As Ground Cover Mulch”