Home>Gardening & Outdoor>Outdoor Entertaining>How To Move A Commercial Pizza Oven
Outdoor Entertaining
How To Move A Commercial Pizza Oven
Modified: January 19, 2024
Learn how to safely and efficiently move a commercial pizza oven for your outdoor entertaining needs. Follow our expert tips for a seamless relocation process.
(Many of the links in this article redirect to a specific reviewed product. Your purchase of these products through affiliate links helps to generate commission for Storables.com, at no extra cost. Learn more)
Introduction
So, you've decided to relocate your commercial pizza oven. Whether you're moving to a new location or simply rearranging your current space, it's essential to handle this heavy and valuable equipment with care. Moving a commercial pizza oven requires strategic planning, proper tools, and a solid understanding of the disassembly and reassembly process. In this guide, we'll walk you through the essential steps to ensure a smooth and successful move for your prized pizza oven. From assessing the oven and preparing for the move to disassembling, transporting, and reassembling it, we've got you covered. Let's dive in and make this seemingly daunting task manageable and efficient.
Key Takeaways:
- Moving a commercial pizza oven requires careful assessment, preparation, disassembly, transportation, and reassembly. Attention to detail, teamwork, and safety are essential for a successful and efficient relocation process.
- Thoroughly assessing the oven, preparing with the right tools and team, and following a systematic disassembly and reassembly process are crucial for a smooth and stress-free move of a commercial pizza oven.
Read more: How To Make Pizza In A Pizza Oven
Assessing the Pizza Oven
Before diving into the moving process, it's crucial to assess the pizza oven and its surroundings. Start by carefully examining the oven to determine its dimensions, weight, and structural components. This information will be invaluable when planning the disassembly and reassembly process. Additionally, take note of any fragile or delicate parts that require special attention during the move.
Next, evaluate the current location of the pizza oven. Consider the path it will need to travel to reach its new spot, taking into account any obstacles, narrow doorways, or tight corners that may pose challenges during the move. Measure the doorways and hallways to ensure that the oven can pass through without difficulty. If necessary, remove any obstacles or temporary structures that could impede the smooth transportation of the oven.
Furthermore, assess the destination where the pizza oven will be relocated. Ensure that the new space can accommodate the oven's size and ventilation requirements. Take measurements to confirm that the oven will fit seamlessly into its new home without any last-minute surprises.
By thoroughly assessing the pizza oven and its surroundings, you can preemptively address any potential obstacles and streamline the moving process, setting the stage for a successful and stress-free relocation.
Preparing for the Move
With the assessment phase complete, it's time to prepare for the actual move of your commercial pizza oven. Start by gathering the necessary tools and equipment to facilitate the disassembly, transportation, and reassembly of the oven. This may include heavy-duty moving straps, protective padding, a dolly or hand truck, wrenches or screwdrivers, and any specialized tools required for your specific pizza oven model.
Next, ensure that you have a dedicated team of individuals available to assist with the move. Moving a commercial pizza oven is not a one-person job, and having a capable team will make the process safer and more efficient. Clearly communicate the roles and responsibilities of each team member to ensure a coordinated and organized effort.
Prior to disassembly, it's essential to disconnect the pizza oven from any gas, electrical, or ventilation connections. Follow the manufacturer's guidelines for safely shutting off and disconnecting these utilities to avoid any potential hazards during the move. If you're unsure about the disconnection process, consider enlisting the help of a qualified professional to handle this crucial step.
Finally, create a detailed plan for the disassembly and reassembly of the pizza oven. This plan should outline the sequence of steps, assign specific tasks to team members, and include a timeline for completion. By having a well-defined plan in place, you can minimize confusion and ensure that the move progresses smoothly and efficiently.
By adequately preparing for the move, equipping yourself with the right tools and personnel, and developing a comprehensive plan, you set the stage for a successful and well-executed relocation of your commercial pizza oven.
Disassembling the Pizza Oven
Disassembling a commercial pizza oven is a meticulous process that requires attention to detail and careful execution. Before initiating the disassembly, refer to the oven’s manual or manufacturer’s guidelines for specific instructions tailored to your oven model. Here are the general steps involved in disassembling a typical commercial pizza oven:
- Removing the Oven Components: Start by removing the oven’s removable components, such as the baking stones, racks, and trays. Secure these components properly to prevent damage during transit.
- Disconnecting Gas and Electrical Connections: If the oven is gas-powered, ensure that the gas supply is turned off and disconnect the gas line according to the manufacturer’s instructions. For electric ovens, disconnect the power supply and carefully label the wires to facilitate reconnection.
- Unscrewing Panels and Sections: Use appropriate tools to unscrew and remove the outer panels or sections of the oven. Take care to label and organize the screws and hardware for each section to simplify reassembly.
- Separating Heavy Components: For larger and heavier components, such as the main oven chamber or heating elements, use a dolly or lifting equipment to carefully separate and transport them to the designated moving vehicle.
- Protecting Fragile Elements: Safeguard any delicate or fragile elements, such as temperature sensors or wiring, by wrapping them in protective padding or bubble wrap to prevent damage during transit.
Throughout the disassembly process, maintain a methodical approach and keep track of all removed components, hardware, and connections. Take photographs or make detailed notes to document the disassembly sequence, which will prove invaluable during the reassembly phase.
By following a systematic disassembly process and adhering to the manufacturer’s guidelines, you can ensure that your commercial pizza oven is safely and effectively prepared for transportation to its new location.
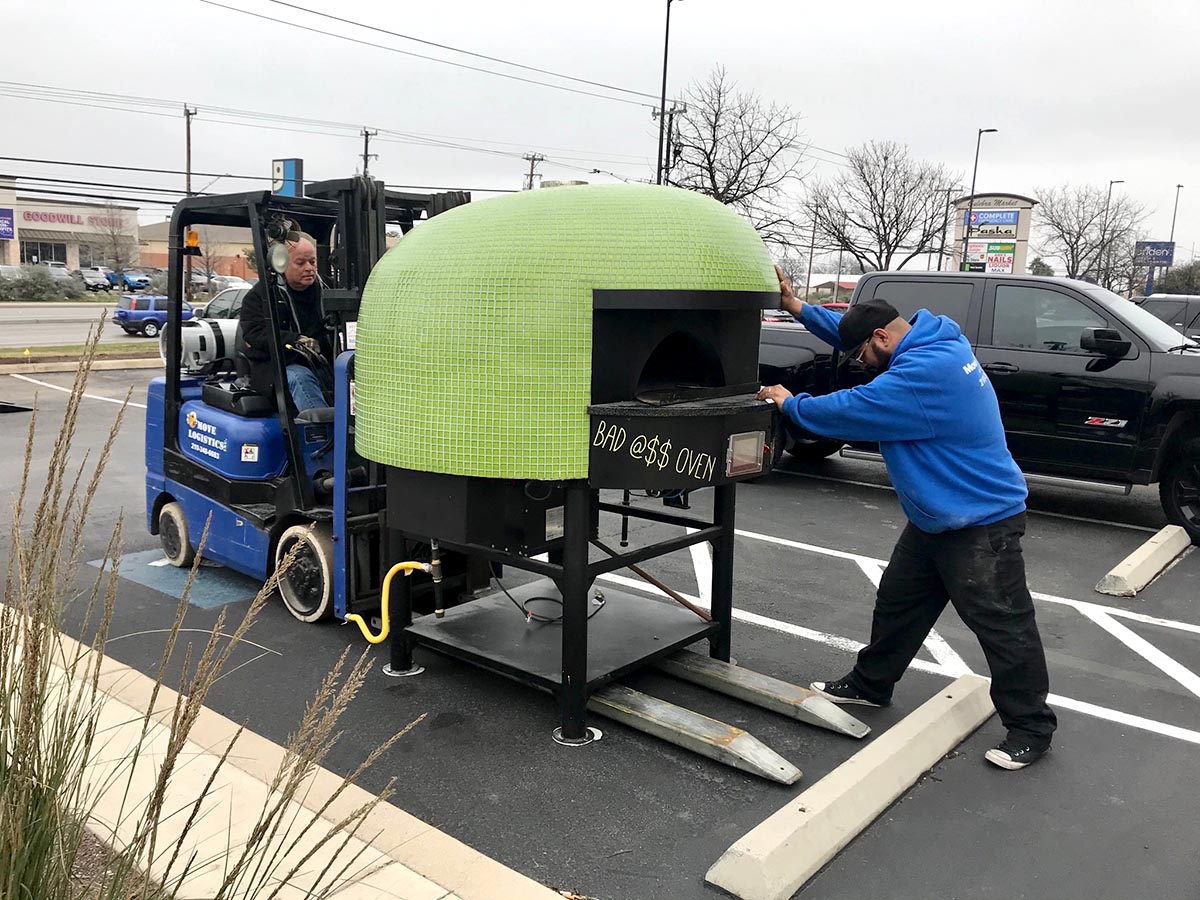
Before moving a commercial pizza oven, make sure to disconnect the gas and electrical connections. Use a dolly to carefully transport the oven to its new location, ensuring it is properly secured to prevent any damage.
Moving the Pizza Oven
Transporting a commercial pizza oven requires careful planning, proper equipment, and a focus on safety. Before initiating the move, ensure that the oven components are securely packed and protected to prevent damage during transportation. Here are the essential steps for safely moving a commercial pizza oven:
- Securing the Oven Components: Double-check that all removable components, such as baking stones and trays, are securely packed and cushioned to prevent shifting or breakage during transit. Utilize heavy-duty moving straps or tie-downs to secure the components in place.
- Utilizing Proper Lifting Equipment: If the oven components are particularly heavy or cumbersome, employ a sturdy dolly or hand truck to transport them to the moving vehicle. Ensure that the equipment is rated for the weight of the oven components and that it is maneuverable within the space.
- Ensuring Adequate Protection: Wrap the disassembled sections of the oven in protective padding or moving blankets to shield them from potential impacts and vibrations during transit. Pay special attention to fragile components and sensitive electrical or gas connections.
- Coordinating the Loading Process: When loading the oven components onto the moving vehicle, enlist the assistance of a capable team to ensure safe and efficient handling. Utilize ramps or lift gates to facilitate the loading process, minimizing the risk of strain or damage to the components.
- Securing the Moving Vehicle: Once the oven components are loaded, secure them within the moving vehicle using additional tie-downs or restraints to prevent shifting during transportation. Verify that the components are evenly distributed and properly secured to maintain balance and stability.
- Exercising Caution During Transit: Drive cautiously and avoid sudden stops or sharp turns to minimize jostling and movement of the oven components. Communicate with the driver to ensure a smooth and steady transit, especially when navigating uneven road surfaces or obstacles.
By meticulously following these steps and prioritizing the safety and security of the oven components, you can ensure that your commercial pizza oven reaches its destination in optimal condition, ready for the reassembly process.
Read more: How To Cook Pizza In An Outdoor Pizza Oven
Reassembling the Pizza Oven
As you arrive at the new location with the disassembled components of your commercial pizza oven, it’s time to focus on the meticulous process of reassembly. By following a systematic approach and referencing the documentation and notes from the disassembly phase, you can ensure a smooth and successful reassembly. Here are the essential steps for reassembling a commercial pizza oven:
- Referencing Documentation: Review the photographs, notes, and labels from the disassembly phase to guide the reassembly process. If available, consult the oven’s manual or manufacturer’s guidelines for specific reassembly instructions tailored to your model.
- Organizing Components and Hardware: Lay out the disassembled components in a clean and spacious area, arranging them in the sequence of reassembly. Ensure that all hardware, such as screws and fasteners, is readily accessible and organized according to the sections they belong to.
- Assembling Outer Panels and Sections: Begin by reattaching the outer panels or sections of the oven, following the reverse sequence of the disassembly. Use the appropriate tools to securely fasten the panels, taking care to align them accurately and evenly.
- Connecting Gas and Electrical Components: If applicable, carefully reconnect the gas line and electrical connections according to the manufacturer’s guidelines. Ensure that all connections are secure and properly sealed to prevent any potential leaks or malfunctions.
- Installing Internal Components: Reinstall the internal components, such as the baking stones, racks, and trays, in their designated positions within the oven. Take care to align and secure these components to maintain the oven’s functionality and structural integrity.
- Testing and Calibration: Once the reassembly is complete, conduct a thorough inspection of the oven to verify that all components are correctly installed and secured. Test the oven’s functionality and, if necessary, recalibrate any settings to ensure optimal performance.
Throughout the reassembly process, maintain a patient and methodical approach, ensuring that each step is executed with precision and attention to detail. By adhering to the reassembly guidelines and leveraging the knowledge gained from the disassembly phase, you can successfully restore your commercial pizza oven to its fully operational state in its new location.
Conclusion
Congratulations! You’ve successfully navigated the intricate process of moving a commercial pizza oven. By carefully assessing the oven and its surroundings, preparing meticulously for the move, disassembling the oven with precision, transporting it securely, and reassembling it with care, you’ve ensured a seamless transition to its new location. As a result of your efforts, your prized pizza oven is now ready to resume its role in delighting customers with delectable, perfectly baked pizzas.
Throughout this journey, you’ve not only mastered the logistics of moving a heavy and complex piece of equipment but also demonstrated a commitment to maintaining the integrity and functionality of your commercial kitchen setup. Your attention to detail, strategic planning, and dedication to safety have been instrumental in achieving a successful relocation for your pizza oven.
As you reflect on this experience, remember that the knowledge and skills you’ve acquired can be applied to future endeavors within the realm of commercial kitchen management. Whether it’s relocating other equipment, optimizing kitchen layouts, or tackling new culinary ventures, the lessons learned from moving your pizza oven will continue to serve you well.
With your pizza oven now comfortably settled in its new home, take a moment to appreciate the coordinated effort and teamwork that made this relocation possible. By leveraging the expertise of your team and adhering to a well-defined plan, you’ve overcome the challenges of moving a substantial piece of kitchen equipment, reinforcing your ability to tackle complex tasks with confidence and proficiency.
As you embark on future endeavors, carry forward the valuable insights gained from this experience, knowing that your adaptability and problem-solving capabilities have been honed through the successful relocation of your commercial pizza oven. Your dedication to excellence and meticulous approach have set a standard for efficient and effective equipment management within your culinary domain.
Embrace the satisfaction of a job well done, knowing that your commercial pizza oven now stands ready to continue its culinary journey in its new location, thanks to your expertise and commitment to excellence.
Frequently Asked Questions about How To Move A Commercial Pizza Oven
Was this page helpful?
At Storables.com, we guarantee accurate and reliable information. Our content, validated by Expert Board Contributors, is crafted following stringent Editorial Policies. We're committed to providing you with well-researched, expert-backed insights for all your informational needs.


0 thoughts on “How To Move A Commercial Pizza Oven”