Home>Ideas and Tips>DIY Guide to Installing a Bathroom Heated Mirror with a Built-In Clock
Ideas and Tips
DIY Guide to Installing a Bathroom Heated Mirror with a Built-In Clock
Modified: October 18, 2024
Learn how to install a bathroom heated mirror with a built-in clock. Follow our step-by-step DIY guide for a fog-free, modern bathroom upgrade.
(Many of the links in this article redirect to a specific reviewed product. Your purchase of these products through affiliate links helps to generate commission for Storables.com, at no extra cost. Learn more)
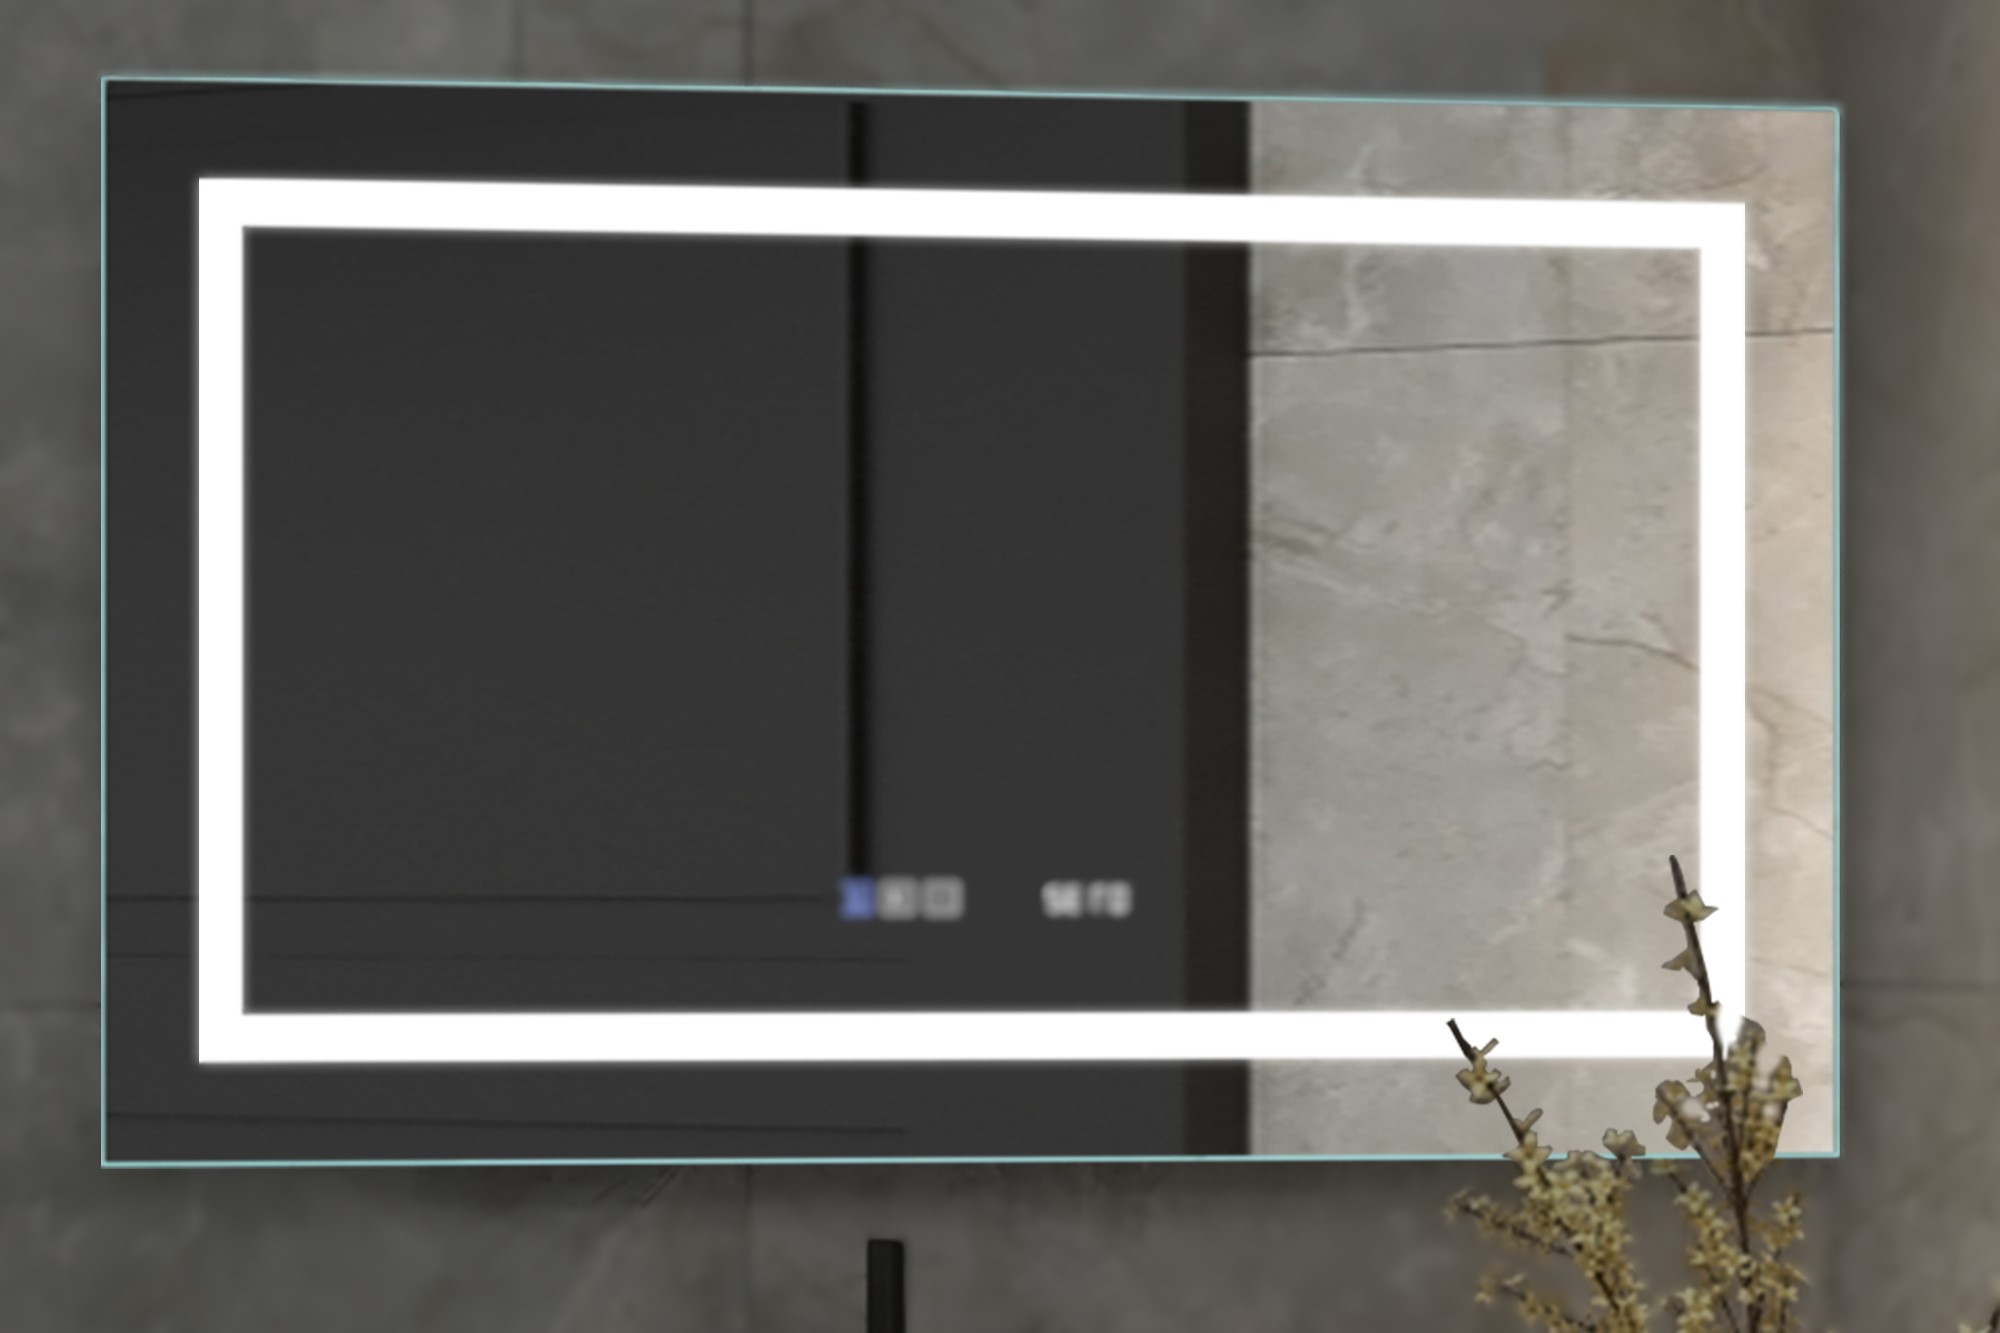
Installing a bathroom heated mirror with a built-in clock can be a fantastic way to enhance your bathroom's functionality and aesthetic appeal. Not only does it provide a clear view even in humid conditions, but it also adds a touch of modern elegance to your space. In this comprehensive guide, we will walk you through the steps to install a heated bathroom mirror with a built-in clock, ensuring that you have all the necessary tools and information to complete the project successfully.
Step 1: Planning and Preparation
Before you begin, it’s essential to plan and prepare for the installation. Here are some key considerations:
- Choose the Right Mirror: Select a high-quality mirror that is specifically designed for bathroom use. Look for features like a built-in clock, demisting pad, and adequate power output to ensure effective heating.
- Determine the Location: Decide on the ideal location for your heated mirror. It should be close to the sink and at a height that suits your needs. Ensure that the mirror is easily accessible and does not obstruct any other bathroom fixtures.
- Gather Tools and Materials: You will need various tools and materials for this project. These include:
- High-quality mirror with built-in heating element and clock
- Powerful mirror demisting pad
- Power source (dedicated circuit or existing electrical circuit)
- Installation accessories (brackets, screws, adhesive)
- Switch or timer (optional)
- Voltage tester
- Jab saw
- Wire nuts
- Old work electrical box
- Wago connectors (if using Wago products)
Step 2: Running the Electrical Supply Cable
To power your heated mirror, you will need to run an electrical supply cable to the area where you plan to install the mirror. Here’s how you can do it:
-
Identify the Power Source: Determine where you will take the power from. The most practical circuit to take power from is usually the lighting circuit for the bathroom. If you have attic access, you can feasibly get power from the wire in the ceiling and then go straight down into the stud bay. However, if this option is not feasible, you can use an existing electrical outlet in the bathroom.
-
Turn Off the Power: Before doing any electrical work, turn off the breaker for the bathroom. This is always the safer bet to avoid any electrical shocks.
-
Remove the Electrical Box: If you need to run a new wire, remove the electrical box from the wall. If you have an old work style box that holds to the drywall by small ears controlled by Phillips head screws, you can easily remove it. If you have a new work box nailed into the stud, it may be more difficult to remove and might require changing out the box.
-
Run the Wire: Once you have removed the electrical box, run the wire over to your next stud bay. If you are using an old work electrical box, scribe around the wires and cut out very gingerly with a jab saw.
-
Double Check Power: After cutting out the penetration with the jab saw, double-check that the power is off before proceeding further.
Step 3: Installing the Old Work Electrical Box
Now that you have run the wire, it’s time to install the old work electrical box:
-
Place Cables Through Back of Gang Box: Take off the wire nuts and place the cables through the back of the gang box.
-
Push Electrical Box into Place: Push the electrical box into place because this is an old work box; they have flanges on each of the four corners where when you tighten it up with a screwdriver, it flanges out and pulls it up tight against the drywall.
Step 4: Hooking Up Wires
Next, hook up the wires to power your heated mirror:
-
Identify Incoming Power Feed: Identify where your incoming power feed comes from (e.g., GFCI outlet or dedicated circuit).
-
Connect Mirror Wires: Connect your mirror wires to this power supply. If you are using Wago products like Wago connectors or Wago lighting boxes, follow their specific instructions for wiring.
-
Secure Wires: Secure all wires properly using wire nuts or connectors to prevent any electrical hazards.
Step 5: Hanging the Mirror
Now that you have hooked up all wires correctly, it’s time to hang your heated mirror:
-
Attach Mirror Brackets: Attach your mirror brackets securely onto the wall using screws or adhesive provided by the manufacturer.
-
Hang Mirror: Carefully hang your heated mirror onto these brackets ensuring it is level and securely fastened.
Step 6: Setting Up Controls (Optional)
If you want additional control over when your heated mirror operates, consider setting up a switch or timer:
-
Install Switch or Timer: Install either a switch that synchronizes with your main light switch or use a thermostat to regulate demisting cycles.
-
Configure Controls: Follow manufacturer’s instructions for configuring these controls so they work seamlessly with your heated mirror setup.
Step 7: Testing Your Installation
Before finalizing everything make sure you test out your installation thoroughly:
-
Turn On Power Source: Turn on power source connected to your heated mirror ensuring everything works as expected without any issues.
-
Check Functionality: Check both heating functionality as well as clock display ensuring both are working correctly without any problems.
Conclusion
Installing a bathroom heated mirror with built-in clock not only adds functionality but also enhances aesthetic appeal making it an ideal addition any modern bathroom setup By following these detailed steps outlined above you should be able complete this project successfully ensuring clear visibility even during humid conditions while enjoying luxurious touch provided by built-in clock feature!
Additional Tips & Considerations
-
Safety First: Always prioritize safety when dealing electrical work especially bathrooms where water present always ensure proper insulation electrical components avoid any potential hazards!
-
Professional Help: If unsure about any part process consider hiring qualified electrician ensure job done safely efficiently!
-
Maintenance Tips: Regularly clean mirror surface ensure optimal performance avoid dust buildup reduce effectiveness demisting pad!
By following this comprehensive guide you’ll be able create beautiful functional space perfect enjoying daily routines without worrying foggy mirrors again Happy DIY-ing
Was this page helpful?
At Storables.com, we guarantee accurate and reliable information. Our content, validated by Expert Board Contributors, is crafted following stringent Editorial Policies. We're committed to providing you with well-researched, expert-backed insights for all your informational needs.


0 thoughts on “DIY Guide to Installing a Bathroom Heated Mirror with a Built-In Clock”