Home>Ideas and Tips>Home Bar Glass Washer Installation: Efficient Drink Prep
Ideas and Tips
Home Bar Glass Washer Installation: Efficient Drink Prep
Published: September 24, 2024
Learn how to install a home bar glass washer for efficient drink prep. Save time, ensure cleanliness, and enhance your home bar experience with our guide.
(Many of the links in this article redirect to a specific reviewed product. Your purchase of these products through affiliate links helps to generate commission for Storables.com, at no extra cost. Learn more)
Installing a glass washer in your home bar can significantly enhance the efficiency and cleanliness of your drink preparation process. Whether you're a seasoned bartender or an enthusiast looking to elevate your home bar experience, this article will guide you through the detailed steps of installing a glass washer, highlighting its benefits, and providing tips for maintenance and troubleshooting.
Benefits of a Glass Washer
Before diving into the installation process, it's essential to understand the advantages of using a glass washer. Here are some key benefits:
Effective and Exhaustive Cleaning
A glass washer uses a strong stream of water to rapidly and thoroughly clean glasses. This high-pressure water jet reaches all areas of the glass, from the base to the sides and edge, effectively removing deposits such as coffee, lipstick, and foam. The proficiency of the washing system eliminates the need for manual scouring, significantly shortening the cleaning time.
Time and Work Investment
The auto glass cleaning process with a high-pressure glass rinser can save a lot of time and diminish work necessities. Traditional handwashing methods can be tedious and require extra staff. The glass rinser simplifies the cleaning process, saving you time and money. It speeds up the rinsing process, allowing barkeeps, servers, and homeowners to quickly and easily rinse and reuse glasses. This time and work savings convert into quicker service delivery, shorter wait times for clients, and increased operational efficiency in kitchens and bars.
Temperature Control
For beverages that require a specific serving temperature, glass washers offer an added benefit. By rinsing with cold or hot water, the glass can be pre-cooled or pre-heated, enhancing the overall drinking experience. This is particularly beneficial for cocktail, beer, or wine lovers who appreciate the nuances of their drinks.
Cleanliness and Disinfection
Maintaining cleanliness and ensuring proper dish sterilization are crucial in food service establishments and families. The high-pressure water jets of a glass rinser effectively remove soil, microorganisms, and various contaminants. This ensures that the glasses are thoroughly cleaned and free of any potentially harmful materials. Cleanliness and hygiene play a significant role in pubs and restaurants, making a glass rinser an essential tool.
Installation Guide
Installing a glass washer is a relatively straightforward process that can be completed with basic DIY skills. Here’s a step-by-step guide to help you through the installation:
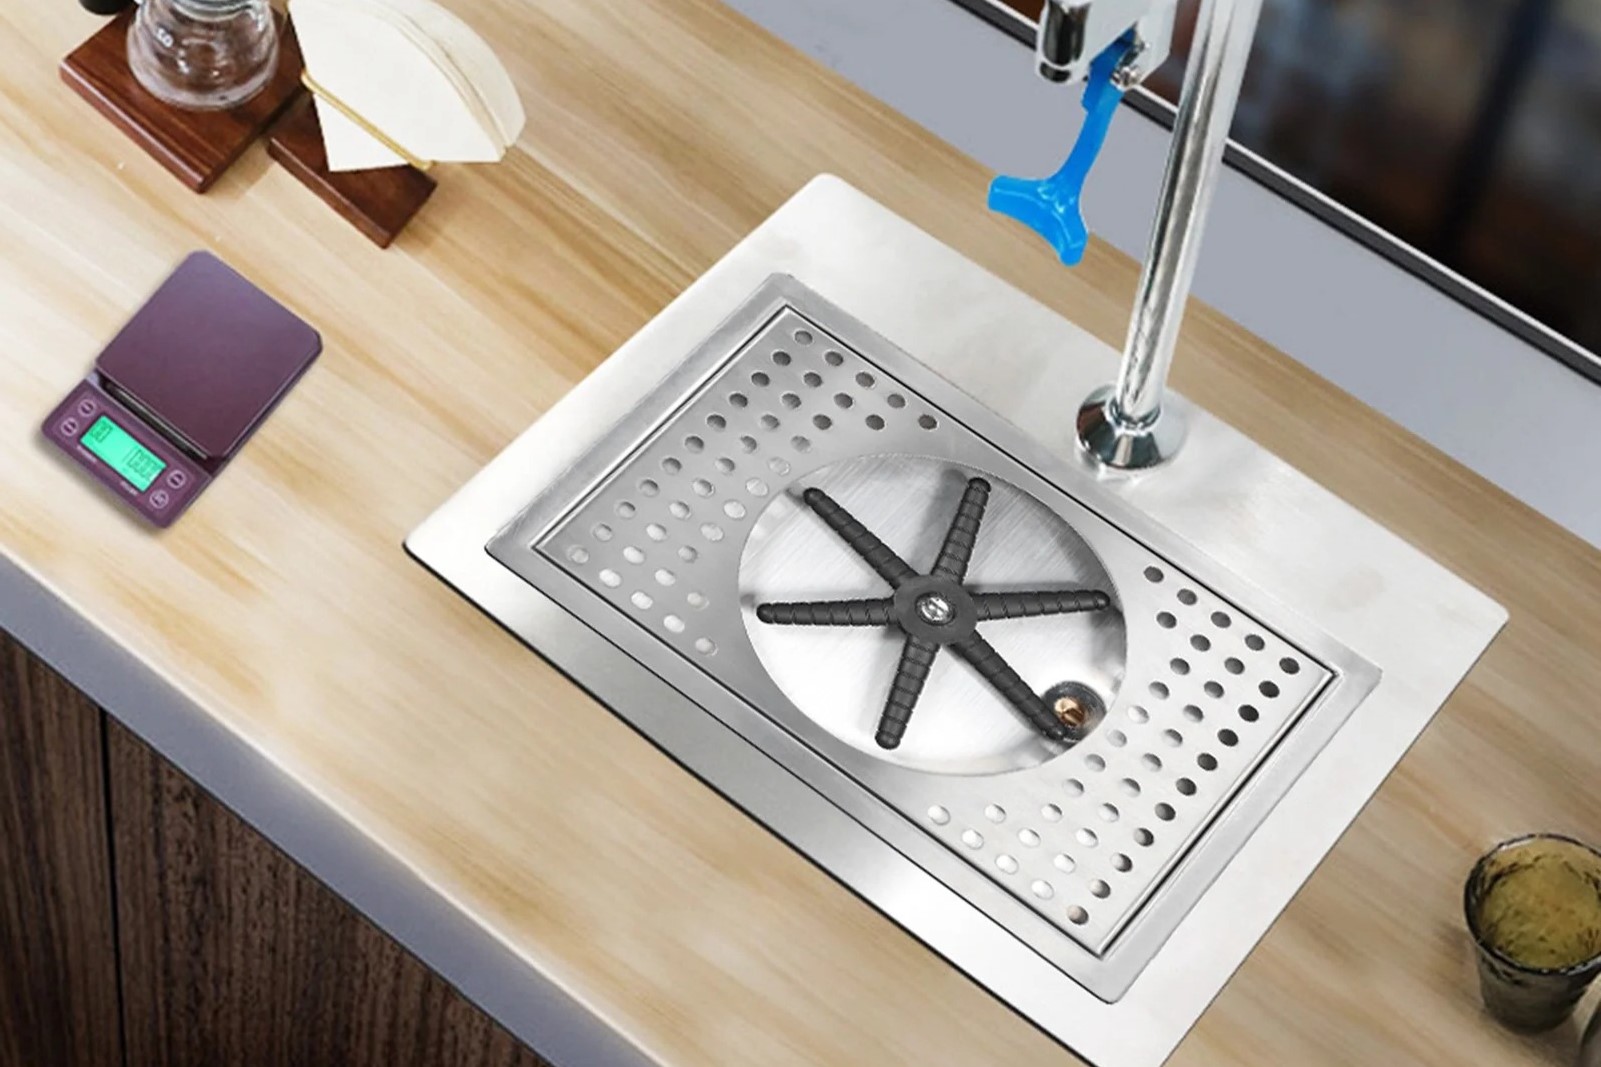
Step 1: Prepare Your Sink
Before starting the installation, ensure that your sink has holes in it or is capable of being drilled. If your sink doesn't have pre-existing holes, you may need to use a sink hole saw to create one. Consider the location of the hole in relation to your faucet and any surrounding objects like window ledges or cabinets. The hole should be far enough away from the faucet to accommodate the glass washer without any obstructions.
Step 2: Assemble the Glass Washer
Slide the mounting shank through the glass washer base, rubber gasket, and steel support washer from above. Lower this assembly through the sink from above, ensuring that the base is aligned with the sink and the outlet extends into the basin prior to fully tightening the mounting nut.
Step 3: Align and Secure the Base
Ensure that the base is aligned with the sink and the outlet extends into the basin. Tighten the mounting nut securely, but avoid over-tightening to prevent damage to the sink or washer.
Step 4: Connect Water Supply Lines
Determine whether you want your new glass washer to be supplied by cold or hot water. Unthread the existing faucet supply line from the angle stop on the chosen side. Attach a tee thread connector provided onto the angle stop in place of the supply line that was disconnected. Thread both the faucet supply line and the 9/16” end of the provided supply line to the tee. Finally, thread the 1/2” end of the provided supply line to the mounting shank. Use a wrench on the shank flats to avoid rotation when tightening.
Step 5: Test and Adjust
Turn on both water supplies at the angle stop. Check all connections for any signs of leaks or drips. If you notice any leaks, tighten the connections as needed or use extra Teflon tape to fix the problem.
Tools and Materials Needed
To install a glass washer, you will need the following tools and materials:
- Glass Washer: The primary component that will be installed in your sink.
- Sink Hole Saw: If your sink doesn't have pre-existing holes, this tool is necessary for creating one.
- Adjustable Wrench: For tightening and loosening connections.
- Teflon Tape: To ensure watertight seals on connections.
- Screwdriver: For any additional adjustments or tightening.
- Water Supply and Drain Lines: Necessary for connecting the glass washer to your plumbing system.
- Mounting Nut and Screws: Provided with most glass washers for securing them in place.
Troubleshooting Common Issues
While installing a glass washer is generally straightforward, there are some common issues that may arise during or after installation:
Water Pressure Issues
Most glass rinsers require an in-line water regulator to reduce inlet water pressure to a safe level. This is crucial to prevent damage to the washer or other components. The Micro Matic In-line Water Pressure Regulator is a recommended solution, as it comes with a removable, cleanable inlet screen and is pre-set at 15 PSI.
Beer Residue Build-Up
If you're using your glass washer for beer glasses, you might encounter issues with beer residue building up on the washer. To remedy this, pour water on the rinser to loosen any stuck residue. This should help restore proper function.
Spring Rinser Replacement
One common problem with rinsers is replacing the spring rinser. The spring snaps after a lot of use and causes the rinser to leak or spray improperly. To fix this issue, you'll need to replace the spring using a small crescent wrench and a straight edge screwdriver. Ensure your water supply is shut off before doing this.
Maintenance Tips
Regular maintenance is crucial for keeping your glass washer in optimal condition:
Cleaning the Washer
Run hot water through the washer periodically to clean out any debris or residue. For more thorough cleaning, use an espresso cleaner or similar solution. Soak the parts in hot water for a few minutes before rinsing thoroughly.
Regular Inspection
Regularly inspect your glass washer for any signs of wear or damage. Check for leaks around connections and ensure all parts are securely fastened. Replace any worn-out parts promptly to maintain efficiency and hygiene.
Final Thoughts
Installing a glass washer in your home bar is a worthwhile investment for enhancing drink preparation efficiency and cleanliness. By following these detailed steps and tips for maintenance and troubleshooting, you can ensure that your glass washer operates effectively and efficiently. Whether you're a professional bartender or an enthusiast, this tool will significantly improve your home bar experience.
In conclusion, a glass washer is not just a luxury but a necessity for any serious home bar setup. Its ability to save time, reduce work necessities, and ensure thorough cleaning makes it an indispensable tool for anyone looking to elevate their drink preparation process.
Additional Resources
For more detailed information on glass washers and their installation, you can refer to the following resources:
- Bostingner Blog: Provides detailed installation steps and benefits of using a glass washer.
- YouTube Install Guide: Offers a visual guide to installing a glass washer in your home bar.
- Draft Beer Dispense Blog: Offers troubleshooting tips and maintenance advice for beer glass rinsers.
By following these guidelines and resources, you'll be well-equipped to install and maintain your glass washer, ensuring that your home bar remains efficient and hygienic.
Was this page helpful?
At Storables.com, we guarantee accurate and reliable information. Our content, validated by Expert Board Contributors, is crafted following stringent Editorial Policies. We're committed to providing you with well-researched, expert-backed insights for all your informational needs.


0 thoughts on “Home Bar Glass Washer Installation: Efficient Drink Prep”