Home>Ideas and Tips>Upgrading Your Home’s Exterior With DIY Outdoor Pizza Oven
Ideas and Tips
Upgrading Your Home’s Exterior With DIY Outdoor Pizza Oven
Modified: October 20, 2024
Elevate your backyard with a DIY outdoor pizza oven. Learn how to build, design, and enjoy delicious homemade pizzas in your own stunning outdoor space.
(Many of the links in this article redirect to a specific reviewed product. Your purchase of these products through affiliate links helps to generate commission for Storables.com, at no extra cost. Learn more)
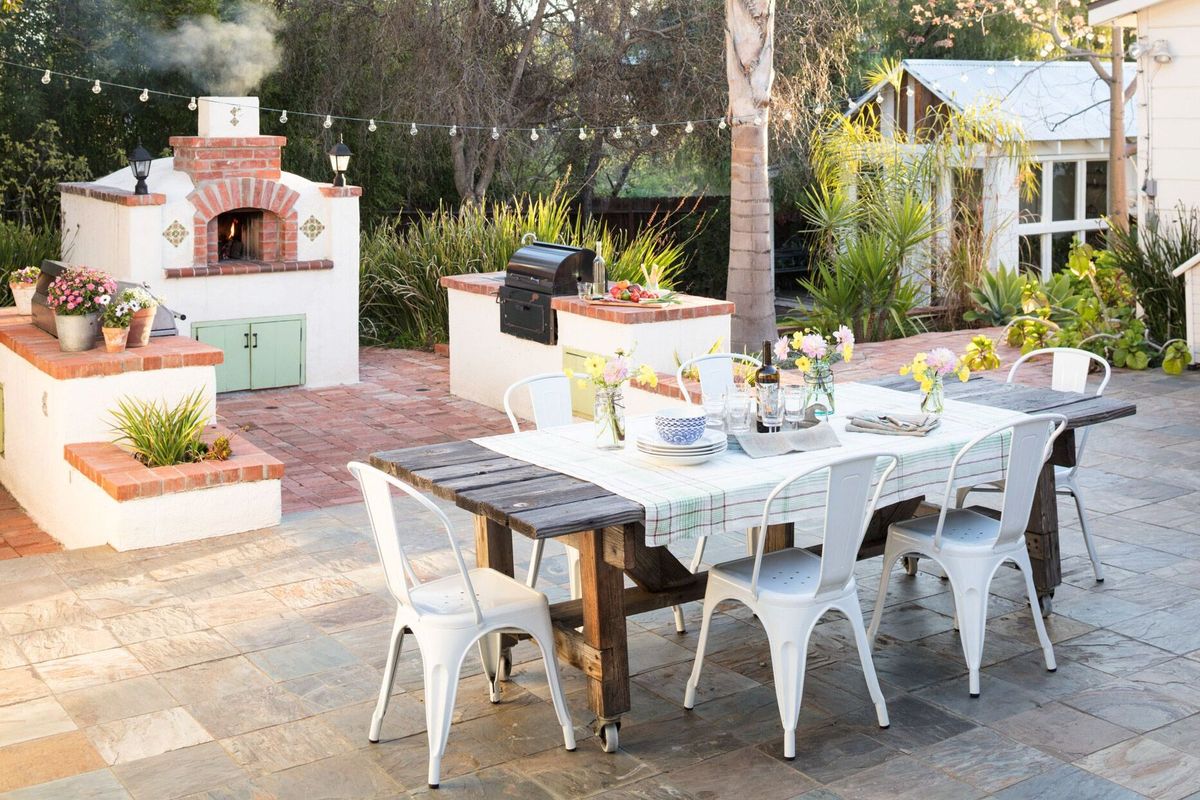
Are you looking to elevate your outdoor entertainment space and add a unique touch to your home's exterior? Building a DIY outdoor pizza oven is an excellent way to do just that. Not only will it provide you with the perfect spot to cook delicious pizzas, but it will also become a stunning centerpiece for your backyard. In this article, we will guide you through the process of building an outdoor pizza oven, from choosing the right location to completing the final touches.
Choosing the Right Location
Before you start building your outdoor pizza oven, it's crucial to select the perfect location. Here are some key considerations:
-
Safety First: Ensure that your pizza oven is at least three feet away from any combustible structures like your house, garage, or shed. This will prevent any potential fires from spreading to these structures.
-
Utility Lines: Call 811 to mark any utility lines in your yard before digging. This is a safety precaution to avoid damaging any underground cables or pipes.
-
Sturdy Ground: Choose a location with sturdy ground that can support the weight of the oven. If necessary, create a foundation to ensure stability.
-
Accessibility: Place your pizza oven in an area that is easily accessible to your dining or entertaining space. This will make it convenient to use and enjoy.
-
Aesthetics: Consider the overall aesthetic of your backyard when choosing a location. You want your pizza oven to blend in or stand out in a way that complements your outdoor space.
Designing Your Pizza Oven
The design of your pizza oven can vary greatly depending on your personal preferences, DIY skills, and the materials you have available. Here are some popular designs:
-
Brick Oven: A brick oven is one of the most traditional and visually appealing designs. It requires specialized tools and experience but can be very rewarding to build.
-
Cob Oven: A cob oven is made from natural materials like clay, sand, and sawdust. It's an eco-friendly option that can be built for under $20 using recycled materials.
-
Concrete Oven: A concrete oven is durable and can be designed in various shapes and sizes. It's a good option if you're looking for something more modern.
-
Wood-Fired Oven: A wood-fired oven is perfect for those who love the taste of wood-fired pizzas. It requires more maintenance but offers a unique cooking experience.
Building the Foundation
The foundation of your pizza oven is crucial for its stability and functionality. Here’s how to build a solid base:
-
Remove Topsoil: Clear an area slightly larger than the footprint of your oven base. Remove 6 to 8 inches of topsoil to create a level surface.
-
Compact Gravel: Compact a few inches of gravel to create a solid and level surface. This will help prevent settling and ensure stability.
-
Add Sand Layer: Add a 1-inch layer of sand on top of the compacted gravel. This layer helps with drainage and provides a smooth surface for laying bricks or other materials.
-
Lay Bricks or Pavers: Use concrete pavers or bricks to create the base of your oven. Ensure they are laid in a pattern that provides adequate support and drainage.
Building the Oven Structure
Once you have your base ready, it's time to start building the oven structure:
Brick Oven
-
Lay First Layer: Begin by laying the first layer of bricks or pavers. Use a level to ensure they are even and aligned properly.
-
Add Insulating Layer: If you're building a brick oven, you may want to add an insulating layer such as beer bottles filled with sawdust and clay mortar (as described in).
-
Build Hearth: The hearth is the bottom layer of the oven where pizzas will bake directly. Use firebricks laid on a thin bed of sand for this purpose.
-
Construct Dome: Build the dome-shaped structure using bricks or pavers. Use a wooden mold to shape the dome and ensure it's even.
-
Add Chimney: Construct a chimney using brick and mortar or another form of concrete. This will help with ventilation and ensure proper airflow.
-
Cladding: Add cladding to dress the oven and make it look more appealing. You can use brick or other masonry materials for this purpose.
Cob Oven
-
Prepare Foundation: Use reclaimed cinder blocks and urbanite to create a foundation for your cob oven.
-
Insulating Layer: Create an insulating layer using beer bottles filled with sawdust and clay mortar.
-
Build Hearth: Use recycled firebricks for the hearth, carefully laying them on a thin bed of sand.
-
Construct Dome: Mix sand and clay at a 3:1 ratio to create the cob mixture. Build up the dome around a moist sand form covered with wet newspaper.
-
Finish Touches: Once the dome has dried slightly, remove the sand from the doorway and add any final touches such as an arched doorway made from reclaimed red brick.
Concrete Oven
-
Prepare Base: Use concrete pavers or bricks to create the base of your oven.
-
Mix Concrete: Mix concrete according to the manufacturer's instructions and pour it into the base.
-
Shape Dome: Use a wooden mold or formwork to shape the dome of your oven.
-
Add Insulating Layer: If desired, add an insulating layer such as foam board or refractory insulation.
-
Finish Surface: Once the concrete has set, finish the surface with a smooth layer of concrete or render.
Final Touches
After completing the structure of your pizza oven, there are several final touches you should consider:
-
Cleaning: Use an oven brush with copper or brass bristles to scrape off caked-on food debris.
-
Seasoning: Season your pizza oven by heating it up to high temperatures without any food inside. This will help create a non-stick surface.
-
Maintenance: Regularly maintain your pizza oven by cleaning it after each use and ensuring proper ventilation.
Using Your Pizza Oven
Now that you have built your DIY outdoor pizza oven, it's time to start using it Here are some tips for getting the best results:
-
Preheating: Preheat your oven to high temperatures (usually around 700°F) using wood, pellets, charcoal, natural gas, or propane.
-
Cooking Pizzas: Place your pizzas inside the oven and cook for 2-3 minutes on each side until they are golden brown and crispy.
-
Baking Bread: Use your pizza oven to bake delicious homemade bread. The high temperatures will give your bread a crispy crust and a soft interior.
-
Cooking Other Foods: Experiment with cooking other foods like vegetables, meats, and even desserts in your pizza oven.
Cost Comparison
Building a DIY outdoor pizza oven can be cost-effective compared to hiring a professional contractor. Here’s a rough estimate of the costs involved:
- Materials Cost: The cost of materials can range from $800 to $2,000 depending on the size and design of your oven.
- Labor Cost: If you choose to hire a professional contractor, the labor cost can range from $40 to $75 per hour with a minimum fee of $200 to $400.
- Total Cost: The total cost of hiring a professional contractor can range from $1,000 to $3,500 or more, while building it yourself can be significantly cheaper.
Frequently Asked Questions
- Size of the Oven: The size of your pizza oven will determine the number of bricks necessary to build it. Larger ovens require more fire bricks, which cost about $3 each.
- Materials: You can use normal bricks as cladding for a concrete or clay pizza oven or as a base underneath one. Fire bricks or solid clay bricks are necessary for the floor of an outdoor pizza oven.
- DIY vs. Professional: Building a DIY outdoor pizza oven is a gratifying experience, but it requires specialized tools, experience, and plenty of labor hours. Hiring a professional ensures that the pizza oven will be functional and safe.
Conclusion
Building a DIY outdoor pizza oven is a rewarding project that can elevate your home's exterior and provide you with a unique cooking experience. By following these steps and considering your design options, you can create a stunning and functional pizza oven that will become the centerpiece of your backyard. Whether you choose to build a brick oven, cob oven, or concrete oven, the process is sure to be enjoyable and rewarding. So why wait? Start planning your DIY outdoor pizza oven today and enjoy delicious homemade pizzas and bread in the comfort of your own home
Was this page helpful?
At Storables.com, we guarantee accurate and reliable information. Our content, validated by Expert Board Contributors, is crafted following stringent Editorial Policies. We're committed to providing you with well-researched, expert-backed insights for all your informational needs.


0 thoughts on “Upgrading Your Home’s Exterior With DIY Outdoor Pizza Oven”