Home>Ideas and Tips>Upgrading Your Home’s Garage With DIY Pegboard Wall System
Ideas and Tips
Upgrading Your Home’s Garage With DIY Pegboard Wall System
Published: September 4, 2024
Transform your garage with a DIY pegboard wall system. Maximize storage, enhance organization, and create a functional workspace easily and affordably.
(Many of the links in this article redirect to a specific reviewed product. Your purchase of these products through affiliate links helps to generate commission for Storables.com, at no extra cost. Learn more)
When it comes to home improvement, few spaces offer as much potential for transformation as the garage. Often relegated to mere parking and storage, a garage can be so much more. With the right tools and a bit of creativity, you can turn your cramped, cluttered garage into a well-organized workshop or storage space. One of the most effective ways to achieve this is by installing a DIY pegboard wall system. In this article, we will explore the benefits, design considerations, and step-by-step guide to creating your own pegboard wall.
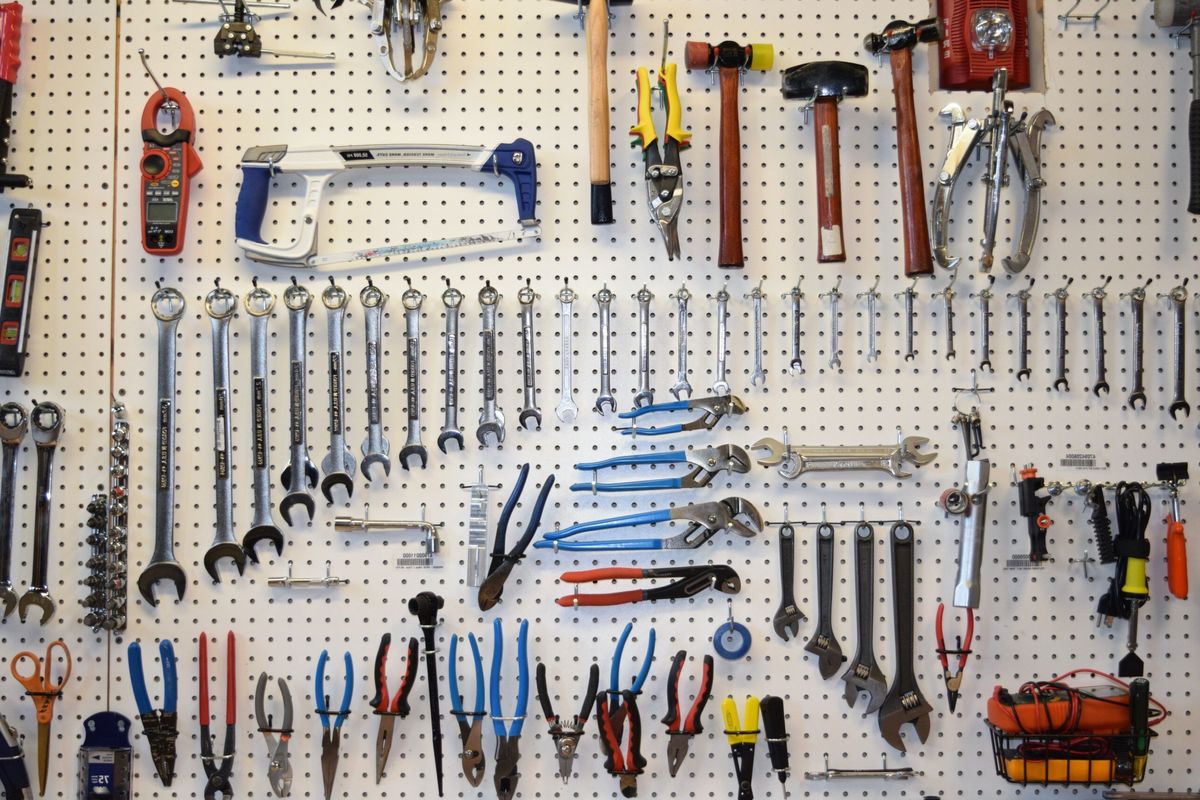
A pegboard wall is an old-time organization tool that has taken on a new look and become an exciting way to enhance your space. Here are some of the key benefits:
-
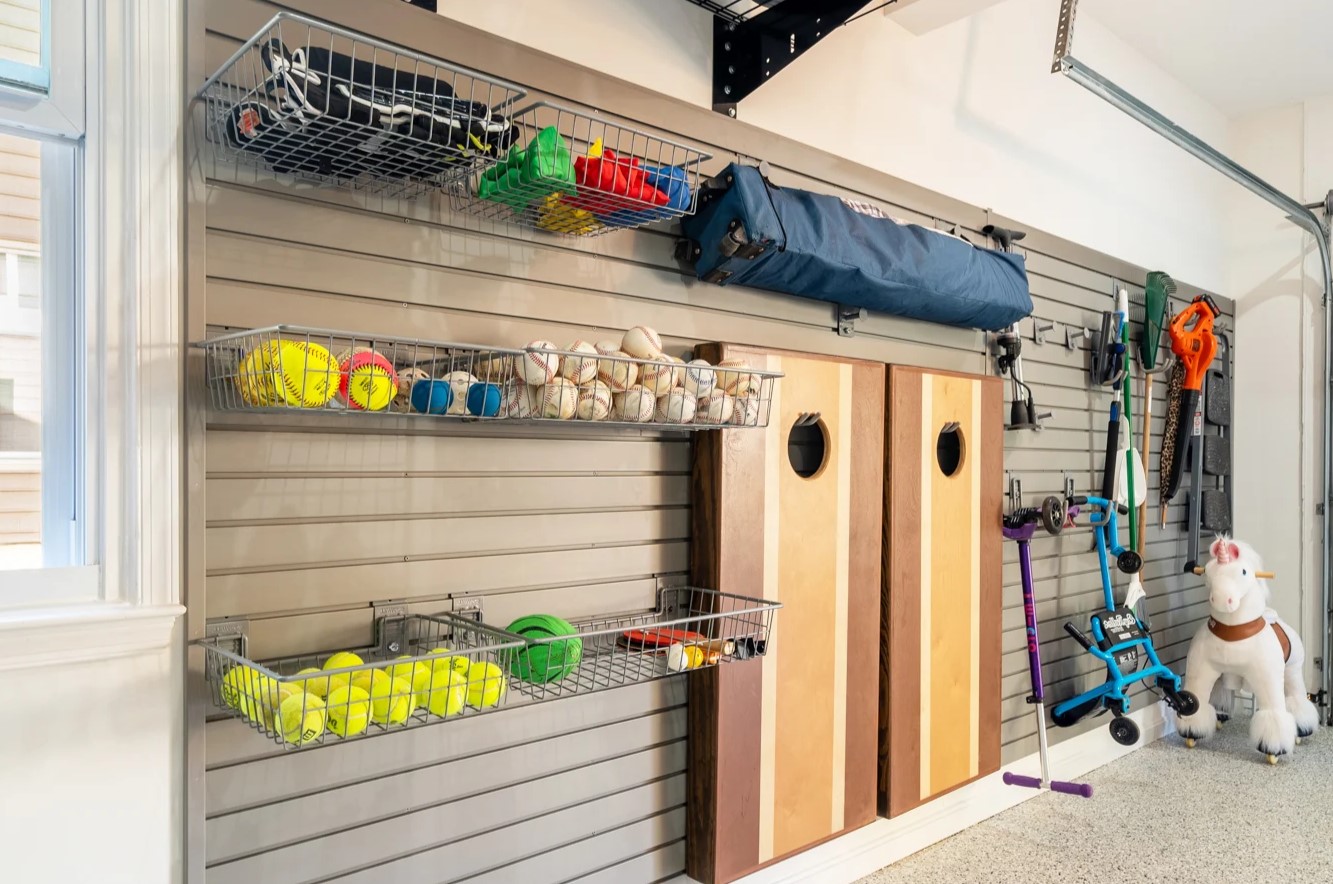
Versatility: Pegboards come in various sizes and can be adapted to fit any space, from small garages to large workshops. They offer a flexible solution for organizing tools, equipment, and other items.
-
Customization: With a pegboard, you can customize the layout to suit your specific needs. Whether you need hooks for tools, bins for supplies, or even a place to hang your favorite sports equipment, the pegboard allows you to tailor the storage to your requirements.
-
Space Efficiency: By utilizing the vertical space on your walls, pegboards help maximize storage capacity without taking up valuable floor space. This is particularly important in smaller garages where every inch counts.
-
Easy Installation: Most pegboard systems are relatively easy to install, requiring minimal tools and expertise. This makes them accessible even for those who are not experienced DIY enthusiasts.
-
Cost-Effective: Compared to other storage solutions like cabinets or shelves, pegboards are generally more affordable. They also offer a budget-friendly way to upgrade your garage without breaking the bank.
Before diving into the installation process, it's essential to consider several design factors that will ensure your pegboard wall is both functional and aesthetically pleasing:
-
Space Constraints: If you have a narrow garage, it's crucial to choose a design that fits snugly against the wall without obstructing doorways or windows. A narrow pegboard wall can be an excellent solution in such cases.
-
Material Selection: The type of material used for the pegboard can affect its durability and appearance. Pre-primed white pegboards are popular choices due to their ease of use and clean appearance.
-
Hook and Accessory Selection: The variety of hooks and accessories available can significantly enhance the functionality of your pegboard wall. From standard hooks to specialized tools like angle cutters and screwdriver holders, there are numerous options to choose from.
-
Lighting: Adding LED lighting across your pegboard can make it easier to find tools in the dark and enhance the overall ambiance of your workspace.
-
Maintenance: Regular maintenance is key to keeping your pegboard organized and functional. Make sure to clean the hooks regularly and ensure that everything is properly secured.
Step-by-Step Guide to Installing a DIY Pegboard Wall
Materials Needed
- 1 – 4′ x 8′ pre-primed white pegboard
- 5 – 1″ x 6″ x 8′ pine boards
- 6 – 1″ x 2″ x 8′ furring strips
- Hooks and accessories of your choice
- Drill with screwdriver bits
- Level
- Measuring tape
- Pencil or marker
Step 1: Plan Your Layout
Before starting the installation process, take some time to plan out your layout. Measure the width of your wall and decide how many sections you want on your pegboard wall. Consider leaving space behind the pegboard for easy access and to avoid any obstructions.
Step 2: Prepare the Wall
Ensure that the wall is clean and free from any debris or old adhesive. If necessary, apply a coat of primer to create a smooth surface for installation.
Step 3: Install Furring Strips
Furring strips are essential for supporting the pegboard and providing a stable base. Measure and mark the wall where you want to place the furring strips, about 12 inches apart. Use screws to secure them firmly into place.
Step 4: Attach Pegboard
Place the pegboard on top of the furring strips, ensuring it is level and secure. Use screws or nails to attach it firmly to the furring strips. If you're using pre-made pegboard sections, follow the manufacturer's instructions for installation.
Step 5: Add Hooks and Accessories
Once the pegboard is securely attached, start adding hooks and accessories according to your needs. Make sure they are evenly spaced and not too close together to avoid clutter.
Step 6: Add Lighting (Optional)
If you've decided to add LED lighting across your pegboard wall, now is the time to do it. Follow the manufacturer's instructions for installation.
Step 7: Final Touches
Double-check that everything is level and securely attached. Add any finishing touches such as painting or staining the surrounding area if needed.
Real-Life Examples
Example 1: Narrow Pegboard Wall
In an article from Ugly Duckling House, a homeowner shares their experience with installing a narrow pegboard wall in their cramped one-car garage. The homeowner chose this design because it was narrow enough to fit snugly against the wall without obstructing doorways or windows. The entire structure was supported by a series of 1×2 furring strips, making it easy to install without any major cuts.
Example 2: Customized Craft Space
Monica Chavez created an interactive toy and storage area under her staircase using dowels and pegboard. She cut pointed boards to look like houses and added bright colors in fun patterns. This project not only provided storage but also developed her son’s motor skills.
Example 3: Garage Makeover
Jeremiah Skinner transformed his garage by building a 16-foot workbench and installing a pegboard wall across it. He documented his process on YouTube and found that having most of his available hand tools visible made it easier to organize and access everything he frequently used.
Common Issues and Solutions
While pegboard walls offer numerous benefits, there are some common issues that users may encounter:
-
Hooks Falling Off: This issue can be resolved by using hooks with plastic clips or by leaving space behind the pegboard for easy access.
-
Tools Getting Stuck: Tools like angle cutters can get stuck on hooks. To avoid this, ensure that there is enough space between tools and hooks.
-
Small Containers for Screws/Nuts: Small containers for screws/nuts can be a pain due to limited space. Consider using larger containers or placing them in a separate bin.
-
Disorganization: Regular maintenance is key to keeping your pegboard organized. Make sure to clean the hooks regularly and ensure that everything is properly secured.
Upgrading your home's garage with a DIY pegboard wall system is an excellent way to enhance storage capacity while maintaining a clean and organized workspace. By following these steps and considering design factors such as space constraints, material selection, and hook/accessory selection, you can create a functional and aesthetically pleasing pegboard wall that meets all your needs. Whether you're looking to organize tools in a garage or create an interactive toy area in your home studio, pegboards offer endless possibilities for customization and efficiency.
References
- Ugly Duckling House – Garage Pegboard Wall
- Public Storage – Pegboard Storage to Transform Your Home
- The Creativity Exchange – DIY Garage Pegboard Storage Wall
- Reddit – Pegboard for Garage Tool Wall: Yay or Nay?
- Philip Orflop – Declutter, Clean and Give Your Garage a DIY Makeover
Was this page helpful?
At Storables.com, we guarantee accurate and reliable information. Our content, validated by Expert Board Contributors, is crafted following stringent Editorial Policies. We're committed to providing you with well-researched, expert-backed insights for all your informational needs.


0 thoughts on “Upgrading Your Home’s Garage With DIY Pegboard Wall System”