Home>Renovation & DIY>Tools & Equipment>How To Pop A Tire With A Screwdriver
Tools & Equipment
How To Pop A Tire With A Screwdriver
Published: December 20, 2023
Learn the proper technique for popping a tire with a screwdriver and the essential tools and equipment needed for the job. Master the art of tire maintenance and repair.
(Many of the links in this article redirect to a specific reviewed product. Your purchase of these products through affiliate links helps to generate commission for Storables.com, at no extra cost. Learn more)
Introduction
Have you ever found yourself in a situation where you urgently need to deflate a tire, but you don’t have the appropriate tools at hand? Perhaps you’re dealing with a tire that’s overinflated, or you need to release air to navigate challenging off-road terrain. While it’s always best to use the right tools for the job, there may be instances where you find yourself without access to a tire pressure gauge or a dedicated deflation tool. In such cases, knowing how to pop a tire with a screwdriver can be a valuable skill.
Before proceeding, it’s essential to emphasize that deflating a tire with a screwdriver should only be done in emergency situations or when no other options are available. Additionally, this method should be used with caution, as it can cause damage to the tire and pose safety risks if not carried out carefully. With that in mind, let’s explore the step-by-step process of deflating a tire using a screwdriver, along with the necessary precautions to ensure a safe and effective outcome.
Key Takeaways:
- In emergency situations, a screwdriver can be used to release air from a tire, but it should be done with caution. Always prioritize safety and use the right tools whenever possible.
- Using a screwdriver to deflate a tire is a temporary solution. It’s important to seek professional help for any tire issues and to maintain proper tire pressure for vehicle safety and performance.
Read more: How To Store Tire Chains
Materials Needed
Before attempting to deflate a tire using a screwdriver, it’s important to gather the necessary materials to ensure a safe and efficient process. Here’s what you’ll need:
- Screwdriver: Select a sturdy flathead screwdriver with a narrow tip. The screwdriver should be long enough to reach the tire valve comfortably.
- Tire Pressure Gauge (optional): While not essential for the deflation process, having a tire pressure gauge on hand can help you monitor the air pressure and ensure that you release the desired amount of air from the tire.
- Valve Cap (optional): If the valve cap is not already removed, you may need to have a pair of pliers or a similar tool to assist in its removal.
- Flashlight (optional): If you’re working in low light conditions, a flashlight can help you locate the tire valve and ensure precise insertion of the screwdriver.
By having these materials at your disposal, you can proceed with the deflation process with greater confidence and control. Remember, safety should always be a top priority when working with tires, so exercise caution and use the appropriate tools for the task at hand.
Step 1: Locate the Tire Valve
Before initiating the deflation process, it’s crucial to locate the tire valve on the wheel. The valve is typically positioned on the outer surface of the tire and is used to inflate and deflate the tire as needed. It appears as a small, cylindrical protrusion, often covered by a protective valve cap.
To locate the tire valve:
- Visually Inspect the Tire: Begin by visually examining the surface of the tire to identify the valve stem. The valve is commonly located near the edge of the wheel, protruding slightly from the tire’s surface.
- Check the Valve Cap: If the valve cap is still in place, it will need to be removed to access the valve. Unscrew the cap in a counterclockwise direction and set it aside in a secure location to prevent misplacement.
- Use a Flashlight (if necessary): In low light conditions or when working with a particularly dirty or obscured valve, a flashlight can aid in locating the valve with precision.
Once the tire valve is located and the valve cap is removed, you’re ready to proceed to the next step of the deflation process. Remember to handle the valve and surrounding area with care to avoid causing any damage or introducing contaminants that could affect the tire’s performance.
Step 2: Remove the Valve Cap
After locating the tire valve, the next step is to remove the valve cap, which serves as a protective covering for the valve stem. The valve cap helps prevent dirt, debris, and moisture from entering the valve, safeguarding the tire’s air retention system. To prepare for the deflation process, the valve cap must be removed to allow access to the valve stem.
Here’s how to remove the valve cap:
- Secure the Valve Cap: If the valve cap is still in place, hold it firmly to prevent it from falling onto the ground or getting lost during removal.
- Turn Counterclockwise: Using your fingers, a pair of pliers, or a dedicated valve cap removal tool, rotate the cap in a counterclockwise direction. Apply steady and gentle pressure to loosen the cap without causing damage to the valve stem.
- Set Aside the Valve Cap: Once the valve cap is successfully unscrewed, set it aside in a safe location where it won’t roll away or become misplaced. Keeping the valve cap secure is important, as it will be needed to reseal the valve after the deflation process is complete.
With the valve cap removed, the valve stem is exposed and ready for the next steps in the tire deflation process. Take care to handle the valve cap and valve stem with attention to prevent any potential damage or contamination as you proceed with the deflation procedure.
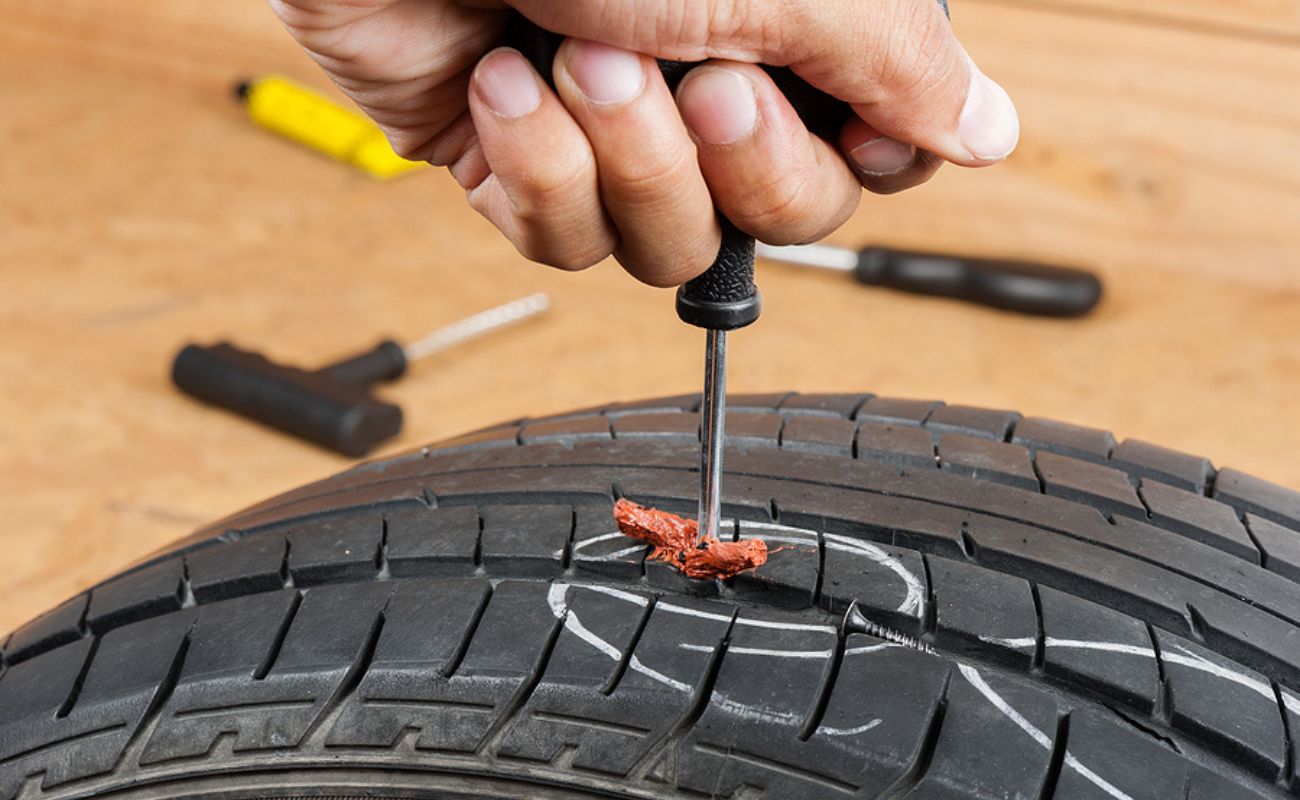
Using a screwdriver, puncture the tire sidewall near the tread. Apply force and twist the screwdriver to create a hole. Be cautious of the tire pressure and potential injury.
Step 3: Insert the Screwdriver
With the valve cap removed and the valve stem accessible, the next crucial step in deflating the tire with a screwdriver is to carefully insert the screwdriver tip into the valve stem. This step requires precision and attentiveness to avoid damaging the valve and ensure effective air release.
Follow these steps to insert the screwdriver into the valve stem:
- Select the Appropriate Screwdriver: Choose a flathead screwdriver with a narrow tip that can fit into the valve stem opening without causing damage. The screwdriver should be long enough to reach the valve comfortably.
- Position the Screwdriver: Align the tip of the screwdriver with the opening of the valve stem. Hold the screwdriver steady and perpendicular to the valve stem to ensure proper insertion without slippage.
- Gently Insert the Screwdriver: With a steady hand, carefully insert the screwdriver into the valve stem. Apply gentle pressure to overcome the initial resistance, but avoid forcing the screwdriver to prevent any potential damage to the valve or the screwdriver itself.
As you insert the screwdriver into the valve stem, be mindful of maintaining a straight and steady posture to prevent any accidental slippage or misalignment. Proper insertion of the screwdriver sets the stage for the subsequent step in the deflation process, allowing for controlled air release from the tire.
Read more: How To Store Unmounted Tires
Step 4: Apply Pressure
Once the screwdriver is securely inserted into the valve stem, the next pivotal step in deflating the tire involves applying pressure to initiate the release of air from the tire. This process demands a delicate balance of control and attentiveness to achieve the desired reduction in tire pressure without causing damage or compromising safety.
Follow these guidelines to apply pressure and release air from the tire:
- Maintain a Steady Grip: Hold the screwdriver firmly and maintain a steady grip to ensure precise control over the deflation process. A stable grip minimizes the risk of slippage and helps regulate the amount of pressure applied to the valve stem.
- Apply Gentle Pressure: With the screwdriver inserted, exert gentle pressure on the screwdriver handle to depress the valve stem’s internal pin. This action opens the valve, allowing air to escape from the tire. Exercise caution to avoid applying excessive force, as it may lead to rapid or uncontrolled air release.
- Monitor Air Release: As you apply pressure, monitor the air release from the tire. Maintain awareness of the tire’s pressure level and listen for the sound of air escaping. If you have a tire pressure gauge on hand, periodically check the pressure to ensure that the desired level is being achieved.
By carefully applying pressure and overseeing the air release process, you can effectively reduce the tire’s pressure to the desired level. Exercise patience and attentiveness throughout this step to maintain control and prevent overdeflation, which can compromise the tire’s performance and safety.
Step 5: Repeat if Necessary
After initiating the deflation process by applying pressure to release air from the tire, it’s essential to assess the tire’s pressure level and determine whether further deflation is required to achieve the desired tire pressure. Depending on the initial pressure and the specific needs of the vehicle or terrain, you may need to repeat the deflation process to attain the optimal tire pressure.
Consider the following steps when determining if further deflation is necessary:
- Check Tire Pressure: Utilize a tire pressure gauge to measure the current pressure in the tire. Compare the reading to the recommended tire pressure specified by the vehicle manufacturer or adjust it based on the terrain or driving conditions.
- Assess Tire Firmness: Gently press on the tire with your hand or foot to gauge its firmness. If the tire feels excessively rigid or overinflated, further deflation may be warranted to optimize its performance and traction.
- Repeat Deflation Process: If additional deflation is needed, carefully insert the screwdriver into the valve stem and apply controlled pressure to release more air from the tire. Exercise caution to prevent overdeflation and regularly monitor the tire’s pressure during the process.
By repeating the deflation process as necessary, you can fine-tune the tire pressure to align with the specific requirements of your vehicle and the driving conditions. This iterative approach allows for precise adjustment and ensures that the tire’s performance and safety are optimized for the intended use.
Conclusion
Mastering the technique of deflating a tire with a screwdriver can be a valuable skill in emergency situations or when access to specialized deflation tools is limited. However, it’s important to approach this method with caution and discretion, as improper tire deflation can lead to safety hazards and tire damage. When employing this method, always prioritize safety and use it only when no other options are available.
By following the step-by-step process outlined in this guide, you can effectively and safely reduce the tire pressure using a screwdriver. From locating the tire valve to applying controlled pressure for air release, each step demands precision and attentiveness to ensure a successful outcome. Additionally, being mindful of the tire pressure level and the specific requirements of your vehicle or driving conditions allows for the fine-tuning of tire pressure to optimize performance and safety.
It’s crucial to emphasize that deflating a tire with a screwdriver should be considered a temporary solution, and professional assistance should be sought to address any underlying issues or to properly inflate the tire to the recommended pressure. Regularly inspecting and maintaining proper tire pressure using appropriate tools and equipment is essential for ensuring vehicle safety and optimal performance.
Remember, safety is paramount when working with tires, and using the right tools for the job is always the best practice. While knowing how to pop a tire with a screwdriver can be a useful skill in certain circumstances, it’s equally important to prioritize the long-term health and safety of your vehicle’s tires by adhering to recommended maintenance practices and seeking professional assistance when needed.
Frequently Asked Questions about How To Pop A Tire With A Screwdriver
Was this page helpful?
At Storables.com, we guarantee accurate and reliable information. Our content, validated by Expert Board Contributors, is crafted following stringent Editorial Policies. We're committed to providing you with well-researched, expert-backed insights for all your informational needs.


0 thoughts on “How To Pop A Tire With A Screwdriver”