Home>Articles>How Long Does It Take Wood To Dry For Woodworking
Articles
How Long Does It Take Wood To Dry For Woodworking
Modified: January 5, 2024
Discover how long it takes for wood to dry before using it in your woodworking projects with informative articles and expert insights.
(Many of the links in this article redirect to a specific reviewed product. Your purchase of these products through affiliate links helps to generate commission for Storables.com, at no extra cost. Learn more)
Introduction
When it comes to woodworking, one crucial aspect that cannot be overlooked is drying the wood. Properly dried wood is essential for ensuring the stability, durability, and quality of any woodworking project. But how long does it take for wood to dry? The answer to this question depends on various factors, including the type of wood, the moisture content, and the drying method used.
In this article, we will delve into the intricacies of wood drying for woodworking projects. We will explore the factors that affect drying time, the methods used to dry wood, and provide some valuable tips for ensuring your wood dries effectively. So, let’s jump right in and understand the process of drying wood for woodworking.
Key Takeaways:
- Properly drying wood is crucial for woodworking projects, and factors like wood species, initial moisture content, and drying methods influence drying time. Understanding these factors ensures optimal results.
- Air drying and kiln drying are the primary methods for drying wood, each with its advantages. Monitoring moisture content, using stickers for airflow, and avoiding common mistakes are essential for successful wood drying.
Read more: How Long Does It Take For Brick To Dry
Factors Affecting Wood Drying Time
The drying time of wood can vary greatly depending on several factors. Understanding these factors is crucial for determining how long it will take for the wood to reach an optimal moisture content for woodworking. Here are some key factors that can affect the drying time:
- Wood Species: Different species of wood have different drying characteristics. Some species, such as oak and maple, have a higher density and moisture content, which means they will require a longer time to dry compared to softer woods like pine.
- Initial Moisture Content: The initial moisture content of the wood plays a significant role in drying time. Wood that is freshly cut typically has a moisture content of around 30% to 60%. The higher the initial moisture content, the longer it will take for the wood to dry.
- Board Thickness: Thicker boards take longer to dry compared to thinner boards. This is because the moisture must travel from the center of the board to the surface, and thicker boards have a greater distance to travel.
- Ambient Conditions: The environmental conditions in which the wood is drying can impact the drying time. Factors such as temperature, humidity, and airflow can affect how quickly the moisture evaporates from the wood.
- Drying Method: The method used to dry the wood can significantly influence the drying time. The two primary methods are air drying and kiln drying, each with its advantages and considerations.
It is important to note that these factors are not independent of each other. They often interact and influence one another. For example, a combination of a dense wood species, high initial moisture content, and thicker boards may require a longer drying time.
Now that we have a better understanding of the factors that affect wood drying time, let’s explore the concept of wood moisture content and why it is crucial in the drying process.
Understanding Wood Moisture Content
Wood moisture content refers to the amount of water contained within the wood fibers. It is expressed as a percentage of the weight of the wood compared to its dry weight. The moisture content of wood has a direct impact on its dimensional stability, strength, and workability. Understanding wood moisture content is essential for determining when the wood is properly dried and ready for woodworking.
Wood is considered to be “green” or “wet” when it is freshly cut and contains a high moisture content. As the wood dries, moisture slowly evaporates from the wood fibers until it reaches a moisture content that is in equilibrium with the surrounding environment. This is known as the equilibrium moisture content (EMC).
The EMC of wood varies depending on the relative humidity and temperature of the environment. In regions with high humidity, the EMC of wood will be higher, while in drier regions, the EMC will be lower. For woodworking purposes, the ideal moisture content of wood is typically around 6% to 8%.
Wood that is too wet or has a high moisture content can lead to several issues in woodworking projects. It can cause warping, cracking, and shrinking of the wood once it is incorporated into a finished product. On the other hand, wood that is too dry or has a low moisture content can become brittle, making it difficult to work with.
Therefore, achieving the right moisture content is crucial for ensuring the stability and quality of woodworking projects. This is where the wood drying process comes into play. By effectively drying the wood, you can bring it to the desired moisture content and prepare it for use in your woodworking projects.
Next, let’s explore the two primary methods used for drying wood: air drying and kiln drying.
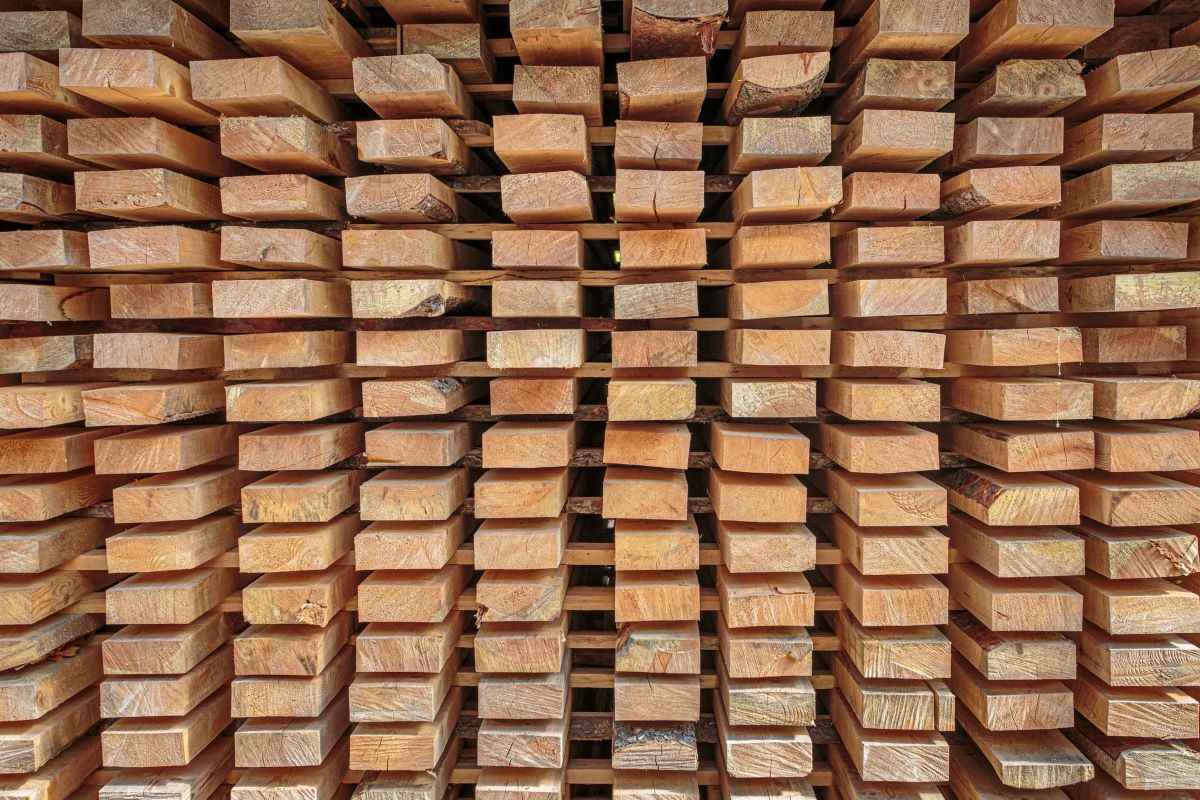
Air Drying Process for Wood
Air drying is one of the oldest and most natural methods of drying wood. It involves allowing the wood to dry naturally by exposing it to the surrounding air. While it is a slower process compared to kiln drying, it can be a cost-effective and energy-efficient option for drying wood.
The air drying process requires a well-ventilated space where the wood can be stacked or arranged in a way that allows for proper airflow. Here is a step-by-step guide to the air drying process:
- Prepare the Wood: Before air drying, it is important to properly prepare the wood by removing the bark and any excess branches or debris. This ensures that the wood dries evenly and reduces the risk of mold or insect infestation.
- Stack the Wood: Stack the wood in a way that allows for good airflow between the boards. Leave space between the boards to promote air circulation. It is recommended to use stickers or thin spacers between the boards to create even spacing and prevent them from sticking together.
- Protect from the Elements: While air drying, it is essential to protect the wood from direct exposure to rain, excessive sunlight, and extreme temperature fluctuations. This can be achieved by covering the stacked wood with a waterproof tarp or placing it in a covered area like a shed or barn.
- Monitor Moisture Content: Regularly monitor the moisture content of the wood using a moisture meter. This will help you determine when the wood has reached the desired moisture content for woodworking.
- Patience is Key: Air drying is a slow process, and the time it takes for the wood to fully dry will depend on the factors we discussed earlier. It can take anywhere from a few months to several years for the wood to reach the desired moisture content.
While air drying may take longer compared to kiln drying, it has its benefits. The slow drying process can result in more stable and less stressed wood, which can be beneficial for certain woodworking projects. Additionally, air drying is a more environmentally friendly method as it does not require the use of energy and doesn’t emit greenhouse gases.
However, it’s important to note that air drying may not be suitable for all types of wood or in regions with high humidity or severe weather conditions. In such cases, kiln drying may be a more viable option, which we will explore in the next section.
Kiln Drying Process for Wood
Kiln drying is a controlled and accelerated method of drying wood. It involves using a specialized kiln to extract moisture from the wood at a faster rate than air drying. Kiln drying offers several advantages, including faster drying times, precise control over moisture content, and the ability to dry wood in regions with unfavorable weather conditions.
The kiln drying process typically follows these steps:
- Preconditioning: Before the wood is placed in the kiln, it undergoes a process called preconditioning. This involves stacking the wood in a well-ventilated area with stickers or spacers between the boards. The wood is allowed to equalize and reach a moisture content that is suitable for kiln drying.
- Loading the Kiln: Once the wood is prepped, it is loaded into the kiln. The kiln is designed to control temperature, humidity, and airflow to facilitate rapid evaporation of moisture from the wood.
- Drying Schedule: The kiln operates on a drying schedule, which specifies the time, temperature, and humidity levels at different stages of the drying process. This schedule is determined based on the species of wood and desired moisture content.
- Monitoring and Control: Throughout the drying process, the kiln’s sensors and controls monitor and adjust temperature and humidity levels to ensure optimal drying conditions. This helps prevent drying defects such as warping, checking, or case hardening.
- Final Moisture Content: Once the drying process is complete, the wood is tested to ensure it has reached the desired moisture content. This is done using a moisture meter, and the wood is considered dry when it reaches the recommended moisture content for woodworking.
- Resting and Conditioning: After kiln drying, the wood is typically allowed to rest and acclimate to the surrounding environment. This helps reduce any remaining stress in the wood and allows it to stabilize before it is used in woodworking projects.
Kiln drying offers several advantages over air drying. It significantly reduces the drying time, allowing wood to be ready for use in a matter of weeks rather than months or years. Kilns also provide better control over the drying process, resulting in more consistent and predictable outcomes. Furthermore, kiln drying can effectively eliminate insects, mold, and fungi that can harm the wood.
However, it is important to note that kiln drying requires specialized equipment and energy consumption, making it more costly compared to air drying. Additionally, rapid drying can sometimes lead to internal stresses in the wood, which may require additional conditioning or treatment before using it in woodworking projects.
Now that we have explored the two main methods of drying wood, let’s look at the typical drying time required for different types of wood.
Wood can take anywhere from a few weeks to several months to dry for woodworking, depending on the species and thickness. To speed up the process, you can use a kiln or air-dry the wood in a well-ventilated area.
Read more: How Long Does It Take For A Driveway To Dry
Drying Time for Different Types of Wood
The drying time for wood can vary depending on the type of wood species. Some wood species dry faster, while others may require more time due to their density and moisture content. Here are some general guidelines for the drying time of common wood types:
- Softwoods: Softwoods like pine, spruce, and cedar tend to dry faster compared to hardwoods. These woods typically have a lower density and higher initial moisture content, which allows them to dry more quickly. Softwoods can typically be air dried in 6 to 12 months.
- Hardwoods: Hardwoods such as oak, walnut, and maple have a higher density and lower initial moisture content, which makes them slower to dry compared to softwoods. Depending on the thickness of the wood and the specific species, hardwoods can take anywhere from several months to a few years to fully dry.
- Exotic Woods: Exotic woods like teak, mahogany, and ebony can have unique drying characteristics. These woods often have higher oil content, which can slow down the drying process. Exotic woods may require specialized drying techniques and can take longer to reach the desired moisture content.
It’s important to note that the drying time mentioned above is a general estimate and can vary based on several factors such as board thickness, initial moisture content, and drying methods used. Monitoring the wood’s moisture content using a moisture meter is crucial to determine when it has reached the desired level for woodworking.
In addition to the type of wood, it’s essential to consider the size and thickness of the wood boards when estimating drying time. Thicker boards will take longer to dry compared to thinner boards because the moisture has to travel a greater distance to the surface.
Now that we have a better understanding of typical drying times for different types of wood, let’s explore some useful tips for properly drying wood for woodworking projects.
Tips for Properly Drying Wood for Woodworking
Properly drying wood is crucial for ensuring the quality and stability of woodworking projects. Here are some valuable tips to help you effectively dry wood for your woodworking endeavors:
- Start with Properly Seasoned Wood: Using wood that has been properly seasoned or dried before starting the drying process can significantly reduce drying time and minimize the risk of defects. Purchase or acquire wood that has already gone through the initial drying stage.
- Prepare the Wood: Remove the bark, excess branches, and debris from the wood before drying. This allows for more efficient drying and reduces the risk of mold and insect infestation.
- Control the Environment: Ensure the wood is stored in a well-ventilated area with good airflow. This will help facilitate the drying process by allowing the moisture to evaporate from the wood more effectively.
- Use Stickers or Spacers: Place stickers or spacers between the wood boards to create even spacing and promote airflow. This prevents the boards from sticking together and ensures uniform drying.
- Monitor Moisture Content: Regularly check the moisture content of the wood using a moisture meter. This will help you determine when the wood has reached the desired moisture content for woodworking.
- Allow Sufficient Drying Time: Patience is key when it comes to drying wood. Depending on the type of wood and the drying method used, it can take anywhere from a few weeks to several months or even years for the wood to reach the appropriate moisture content.
- Regularly Rotate the Wood: Rotate the wood periodically during the drying process to ensure even drying. This helps prevent uneven moisture distribution and minimizes the risk of warping or twisting.
- Protect from the Elements: Shield the wood from direct exposure to rain, sunlight, and extreme temperature fluctuations. Cover the wood with a waterproof tarp or store it in a covered area to prevent damage during the drying process.
- Consider Kiln Drying: If time is a constraint or you need to dry wood in regions with unfavorable weather conditions, kiln drying can be a viable option. Kiln drying offers faster and more controlled drying, ensuring consistent results.
Following these tips will help you dry wood effectively, reducing the risk of defects and ensuring the wood is ready to be used in your woodworking projects.
However, there are some common mistakes you should avoid during the wood drying process to ensure optimal results, which we will discuss in the next section.
Common Mistakes to Avoid in Wood Drying Process
When it comes to drying wood for woodworking projects, there are some common mistakes that can lead to issues with the wood’s quality and stability. By avoiding these mistakes, you can ensure a successful wood drying process. Here are some common errors to watch out for:
- Rushing the Drying Process: Trying to accelerate the drying process by increasing temperature or airflow can lead to stress, warping, and cracking in the wood. It’s important to be patient and allow the wood to dry gradually to minimize these issues.
- Insufficient Airflow: Inadequate airflow can prolong the drying process and increase the risk of mold and mildew growth. Make sure the wood is properly stacked with adequate space for airflow between the boards.
- Stacking Wood Improperly: Incorrectly stacking the wood can lead to uneven drying and increased risk of warping. Use stickers or spacers to create even spacing between the boards and ensure proper air circulation.
- Ignoring Moisture Content: Failing to monitor and measure the moisture content of the wood during the drying process can lead to over-drying or using wood with high moisture content. Regularly use a moisture meter to track the wood’s progress and determine when it has reached the desired moisture content.
- Exposing Wood to Extreme Conditions: Direct exposure to rain, sunlight, or extreme temperatures can damage the wood and hinder the drying process. Protect the wood by covering it with a waterproof tarp or storing it in a covered area.
- Not Acclimating the Wood: After the wood has dried, it is essential to allow it to acclimate or rest in the environment where it will be used. This helps reduce any remaining stress in the wood and ensures stability in your woodworking projects.
- Using Wet or Undried Wood: Incorporating wood into your woodworking projects before it has adequately dried can lead to issues such as warping, shrinking, and joint failure. Make sure the wood is properly dried before using it for your projects.
- Ignoring Wood Species and Thickness: Different wood species and thicknesses have varying drying characteristics. It’s important to consider these factors when estimating drying time and adjusting the drying process accordingly.
- Not Following Manufacturer Guidelines: If using a kiln drying method, it is important to follow the manufacturer’s guidelines and recommended drying schedules. Deviating from these guidelines can result in subpar drying outcomes.
Avoiding these common mistakes will help ensure a successful wood drying process, resulting in high-quality, stable wood that is ready for use in your woodworking projects.
Now that we have covered the common mistakes to avoid, let’s summarize the key points we have discussed.
Conclusion
Properly drying wood is a critical step in the woodworking process, as it directly affects the quality, stability, and durability of your projects. Whether you choose to air dry or kiln dry your wood, it’s essential to understand the factors that affect drying time and take the necessary precautions to ensure successful results.
We explored the factors that influence wood drying time, such as the type of wood, initial moisture content, board thickness, ambient conditions, and drying methods. Understanding these factors allows you to make informed decisions and tailor the drying process to achieve optimal results.
We also discussed the air drying process, which is a natural and cost-effective method that requires proper airflow and protection from the elements. Additionally, we explored the kiln drying process, which offers faster drying times and more controlled conditions, but at a higher cost.
Knowing the typical drying time for different types of wood, as well as the importance of wood moisture content, helps you determine when the wood is ready for woodworking projects. Additionally, we shared valuable tips to properly dry wood, such as using stickers or spacers, monitoring moisture content, and ensuring sufficient airflow.
To avoid common mistakes in the wood drying process, it’s important to be patient, avoid rushing the drying process, and protect the wood from extreme conditions. Acclimating the wood and using properly seasoned wood are also essential for successful results.
In conclusion, taking the time and care to properly dry wood for woodworking projects is crucial for achieving the best possible outcomes. By understanding the factors that affect drying time, choosing the appropriate drying method, and following best practices, you can ensure that your wood is stable, durable, and ready to be transformed into remarkable creations.
Frequently Asked Questions about How Long Does It Take Wood To Dry For Woodworking
Was this page helpful?
At Storables.com, we guarantee accurate and reliable information. Our content, validated by Expert Board Contributors, is crafted following stringent Editorial Policies. We're committed to providing you with well-researched, expert-backed insights for all your informational needs.


0 thoughts on “How Long Does It Take Wood To Dry For Woodworking”