Articles
How To Clean Air Cooler Honeycomb
Modified: September 2, 2024
Discover effective ways to clean the honeycomb of your air cooler with these informative articles. Keep your air cooler running efficiently and enjoy fresh, clean air all year round.
(Many of the links in this article redirect to a specific reviewed product. Your purchase of these products through affiliate links helps to generate commission for Storables.com, at no extra cost. Learn more)
Introduction
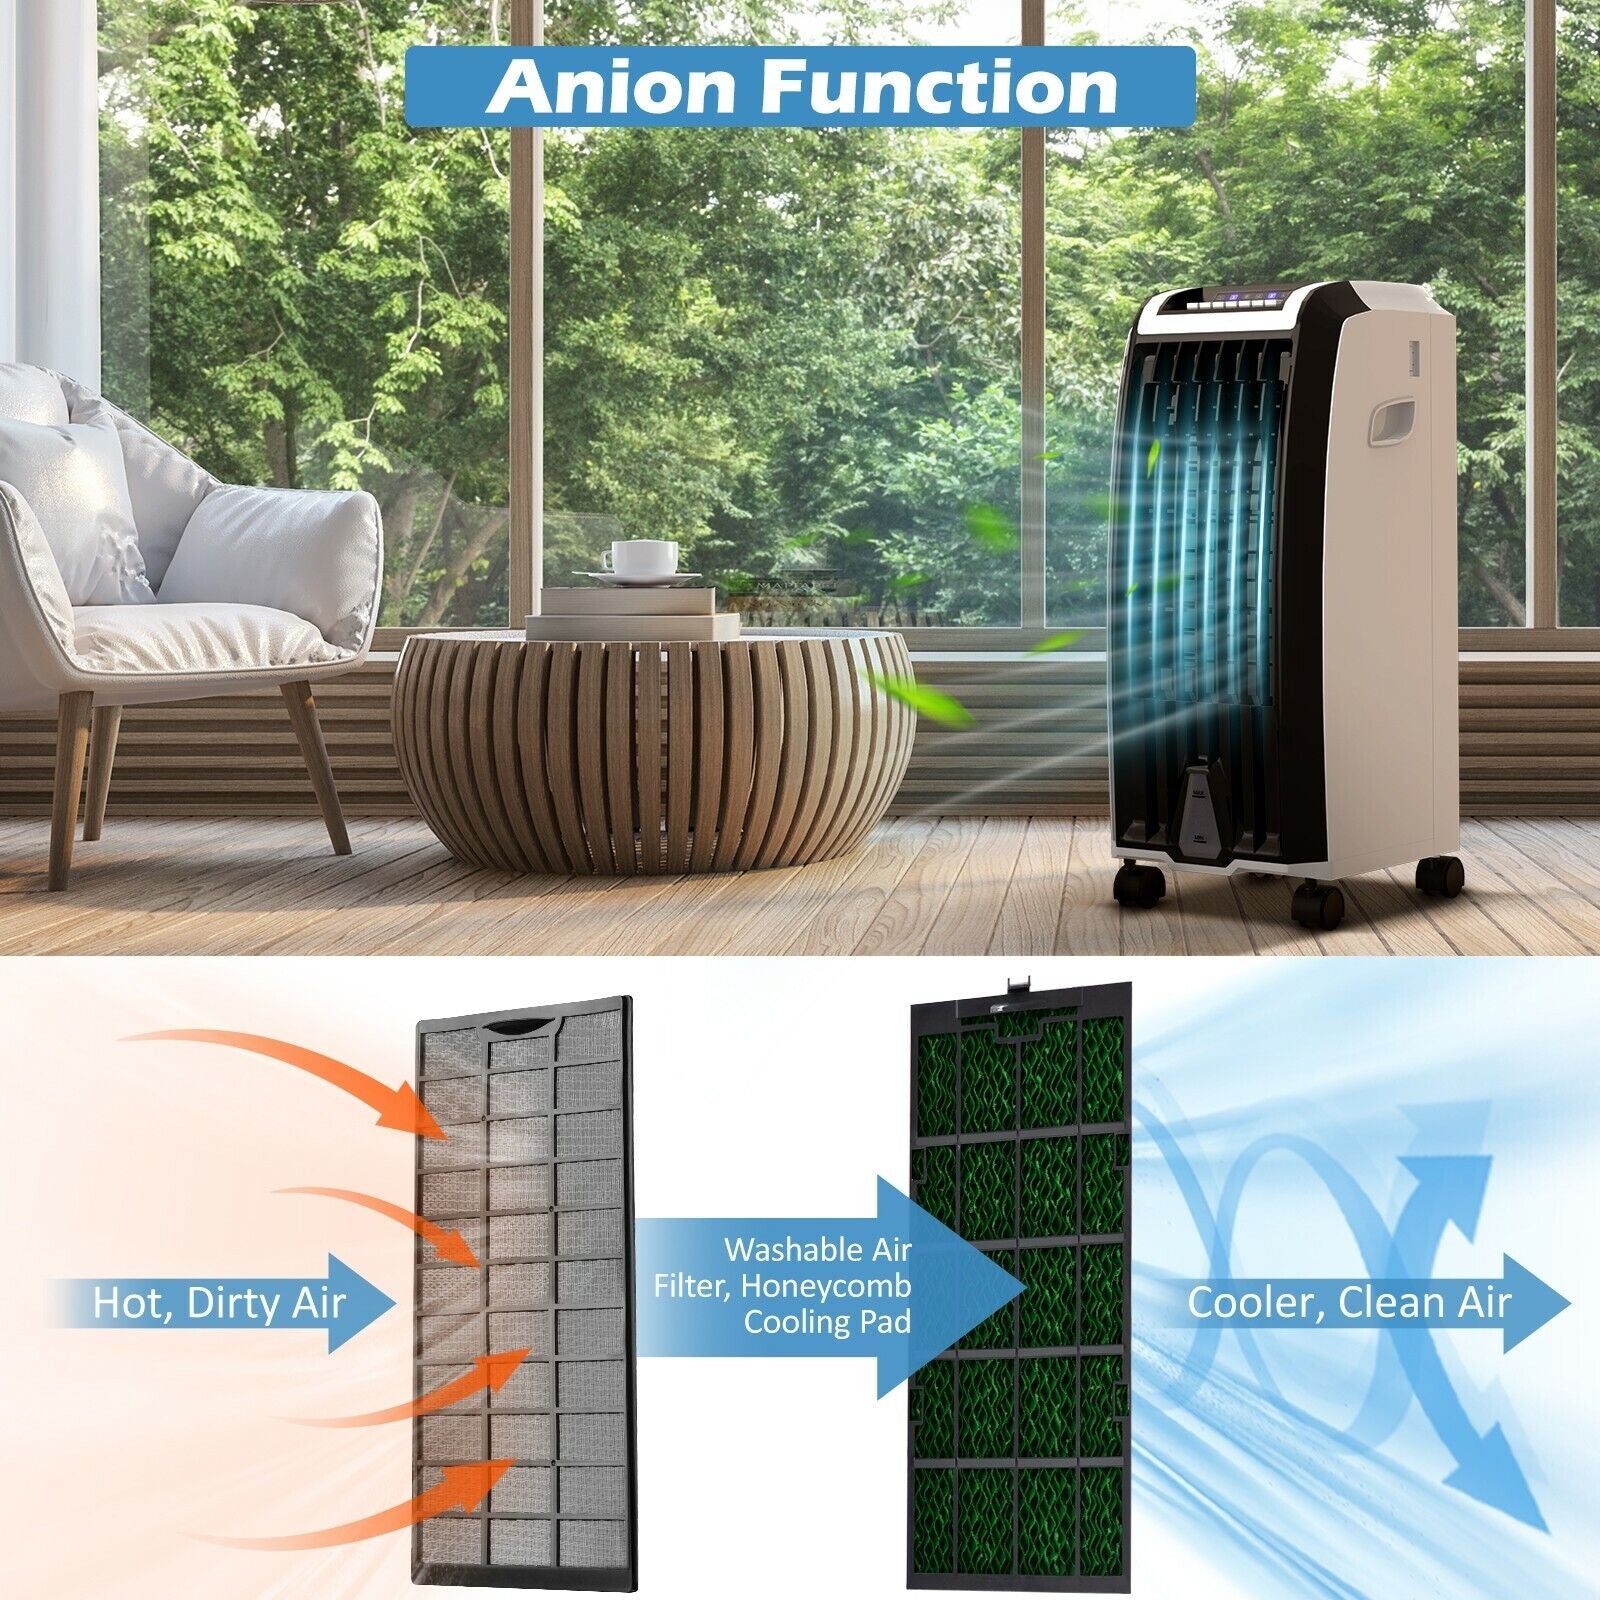
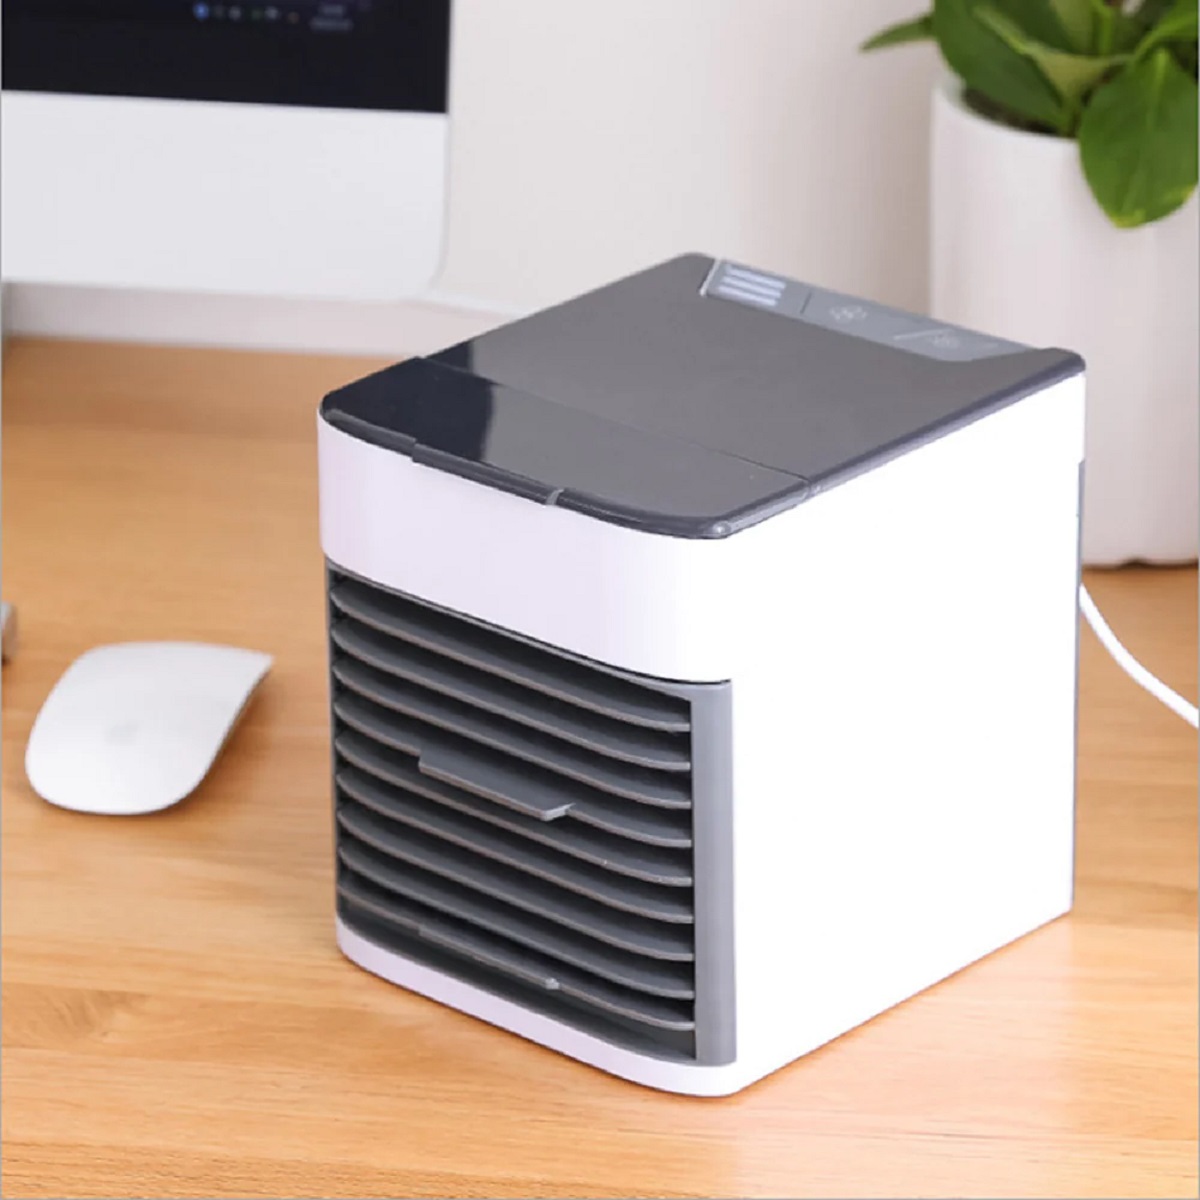
Welcome to our comprehensive guide on how to clean air cooler honeycomb! As the summer heat becomes more intense, many of us rely on air coolers to keep our homes and offices cool and comfortable. Air coolers, also known as evaporative coolers, work by drawing in warm air, passing it through damp honeycomb pads, and releasing cooler air.
However, over time, dust, dirt, and mineral deposits can accumulate on the honeycomb pads, affecting the performance and efficiency of the air cooler. Regularly cleaning the honeycomb pads is crucial to ensure that your air cooler continues to function optimally and provides you with clean and fresh air.
In this article, we will walk you through the step-by-step process of cleaning air cooler honeycomb pads. We will also discuss the tools and materials you’ll need, as well as helpful tips and precautions to follow during the cleaning process. So, let’s get started and learn how to effectively clean your air cooler honeycomb.
Key Takeaways:
- Regularly cleaning honeycomb air coolers is essential for improved cooling performance, enhanced air quality, extended lifespan, energy efficiency, and better odor control, ensuring a comfortable and healthy indoor environment.
- When cleaning honeycomb air coolers, gather the necessary tools and materials, follow the step-by-step instructions, and adhere to precautions and safety measures to effectively clean the unit and maintain optimal performance.
Read more: What Is an Air Cooler
Understanding Honeycomb Air Coolers
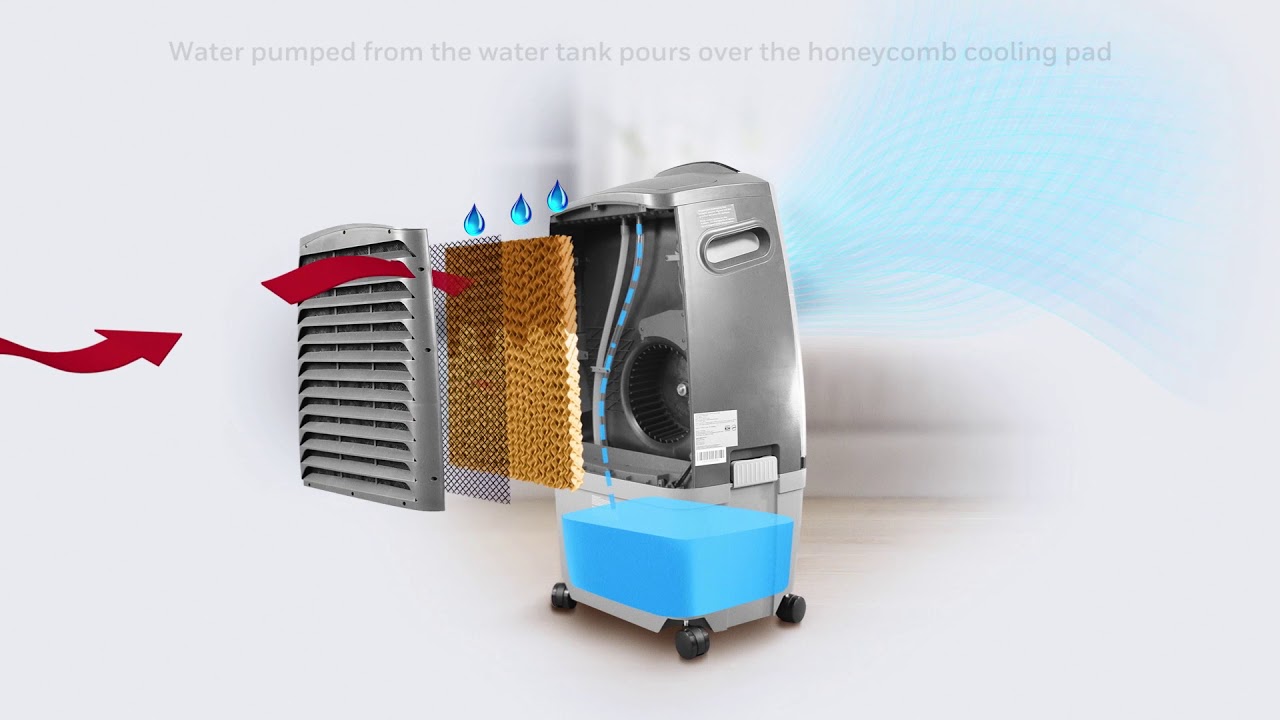
Honeycomb air coolers, also known as evaporative coolers, are a popular and energy-efficient cooling solution for many households and businesses. They work on the principle of evaporation, which is the process of converting liquid water into water vapor. This evaporation process helps to cool the surrounding air, providing a refreshing and comfortable environment.
The honeycomb pads in air coolers are made of a special material, often a cellulose or synthetic fiber, which is designed to absorb water and promote efficient evaporation. These pads are structured in a honeycomb pattern, allowing for a large surface area and maximizing contact with the air passing through them.
When the air cooler is turned on, a fan pulls warm air from the surroundings and passes it through the wet honeycomb pads. As the air passes through the moist pads, the water evaporates, absorbing heat from the air in the process. This causes the air to cool down significantly before being released back into the room.
Honeycomb air coolers are ideal for dry and arid climates, as they add moisture to the air while cooling it. They are also more environmentally friendly and cost-effective compared to traditional air conditioners, as they consume less energy and are easier to maintain.
However, despite their many advantages, honeycomb air coolers require regular maintenance to ensure optimal performance. Over time, the honeycomb pads can become clogged with dust, dirt, and mineral deposits, restricting airflow and reducing cooling efficiency. Therefore, it is essential to clean the honeycomb pads to maintain the effectiveness of your air cooler.
In the next section, we will discuss why cleaning honeycomb air coolers is important and how it can benefit you in the long run.
Why Cleaning Honeycomb Air Coolers is Important
Regularly cleaning honeycomb air coolers is crucial for several reasons. Let’s take a look at why cleaning your air cooler’s honeycomb pads should be a part of your maintenance routine:
1. Improved cooling performance: Over time, dust, dirt, and mineral deposits can build up on the honeycomb pads, hindering the airflow and reducing the cooling effectiveness of your air cooler. By cleaning the honeycomb pads, you can remove these deposits and ensure that your air cooler operates at its maximum cooling capacity.
2. Enhanced air quality: A dirty honeycomb pad can become a breeding ground for bacteria, mold, and other allergens. These contaminants can then be released into the air when the air cooler is in operation, compromising the air quality in your living or working space. Regular cleaning helps to eliminate these pollutants, providing you with cleaner and fresher air.
3. Extended lifespan: Cleaning the honeycomb pads regularly can prolong the lifespan of your air cooler. When the pads are clogged with dirt, the motor and other components of the air cooler have to work harder, putting unnecessary strain on the unit. By keeping the honeycomb pads clean, you reduce the risk of mechanical failures and costly repairs.
4. Energy efficiency: A clean honeycomb pad allows for better airflow and evaporation, resulting in improved energy efficiency. When the pads are dirty, the air cooler needs to work harder to achieve the desired cooling effect, leading to increased energy consumption. By cleaning the honeycomb pads, you can ensure that your air cooler operates efficiently, keeping your energy bills in check.
5. Better odor control: If the honeycomb pads are not cleaned regularly, they can develop a musty smell due to the growth of mold and bacteria. This unpleasant odor can be circulated throughout your space when the air cooler is in use. Regular cleaning helps to eliminate these odor-causing agents, ensuring that your surroundings smell fresh and clean.
As you can see, cleaning honeycomb air coolers is vital for maintaining optimal performance, improving air quality, extending the lifespan of the unit, saving energy, and eliminating unpleasant odors. Now that we understand the importance of cleaning, let’s move on to the tools and materials you’ll need for the cleaning process.
Tools and Materials Needed
Before you embark on the task of cleaning your honeycomb air cooler, it’s important to gather the necessary tools and materials. Having them on hand will ensure a smooth and efficient cleaning process. Here are the tools and materials you’ll need:
1. Gloves: It’s always a good idea to wear gloves while cleaning to protect your hands from dirt, dust, and any cleaning products that you may use.
2. Dust mask: A dust mask or respirator can help protect you from inhaling dust and debris while working with the air cooler.
3. Brush: A soft-bristle brush or a toothbrush can be used to gently scrub the honeycomb pads and remove any dirt or debris lodged in them.
4. Water hose: A water hose with a gentle spray attachment will be useful for rinsing off the honeycomb pads and removing any loosened dirt or residue.
5. Bucket: You’ll need a bucket filled with clean water. This will be used for soaking the honeycomb pads and rinsing out the brush or cloth during the cleaning process.
6. Mild detergent or cleaner: A mild detergent or air cooler cleaner specifically designed for cleaning honeycomb pads can be used to remove stubborn stains or deposits.
7. Old cloth or sponge: An old cloth or sponge will come in handy for wiping down the exterior of the air cooler, removing any dirt or grime.
8. Towels or rags: You’ll need some towels or rags to dry the honeycomb pads and the exterior of the air cooler after cleaning.
Remember to always consult the manufacturer’s instructions for your specific air cooler model, as some may have additional or unique cleaning requirements.
Now that you have the necessary tools and materials ready, let’s move on to the step-by-step instructions for cleaning honeycomb air coolers.
Step-by-Step Instructions for Cleaning Honeycomb Air Coolers
Now that you have gathered all the necessary tools and materials, let’s dive into the step-by-step process of cleaning honeycomb air coolers:
Step 1: Turn off and unplug the air cooler – Safety should always be a priority. Make sure the air cooler is turned off and unplugged from the power source before starting the cleaning process.
Step 2: Remove the honeycomb pads – Depending on your air cooler model, you may need to unscrew or unclip the front panel to access the honeycomb pads. Carefully remove the pads from the air cooler.
Step 3: Shake off loose debris – Take each honeycomb pad and gently shake it to remove any loose dust or debris. This will help loosen any dirt or particles stuck in the pads.
Step 4: Soak the honeycomb pads – Fill a bucket with clean water and place the honeycomb pads in the bucket. Allow them to soak for about 15-20 minutes. This will help loosen stubborn dirt and stains.
Step 5: Scrub the honeycomb pads – Take a soft-bristle brush or toothbrush and gently scrub the honeycomb pads. Pay close attention to areas with heavy dirt or mineral deposits. Use a mild detergent or air cooler cleaner if necessary. Be careful not to apply too much pressure to avoid damaging the pads.
Step 6: Rinse the honeycomb pads – Use a gentle spray attachment on a water hose to thoroughly rinse the honeycomb pads. Remove any remaining soap or cleaner residue. Ensure that the water flows through the pads from top to bottom, effectively cleaning away all the dirt and debris.
Step 7: Dry the honeycomb pads – Once rinsed, gently shake off any excess water from the honeycomb pads. Place them on a clean towel or hang them in a well-ventilated place to air dry completely. Ensure that the pads are completely dry before reassembling them into the air cooler.
Step 8: Clean the exterior of the air cooler – While the honeycomb pads are drying, use an old cloth or sponge to wipe down the exterior of the air cooler. Remove any dirt, dust, or grime from the housing and fan blades. Pay attention to any vents or openings where air passes through.
Step 9: Reassemble and restart the air cooler – Once the honeycomb pads are completely dry, carefully place them back into the air cooler. Ensure they are properly aligned and secured. Reattach the front panel if necessary. Plug in and turn on the air cooler.
Congratulations! You have successfully cleaned your honeycomb air cooler, and it is now ready to provide you with efficient cooling and clean air.
Now that you’ve learned how to clean your honeycomb air cooler, let’s delve into some additional tips and tricks to make the cleaning process more efficient and effective.
To clean air cooler honeycomb, mix equal parts water and vinegar, then soak the honeycomb in the solution for 30 minutes. Gently scrub with a brush, rinse, and let it dry before reassembling.
Read more: How Do You Clean Honeycomb Blinds
Tips and Tricks for Efficient Cleaning
Cleaning honeycomb air coolers can be a relatively simple process if you follow these tips and tricks to make it more efficient and effective:
1. Regular maintenance: Make it a habit to clean your honeycomb air cooler at least once every month, especially during the summer months when it’s in heavy use. Regular maintenance will prevent dirt and debris from building up and ensure optimal performance.
2. Use a soft brush: When scrubbing the honeycomb pads, use a soft-bristle brush or toothbrush to avoid damaging the delicate material. Avoid using wire brushes or abrasive scrubbers that may tear or degrade the pads.
3. Be gentle: Handle the honeycomb pads with care while cleaning and avoid bending or twisting them. Handle them by the edges to prevent any damage to the structure.
4. Follow manufacturer’s instructions: Refer to the manufacturer’s guidelines and instructions specifically meant for your air cooler model. These instructions may provide specific cleaning instructions and precautions that are tailored to your particular unit.
5. Keep the area well-ventilated: Ensure that there is proper ventilation in the area where you’re cleaning the honeycomb pads. This will help in the drying process and prevent the growth of mold or mildew.
6. Use specialized cleaners: If you find stubborn stains or mineral deposits on the honeycomb pads, consider using air cooler cleaner or mild detergent specifically designed for cleaning such pads. These cleaners are formulated to effectively remove tough deposits without damaging the pads.
7. Inspect for damage: While cleaning, take the opportunity to inspect the honeycomb pads for any signs of damage or wear. If you notice tears, holes, or other significant damage, it may be necessary to replace the pads to maintain the optimal performance of the air cooler.
8. Don’t forget the exterior: While the main focus is on cleaning the honeycomb pads, don’t neglect the exterior of the air cooler. Wipe down the housing, fan blades, and any vents or openings to ensure proper airflow and prevent dust buildup.
Remember, regular and thorough cleaning of your honeycomb air cooler will not only improve its performance but also extend its lifespan. By following these tips and tricks, you’ll be able to maintain a clean and efficient air cooler that provides cool and refreshing air throughout the summer.
Now, let’s address some common questions and concerns related to cleaning honeycomb air coolers.
Precautions and Safety Measures
When cleaning honeycomb air coolers, it is important to take certain precautions and safety measures to ensure your well-being and prevent any potential damage. Here are some key precautions to keep in mind:
1. Turn off and unplug: Always turn off and unplug the air cooler from the power source before starting the cleaning process. This will prevent any electrical accidents or shocks while working on the unit.
2. Wear protective gear: Protect your hands by wearing gloves to avoid direct contact with dirt, grime, or cleaning solutions. Additionally, consider wearing a dust mask or respirator to prevent inhalation of dust or debris while cleaning.
3. Follow manufacturer’s instructions: Read and follow the manufacturer’s instructions and guidelines specific to your air cooler model. This includes recommendations for cleaning, maintenance, and any safety precautions unique to your device.
4. Use gentle cleaning methods: When cleaning the honeycomb pads, use a soft brush or toothbrush and gentle scrubbing to avoid damaging the delicate material. Applying excessive force or using abrasive cleaning tools can result in tears or degradation of the pads.
5. Avoid harsh chemicals: Unless specified by the manufacturer, avoid using harsh chemicals or strong cleaning agents. These can cause damage to the honeycomb pads or other components of the air cooler. Stick to mild detergents or cleaners designed specifically for air coolers, if necessary.
6. Ensure proper ventilation: Clean the honeycomb pads in a well-ventilated area to avoid inhaling any dust or cleaning fumes. Adequate ventilation will aid in drying the pads and prevent the growth of mold or mildew.
7. Inspect electrical components: Before reassembling the air cooler, inspect the electrical components for any signs of damage or wear. Look for frayed wires, loose connections, or any other abnormalities. If you notice any issues, consult a professional for repair or replacement.
8. Take care when handling water: Be cautious with water while cleaning the honeycomb pads. Ensure that the water does not come into contact with the electrical components of the air cooler to avoid short circuits or damage. Keep the water away from any power cords or outlets.
By following these precautions and safety measures, you can protect yourself, prevent damage to your air cooler, and ensure a safe and effective cleaning process.
Now that we’ve covered the precautions, let’s address some commonly asked questions about cleaning honeycomb air coolers.
FAQs about Cleaning Honeycomb Air Coolers
Here are some frequently asked questions about cleaning honeycomb air coolers:
Q: How often should I clean my honeycomb air cooler?
A: It is recommended to clean the honeycomb pads of your air cooler at least once a month, especially during the summer months when the unit is used more frequently. Regular cleaning will help maintain optimal performance and prevent dirt and debris buildup.
Q: Can I clean the honeycomb pads with bleach?
A: It is not recommended to use bleach or harsh chemicals to clean the honeycomb pads. These chemicals can damage the pads and shorten their lifespan. Stick to mild detergents or air cooler cleaners specifically designed for cleaning honeycomb pads.
Q: Can I clean the honeycomb pads in a washing machine?
A: No, you should not clean the honeycomb pads in a washing machine. The delicate nature of the pads may not withstand the agitation and can result in tears or damage to the material. It is best to clean them manually using the steps outlined earlier.
Q: Can I use a pressure washer to clean the honeycomb pads?
A: It is not recommended to use a pressure washer to clean the honeycomb pads. The high pressure can damage the pads and compromise their effectiveness. Stick to gentle rinsing using a water hose with a spray attachment.
Q: How can I prevent mineral deposits from building up on the honeycomb pads?
A: To prevent mineral deposits, it is advisable to use distilled or demineralized water in your air cooler. Tap water often contains minerals that can accumulate on the pads over time. Regularly flushing the pads with clean water and using a water treatment additive can also help minimize mineral buildup.
Q: Can I clean the honeycomb pads without removing them?
A: While it is best to remove the honeycomb pads for a thorough cleaning, you can perform a surface cleaning without removing them. Use a vacuum cleaner with a brush attachment to gently remove any loose dirt or debris from the exterior of the pads.
Q: What should I do if my honeycomb pads are damaged?
A: If you notice tears, holes, or significant damage to the honeycomb pads, it is best to replace them. Damaged pads can affect the airflow and cooling performance of the air cooler. Contact the manufacturer or a professional technician to find and install the appropriate replacement pads for your specific air cooler model.
These are some common questions and answers related to cleaning honeycomb air coolers. If you have any specific concerns or questions about your particular air cooler, refer to the manufacturer’s instructions or seek professional assistance.
Now, let’s wrap up our guide on how to clean air cooler honeycomb.
Conclusion
Cleaning the honeycomb pads of your air cooler is an essential maintenance task that should be performed regularly to ensure optimal performance and prolong the lifespan of the unit. By following the step-by-step instructions outlined in this guide and adhering to the recommended precautions and safety measures, you can effectively clean your honeycomb air cooler and enjoy the benefits of clean and refreshing air.
Regular cleaning of the honeycomb pads helps improve cooling performance, enhance air quality, extend the lifespan of the air cooler, promote energy efficiency, and prevent unpleasant odors. By removing dirt, dust, and mineral deposits from the pads, you can ensure that your air cooler operates at its best, providing you with a comfortable and healthy indoor environment.
Remember to gather the necessary tools and materials, such as gloves, brushes, water hose, bucket, mild detergent, and towels, before starting the cleaning process. Take care to follow the manufacturer’s instructions for your specific air cooler model and handle the honeycomb pads with gentle care to avoid any damage.
Additionally, practicing regular maintenance, such as monthly cleaning and inspections for any damage or wear, will help you keep your air cooler in top condition and avoid costly repairs or replacements.
We hope that this comprehensive guide has provided you with valuable insights and knowledge on how to effectively clean your honeycomb air cooler. By incorporating these cleaning practices into your maintenance routine, you can enjoy the cool and fresh air that your air cooler provides, all summer long.
Stay cool, comfortable, and breathe easy with a clean and well-maintained honeycomb air cooler!
Now that you're well-versed in keeping your honeycomb air cooler in tip-top shape, why not broaden your knowledge with our next guide on air cooling systems? If you're curious about different types of cooling units, our detailed article on "What Is An Evaporative Air Cooler" offers a deep dive into the specifics, benefits, and operation of evaporative coolers. You'll gain insights on how these devices provide efficient cooling, making them a smart choice for eco-conscious homeowners.
Frequently Asked Questions about How To Clean Air Cooler Honeycomb
Was this page helpful?
At Storables.com, we guarantee accurate and reliable information. Our content, validated by Expert Board Contributors, is crafted following stringent Editorial Policies. We're committed to providing you with well-researched, expert-backed insights for all your informational needs.


0 thoughts on “How To Clean Air Cooler Honeycomb”