Articles
How To Cook A Steak On An Indoor Grill
Modified: August 17, 2024
Discover mouthwatering articles on how to cook a perfect steak on your indoor grill. Explore expert tips and techniques to elevate your grilling game.
(Many of the links in this article redirect to a specific reviewed product. Your purchase of these products through affiliate links helps to generate commission for Storables.com, at no extra cost. Learn more)
Introduction
Welcome to the world of indoor grilling, where you can enjoy the delicious taste of a perfectly cooked steak without having to brave the elements or fire up a traditional outdoor grill. With the right techniques and equipment, you can achieve that charred, juicy, and tender steak right in the comfort of your own kitchen.
Indoor grills offer convenience and versatility, making them an ideal option for those who want to cook a steak without the hassle of outdoor grilling. Whether you live in an apartment, have limited outdoor space, or simply prefer the convenience of cooking indoors, an indoor grill can be the perfect solution.
In this article, we will guide you through the process of cooking a steak on an indoor grill. From choosing the right grill and selecting the perfect cut of meat to seasoning, cooking, and serving, we will cover it all. So, let’s dive in and discover the secrets to preparing a mouthwatering steak that will impress your family and friends.
But before we get started, it’s important to note that the success of your indoor grilling adventure largely depends on the quality of the grill and the cut of steak you choose. So, let’s first explore the factors to consider when selecting the right indoor grill.
Key Takeaways:
- Enjoy the convenience of indoor grilling with the right techniques and equipment for perfectly cooked steaks, all from the comfort of your own kitchen.
- Elevate your grilling game and create memorable moments with family and friends by mastering the art of indoor grilling and serving up delicious, perfectly cooked steaks.
Read more: How To Cook Steak On Indoor Grill
Choosing the Right Indoor Grill
When it comes to indoor grilling, having the right grill is essential for achieving the best results. Here are some factors to consider when choosing the perfect indoor grill:
- Size and Capacity: Determine the size of the grill that will best suit your needs. Consider how much cooking space you require and whether you plan to cook for just yourself or for a larger group. Additionally, consider the dimensions of your kitchen or designated grilling area to ensure that the grill fits comfortably.
- Type of Grill: There are different types of indoor grills available, including electric, stovetop, and countertop grills. Electric grills are popular due to their ease of use and temperature control features. Stovetop grills offer a traditional grilling experience, often used on gas or electric stovetops. Countertop grills are versatile and can be used for grilling, as well as other cooking methods like panini pressing.
- Heat Control: Look for an indoor grill that offers precise temperature control. This will allow you to adjust the heat according to the specific requirements of different cuts of steak and the desired level of doneness.
- Non-Stick Surface: A non-stick surface is crucial for easy cleaning and preventing the steak from sticking to the grill. Look for grills with a high-quality non-stick coating or removable grill plates that can be easily cleaned.
- Easy Maintenance: Consider the ease of cleaning and maintaining the grill. Look for grills that have removable parts that can be washed separately and are dishwasher safe.
- Additional Features: Some indoor grills come with additional features such as adjustable grates, built-in timers, and smokeless operation. Assess your needs and preferences to determine if these features are important to you.
Once you have narrowed down your options based on these factors, read reviews, compare prices, and choose a reputable brand that offers good customer support and warranty. Investing in a high-quality indoor grill will ensure that you can enjoy delicious steaks for years to come.
Now that you have the right indoor grill, it’s time to move on to the next step – selecting the perfect cut of steak.
Selecting the Perfect Cut of Steak
Choosing the right cut of steak is crucial for achieving a flavorful and tender result. Here’s a guide to help you select the perfect cut:
- Ribeye: Known for its marbling and rich flavor, the ribeye is a popular choice among steak lovers. It is tender, juicy, and packed with flavor.
- Tenderloin/Filet Mignon: This cut is prized for its tenderness and mild flavor. It is lean and buttery, making it an excellent choice for those who prefer a more delicate steak.
- New York Strip: Also known as a strip steak or sirloin, this cut is flavorful, juicy, and slightly leaner than a ribeye. It has a firmer texture and a good balance of marbling.
- T-Bone: The T-bone steak consists of two cuts – the tenderloin on one side of the bone and the strip steak on the other. It offers the best of both worlds with tender and flavorful meat.
- Porterhouse: Similar to the T-bone, the porterhouse steak is a larger version with a bigger portion of tenderloin. It is perfect for those who enjoy a combination of tender and well-marbled meat.
- Sirloin: The sirloin steak is leaner and slightly less tender than other cuts but still offers good flavor. It is a versatile cut that can be cooked to varying levels of doneness.
When selecting your steak, look for cuts that have consistent marbling, which adds flavor and tenderness. Choose cuts that are at least 1 inch thick to ensure juicy and well-cooked results. If possible, opt for steaks that are dry-aged or have been aged for a specific period, as this enhances the flavor and tenderness.
Consider your personal preferences for fat content, tenderness, and flavor when choosing the right cut of steak. It’s always a good idea to consult your local butcher or meat vendor for recommendations based on their expertise and the availability of the cuts you desire.
Now that you have selected the perfect cut, let’s move on to preparing the steak for cooking.
Preparing the Steak
Before you start cooking, it’s important to properly prepare the steak to ensure maximum flavor and tenderness. Follow these steps to prepare your steak:
- Thawing: If your steak is frozen, make sure to thaw it completely in the refrigerator. This process may take several hours or overnight, depending on the size of the steak. Avoid thawing at room temperature, as it can promote the growth of harmful bacteria.
- Trimming: Check the steak for any excess fat or silver skin, which can affect the texture and taste. Use a sharp knife to trim off any unwanted fat or connective tissue.
- Patting Dry: Before seasoning, pat the steak dry using paper towels. This step helps to ensure a better sear and prevents the meat from steaming instead of grilling.
- Bringing to Room Temperature: Allow the steak to come to room temperature for about 30 minutes before cooking. This allows for more even cooking and prevents the steak from being cold in the center.
By following these simple steps, you will ensure that your steak is ready to be seasoned and cooked to perfection. Speaking of seasoning, let’s talk about the next important step – seasoning the steak.
Seasoning the Steak
Seasoning your steak is a crucial step in enhancing its flavor and creating a delicious crust. Here are some tips for seasoning your steak:
- Salt: Liberally sprinkle both sides of the steak with kosher salt or sea salt. The salt helps to enhance the natural flavors of the meat and tenderize it.
- Pepper: Freshly ground black pepper adds a subtle heat and complements the savory flavors of the steak. Grind the pepper directly onto the steak or mix it with the salt before applying.
- Additional Seasonings: If desired, you can experiment with other seasonings such as garlic powder, onion powder, paprika, or dried herbs like thyme or rosemary. Just be mindful not to overpower the natural taste of the steak.
- Oil: Lightly brush both sides of the steak with a high smoke point oil such as canola or avocado oil. This helps to prevent sticking and aids in creating a flavorful and crispy crust.
Allow the seasoned steak to sit at room temperature for about 15-30 minutes before cooking. This allows the flavors to penetrate the meat and ensures more even cooking.
Now that your steak is properly seasoned and ready to go, it’s time to preheat your indoor grill.
Read more: How Long To Cook Steak On Indoor Grill
Preheating the Indoor Grill
Preheating your indoor grill is a crucial step to ensure that the steak cooks evenly and develops a beautiful sear. Follow these steps to preheat your indoor grill:
- Clean the Grill: Make sure the grill plates or grates are clean from any residue or debris. This ensures that the steak will cook evenly and prevents any unwanted flavors from affecting the taste.
- Plug in the Grill: Plug in the indoor grill and set it to the desired temperature. Different grills have different temperature settings, so consult the manufacturer’s instructions for the recommended preheating temperature for steak.
- Preheat for the Recommended Time: Allow the grill to preheat for the recommended time. This usually takes around 10-15 minutes, but it may vary depending on the specific grill model.
- Check the Temperature: After the preheating time has elapsed, check the temperature of the grill to ensure it has reached the desired level. For medium-rare to medium steaks, a grill temperature of around 400°F (200°C) works well. Adjust accordingly based on your preferred level of doneness.
Preheating the indoor grill ensures that the cooking surface is hot enough to sear the steak and lock in the juices. Now that your grill is preheated, it’s time to move on to the cooking techniques for indoor grilling.
Before cooking, make sure the steak is at room temperature. Pat it dry with paper towels to ensure a good sear. Season with salt and pepper just before grilling for the best flavor.
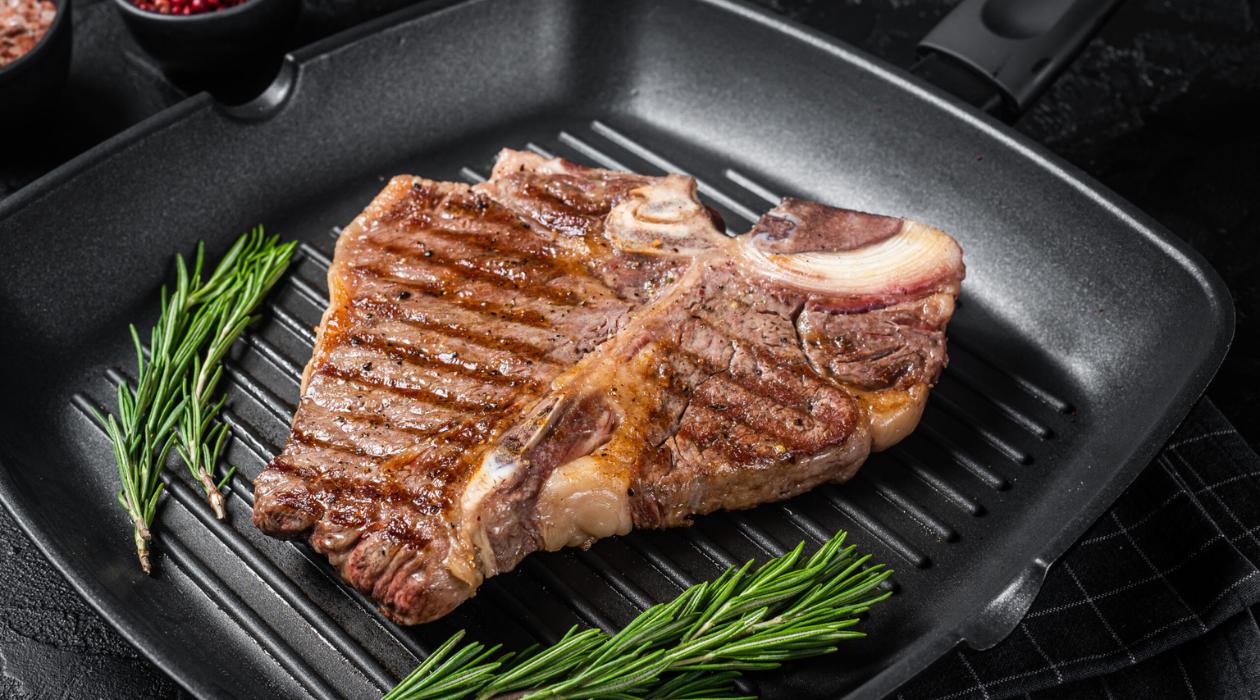
Cooking Techniques
When it comes to cooking a steak on an indoor grill, there are a few techniques you can use to achieve the desired level of doneness and create a mouthwatering crust. Here are some popular cooking techniques for indoor grilling:
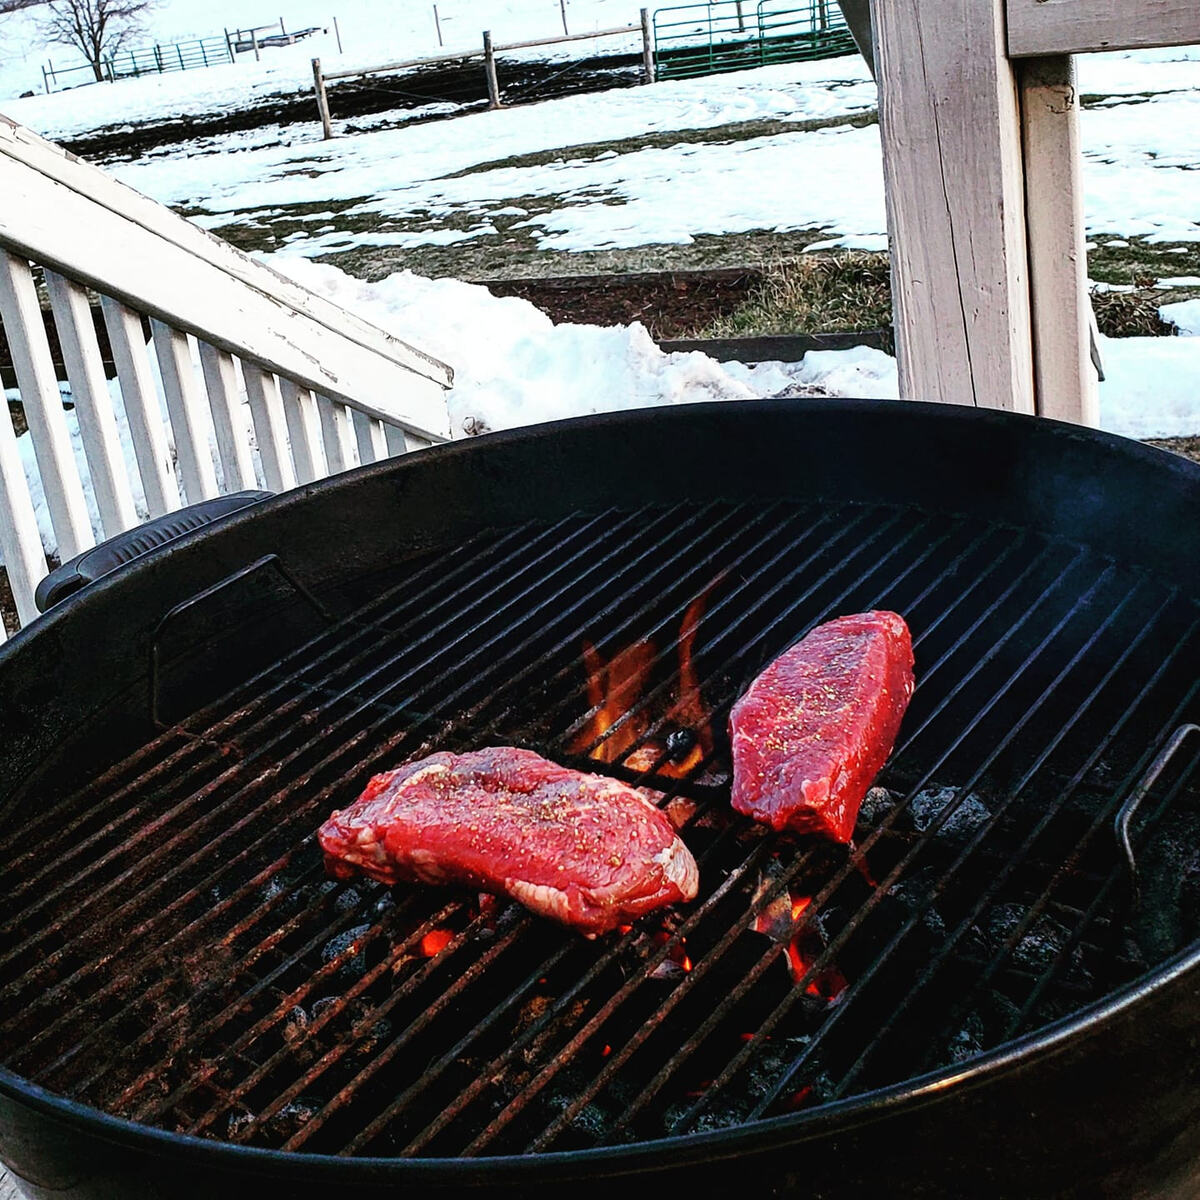
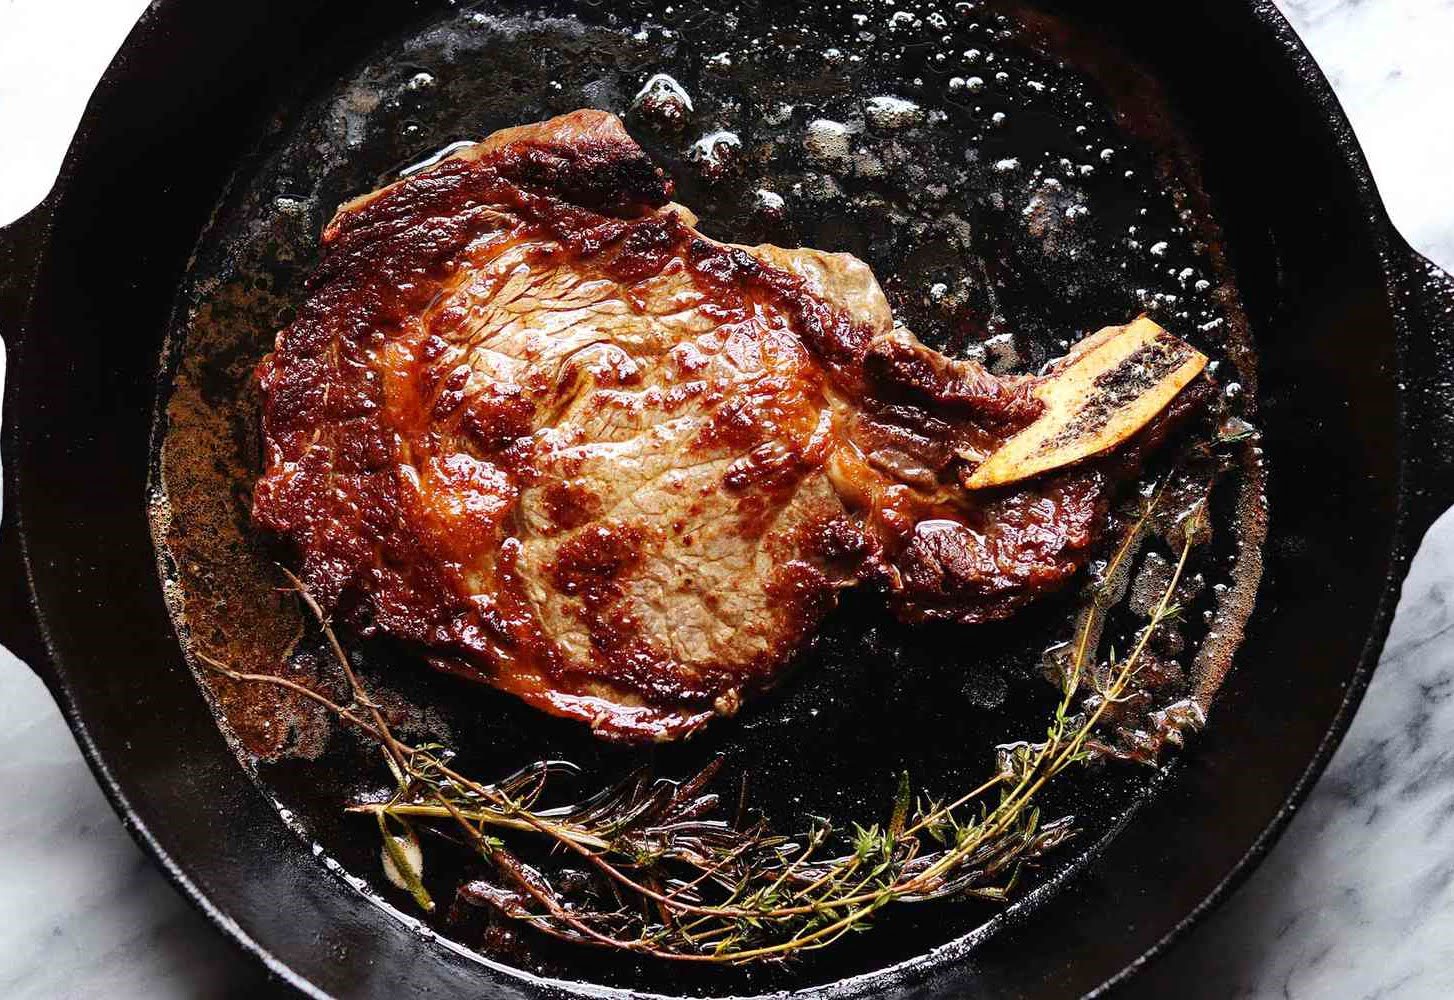
- Searing: Searing the steak involves cooking it on high heat for a short period of time to create a flavorful crust. Place the seasoned steak on the preheated grill and let it cook for a few minutes on each side until a golden brown crust forms.
- Reverse Sear: The reverse sear method involves cooking the steak at a lower temperature first and then finishing it off with a high-heat sear. This technique allows for more even cooking and results in a tender steak with a delicious sear.
- Direct Heat: Direct heat grilling involves cooking the steak directly over the heat source. This technique is great for thinner cuts of steak or when you prefer a faster cooking time. Flip the steak once halfway through the cooking process to ensure even browning.
- Indirect Heat: Indirect heat grilling involves cooking the steak away from the direct heat source. This method is ideal for thicker cuts of steak or when you want to cook the steak more slowly. Start by searing the steak on high heat and then move it to a cooler part of the grill to cook through.
Choose the cooking technique that best suits your preferences and the thickness of your steak. Remember to monitor the internal temperature of the steak using a meat thermometer to ensure it reaches your desired level of doneness.
Speaking of doneness, let’s take a look at the recommended cooking times for different levels of doneness.
Cooking Times for Different Levels of Doneness
The cooking time for your steak will vary depending on the thickness, cut, and desired level of doneness. Here are general guidelines for cooking times based on the level of doneness:
- Rare: For a rare steak, cook it on high heat for approximately 3-4 minutes per side. The internal temperature should register around 125°F (52°C). The steak will have a cool red center.
- Medium Rare: For a medium-rare steak, cook it on high heat for approximately 4-5 minutes per side. The internal temperature should register around 135°F (57°C). The steak will have a warm red center.
- Medium: For a medium steak, cook it on medium heat for approximately 5-6 minutes per side. The internal temperature should register around 145°F (63°C). The steak will have a warm pink center.
- Medium Well: For a medium-well steak, cook it on medium heat for approximately 6-7 minutes per side. The internal temperature should register around 155°F (68°C). The steak will have a slightly pink center.
- Well Done: For a well-done steak, cook it on medium heat for approximately 8 minutes per side. The internal temperature should register around 160°F (71°C) or higher. The steak will have no pinkness and be fully cooked.
Remember that these are just general guidelines, and the cooking time may vary depending on the thickness of the steak and the specific characteristics of your grill. It’s always a good idea to use a meat thermometer to ensure the steak reaches the desired internal temperature.
Once the steak is cooked to your desired level of doneness, it’s essential to let it rest before slicing.
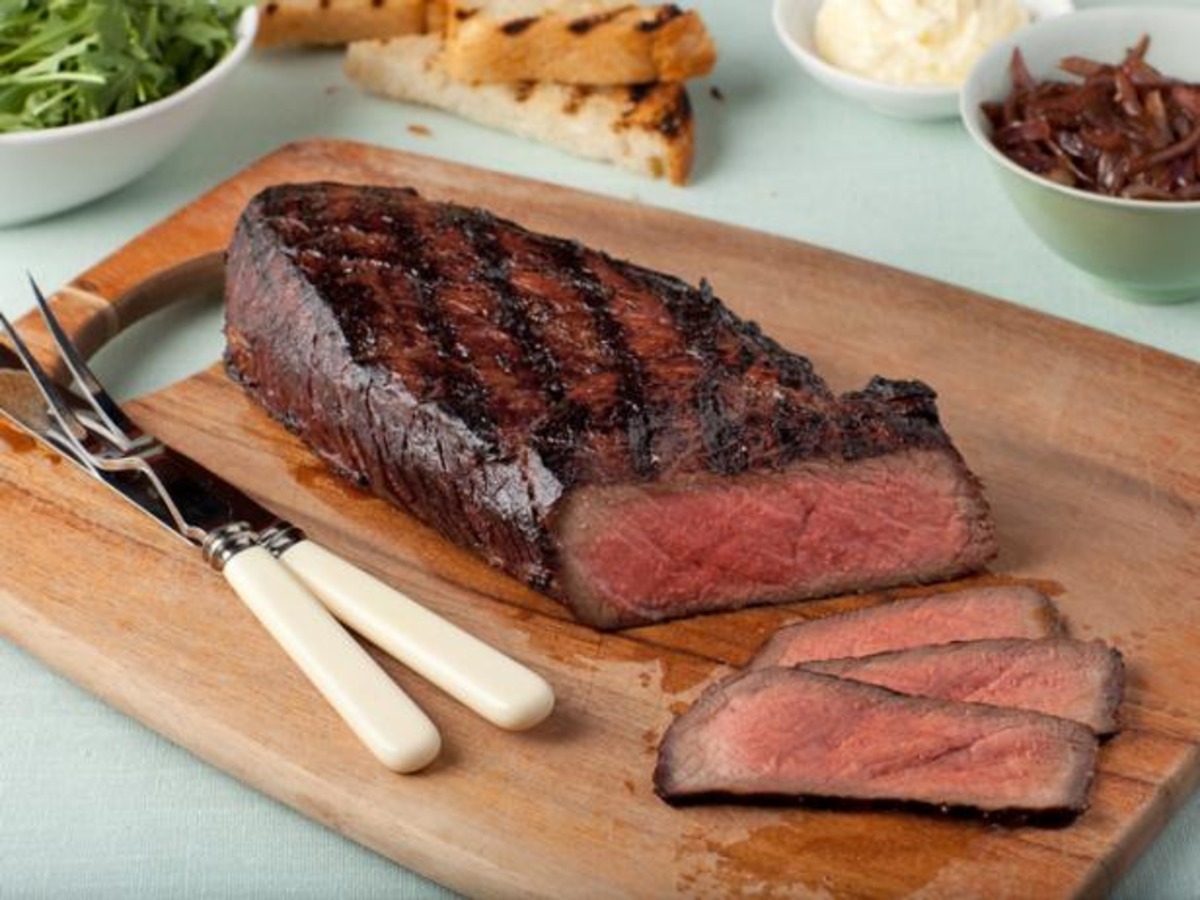
Resting and Slicing the Steak
Resting the steak after it’s cooked is a crucial step that allows the juices to redistribute, resulting in a tender and juicy steak. Here’s how to properly rest and slice your steak:
- Remove from the Grill: Carefully remove the steak from the grill using tongs or a spatula. Place it on a cutting board or a plate.
- Tent with Foil: Loosely tent the steak with aluminum foil to keep it warm. This helps to retain the heat and allows the residual heat to continue cooking the steak gently.
- Resting Time: Let the steak rest for about 5-10 minutes. This resting period allows the juices to redistribute throughout the meat, resulting in a more flavorful and tender steak.
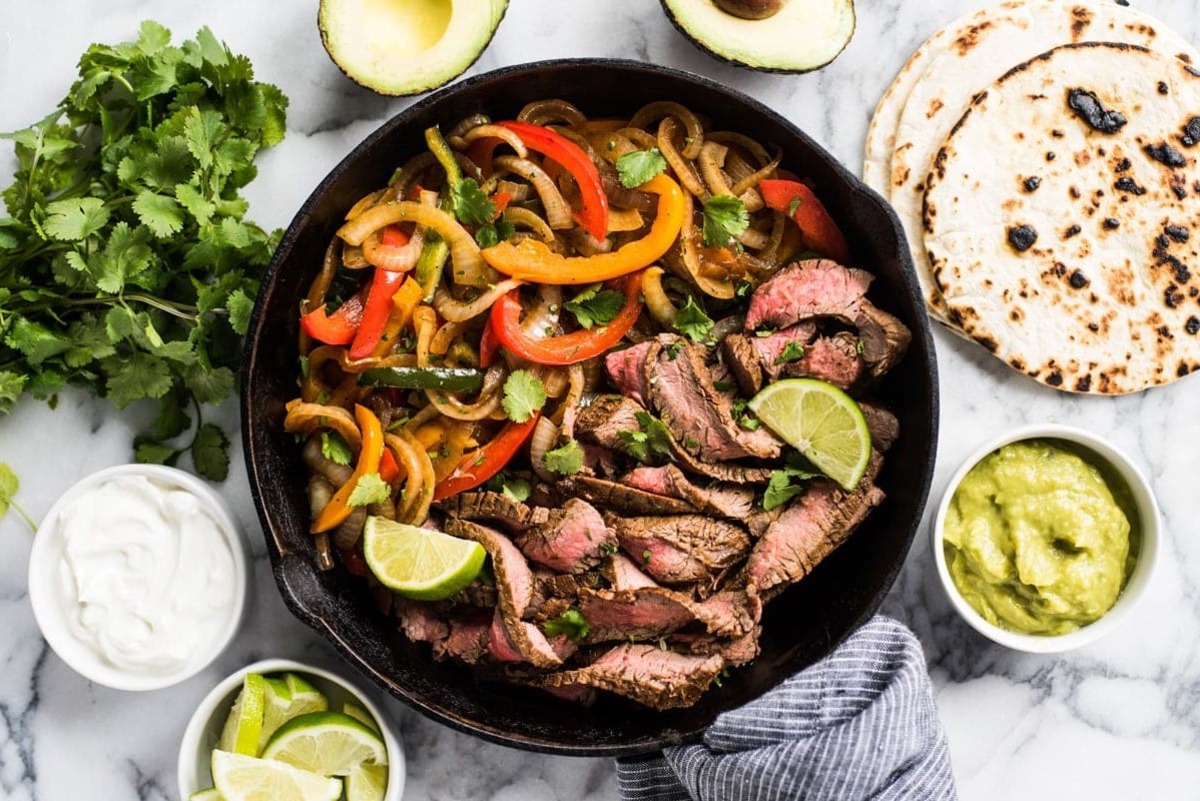
- Slicing: After the resting period, it’s time to slice the steak. Cut against the grain of the meat to ensure tenderness. The grain refers to the direction of the muscle fibers in the steak. Look for the lines running through the meat and cut perpendicular to those lines.
- Thickness of Slices: The thickness of the slices will depend on personal preference. Thinner slices are more suitable for tender cuts like filet mignon, while thicker slices work well for cuts with more texture, like ribeye or strip steak.
Remember to use a sharp knife for slicing to maintain the integrity of the meat and ensure clean cuts.
Now that your steak is beautifully sliced, it’s time to serve and enjoy your meticulously cooked masterpiece.
Serving and Enjoying your Perfectly Cooked Steak
Now that your perfectly cooked steak is ready, it’s time to serve it up and savor its delicious flavors. Here are some tips for serving and enjoying your steak:
- Plating: Place the slices of steak on a clean serving plate. Arrange them in an appealing manner, and consider garnishing with fresh herbs or a sprinkle of sea salt for an extra touch.
- Sauces and Accompaniments: While a well-cooked steak is delicious on its own, you can enhance the flavors with a variety of sauces or accompaniments. Classic options include a flavorful steak sauce, a tangy chimichurri, or a creamy garlic butter. Additionally, consider serving your steak with side dishes like roasted vegetables, mashed potatoes, or a crisp salad to create a balanced and satisfying meal.
- Enjoying the Steak: Take a moment to appreciate the aroma and visually appealing presentation of your beautifully cooked steak. Cut into a slice, savoring the tenderness and juiciness. Pay attention to the flavors, the seasoning, and the combination of textures in each bite.
- Pairing: Choose a beverage that complements the flavors of your steak. Classic options include a robust red wine like Cabernet Sauvignon or Malbec, a rich and malty beer, or even a refreshing mocktail for those who prefer a non-alcoholic option.
- Conversation and Company: Share the enjoyment of your perfectly cooked steak with family or friends. Engage in a lively conversation, reminisce, and create lasting memories over a meal that is sure to impress.
Remember, cooking a steak to perfection takes practice and experimentation. Fine-tune your techniques, adjust cooking times according to your preferences, and enjoy the process of mastering the art of indoor grilling.
Congratulations! Now that you know how to cook a steak on an indoor grill and serve it like a pro, it’s time to dive in and relish the amazing flavors of your perfectly cooked steak!
But the journey doesn’t end here—remember to clean and maintain your indoor grill to keep it in top shape for future grilling adventures.
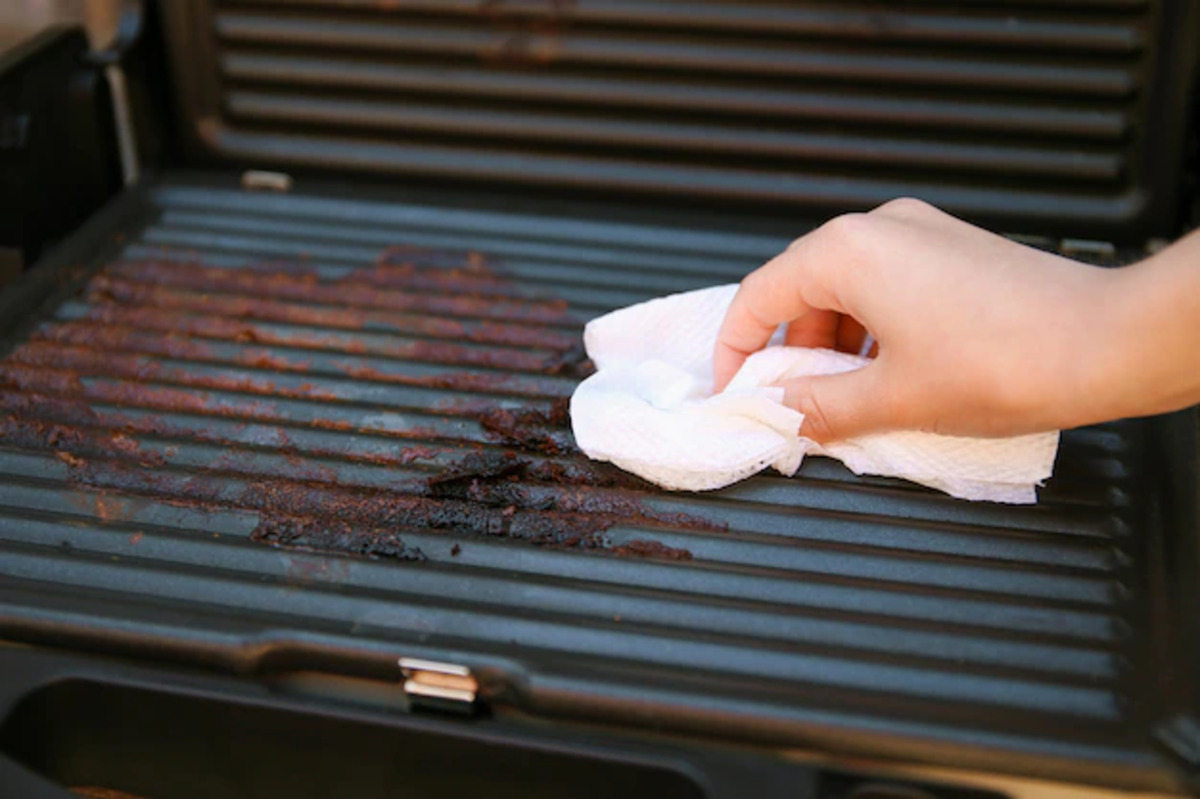
Cleaning and Maintaining your Indoor Grill
Proper cleaning and maintenance of your indoor grill are essential for its longevity and optimal performance. Here are some tips to help you keep your grill in top shape:
- Cooling Down: Before cleaning your indoor grill, ensure that it has cooled down completely. This will prevent any burns or accidents while handling the grill.
- Removable Parts: If your indoor grill has removable parts such as grill plates or drip trays, take them out and wash them separately. Follow the manufacturer’s instructions for cleaning these parts. Many grill plates are dishwasher safe, but it’s always best to check the specific guidelines.
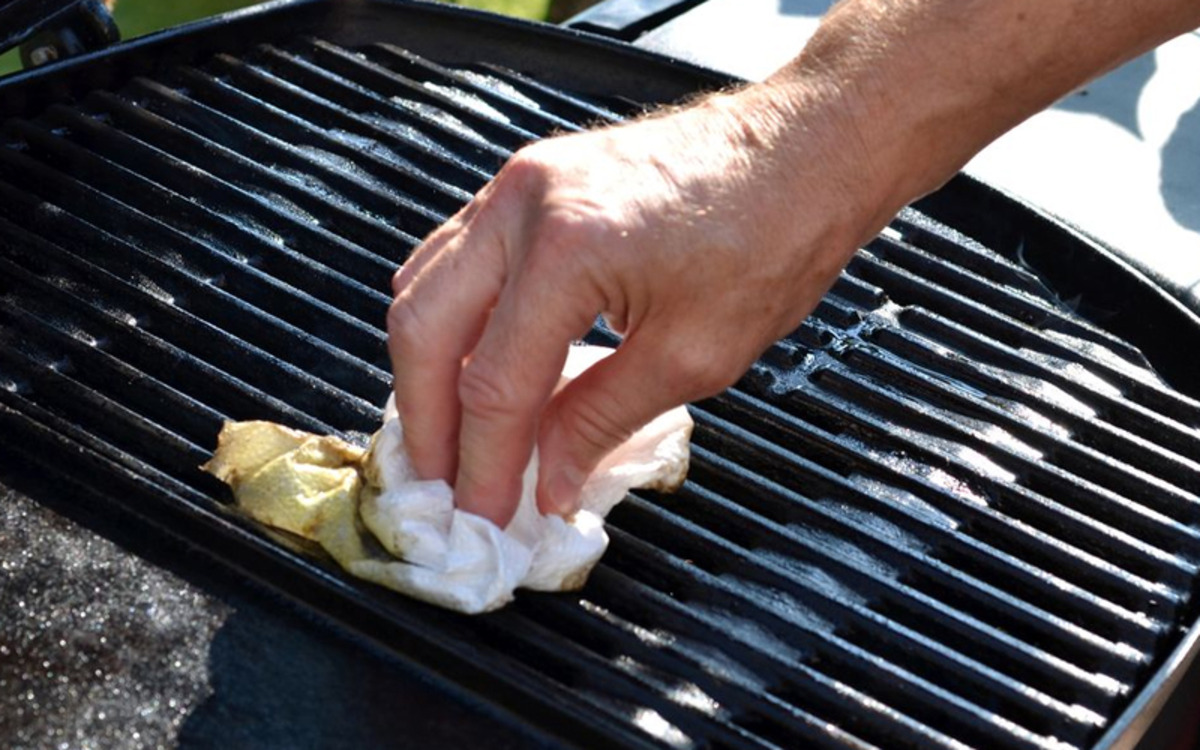
- Scraping Food Residue: Use a grill brush or a scraper to remove any food residue or charred bits from the grill plates or grates. This will make the cleaning process easier and prevent any unwanted flavors during future use.
- Warm Soapy Water: Fill a sink or basin with warm soapy water and submerge the grill plates or grates. Let them soak for a few minutes to loosen any stubborn food particles.
- Scrubbing: Scrub the grill plates or grates using a non-abrasive sponge or brush. Pay attention to any hard-to-reach areas and ensure that all surfaces are thoroughly cleaned.
- Rinsing and Drying: Rinse the grill plates or grates with clean water to remove any soap residue. Pat them dry with a clean towel or allow them to air dry completely before reassembling your indoor grill.
- Exterior Cleaning: Wipe down the exterior of your indoor grill with a damp cloth or sponge. Ensure that all surfaces are clean and free from grease or residue.
- Regular Maintenance: In addition to regular cleaning, it’s important to perform routine maintenance on your indoor grill. Check the manufacturer’s instructions for any specific maintenance tasks, such as lubricating moving parts or replacing worn-out components.
- Storage: If you are not using your indoor grill for an extended period, store it in a clean and dry place. Wrap any detachable parts in plastic or keep them in a sealed bag to prevent dust or grime from accumulating.
By following these cleaning and maintenance practices, you can ensure that your indoor grill stays in top condition and continues to provide delicious grilled meals for years to come.
Now that you have everything you need to know about cleaning and maintaining your indoor grill, it’s time to put your knowledge to use and enjoy the convenience of indoor grilling whenever you crave a perfectly cooked steak.
Happy grilling!
Conclusion
Cooking a steak on an indoor grill opens up a world of possibilities for enjoying deliciously grilled meat right from the comfort of your own kitchen. With the right techniques, equipment, and attention to detail, you can achieve perfectly cooked steaks that rival those cooked on an outdoor grill.
In this comprehensive guide, we have covered everything you need to know to cook a steak on an indoor grill. From choosing the right grill and selecting the perfect cut of steak to seasoning, preheating, and cooking techniques, we have walked you through each step of the process. Additionally, we have discussed the importance of resting and slicing the steak, serving and enjoying it, as well as cleaning and maintaining your indoor grill for future grilling adventures.
Remember, practice makes perfect! Experiment with different seasonings, cooking times, and techniques to find the perfect balance that suits your taste preferences. The more you cook steaks on your indoor grill, the better you will become at achieving the desired level of doneness and creating that perfect sear.
So, grab your favorite cut of steak, fire up your indoor grill, and dive into the flavorful world of indoor grilling. Whether you’re cooking for yourself, your family, or entertaining friends, the joy of savoring a perfectly cooked steak is incomparable. Enjoy the process, appreciate the flavors, and create memorable moments over a delicious meal.
Now that you have the knowledge and skills to cook a steak on an indoor grill, it’s time to unleash your culinary prowess and elevate your grilling game. So, get ready to impress and indulge in the succulent delight of a perfectly cooked steak!
Happy grilling!
Frequently Asked Questions about How To Cook A Steak On An Indoor Grill
Was this page helpful?
At Storables.com, we guarantee accurate and reliable information. Our content, validated by Expert Board Contributors, is crafted following stringent Editorial Policies. We're committed to providing you with well-researched, expert-backed insights for all your informational needs.


0 thoughts on “How To Cook A Steak On An Indoor Grill”